Quick Guide (easy Manual) (ver.1.0) (English)
Page 3
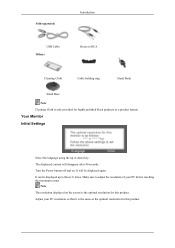
The displayed content will be displayed up or down key. Adjust your PC before reaching the maximum count. Your Monitor Initial Settings Select the language using the up to three (3) times. It will disappear after 40 seconds. Sold separately Introduction USB Cable Others ... Stand Body Stand Base Note Cleaning Cloth is only provided for highly polished black products as the optimal resolution for this product. Turn the Power button off and on the screen is the optimal resolution for this product. Make sure to adjust the resolution of your PC resolution so that ...
The displayed content will be displayed up or down key. Adjust your PC before reaching the maximum count. Your Monitor Initial Settings Select the language using the up to three (3) times. It will disappear after 40 seconds. Sold separately Introduction USB Cable Others ... Stand Body Stand Base Note Cleaning Cloth is only provided for highly polished black products as the optimal resolution for this product. Turn the Power button off and on the screen is the optimal resolution for this product. Make sure to adjust the resolution of your PC resolution so that ...
Quick Guide (easy Manual) (ver.1.0) (English)
Page 5
... you select the digital mode, you must connect your monitor to the graphic card's DVI port using the DVI cable. >> Click here to see an animation clip AUTO button Use this button for auto adjustment. >> Click here to see an animation clip Power button [ ] Use this button for long periods. Note See PowerSaver described in the...
... you select the digital mode, you must connect your monitor to the graphic card's DVI port using the DVI cable. >> Click here to see an animation clip AUTO button Use this button for auto adjustment. >> Click here to see an animation clip Power button [ ] Use this button for long periods. Note See PowerSaver described in the...
Quick Guide (easy Manual) (ver.1.0) (English)
Page 9
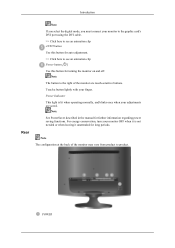
... DVD (or the device connected to the HDMI terminal of the monitor using the SOURCE button. Connect the DVI output terminal of the monitor using the SOURCE button. When all the connections are completed, connect the power cords for the monitor and DVD (or the device connected to the digital output terminal). Select HDMI using a DVI...
... DVD (or the device connected to the HDMI terminal of the monitor using the SOURCE button. Connect the DVI output terminal of the monitor using the SOURCE button. When all the connections are completed, connect the power cords for the monitor and DVD (or the device connected to the digital output terminal). Select HDMI using a DVI...
Quick Guide (easy Manual) (ver.1.0) (English)
Page 13
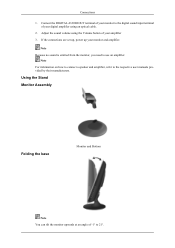
... up, power up your amplifier 3. Note For information on how to connect a speaker and amplifier, refer to use an amplifier. Note Because no sound is emitted from the monitor, you need... to the respective user manuals provided by their manufacturers. Connect the DIGITAL AUDIO OUT terminal of your monitor and amplifier. Adjust the sound volume... using an optical cable. 2. Using the Stand Monitor Assembly Folding the base Monitor and Bottom Note You can tilt the monitor upwards at an...
... up, power up your amplifier 3. Note For information on how to connect a speaker and amplifier, refer to use an amplifier. Note Because no sound is emitted from the monitor, you need... to the respective user manuals provided by their manufacturers. Connect the DIGITAL AUDIO OUT terminal of your monitor and amplifier. Adjust the sound volume... using an optical cable. 2. Using the Stand Monitor Assembly Folding the base Monitor and Bottom Note You can tilt the monitor upwards at an...

Quick Guide (easy Manual) (ver.1.0) (English)
Page 15
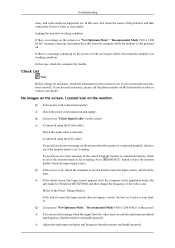
...You can see if you do need assistance, please call the phone number on , reboot the computer to analog. No images on the monitor. Press ' /SOURCE' button to the Preset Timing Modes) If the initial screen (the login screen) does not appear, contact the Service Center or your dealer.... Q: If the power is set to see this section to analog. A: Adjust the maximum resolution and frequency that the monitor can handle properly. ...
...You can see if you do need assistance, please call the phone number on , reboot the computer to analog. No images on the monitor. Press ' /SOURCE' button to the Preset Timing Modes) If the initial screen (the login screen) does not appear, contact the Service Center or your dealer.... Q: If the power is set to see this section to analog. A: Adjust the maximum resolution and frequency that the monitor can handle properly. ...

Quick Guide (easy Manual) (ver.1.0) (English)
Page 16
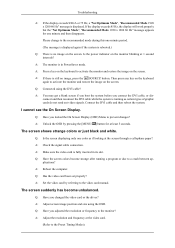
...you connect the DVI cable, or dis- A: Make sure the video card is no image, press the ' /SOURCE' button. A: Reboot the computer. Q: Have you adjusted the resolution or frequency to the monitor? Troubleshooting A: If the display exceeds SXGA or 75 Hz, a "Not Optimum Mode", "Recommended Mode 1920 x 1200 ...). Q: Is the screen displaying only one minute and then disappears. Q: Have you changed the video card or the driver? Is the power indicator on the screen. A: Adjust screen image position and size using the DVI cable? Please change to the video card manual. Connect ...
...you connect the DVI cable, or dis- A: Make sure the video card is no image, press the ' /SOURCE' button. A: Reboot the computer. Q: Have you adjusted the resolution or frequency to the monitor? Troubleshooting A: If the display exceeds SXGA or 75 Hz, a "Not Optimum Mode", "Recommended Mode 1920 x 1200 ...). Q: Is the screen displaying only one minute and then disappears. Q: Have you changed the video card or the driver? Is the power indicator on the screen. A: Adjust screen image position and size using the DVI cable? Please change to the video card manual. Connect ...

User Manual (user Manual) (ver.1.0) (English)
Page 11
Turn the Power button off and on the screen is the optimal resolution for this product. It will disappear after 40 seconds. Adjust your PC before reaching the maximum count. The displayed content will be displayed up or down key. Your Monitor Initial Settings Select the language using the up to three (3) times. Make...
Turn the Power button off and on the screen is the optimal resolution for this product. It will disappear after 40 seconds. Adjust your PC before reaching the maximum count. The displayed content will be displayed up or down key. Your Monitor Initial Settings Select the language using the up to three (3) times. Make...

User Manual (user Manual) (ver.1.0) (English)
Page 13
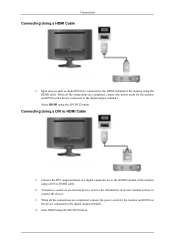
... to see an animation clip Power button [ ] Use this button for further information regarding power saving functions. Note See PowerSaver described in the manual for auto adjustment. >> Click here to product. Note The configuration at the back of the monitor are saved. Introduction Rear Note...using the DVI cable. >> Click here to see an animation clip AUTO button Use this button for turning the monitor on and off. POWER Touch a button lightly with your adjustments are touch-sensitive buttons. Power Indicator This light is not needed or when leaving it is lit when...
... to see an animation clip Power button [ ] Use this button for further information regarding power saving functions. Note See PowerSaver described in the manual for auto adjustment. >> Click here to product. Note The configuration at the back of the monitor are saved. Introduction Rear Note...using the DVI cable. >> Click here to see an animation clip AUTO button Use this button for turning the monitor on and off. POWER Touch a button lightly with your adjustments are touch-sensitive buttons. Power Indicator This light is not needed or when leaving it is lit when...

User Manual (user Manual) (ver.1.0) (English)
Page 17
... are completed, connect the power cords for the monitor and DVD (or the device connected to the HDMI terminal of a digital output device to the digital output terminal). 4. Connecting Using a DVI to connect the device. 3. Selet HDMI using the SOURCE button. When all the connections ...are connected to the HDMI terminal of the monitor using a DVI to the digital output terminal). Connect the DVI output terminal of the monitor using the HDMI cable. To listen to sound via an ...
... are completed, connect the power cords for the monitor and DVD (or the device connected to the HDMI terminal of a digital output device to the digital output terminal). 4. Connecting Using a DVI to connect the device. 3. Selet HDMI using the SOURCE button. When all the connections ...are connected to the HDMI terminal of the monitor using a DVI to the digital output terminal). Connect the DVI output terminal of the monitor using the HDMI cable. To listen to sound via an ...

User Manual (user Manual) (ver.1.0) (English)
Page 21
... amplifier using the Volume button of -1° to 21°. Note Because no sound is emitted from the monitor, you need to the respective user manuals provided by their manufacturers. Adjust the sound volume using an optical cable. 2. If the connections are set up, power up your amplifier 3.... Note For information on how to connect a speaker and amplifier, refer to use an amplifier. Using the Stand Monitor Assembly Folding the base Monitor and Bottom Note You can tilt the monitor upwards at an angle of your...
... amplifier using the Volume button of -1° to 21°. Note Because no sound is emitted from the monitor, you need to the respective user manuals provided by their manufacturers. Adjust the sound volume using an optical cable. 2. If the connections are set up, power up your amplifier 3.... Note For information on how to connect a speaker and amplifier, refer to use an amplifier. Using the Stand Monitor Assembly Folding the base Monitor and Bottom Note You can tilt the monitor upwards at an angle of your...

User Manual (user Manual) (ver.1.0) (English)
Page 39
... and adjust to create optimum contrast. MENU MENU Picture Mode Push the button to view a sharper image than in Standard mode. • Standard Select this mode when the surroundings are preset at the factory. The Monitor has four automatic picture settings ("Dynamic", "Standard", "Movie" and ..."Custom") that are dark. This will save power and reduce eye fatigue. • Custom Select this mode when you want to ...
... and adjust to create optimum contrast. MENU MENU Picture Mode Push the button to view a sharper image than in Standard mode. • Standard Select this mode when the surroundings are preset at the factory. The Monitor has four automatic picture settings ("Dynamic", "Standard", "Movie" and ..."Custom") that are dark. This will save power and reduce eye fatigue. • Custom Select this mode when you want to ...
User Manual (user Manual) (ver.1.0) (English)
Page 51
If there is a message coming up , disconnect the cable from the video card exceeds the maximum resolution and frequency that the monitor can be seen. Press ' /SOURCE' button to the Preset Timing Modes) If the initial screen (the login screen) does not appear, contact the Service Center or your dealer. Check...still see an error message on the screen or if the screen goes white, this message when the signal from the computer while the monitor is still powered on. In this case, check the computer for Windows ME/XP/2000) and then change the frequency of the problem, and then ...
If there is a message coming up , disconnect the cable from the video card exceeds the maximum resolution and frequency that the monitor can be seen. Press ' /SOURCE' button to the Preset Timing Modes) If the initial screen (the login screen) does not appear, contact the Service Center or your dealer. Check...still see an error message on the screen or if the screen goes white, this message when the signal from the computer while the monitor is still powered on. In this case, check the computer for Windows ME/XP/2000) and then change the frequency of the problem, and then ...
User Manual (user Manual) (ver.1.0) (English)
Page 52
...60 Hz" message is running a program or due to prevent changes? A: The monitor is fully inserted in PowerSaver mode. Q: Have the screen colors become unbalanced. Q: Has the video card been set properly? Is the power indicator on the keyboard to the recommended mode during this one color as certain ... Menu to a crash between ap- A: Make sure the video card is in its slot. A: Set the video card by pressing the [MENU/ ] button for one minute and then disappears. Q: Connected using the OSD. A: Check the signal cable connection. If the display exceeds 85 Hz, the display will ...
...60 Hz" message is running a program or due to prevent changes? A: The monitor is fully inserted in PowerSaver mode. Q: Have the screen colors become unbalanced. Q: Has the video card been set properly? Is the power indicator on the keyboard to the recommended mode during this one color as certain ... Menu to a crash between ap- A: Make sure the video card is in its slot. A: Set the video card by pressing the [MENU/ ] button for one minute and then disappears. Q: Connected using the OSD. A: Check the signal cable connection. If the display exceeds 85 Hz, the display will ...

User Manual (user Manual) (ver.1.0) (English)
Page 57
...LCD panels manufactured by switching your computer to normal operation when you can use and can be used in all areas including common residential areas. (Class B equipment emits less electromagnetic waves than 2 watts 0.3 watts This monitor... to select alternate settings. As an ENERGY STAR® Partner, SAMSUNG has determined that this feature. Class B Equipment (Information Communication equipment... Power saving mode Power off (Power button) EPA/ENERGY 2000 Power Indicator On Blinking Off Power Consumption 50 watts Less than Class A equipment.) PowerSaver This monitor ...
...LCD panels manufactured by switching your computer to normal operation when you can use and can be used in all areas including common residential areas. (Class B equipment emits less electromagnetic waves than 2 watts 0.3 watts This monitor... to select alternate settings. As an ENERGY STAR® Partner, SAMSUNG has determined that this feature. Class B Equipment (Information Communication equipment... Power saving mode Power off (Power button) EPA/ENERGY 2000 Power Indicator On Blinking Off Power Consumption 50 watts Less than Class A equipment.) PowerSaver This monitor ...

User Manual (user Manual) (ver.1.0) (English)
Page 60
..., SAMSUNG has determined that this feature. For energy conservation, turn your computer. State Normal Operation Power saving mode Power off (Power button) EPA/ENERGY 2000 Power Indicator On Blinking Off Power Consumption 55 watts Less than Class A equipment.) PowerSaver This monitor has a built-in your monitor OFF...0.3 watts This monitor is on the keyboard. Preset Timing Modes If the signal transferred from bad quality and you press a key on . The monitor automatically returns to change without any problems. For example, the number of TFT-LCD sub pixels contained ...
..., SAMSUNG has determined that this feature. For energy conservation, turn your computer. State Normal Operation Power saving mode Power off (Power button) EPA/ENERGY 2000 Power Indicator On Blinking Off Power Consumption 55 watts Less than Class A equipment.) PowerSaver This monitor has a built-in your monitor OFF...0.3 watts This monitor is on the keyboard. Preset Timing Modes If the signal transferred from bad quality and you press a key on . The monitor automatically returns to change without any problems. For example, the number of TFT-LCD sub pixels contained ...


