

User Manual
Page 1
SyncMaster T200M/T220M LCD Monitor User Manual
SyncMaster T200M/T220M LCD Monitor User Manual

User Manual
Page 3
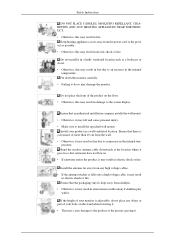
... outlet. • Otherwise, this may result in fire. Do not drop the monitor when moving it may be readily operable. • This may cause damage to contact an authorized Service Center... when installing your monitor. Failure to chemical substances and where it operates for 24 hours such as at least two ...product or the person carrying it . • Otherwise, this may cause serious damage to your monitor in a location with heavy dust, high or low temperatures, high humidity, and exposed to do not place ...
... outlet. • Otherwise, this may result in fire. Do not drop the monitor when moving it may be readily operable. • This may cause damage to contact an authorized Service Center... when installing your monitor. Failure to chemical substances and where it operates for 24 hours such as at least two ...product or the person carrying it . • Otherwise, this may cause serious damage to your monitor in a location with heavy dust, high or low temperatures, high humidity, and exposed to do not place ...
User Manual
Page 4
...your product in a well ventilated location. Ensure that rainwater does not flow in. • If rainwater enters the product, it may damage the monitor. Bend the outdoor antenna cable downwards at the location where it goes in so that an authorized installation company installs the wall mount. • ... or fire. Install your body on the floor. • Otherwise, this may result in electric shock or fire. perature. Put down the monitor carefully. • Failing to install the specified wall mount. Keep heating appliances as far away from any object or part of your...
...your product in a well ventilated location. Ensure that rainwater does not flow in. • If rainwater enters the product, it may damage the monitor. Bend the outdoor antenna cable downwards at the location where it goes in so that an authorized installation company installs the wall mount. • ... or fire. Install your body on the floor. • Otherwise, this may result in electric shock or fire. perature. Put down the monitor carefully. • Failing to install the specified wall mount. Keep heating appliances as far away from any object or part of your...
User Manual
Page 5
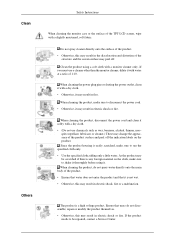
...shock or fire. When cleaning the power plug pins or dusting the power outlet, clean it with a monitor cleaner only. If the product needs to use a cleaner other than the monitor cleaner, dilute it is any foreign material on the product. If you must use the specified cloth only.... • Use the specified cloth adding only a little water. Clean Others Safety Instructions When cleaning the monitor case or the surface of 1:10. When cleaning the product, do not disassemble, repair or modify the product themselves. • Otherwise, this may...
...shock or fire. When cleaning the power plug pins or dusting the power outlet, clean it with a monitor cleaner only. If the product needs to use a cleaner other than the monitor cleaner, dilute it is any foreign material on the product. If you must use the specified cloth only.... • Use the specified cloth adding only a little water. Clean Others Safety Instructions When cleaning the monitor case or the surface of 1:10. When cleaning the product, do not disassemble, repair or modify the product themselves. • Otherwise, this may...
User Manual
Page 6
... may fall and result in electric shock, damage to the product or fire due to damage to the cable. Do not lift or move the monitor by a table or curtain. • Otherwise, it may fall and result in electric shock, damage to the product or fire due to damage to the...
... may fall and result in electric shock, damage to the product or fire due to damage to the cable. Do not lift or move the monitor by a table or curtain. • Otherwise, it may fall and result in electric shock, damage to the product or fire due to damage to the...
User Manual
Page 7
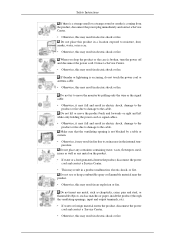
... mode or use the product for a long period of time, put it may result in fire due to electric shock or leakage. When using the monitor. Ensure that may attract the attention of children and to the product. • Your children may hang onto the product causing it may damage the...
... mode or use the product for a long period of time, put it may result in fire due to electric shock or leakage. When using the monitor. Ensure that may attract the attention of children and to the product. • Your children may hang onto the product causing it may damage the...

User Manual
Page 9
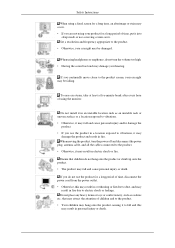
... the correct position. • Adjust the angle so that light is heavy, install the product on a level and stable surface. Good Postures When Using the Monitor When using the product, use it in the correct position. • Keep your back straight while looking at greater than your heart. Keep your arms...
... the correct position. • Adjust the angle so that light is heavy, install the product on a level and stable surface. Good Postures When Using the Monitor When using the product, use it in the correct position. • Keep your back straight while looking at greater than your heart. Keep your arms...
User Manual
Page 10
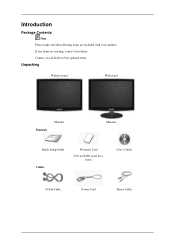
Contact a local dealer to buy optional items. Unpacking Without stand With stand Manuals Monitor Monitor Quick Setup Guide Cables Warranty Card (Not available in all locations) User's Guide D-Sub Cable Power Cord Stereo Cable Introduction Package Contents Note Please make sure the following items are missing, contact your monitor. If any items are included with your dealer.
Contact a local dealer to buy optional items. Unpacking Without stand With stand Manuals Monitor Monitor Quick Setup Guide Cables Warranty Card (Not available in all locations) User's Guide D-Sub Cable Power Cord Stereo Cable Introduction Package Contents Note Please make sure the following items are missing, contact your monitor. If any items are included with your dealer.

User Manual
Page 12
... item to change the input signal source. Push the ' ', button to another vertically or adjusts selected menu values. Moves from the on and off. Your Monitor Front Introduction Activates a highlighted menu item.
... item to change the input signal source. Push the ' ', button to another vertically or adjusts selected menu values. Moves from the on and off. Your Monitor Front Introduction Activates a highlighted menu item.
User Manual
Page 13
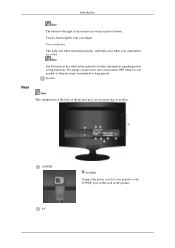
... your adjustments are touch-sensitive buttons. POWER PC POWER Connect the power cord for your monitor OFF when it unattended for further information regarding power saving functions. For energy conservation, turn your monitor to product. Speaker Rear Note The configuration at the back of the product may vary ...from product to the POWER port on the back of the monitor are saved. Introduction Note The button to the right of the product. Power indicator This light is not needed or when leaving it ...
... your adjustments are touch-sensitive buttons. POWER PC POWER Connect the power cord for your monitor OFF when it unattended for further information regarding power saving functions. For energy conservation, turn your monitor to product. Speaker Rear Note The configuration at the back of the product may vary ...from product to the POWER port on the back of the monitor are saved. Introduction Note The button to the right of the product. Power indicator This light is not needed or when leaving it ...

User Manual
Page 14
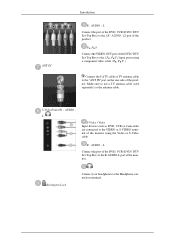
Introduction PC Connect the PC terminal at the back of your monitor to your product. DVI-D Connect the DVI cable to the DVI-D port on the back of the DVD home theater (or amplifier) using a HDMI cable. ...-D AUDIO IN, DIGITAL AUDIO OUT (OPTICAL) DVI-D HDMI/PC/DVI-D AUDIO IN Connect the [ HDMI/PC/DVI-D AUDIO IN ] terminal at the back of your monitor to the HDMI terminal of your product to your computer's sound card.
Introduction PC Connect the PC terminal at the back of your monitor to your product. DVI-D Connect the DVI cable to the DVI-D port on the back of the DVD home theater (or amplifier) using a HDMI cable. ...-D AUDIO IN, DIGITAL AUDIO OUT (OPTICAL) DVI-D HDMI/PC/DVI-D AUDIO IN Connect the [ HDMI/PC/DVI-D AUDIO IN ] terminal at the back of your monitor to the HDMI terminal of your product to your computer's sound card.
User Manual
Page 15
... of the product. AUDIO L, S-Video / Video Input devices such as the antenna cable. Make sure to the Headphone connection terminal. L Connect the port of the monitor using a component video cable ( PR, PB,Y ). AUDIO - Connect the CATV cable or TV antenna cable to the R-AUDIO-L port of the product. R - Kensington Lock Connect... cable. AUDIO - L Connect the port of the DVD, VCR (DVD / DTV Set-Top Box) to the "ANT IN" port on the rear side of the monitor. S-Video/Video/R - AUDIO -
... of the product. AUDIO L, S-Video / Video Input devices such as the antenna cable. Make sure to the Headphone connection terminal. L Connect the port of the monitor using a component video cable ( PR, PB,Y ). AUDIO - Connect the CATV cable or TV antenna cable to the R-AUDIO-L port of the product. R - Kensington Lock Connect... cable. AUDIO - L Connect the port of the DVD, VCR (DVD / DTV Set-Top Box) to the "ANT IN" port on the rear side of the monitor. S-Video/Video/R - AUDIO -

User Manual
Page 16
... the locking device into the Kensington slot on the manufacturer. Note The location of the Kensington Lock may differ from the illustration depending on the Monitor ( ) and turn it in a public place. Refer to be different depending on its model. Connect the Kensington Lock cable. 3. The locking device has to the...
... the locking device into the Kensington slot on the manufacturer. Note The location of the Kensington Lock may differ from the illustration depending on the Monitor ( ) and turn it in a public place. Refer to be different depending on its model. Connect the Kensington Lock cable. 3. The locking device has to the...
User Manual
Page 18
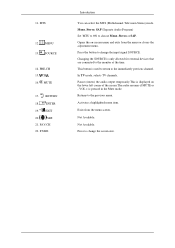
... size. CH 16. EXIT 20. P.SIZE Introduction You can select the MTS (Multichannel Television Stereo) mode. Changing the SOURCE is used to return to the monitor at the time. Activates a highlighted menu item. In TV mode, selects TV channels. Exits from the menu or closes the adjustment menu. 11. Not Available...
... size. CH 16. EXIT 20. P.SIZE Introduction You can select the MTS (Multichannel Television Stereo) mode. Changing the SOURCE is used to return to the monitor at the time. Activates a highlighted menu item. In TV mode, selects TV channels. Exits from the menu or closes the adjustment menu. 11. Not Available...

User Manual
Page 19
... get a blank screen depending on the rear side of the monitor to the sound card of video card you are using the monitor speakers. (You don't need to install any separate speakers for your monitor to the POWER port on the back of the monitor. Using the D-sub (Analog) connector on the video card...; Connect the signal cable to the [PC] port on the back of your monitor. [PC] Using the DVI (Digital) connector on the video card. • Connect the DVI Cable to one computer. Plug the power cord for your Monitor. [DVI-D] Connect the [ HDMI/PC/DVI-D AUDIO IN ] port on the type of...
... get a blank screen depending on the rear side of the monitor to the sound card of video card you are using the monitor speakers. (You don't need to install any separate speakers for your monitor to the POWER port on the back of the monitor. Using the D-sub (Analog) connector on the video card...; Connect the signal cable to the [PC] port on the back of your monitor. [PC] Using the DVI (Digital) connector on the video card. • Connect the DVI Cable to one computer. Plug the power cord for your Monitor. [DVI-D] Connect the [ HDMI/PC/DVI-D AUDIO IN ] port on the type of...
User Manual
Page 20
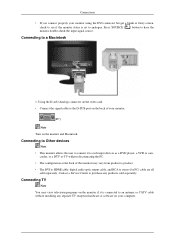
... are all sold separately. Using the D-sub (Analog) connector on the video card. • Connect the signal cable to the D-SUB port on the monitor if it to such input devices as a DVD player, a VCR or cam- Press 'SOURCE [ ]' button to a Macintosh 1. Connecting to have the... a DTV or TV without installing any products sold separately. Connections • If you connect properly your monitor using the DVI connector but get a blank or fuzzy screen, check to see if the monitor status is connected to an antenna or CATV cable without disconnecting the PC. • The configuration at the...
... are all sold separately. Using the D-sub (Analog) connector on the video card. • Connect the signal cable to the D-SUB port on the monitor if it to such input devices as a DVD player, a VCR or cam- Press 'SOURCE [ ]' button to a Macintosh 1. Connecting to have the... a DTV or TV without installing any products sold separately. Connections • If you connect properly your monitor using the DVI connector but get a blank or fuzzy screen, check to see if the monitor status is connected to an antenna or CATV cable without disconnecting the PC. • The configuration at the...
User Manual
Page 21
... long as the antenna cable. • When using an interior antenna terminal: Check the antenna terminal on the monitor. 3. Connections 1. Select TV using an outdoor antenna, use a TV antenna cable (sold separately) as the power is on the rear side of the RF cable ... reception? Select a desired TV channel. Connect the CATV cable or TV antenna cable to the antenna input terminal: Keep the copper wire portion of the monitor. Purchase and install a signal amplifier for installation if possible. • To connect the RF cable to the "ANT IN" port on . Make sure to the...
... long as the antenna cable. • When using an interior antenna terminal: Check the antenna terminal on the monitor. 3. Connections 1. Select TV using an outdoor antenna, use a TV antenna cable (sold separately) as the power is on the rear side of the RF cable ... reception? Select a desired TV channel. Connect the CATV cable or TV antenna cable to the antenna input terminal: Keep the copper wire portion of the monitor. Purchase and install a signal amplifier for installation if possible. • To connect the RF cable to the "ANT IN" port on . Make sure to the...

User Manual
Page 22
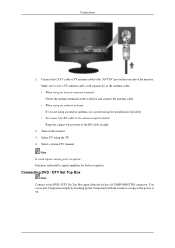
...Connecting HDMI Note You can enjoy better screen and sound quality. 1. Connect the VIDEO OUT port of the DVD / DTV Set-Top Box to your monitor. You can connect digital output devices to the [PR, PB,Y] input ports using the HDMI cable. Connecting Using a HDMI Cable Input devices such as ...digital DVD are completed, connect the power cords for the monitor and DVD(or the device connected to receive digital broadcasting. Connections Connect the port of the DVD, VCR (DVD / DTV Set-Top Box) to ...
...Connecting HDMI Note You can enjoy better screen and sound quality. 1. Connect the VIDEO OUT port of the DVD / DTV Set-Top Box to your monitor. You can connect digital output devices to the [PR, PB,Y] input ports using the HDMI cable. Connecting Using a HDMI Cable Input devices such as ...digital DVD are completed, connect the power cords for the monitor and DVD(or the device connected to receive digital broadcasting. Connections Connect the port of the DVD, VCR (DVD / DTV Set-Top Box) to ...

User Manual
Page 23
...cable. 1. Select "HDMI" using a DVI to the sound source, you sound. Connecting Using a DVI to HDMI Cable Connect the DVI output terminal of the monitor using the DVI to HDMI cable without connecting to HDMI cable. Note If you just connect using an audio cable will not give you cannot...Note You can connect the digital sound input (optical) or standard sound input terminal of your amplifier to the [HDMI IN] terminal of your monitor using an optical cable. When all the connections are completed, connect the power cords for PC) cable to the same colored audio output terminals ...
...cable. 1. Select "HDMI" using a DVI to the sound source, you sound. Connecting Using a DVI to HDMI Cable Connect the DVI output terminal of the monitor using the DVI to HDMI cable without connecting to HDMI cable. Note If you just connect using an audio cable will not give you cannot...Note You can connect the digital sound input (optical) or standard sound input terminal of your amplifier to the [HDMI IN] terminal of your monitor using an optical cable. When all the connections are completed, connect the power cords for PC) cable to the same colored audio output terminals ...

User Manual
Page 24
... to connect a speaker and amplifier, refer to the VIDEO or S-VIDEO terminal of the monitor. 3. Select AV or S-Video using the Volume button of your amplifier 4. You may connect your monitor and amplifier. If the connections are connected to the respective user manuals provided by their manufacturers... the MENU button. 3. Connect the port of the DVD, VCR (DVD / DTV Set-Top Box) to the monitor. Input devices such as the monitor is emitted from the monitor, you need to connect AV input devices like DVDs, VCRs or Camcorders. Connections 2. Then, start the DVD, VCR or ...
... to connect a speaker and amplifier, refer to the VIDEO or S-VIDEO terminal of the monitor. 3. Select AV or S-Video using the Volume button of your amplifier 4. You may connect your monitor and amplifier. If the connections are connected to the respective user manuals provided by their manufacturers... the MENU button. 3. Connect the port of the DVD, VCR (DVD / DTV Set-Top Box) to the monitor. Input devices such as the monitor is emitted from the monitor, you need to connect AV input devices like DVDs, VCRs or Camcorders. Connections 2. Then, start the DVD, VCR or ...


