User Manual
Page 3
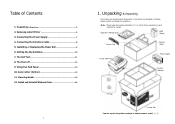
.... Install and Uninstall Windows Driver 16 4 1. Cleaning Head 15 12. Connecting the Power Supply 7 4. Unpacking & Repacking Your printer box should include these items. If any items are damaged or missing, please contact your dealer for repairs. ⑧ Operator's Manual & CD ⑨ Label (Paper) ⑦ Power Cord ⑥ Cushion (TOP) ⑤ Printer (SRP-770) ③ Power Supply...
.... Install and Uninstall Windows Driver 16 4 1. Cleaning Head 15 12. Connecting the Power Supply 7 4. Unpacking & Repacking Your printer box should include these items. If any items are damaged or missing, please contact your dealer for repairs. ⑧ Operator's Manual & CD ⑨ Label (Paper) ⑦ Power Cord ⑥ Cushion (TOP) ⑤ Printer (SRP-770) ③ Power Supply...
User Manual
Page 9
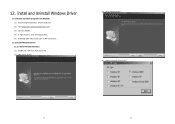
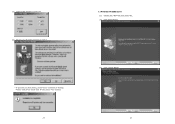
Install and Uninstall Windows Driver 12.1 Download install-program from Website (1) Execute web-browser.(Ex: Internet Explorer) (2) Type http://www.samsungminiprinters.com (3) Connect website. (4) In "Quick menu", click download button. (5) Download "SRP-770_V3.X.X.exe" in SRP-770 section. 12.2 Install Windows Driver 12.2.1 Serial Parallel interface (1) Double click "SRP-770_V3.X.X.exe" file. (2) Click "Next" Button. (3) Click "Install" Button. (4) Select operating system type. 16 17 12.
Install and Uninstall Windows Driver 12.1 Download install-program from Website (1) Execute web-browser.(Ex: Internet Explorer) (2) Type http://www.samsungminiprinters.com (3) Connect website. (4) In "Quick menu", click download button. (5) Download "SRP-770_V3.X.X.exe" in SRP-770 section. 12.2 Install Windows Driver 12.2.1 Serial Parallel interface (1) Double click "SRP-770_V3.X.X.exe" file. (2) Click "Next" Button. (3) Click "Install" Button. (4) Select operating system type. 16 17 12.
User Manual
Page 12
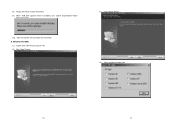
(8) Please click "Next" button three times. (9) When "USB print support" driver is installed, your system automatically restart after 10 seconds. (10) After the system restart, please turn-on printer. Windows NT/2000 (1) Double click "SRP-770_V3.X.X.exe" file. (2) Click "Next" Button. (3) Click "Install" Button. (4) Select operating system type. 22 23 B.
(8) Please click "Next" button three times. (9) When "USB print support" driver is installed, your system automatically restart after 10 seconds. (10) After the system restart, please turn-on printer. Windows NT/2000 (1) Double click "SRP-770_V3.X.X.exe" file. (2) Click "Next" Button. (3) Click "Install" Button. (4) Select operating system type. 22 23 B.
User Manual
Page 13
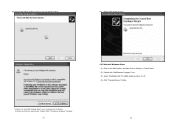
Printer and driver work well. Windows XP/2003 Server (1) Double click "SRP-770_V3.X.X.exe" file. (2) Click "Next" Button. (3) Click "Install" Button. 25 Please click "Yes" button. 24 C. (5) Select "USB" interface (port) type. (6) Please turn-off printer and turn-on printer. * If you can see this dialog, don't worry comment in dialog.
Printer and driver work well. Windows XP/2003 Server (1) Double click "SRP-770_V3.X.X.exe" file. (2) Click "Next" Button. (3) Click "Install" Button. 25 Please click "Yes" button. 24 C. (5) Select "USB" interface (port) type. (6) Please turn-off printer and turn-on printer. * If you can see this dialog, don't worry comment in dialog.
User Manual
Page 15
Printer and driver work well. (8) Please click "Next" button until you can see "Finish" button. (9) Please click "Finish" button. 12.3 Uninstall Windows Driver (1) Click on the Start button, and then click on Settings > Control Panel. (2) Double click "Add/Remove Programs" icon. (3) Select "SAMSUNG SRP-770 LABEL Windows Driver 3.X.X". (4) Click "Change/Remove" button. *If you can see this dialog, don't worry comment in dialog. Please click "Continue Anyway" button. 28 29
Printer and driver work well. (8) Please click "Next" button until you can see "Finish" button. (9) Please click "Finish" button. 12.3 Uninstall Windows Driver (1) Click on the Start button, and then click on Settings > Control Panel. (2) Double click "Add/Remove Programs" icon. (3) Select "SAMSUNG SRP-770 LABEL Windows Driver 3.X.X". (4) Click "Change/Remove" button. *If you can see this dialog, don't worry comment in dialog. Please click "Continue Anyway" button. 28 29


