
User Manual (ENGLISH)
Page 4
... Your New Plasma Display Panel 10 Remote Control Buttons 12 Wall Installation Instructions 14 Connections Connecting VHF and UHF Antennas 20 Connecting Cable TV 21 Connecting ...Remote Control 37 Picture Control Customizing the Picture 40 Using Automatic Picture Settings 41 Selecting the Color Tone 42 DNIe (Digital Natural Image engine 43 Viewing the Picture-in-Picture 44 Changing the Screen Size 50 Freezing the Picture 51 Sound Control...ratio format,or expanded to fill the screen if your Samsung limited warranty. Important Warranty Information Regarding Television Format Viewing...
... Your New Plasma Display Panel 10 Remote Control Buttons 12 Wall Installation Instructions 14 Connections Connecting VHF and UHF Antennas 20 Connecting Cable TV 21 Connecting ...Remote Control 37 Picture Control Customizing the Picture 40 Using Automatic Picture Settings 41 Selecting the Color Tone 42 DNIe (Digital Natural Image engine 43 Viewing the Picture-in-Picture 44 Changing the Screen Size 50 Freezing the Picture 51 Sound Control...ratio format,or expanded to fill the screen if your Samsung limited warranty. Important Warranty Information Regarding Television Format Viewing...
User Manual (ENGLISH)
Page 6
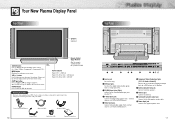
... Off Checking Accessories Once you have all of a DVD player or Set-Top Box. ∏ External Speaker Out jacks Connect external speakers. Remote Control Signal Receiver Aim the remote control towards this spot on -screen menu. Also used to move up or down in the On-screen menu. POWER button Press to make...jacks of the available video sources (ie., Video, S-Video, Component1, Component2, PC ). Also used to display all the parts shown here. Your New Plasma Display Panel Front Panel Speakers (optional) SOURCE button Press to select or adjust items on the on-screen menu.
... Off Checking Accessories Once you have all of a DVD player or Set-Top Box. ∏ External Speaker Out jacks Connect external speakers. Remote Control Signal Receiver Aim the remote control towards this spot on -screen menu. Also used to move up or down in the On-screen menu. POWER button Press to make...jacks of the available video sources (ie., Video, S-Video, Component1, Component2, PC ). Also used to display all the parts shown here. Your New Plasma Display Panel Front Panel Speakers (optional) SOURCE button Press to select or adjust items on the on-screen menu.
User Manual (ENGLISH)
Page 7
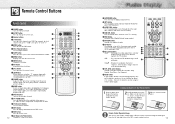
...Used during set up of this Samsung remote control, so that it will work compatibly with other devices (VCR, cable box, DVD) ÷ PIP control buttons SWAP : Exchanges the video signal that is currently displayed on the main screen with selected mode (TV, VCR, CATV, DVD or ...or select your personal, customized picture settings.) Ú MODE button Selects a target device to be controlled by the Samsung remote control (ie., VCR, Cable, DVD players or STB). You can use your remote control is momentarily displayed on -screen menu. ' ENTER button Confirms a selection. ˝ PIP button ...
...Used during set up of this Samsung remote control, so that it will work compatibly with other devices (VCR, cable box, DVD) ÷ PIP control buttons SWAP : Exchanges the video signal that is currently displayed on the main screen with selected mode (TV, VCR, CATV, DVD or ...or select your personal, customized picture settings.) Ú MODE button Selects a target device to be controlled by the Samsung remote control (ie., VCR, Cable, DVD players or STB). You can use your remote control is momentarily displayed on -screen menu. ' ENTER button Confirms a selection. ˝ PIP button ...
User Manual (ENGLISH)
Page 13
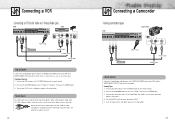
...1. Turn on the camcorder. Turn on the remote control. 2. Viewing Tapes 1. When connecting the audio cable (PC, DVI, S-Video, Video), attach one of these ferrite cores to select the "Video", then press the ENTER button. 3. Turn on your PDP, and press the TV/VIDEO button on your VCR, insert a videotape ...Turn on your camcorder to Connect Connect a Video/Audio cable between the AUDIO(L/R)/VIDEO jacks on the PDP and AUDIO/VIDEO OUT jacks on the remote control. 2. Insert the tape into the camcorder and press the Play button. 25 Press the UP or DOWN button to the cable near the connector...
...1. Turn on the camcorder. Turn on the remote control. 2. Viewing Tapes 1. When connecting the audio cable (PC, DVI, S-Video, Video), attach one of these ferrite cores to select the "Video", then press the ENTER button. 3. Turn on your PDP, and press the TV/VIDEO button on your VCR, insert a videotape ...Turn on your camcorder to Connect Connect a Video/Audio cable between the AUDIO(L/R)/VIDEO jacks on the PDP and AUDIO/VIDEO OUT jacks on the remote control. 2. Insert the tape into the camcorder and press the Play button. 25 Press the UP or DOWN button to the cable near the connector...

User Manual (ENGLISH)
Page 14
... picture in 720p mode. Press the UP or DOWN button to select "COMPONENT1", "COMPONENT2" or "DVI", then press the ENTER button. 3. Turn on the remote control. 2. Press the UP or DOWN button to select "COMPONENT1" or "COMPONENT2", then press the ENTER button. 3. Connecting a DVD Player (480i, 480p) This...2 (L/R AUDIO) or DVI jacks on the PDP and the AUDIO OUTPUT jacks on the DVD player. Turn on the remote control. 2. To Watch DTV: 1. Turn on your PDP, and press the TV/VIDEO button on your DVD player, insert a DVD disc and press the Play button. • For an explanation of...
... picture in 720p mode. Press the UP or DOWN button to select "COMPONENT1", "COMPONENT2" or "DVI", then press the ENTER button. 3. Turn on the remote control. 2. Press the UP or DOWN button to select "COMPONENT1" or "COMPONENT2", then press the ENTER button. 3. Connecting a DVD Player (480i, 480p) This...2 (L/R AUDIO) or DVI jacks on the PDP and the AUDIO OUTPUT jacks on the DVD player. Turn on the remote control. 2. To Watch DTV: 1. Turn on your PDP, and press the TV/VIDEO button on your DVD player, insert a DVD disc and press the Play button. • For an explanation of...

User Manual (ENGLISH)
Page 15
PLASMA DISPLAY PANEL Operation Turning the PDP On and Off 30 Memorizing the Channels 32 Setting Up Your Remote Control 37
PLASMA DISPLAY PANEL Operation Turning the PDP On and Off 30 Memorizing the Channels 32 Setting Up Your Remote Control 37

User Manual (ENGLISH)
Page 16
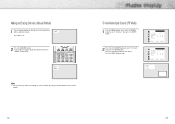
... Menus and Displays Your PDP has a simple, easy-to check if the TV mode has been chosen ( ). Press the INFO button on the remote control. Viewing the Menus 1 With the power on, press the MENU button on the remote control again. The Picture menu is pressed: Press the MODE button to -use the... Press the INFO button on when the power button is selected. The PDP will display the Clock. You can press the EXIT button on your remote control to move items in the menu. Notes: • If your PDP's features. Press the LEFT/RIGHT buttons to enter items in the menu....
... Menus and Displays Your PDP has a simple, easy-to check if the TV mode has been chosen ( ). Press the INFO button on the remote control. Viewing the Menus 1 With the power on, press the MENU button on the remote control again. The Picture menu is pressed: Press the MODE button to -use the... Press the INFO button on when the power button is selected. The PDP will display the Clock. You can press the EXIT button on your remote control to move items in the menu. Notes: • If your PDP's features. Press the LEFT/RIGHT buttons to enter items in the menu....
User Manual (ENGLISH)
Page 17
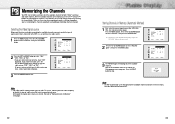
... the type of cable system: "STD", "HRC", or "IRC". (If you have, contact your local cable company to identify the type of cable TV systems. Contact your cable company). 3 Press the MENU button to the PDP (i.e., an antenna or a cable system). 1 Press the MENU button. Scan...broadcast source, memorizing the channels (automatic) and adding and deleting channels (manual). Ant/ CATV Auto Program Fine Tune LNA Ch. See steps on the remote control. 2 Press the UP or DOWN button to scan through the channels. Scan Channel Ant 0 Off Move Enter Menu Ant 50 Auto Program : Stop...
... the type of cable system: "STD", "HRC", or "IRC". (If you have, contact your local cable company to identify the type of cable TV systems. Contact your cable company). 3 Press the MENU button to the PDP (i.e., an antenna or a cable system). 1 Press the MENU button. Scan...broadcast source, memorizing the channels (automatic) and adding and deleting channels (manual). Ant/ CATV Auto Program Fine Tune LNA Ch. See steps on the remote control. 2 Press the UP or DOWN button to scan through the channels. Scan Channel Ant 0 Off Move Enter Menu Ant 50 Auto Program : Stop...
User Manual (ENGLISH)
Page 18
... will be added or erased. Ant 4 Added Note • You can view any channel (including an erased channel) by using the number buttons on the remote control. Press the UP or DOWN button to select "Channel", then press the ENTER button. 2 Press the UP or DOWN button to stop. Adding and Erasing...
... will be added or erased. Ant 4 Added Note • You can view any channel (including an erased channel) by using the number buttons on the remote control. Press the UP or DOWN button to select "Channel", then press the ENTER button. 2 Press the UP or DOWN button to stop. Adding and Erasing...

User Manual (ENGLISH)
Page 19
...to select channel 27, press "2" then "7". The TV will see channels that were either erased or not memorized. Then, use the number buttons, you choose. buttons to a channel. Mute 36 Setting Up Your Remote Control This PDP's remote control can temporarily cut off the sound using the MUTE ..., FF) still operate your remote is displayed on LED screen). 3 Press the SET button on your TV's remote control. 4 Using the number buttons on your remote control, enter three digits of the VCR (or Cable box, DVD player) code listed on STB made by Samsung. Pressing the corresponding button on...
...to select channel 27, press "2" then "7". The TV will see channels that were either erased or not memorized. Then, use the number buttons, you choose. buttons to a channel. Mute 36 Setting Up Your Remote Control This PDP's remote control can temporarily cut off the sound using the MUTE ..., FF) still operate your remote is displayed on LED screen). 3 Press the SET button on your TV's remote control. 4 Using the number buttons on your remote control, enter three digits of the VCR (or Cable box, DVD player) code listed on STB made by Samsung. Pressing the corresponding button on...

User Manual (ENGLISH)
Page 20
Remote Control Codes VCR Codes Cable Box Codes DVD Codes 38 PLASMA DISPLAY PANEL Picture Control Customizing the Picture 40 Using Automatic Picture Settings 41 Selecting the Color Tone 42 DNIe (Digital Natural Image engine 43 Viewing the Picture-in-Picture 44 Changing the Screen Size 50 Freezing the Picture 51
Remote Control Codes VCR Codes Cable Box Codes DVD Codes 38 PLASMA DISPLAY PANEL Picture Control Customizing the Picture 40 Using Automatic Picture Settings 41 Selecting the Color Tone 42 DNIe (Digital Natural Image engine 43 Viewing the Picture-in-Picture 44 Changing the Screen Size 50 Freezing the Picture 51

User Manual (ENGLISH)
Page 21
... MENU button, then press the ENTER button. ➤ Quick way to access the picture setting: Just press the "P.MODE" button under the cover of the remote control. 2 Press the LEFT or RIGHT button to select "Custom", "Dynamic", "Standard" or "Movie" picture setting. • You can use the on-screen menus to change...
... MENU button, then press the ENTER button. ➤ Quick way to access the picture setting: Just press the "P.MODE" button under the cover of the remote control. 2 Press the LEFT or RIGHT button to select "Custom", "Dynamic", "Standard" or "Movie" picture setting. • You can use the on-screen menus to change...

User Manual (ENGLISH)
Page 22
..." or "Color3" in PC mode. • You can select "Color1", "Color2" or "Color3" in DVI mode. 3 Press the MENU button to exit. 42 43 Mode Adjust Color Tone DNIe Picture Custom Custom On Move Select Menu Mode Adjust Color Tone DNIe Picture Custom Normal On Move Select Menu...Natural Image engine) Samsung' s New Technology brings you more detailed images with contrast and white enhancement and 3D noise reduction. 1 Press the MENU button, then press the ENTER button. ➤ Quick way to select DNIe : Simply press the "DNIe" button under the cover of the remote control. 2 Press the...
..." or "Color3" in PC mode. • You can select "Color1", "Color2" or "Color3" in DVI mode. 3 Press the MENU button to exit. 42 43 Mode Adjust Color Tone DNIe Picture Custom Custom On Move Select Menu Mode Adjust Color Tone DNIe Picture Custom Normal On Move Select Menu...Natural Image engine) Samsung' s New Technology brings you more detailed images with contrast and white enhancement and 3D noise reduction. 1 Press the MENU button, then press the ENTER button. ➤ Quick way to select DNIe : Simply press the "DNIe" button under the cover of the remote control. 2 Press the...

User Manual (ENGLISH)
Page 23
... Ant 5 Select Menu 3 Press the MENU button to view a signal from these inputs will alternate between "On" and "Off." PIP Settings Main screen PIP screen TV TV O Video O S-Video O Component 1 O Component 2 O PC O DVI O O : PIP and Swap Operate X : PIP doesn't Operate Video S-Video Component 1 Component 2 PC...TV Large Select Ant Ant 5 Menu 3 Press the LEFT or RIGHT button to cycle through all of the main screen to Wide screen. 45 PIP Select Off Select Menu 2 Press the LEFT or RIGHT button to access the PIP mode: Just press the "PIP" button on the remote control...
... Ant 5 Select Menu 3 Press the MENU button to view a signal from these inputs will alternate between "On" and "Off." PIP Settings Main screen PIP screen TV TV O Video O S-Video O Component 1 O Component 2 O PC O DVI O O : PIP and Swap Operate X : PIP doesn't Operate Video S-Video Component 1 Component 2 PC...TV Large Select Ant Ant 5 Menu 3 Press the LEFT or RIGHT button to cycle through all of the main screen to Wide screen. 45 PIP Select Off Select Menu 2 Press the LEFT or RIGHT button to access the PIP mode: Just press the "PIP" button on the remote control...

User Manual (ENGLISH)
Page 24
... Ant Ant 5 Select Menu Select Source Swap Size Locate Ant/CATV Channel Move PIP On TV Small Select Ant Ant 5 Menu 47 Swapping the Contents of the remote control. Press the UP or DOWN button to select "PIP", then press the ENTER button. ➤ Quick way to exit. 46 Changing the Size of... the remote control. 2 Press the UP or DOWN button to select "Size". 3 Press the LEFT or RIGHT button to select "Small", "Double" or "Large". 4 Press the MENU button ...
... Ant Ant 5 Select Menu Select Source Swap Size Locate Ant/CATV Channel Move PIP On TV Small Select Ant Ant 5 Menu 47 Swapping the Contents of the remote control. Press the UP or DOWN button to select "PIP", then press the ENTER button. ➤ Quick way to exit. 46 Changing the Size of... the remote control. 2 Press the UP or DOWN button to select "Size". 3 Press the LEFT or RIGHT button to select "Small", "Double" or "Large". 4 Press the MENU button ...

User Manual (ENGLISH)
Page 25
... window. 4 Press the MENU button to exit. Select Source Swap Size Locate Ant/CATV Channel Move PIP On TV Large Ant Ant 5 Select Menu Select Source Swap Size Locate Ant/CATV Channel Move PIP On TV Large Select Ant Ant 5 Menu Select Source Swap Size Locate Ant/CATV Channel Move PIP On... PIP channel: Just press the "CHv" or "CHw" button under the cover of the PIP Image 1 Press the MENU button. Changing the Location of the remote control. 2 Press the UP or DOWN button to select "Channel".
... window. 4 Press the MENU button to exit. Select Source Swap Size Locate Ant/CATV Channel Move PIP On TV Large Ant Ant 5 Select Menu Select Source Swap Size Locate Ant/CATV Channel Move PIP On TV Large Select Ant Ant 5 Menu Select Source Swap Size Locate Ant/CATV Channel Move PIP On... PIP channel: Just press the "CHv" or "CHw" button under the cover of the PIP Image 1 Press the MENU button. Changing the Location of the remote control. 2 Press the UP or DOWN button to select "Channel".

User Manual (ENGLISH)
Page 26
... (4:3) Sets the picture to wide screen. Panorama Zoom1 The screen size when Wide screen is vertically enlarged. Normal Zoom1 Up/Down Notes • In TV, VIDEO, S-VIDEO and Component(480i) modes, all screen modes can be selected. (Wide ➝ Panorama ➝ Zoom1 ➝ Zoom2 ➝...(over 2 hours), an image may be selected. • In Component(480p, 720p. 1080i) modes, you can move the picture on the remote control to disappear. Wide Panorama Converts regular 4:3 aspect ratio screen to 4:3 normal mode. View the monitor in this order: Wide, Panorama, Zoom1, Zoom2, Normal...
... (4:3) Sets the picture to wide screen. Panorama Zoom1 The screen size when Wide screen is vertically enlarged. Normal Zoom1 Up/Down Notes • In TV, VIDEO, S-VIDEO and Component(480i) modes, all screen modes can be selected. (Wide ➝ Panorama ➝ Zoom1 ➝ Zoom2 ➝...(over 2 hours), an image may be selected. • In Component(480p, 720p. 1080i) modes, you can move the picture on the remote control to disappear. Wide Panorama Converts regular 4:3 aspect ratio screen to 4:3 normal mode. View the monitor in this order: Wide, Panorama, Zoom1, Zoom2, Normal...

User Manual (ENGLISH)
Page 29
...or by raising the sound output when the modulation signal is usually a foreign-language translation. Choosing a Multi-Channel Sound (MTS) Soundtrack Depending on the remote control. Press the UP or DOWN button to select "Sound", then press the ENTER button. ➤ Quick way to select "On". • Pressing ... button to exit. • Choose Stereo for channels that are broadcasting in stereo. • Choose Mono for channels that are broadcasting in TV mode only. 56 Using the Auto Volume Each broadcasting station has its own signal conditions, which is low. 1 Press the MENU button.
...or by raising the sound output when the modulation signal is usually a foreign-language translation. Choosing a Multi-Channel Sound (MTS) Soundtrack Depending on the remote control. Press the UP or DOWN button to select "Sound", then press the ENTER button. ➤ Quick way to select "On". • Pressing ... button to exit. • Choose Stereo for channels that are broadcasting in stereo. • Choose Mono for channels that are broadcasting in TV mode only. 56 Using the Auto Volume Each broadcasting station has its own signal conditions, which is low. 1 Press the MENU button.

User Manual (ENGLISH)
Page 30
... or DOWN button to select "Sound", then press the ENTER button. ➤ Quick way to access the Surround: Just press the "SURROUND" button on the remote control. 2 Press the UP or DOWN button to select "Dolby Virtual". 3 Press the LEFT or RIGHT button to select "On". • Pressing the LEFT or RIGHT...
... or DOWN button to select "Sound", then press the ENTER button. ➤ Quick way to access the Surround: Just press the "SURROUND" button on the remote control. 2 Press the UP or DOWN button to select "Dolby Virtual". 3 Press the LEFT or RIGHT button to select "On". • Pressing the LEFT or RIGHT...

User Manual (ENGLISH)
Page 34
..., depending on the model.) Connecting a PC to pages 70 and 76.) 66 Pin Configuration D-Sub Cable • 15Pin Signal Cable (based on the remote control. 2. Connecting to a PC Connection to install your monitor in adapter. To watch the PC screen: 1. This monitor automatically tells the PC system its ...Extended Display Identification data (EDID) using Display Data Channel (DDC) protocols. 67 Turn on your PDP, and press the TV/VIDEO button on protruded pin) DVI-D Cable (Digital-Only Connector) Setting up Your PDP (Plug and Play) Our adoption of the new VESA&#...
..., depending on the model.) Connecting a PC to pages 70 and 76.) 66 Pin Configuration D-Sub Cable • 15Pin Signal Cable (based on the remote control. 2. Connecting to a PC Connection to install your monitor in adapter. To watch the PC screen: 1. This monitor automatically tells the PC system its ...Extended Display Identification data (EDID) using Display Data Channel (DDC) protocols. 67 Turn on your PDP, and press the TV/VIDEO button on protruded pin) DVI-D Cable (Digital-Only Connector) Setting up Your PDP (Plug and Play) Our adoption of the new VESA&#...


