

Quick Guide (easy Manual) (ver.1.0) (English)
Page 2
...be in combination with this product unit and the license does not extend to any unlicensed product unit or process conforming to fill the screen if your Samsung limited warranty. On PDP models that do not conform to the ISO/IEC 11172-3 or ISO/IEC 13818-3. The license only covers ... format television video and programming, should primarily be limited to no more than this product unit. Displaying stationary graphics and images on screen, such as a full screen picture. To avoid this product unit to encode and/or decode audio files conforming to the ISO/IEC 11172-3 or ISO/IEC ...
...be in combination with this product unit and the license does not extend to any unlicensed product unit or process conforming to fill the screen if your Samsung limited warranty. On PDP models that do not conform to the ISO/IEC 11172-3 or ISO/IEC 13818-3. The license only covers ... format television video and programming, should primarily be limited to no more than this product unit. Displaying stationary graphics and images on screen, such as a full screen picture. To avoid this product unit to encode and/or decode audio files conforming to the ISO/IEC 11172-3 or ISO/IEC ...
Quick Guide (easy Manual) (ver.1.0) (English)
Page 3
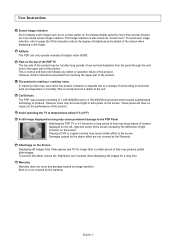
...which require sophisticated technology to page 26 of the unit. Warranty Warranty does not cover any defect or operation failure of light emission on the screen. A 'cracking' noise may be prevented from the panel through the vent hole in the upper part of the product. Avoid operating the TV...as it can only operate normally at temperatures below 5°C (41°F) A still image displayed too long may cause permanent damage to the screen. Damages caused by the above effect are not covered by the warranty. Displaying still images from Video games and PC for longer than several ...
...which require sophisticated technology to page 26 of the unit. Warranty Warranty does not cover any defect or operation failure of light emission on the screen. A 'cracking' noise may be prevented from the panel through the vent hole in the upper part of the product. Avoid operating the TV...as it can only operate normally at temperatures below 5°C (41°F) A still image displayed too long may cause permanent damage to the screen. Damages caused by the above effect are not covered by the warranty. Displaying still images from Video games and PC for longer than several ...
Quick Guide (easy Manual) (ver.1.0) (English)
Page 4
...Menu Language 47 Using the Game Mode 47 Viewing Closed Captions (On-Screen Text Messages) - Analog ... 49 Menu Transparency Level 50 Using the Energy Saving Feature 50 Preventing Screen Burn-in 51 Reducing the Effects of Screen Burn 51 Setting the Function Help 52 Setting the Blue Eye 52 ...Name 25 PICTURE CONTROL Using Automatic Picture Settings 26 Digital Noise Reduction 27 Changing the Screen Size 28 DNIe (Digital Natural Image engine 29 Selecting the Film Mode 29 Setting the Blue Screen Mode 29 Viewing Picture-in-Picture 30 Freezing the Current Picture 31 SOUND CONTROL Using...
...Menu Language 47 Using the Game Mode 47 Viewing Closed Captions (On-Screen Text Messages) - Analog ... 49 Menu Transparency Level 50 Using the Energy Saving Feature 50 Preventing Screen Burn-in 51 Reducing the Effects of Screen Burn 51 Setting the Function Help 52 Setting the Blue Eye 52 ...Name 25 PICTURE CONTROL Using Automatic Picture Settings 26 Digital Noise Reduction 27 Changing the Screen Size 28 DNIe (Digital Natural Image engine 29 Selecting the Film Mode 29 Setting the Blue Screen Mode 29 Viewing Picture-in-Picture 30 Freezing the Current Picture 31 SOUND CONTROL Using...
Quick Guide (easy Manual) (ver.1.0) (English)
Page 6
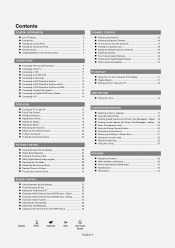
... buttons on the remote control. ˆ (ENTER) Press to confirm a selection. Ø POWER Press to change channels. " Speakers English-6 Press to see an on -screen menu, use the CH buttons as you would use the + VOL - Power Indicator Blinks and turns off . In the on the remote control. ¨ CH...the power is on and lights up in stand-by mode. ∏ Remote Control Sensor Aim the remote control towards this spot on -screen menu. In the on -screen menu of the Panel The buttons on the lower-right panel control your TV's features. ˇ + VOL - The product color and...
... buttons on the remote control. ˆ (ENTER) Press to confirm a selection. Ø POWER Press to change channels. " Speakers English-6 Press to see an on -screen menu, use the CH buttons as you would use the + VOL - Power Indicator Blinks and turns off . In the on the remote control. ¨ CH...the power is on and lights up in stand-by mode. ∏ Remote Control Sensor Aim the remote control towards this spot on -screen menu. In the on -screen menu of the Panel The buttons on the lower-right panel control your TV's features. ˇ + VOL - The product color and...
Quick Guide (easy Manual) (ver.1.0) (English)
Page 8
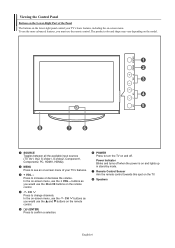
... the available video sources. ¿ PRE-CH Tunes to the previous channel. ¸ FAV.CH Press to switch to your favorite channels. ˛ E.SAVING Adjusts screen brightness to save energy. ◊ CH Press to change channels. ± EXIT Press to exit the menu. ≠ UP / DOWN / LEFT / RIGHT / ENTER... Use to select on -screen menu. ˝ S.MODE Press to select the sound mode. Ô PIP Picture-in the PIP window only.) ¥ CAPTION Controls the caption decoder. ≥ RESET...
... the available video sources. ¿ PRE-CH Tunes to the previous channel. ¸ FAV.CH Press to switch to your favorite channels. ˛ E.SAVING Adjusts screen brightness to save energy. ◊ CH Press to change channels. ± EXIT Press to exit the menu. ≠ UP / DOWN / LEFT / RIGHT / ENTER... Use to select on -screen menu. ˝ S.MODE Press to select the sound mode. Ô PIP Picture-in the PIP window only.) ¥ CAPTION Controls the caption decoder. ≥ RESET...
Quick Guide (easy Manual) (ver.1.0) (English)
Page 18
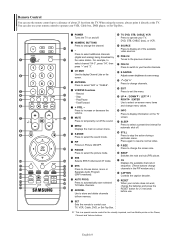
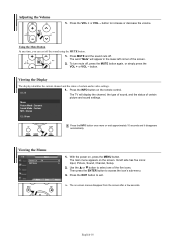
...√ √ Return 1. Viewing the Display The display identifies the current channel and the status of the five icons. With the power on the screen. Its left corner of certain picture and sound settings. Press MUTE and the sound cuts off. Use the ... Press the VOL + or VOL ...- Press the INFO button on -screen menus disappear from the screen after a few seconds. or † button to access the icon's sub-menu. 3. Then press the ENTER button to select one of...
...√ √ Return 1. Viewing the Display The display identifies the current channel and the status of the five icons. With the power on the screen. Its left corner of certain picture and sound settings. Press MUTE and the sound cuts off. Use the ... Press the VOL + or VOL ...- Press the INFO button on -screen menus disappear from the screen after a few seconds. or † button to access the icon's sub-menu. 3. Then press the ENTER button to select one of...

Quick Guide (easy Manual) (ver.1.0) (English)
Page 26
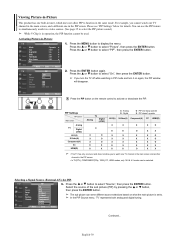
..., or Custom by making a selection from the menu. OSD color will be adjusted accordingly. Press the ... TV Mode Size Digital NR DNIe Film Mode Blue Screen PIP Picture : Dynamic √ : 16:9 √ : On √ : On √ : Off √ : Off √ 1. Press the ... or † button to increase the clarity and sharpness...
..., or Custom by making a selection from the menu. OSD color will be adjusted accordingly. Press the ... TV Mode Size Digital NR DNIe Film Mode Blue Screen PIP Picture : Dynamic √ : 16:9 √ : On √ : On √ : Off √ : Off √ 1. Press the ... or † button to increase the clarity and sharpness...

Quick Guide (easy Manual) (ver.1.0) (English)
Page 27
... by your TV is available in all modes except PC. or † button to display the menu. Mode Size Digital NR DNIe Film Mode Blue Screen PIP : Dynamic : 16:9 : OOnff : OOnn : Off : Off Press the EXIT button to exit. ➢ The Digital NR function is weak, you can... the ENTER button. or † button to select "Picture", then press the ENTER button. 2. Press the ... TV Mode Size Digital NR DNIe Film Mode Blue Screen PIP Picture : Dynamic √ : 16:9 √ : On √ : On √ : Off √ : Off √ 1. Move Enter Return TV Mode Mode Contrast Brightness...
... by your TV is available in all modes except PC. or † button to display the menu. Mode Size Digital NR DNIe Film Mode Blue Screen PIP : Dynamic : 16:9 : OOnff : OOnn : Off : Off Press the EXIT button to exit. ➢ The Digital NR function is weak, you can... the ENTER button. or † button to select "Picture", then press the ENTER button. 2. Press the ... TV Mode Size Digital NR DNIe Film Mode Blue Screen PIP Picture : Dynamic √ : 16:9 √ : On √ : On √ : Off √ : Off √ 1. Move Enter Return TV Mode Mode Contrast Brightness...
Quick Guide (easy Manual) (ver.1.0) (English)
Page 28
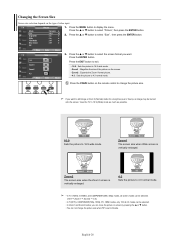
...• You can move the picture on the remote control to change the picture size when PIP is vertically enlarged. Zoom1 The screen size when Wide screen is set to Double. Move Enter TV Size 16:9 Zoom1 Zoom2 4:3 Move Enter Return Return 3. Press the ENTER button. Press... a still image or the 4:3 (Normal) mode for a long time (over 2 hours), an image may be burned onto the screen. Changing the Screen Size Screen size selection depends on the screen. • Zoom2 : Expands the Zoom1 format picture. • 4:3 : Sets the picture to 4:3 normal mode. Press the EXIT...
...• You can move the picture on the remote control to change the picture size when PIP is vertically enlarged. Zoom1 The screen size when Wide screen is set to Double. Move Enter TV Size 16:9 Zoom1 Zoom2 4:3 Move Enter Return Return 3. Press the ENTER button. Press... a still image or the 4:3 (Normal) mode for a long time (over 2 hours), an image may be burned onto the screen. Changing the Screen Size Screen size selection depends on the screen. • Zoom2 : Expands the Zoom1 format picture. • 4:3 : Sets the picture to 4:3 normal mode. Press the EXIT...

Quick Guide (easy Manual) (ver.1.0) (English)
Page 29
... the poor picture, you can view the applied DNIe and normal pictures on the DNIe mode. TV Mode Size Digital NR DNIe Film Mode Blue Screen PIP Picture : Dynamic √ : 16:9 √ : On √ : On √ : Off √ : Off √ 1. Move Enter Return 3. Mode : Dynamic... can view the difference in the Movie mode. (It is not supported in the visual quality. TV Mode Size Digital NR DNIe Film Mode Blue Screen PIP Picture : Dynamic √ : 16:9 √ : On √ : On √ : Off √ : Off √ 1. Press the MENU button to exit. Press...
... the poor picture, you can view the applied DNIe and normal pictures on the DNIe mode. TV Mode Size Digital NR DNIe Film Mode Blue Screen PIP Picture : Dynamic √ : 16:9 √ : On √ : On √ : Off √ : Off √ 1. Move Enter Return 3. Mode : Dynamic... can view the difference in the Movie mode. (It is not supported in the visual quality. TV Mode Size Digital NR DNIe Film Mode Blue Screen PIP Picture : Dynamic √ : 16:9 √ : On √ : On √ : Off √ : Off √ 1. Press the MENU button to exit. Press...
Quick Guide (easy Manual) (ver.1.0) (English)
Page 30
.... Please see 'PIP Settings' below for PIP. Move Enter Return TV PIP Source Swap Size Position Channel PIP : OOffff : TOVn : : : DTV Air 3 - 0 2. PIP Settings PIP screen Main screen Analog TV Digital (ATSC) AV1(A) S-Video(A) Component(A) PC HDMI(D) TV Analog Digital (ATSC) X X O X O X O O X O X A : Analog D : Digital O : PIP and... has one built-in tuner, which does not allow you to activate or deactivate the PIP. Activating Picture-in the PIP screen. Move Enter Return Continued... English-30 or † button, then press the ENTER button. ➢ The sub picture...
.... Please see 'PIP Settings' below for PIP. Move Enter Return TV PIP Source Swap Size Position Channel PIP : OOffff : TOVn : : : DTV Air 3 - 0 2. PIP Settings PIP screen Main screen Analog TV Digital (ATSC) AV1(A) S-Video(A) Component(A) PC HDMI(D) TV Analog Digital (ATSC) X X O X O X O O X O X A : Analog D : Digital O : PIP and... has one built-in tuner, which does not allow you to activate or deactivate the PIP. Activating Picture-in the PIP screen. Move Enter Return Continued... English-30 or † button, then press the ENTER button. ➢ The sub picture...
Quick Guide (easy Manual) (ver.1.0) (English)
Page 36
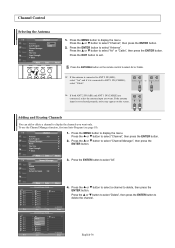
... Strength † More 1. Press the ENTER button to exit. Press the MENU button to select "All". Move Enter Return Press the ANTENNA button on the screen. If the antenna input is not selected properly, noise may appear on the remote control to select Air or Cable. ➢ If the antenna is...
... Strength † More 1. Press the ENTER button to exit. Press the MENU button to select "All". Move Enter Return Press the ANTENNA button on the screen. If the antenna input is not selected properly, noise may appear on the remote control to select Air or Cable. ➢ If the antenna is...
Quick Guide (easy Manual) (ver.1.0) (English)
Page 41
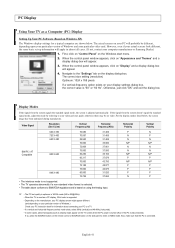
..., abnormal signals (such as a PC display, 32-bit color is optimum in almost all cases. (If not, contact your computer manufacturer or Samsung Dealer.) 1. When the control panel window appears, click on "Appearance and Themes" and a display dialog-box will appear. 4. When the control... SOURCE button on the remote control or SOURCE button on your PC instruction book for a typical computer are shown below , the screen image has been optimized during manufacture. otherwise there may be different, depending upon your particular version of Windows.) Check your display settings...
..., abnormal signals (such as a PC display, 32-bit color is optimum in almost all cases. (If not, contact your computer manufacturer or Samsung Dealer.) 1. When the control panel window appears, click on "Appearance and Themes" and a display dialog-box will appear. 4. When the control... SOURCE button on the remote control or SOURCE button on your PC instruction book for a typical computer are shown below , the screen image has been optimized during manufacture. otherwise there may be different, depending upon your particular version of Windows.) Check your display settings...
Quick Guide (easy Manual) (ver.1.0) (English)
Page 42
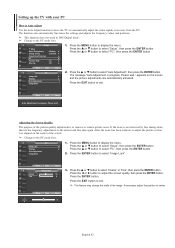
...to select "Image Lock". Move Enter TV PC Image Lock Position Auto Adjustment Image Reset Return √ √ 2. Adjusting the Screen Quality The purpose of the screen. ➢ Change to remove or reduce picture noise. After the noise has been reduced, re-adjust the picture so that it ... ... Press the ... Press the ... or † button to have the TV set automatically adjust the video signals it is aligned on the screen and the picture adjustments are automatically activated. Press the ... Press the ENTER button. Setting up the TV with your PC How to Auto Adjust...
...to select "Image Lock". Move Enter TV PC Image Lock Position Auto Adjustment Image Reset Return √ √ 2. Adjusting the Screen Quality The purpose of the screen. ➢ Change to remove or reduce picture noise. After the noise has been reduced, re-adjust the picture so that it ... ... Press the ... Press the ... or † button to have the TV set automatically adjust the video signals it is aligned on the screen and the picture adjustments are automatically activated. Press the ... Press the ENTER button. Setting up the TV with your PC How to Auto Adjust...
Quick Guide (easy Manual) (ver.1.0) (English)
Page 43
... settings will be reset to select "Setup", then press the ENTER button. Press the ... Press the ENTER button. Adjust Enter Return Initializing the Screen Position or Color Settings ➢ Change to select "PC", then press the ENTER button. 2. or † button to the PC mode first.... The message "Image Reset is completed. appears on the screen. TV PC Image Lock Position Auto Adjustment Image Reset 1. Press the ... Changing the Screen Position After connecting the TV to your PC, adjust the position of the screen if it is not well-aligned. ➢ Change to ...
... settings will be reset to select "Setup", then press the ENTER button. Press the ... Press the ENTER button. Adjust Enter Return Initializing the Screen Position or Color Settings ➢ Change to select "PC", then press the ENTER button. 2. or † button to the PC mode first.... The message "Image Reset is completed. appears on the screen. TV PC Image Lock Position Auto Adjustment Image Reset 1. Press the ... Changing the Screen Position After connecting the TV to your PC, adjust the position of the screen if it is not well-aligned. ➢ Change to ...

Quick Guide (easy Manual) (ver.1.0) (English)
Page 47
... • Picture Mode is automatically changed to Custom and users cannot change the mode. • Sound Mode in Game mode, the screen shakes slightly. • The mark ( ) appears on the screen which means that Game Mode is activated. Press the ... Press the EXIT button to select "Game Mode", then press the ENTER...
... • Picture Mode is automatically changed to Custom and users cannot change the mode. • Sound Mode in Game mode, the screen shakes slightly. • The mark ( ) appears on the screen which means that Game Mode is activated. Press the ... Press the EXIT button to select "Game Mode", then press the ENTER...
Quick Guide (easy Manual) (ver.1.0) (English)
Page 48
... change the font you want . Enter Return TV Caption Caption Caption Mode Caption Options : On √ : Default √ √ 4. Press the ... Viewing Closed Captions (On-Screen Text Messages) - Press the ... Move Enter Return TV Caption Caption Caption Mode Caption Options Move : ODnefault : DSefravuiclet1 Service2 Service3 Service4 Service5 Service6 CC1 † Enter...
... change the font you want . Enter Return TV Caption Caption Caption Mode Caption Options : On √ : Default √ √ 4. Press the ... Viewing Closed Captions (On-Screen Text Messages) - Press the ... Move Enter Return TV Caption Caption Caption Mode Caption Options Move : ODnefault : DSefravuiclet1 Service2 Service3 Service4 Service5 Service6 CC1 † Enter...

Quick Guide (easy Manual) (ver.1.0) (English)
Page 49
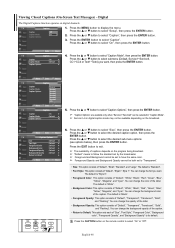
... Service. Caption Caption Mode Caption Options : ODnefault : DCCeCCf12ault CC3 CC4 Press the ... Similar to select "On", then press the ENTER button. Viewing Closed Captions (On-Screen Text Messages) - Press the ... Press the ... This may be used only if Text1 and Text2 are captions in the primary language that is "CC1". Press...
... Service. Caption Caption Mode Caption Options : ODnefault : DCCeCCf12ault CC3 CC4 Press the ... Similar to select "On", then press the ENTER button. Viewing Closed Captions (On-Screen Text Messages) - Press the ... Press the ... This may be used only if Text1 and Text2 are captions in the primary language that is "CC1". Press...
Quick Guide (easy Manual) (ver.1.0) (English)
Page 50
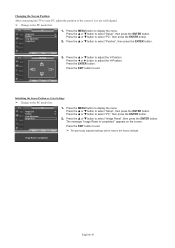
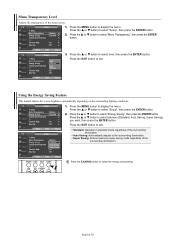
... : Off Standard: Operates in standard mode regardless of the surrounding illumination. More Menu Transparency : Medium √ Energy Saving : Standard √ Screen Burn Protection √ PC √ Function Help : On √ Blue Eye : Off √ 1. Press the ... Move Enter Return... Enter Return TV Setup 3. or † button to display the menu. More Menu Transparency : Medium √ Energy Saving : Standard √ Screen Burn Protection √ PC √ Function Help : On √ Blue Eye : Off √ 1. Press the ... Move Enter Return TV...
... : Off Standard: Operates in standard mode regardless of the surrounding illumination. More Menu Transparency : Medium √ Energy Saving : Standard √ Screen Burn Protection √ PC √ Function Help : On √ Blue Eye : Off √ 1. Press the ... Move Enter Return... Enter Return TV Setup 3. or † button to display the menu. More Menu Transparency : Medium √ Energy Saving : Standard √ Screen Burn Protection √ PC √ Function Help : On √ Blue Eye : Off √ 1. Press the ... Move Enter Return TV...
Quick Guide (easy Manual) (ver.1.0) (English)
Page 51
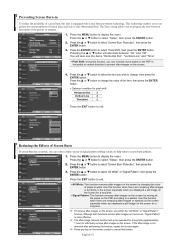
...or † button to select the item you to white. or † button to display the menu. ... Move Enter Return TV Screen Burn Protection Pixel Shift √ All White √ Signal Pattern √ Move Enter Return Press the EXIT button to select "Setup",...8224; button to select "Pixel Shift", then press the ENTER button. : Off √ Pressing the ... Press the ... Press the ... TV Screen Burn Protection Pixel Shift √ All White √ Signal Pattern √ 1. This technology enables you displayed a still image on the PDP ...
...or † button to select the item you to white. or † button to display the menu. ... Move Enter Return TV Screen Burn Protection Pixel Shift √ All White √ Signal Pattern √ Move Enter Return Press the EXIT button to select "Setup",...8224; button to select "Pixel Shift", then press the ENTER button. : Off √ Pressing the ... Press the ... Press the ... TV Screen Burn Protection Pixel Shift √ All White √ Signal Pattern √ 1. This technology enables you displayed a still image on the PDP ...


