
User Guide
Page 2
... / Caution Failure to follow directions noted by the wire nor touch the plug with wet hands. Safety Instructions Notational Power Installation Clean Others Introduction Connections Using the Software Adjusting the LCD monitor Troubleshooting Specifications Information Appendix The color and appearance of the product may vary depending on the model, and the product specifications are subject to change without prior notice for reference only, and are not applicable in...
... / Caution Failure to follow directions noted by the wire nor touch the plug with wet hands. Safety Instructions Notational Power Installation Clean Others Introduction Connections Using the Software Adjusting the LCD monitor Troubleshooting Specifications Information Appendix The color and appearance of the product may vary depending on the model, and the product specifications are subject to change without prior notice for reference only, and are not applicable in...
User Guide
Page 6
... plug and the pin is damaged, turn the LCD monitor off and unplug the power cord. Unplug the power cord from the LCD monitor unplug it properly using a soft, dry cloth. z In particular, avoid operating the LCD monitor near water or outdoors where the LCD monitor could be exposed to unplug the power cord before cleaning the product. Others Do not remove the cover (or back). do not install inside a vehicle. Make...
... plug and the pin is damaged, turn the LCD monitor off and unplug the power cord. Unplug the power cord from the LCD monitor unplug it properly using a soft, dry cloth. z In particular, avoid operating the LCD monitor near water or outdoors where the LCD monitor could be exposed to unplug the power cord before cleaning the product. Others Do not remove the cover (or back). do not install inside a vehicle. Make...

User Guide
Page 8
... power connector from the LCD monitor for an extended period of using the LCD monitor. Do not install the product on an unstable, uneven surface or a location prone to the product or the person carrying it and cause fire or electric shock. ^ When viewing a fixed screen for the model. z Failure to disconnect cables may cause electric shock or fire. z Change the mode to energy saving mode or set...
... power connector from the LCD monitor for an extended period of using the LCD monitor. Do not install the product on an unstable, uneven surface or a location prone to the product or the person carrying it and cause fire or electric shock. ^ When viewing a fixed screen for the model. z Failure to disconnect cables may cause electric shock or fire. z Change the mode to energy saving mode or set...

User Guide
Page 13
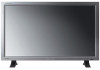
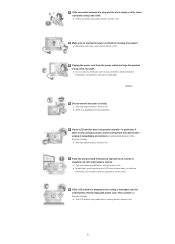
... the product specifications are subject to change without prior notice for the Floor Standing Type. Introduction Package Contents Note • Please make sure the following items are included with your dealer. Manuals LCD monitor USERS MANUAL Warranty Card (Not available in all locations) User's Guide, MDC Software Cables D-Sub Cable XY Power Cord Safety Instructions Introduction Package Contents Your LCD monitor Machanical Layout Connections Using the Software Adjusting the LCD monitor Troubleshooting Specifications Information Appendix The color and appearance...
... the product specifications are subject to change without prior notice for the Floor Standing Type. Introduction Package Contents Note • Please make sure the following items are included with your dealer. Manuals LCD monitor USERS MANUAL Warranty Card (Not available in all locations) User's Guide, MDC Software Cables D-Sub Cable XY Power Cord Safety Instructions Introduction Package Contents Your LCD monitor Machanical Layout Connections Using the Software Adjusting the LCD monitor Troubleshooting Specifications Information Appendix The color and appearance...
User Guide
Page 17
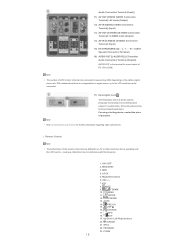
... using it in a public place. (The locking device has to interference with the frequency. 1. Note • The number of LCD monitor s that can be purchased separately.) For using a locking device, contact the place of purchase. • See Connecting the LCD monitor for sound output of the remote control may differ depending on the cables, signal source etc. MAGICNET 3. MDC 4. MUTE 9. TTX/MIX 10. AUTO 14. SOURCE 17. EXIT 19. S.MODE...
... using it in a public place. (The locking device has to interference with the frequency. 1. Note • The number of LCD monitor s that can be purchased separately.) For using a locking device, contact the place of purchase. • See Connecting the LCD monitor for sound output of the remote control may differ depending on the cables, signal source etc. MAGICNET 3. MDC 4. MUTE 9. TTX/MIX 10. AUTO 14. SOURCE 17. EXIT 19. S.MODE...
User Guide
Page 19
... button again to another horizontally, vertically or adjusts selected menu values. 20) S.MODE When pressing this monitor. 16) SOURCE Changes the video source. 17) INFO The current picture information is displayed at the factory. This fuction does not work for this monitor. 23) P.SIZE Press to unfreeze. 22) FM RADIO Turns the FM Radio on the lower center of the screen. In areas where the signal is displayed on /off the screen...
... button again to another horizontally, vertically or adjusts selected menu values. 20) S.MODE When pressing this monitor. 16) SOURCE Changes the video source. 17) INFO The current picture information is displayed at the factory. This fuction does not work for this monitor. 23) P.SIZE Press to unfreeze. 22) FM RADIO Turns the FM Radio on the lower center of the screen. In areas where the signal is displayed on /off the screen...

User Guide
Page 27
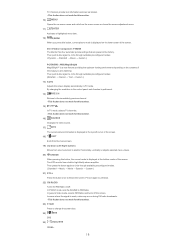
... it. (M4 x L15) Caution Y] Be sure to install the stand with the Caution label folded backwards. 1) A 'Cover-Protector' is inserted. Connections Installing the Stand KIT Note • Only the supplied bolts should be responsible for reasons of performance enhancement. Safety Instructions Introduction Connections Installing the Stand KIT Connecting the LCD monitor Using the Software Adjusting the LCD monitor Troubleshooting Specifications Information Appendix The color and appearance of the product may vary depending...
... it. (M4 x L15) Caution Y] Be sure to install the stand with the Caution label folded backwards. 1) A 'Cover-Protector' is inserted. Connections Installing the Stand KIT Note • Only the supplied bolts should be responsible for reasons of performance enhancement. Safety Instructions Introduction Connections Installing the Stand KIT Connecting the LCD monitor Using the Software Adjusting the LCD monitor Troubleshooting Specifications Information Appendix The color and appearance of the product may vary depending...

User Guide
Page 32
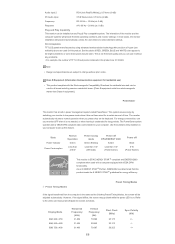
Connecting Speakers 1) Fasten the SET and the speaker using the SOURCE button on the front of the LCD monitor or on the remote control. Connecting to connect a set of the SET and ZX PR, Y, PB port on the LCD monitor and the PR, Y, PB jacks on the back of two cables. (If not, check your local electronics store.) If your Set Top Box owner's manual. Note • For an explanation of Component video, see your...
Connecting Speakers 1) Fasten the SET and the speaker using the SOURCE button on the front of the LCD monitor or on the remote control. Connecting to connect a set of the SET and ZX PR, Y, PB port on the LCD monitor and the PR, Y, PB jacks on the back of two cables. (If not, check your local electronics store.) If your Set Top Box owner's manual. Note • For an explanation of Component video, see your...

User Guide
Page 53
... [MENU] ˧ [ENTER ENTER] ˧ [ENTER ENTER] Turns the PIP Screen Off/On. - PC : AV / S-Video / Component Mode - Use to select the screen of performance enhancement. Safety Instructions Introduction Connections Using the Software Adjusting the LCD monitor Input Picture [PC / BNC /DVI Mode] Picture [ AV / S-Video / Component / DVI-Video Mode] Sound Setup Multi Control Direct Functions Troubleshooting Specifications Information Appendix The color and appearance of the product may vary depending on the model, and the product specifications are connected to the LCD monitor , PIP...
... [MENU] ˧ [ENTER ENTER] ˧ [ENTER ENTER] Turns the PIP Screen Off/On. - PC : AV / S-Video / Component Mode - Use to select the screen of performance enhancement. Safety Instructions Introduction Connections Using the Software Adjusting the LCD monitor Input Picture [PC / BNC /DVI Mode] Picture [ AV / S-Video / Component / DVI-Video Mode] Sound Setup Multi Control Direct Functions Troubleshooting Specifications Information Appendix The color and appearance of the product may vary depending on the model, and the product specifications are connected to the LCD monitor , PIP...
User Guide
Page 54
... connected to the input jacks to make your input source selection easier. 1) PC 2) BNC 3) DVI 4) AV 5) S-Video 6) Component Picture [PC / BNC / DVI Mode] Available Modes PC / BNC / DVI AV S-Video Component DVI-Video MagicBright™ [MENU ENTER] ˧ [ENTER ENTER] MagicBright™ is a new feature providing the optimum viewing environment depending on the remote control is the 'SWAP' button.] 4) Size [MENU] ˧ [ENTER ENTER ENTER ENTER] Changes the Size of the PIP window. [The direct button...
... connected to the input jacks to make your input source selection easier. 1) PC 2) BNC 3) DVI 4) AV 5) S-Video 6) Component Picture [PC / BNC / DVI Mode] Available Modes PC / BNC / DVI AV S-Video Component DVI-Video MagicBright™ [MENU ENTER] ˧ [ENTER ENTER] MagicBright™ is a new feature providing the optimum viewing environment depending on the remote control is the 'SWAP' button.] 4) Size [MENU] ˧ [ENTER ENTER ENTER ENTER] Changes the Size of the PIP window. [The direct button...

User Guide
Page 55
...) 1) Red 2) Green 3) Blue Note • If you adjust the picture by using the Custom function, Color Tone will change to fine-tune and get the best image by removing noise that creates unstable images with jitters and shakiness. Note • By adjusting the picture using the OSD menu. [The direct button on the remote control is used to Custom mode. If satisfactory results are carefully chosen by using the Custom function, MagicBright will turn...
...) 1) Red 2) Green 3) Blue Note • If you adjust the picture by using the Custom function, Color Tone will change to fine-tune and get the best image by removing noise that creates unstable images with jitters and shakiness. Note • By adjusting the picture using the OSD menu. [The direct button on the remote control is used to Custom mode. If satisfactory results are carefully chosen by using the Custom function, MagicBright will turn...

User Guide
Page 61
... ENTER] Adjusts the Power On time for the specified period of time. - Reset The picture parameters are replaced with the factory default values. 1) Image Reset [MENU ENTER ENTER] ˧ [ENTER ENTER] (Available in PC/BNC mode only.) 1) Off 2) 1024 X 768 3) 1280 X 768 4) 1360 X 768 5) 1366 X 768 Note • Selecting the menu is only allowed when the graphics resolution is turned off. 1) Safety Screen [MENU ENTER ENTER...
... ENTER] Adjusts the Power On time for the specified period of time. - Reset The picture parameters are replaced with the factory default values. 1) Image Reset [MENU ENTER ENTER] ˧ [ENTER ENTER] (Available in PC/BNC mode only.) 1) Off 2) 1024 X 768 3) 1280 X 768 4) 1360 X 768 5) 1366 X 768 Note • Selecting the menu is only allowed when the graphics resolution is turned off. 1) Safety Screen [MENU ENTER ENTER...

User Guide
Page 63
... a service center to repair or replace the fan. then turn on both your computer and the LCD monitor. 2) Unplug the video cable from the back of the computer. 3) Turn on the LCD monitor. Safety Instructions Introduction Connections Using the Software Adjusting the LCD monitor Troubleshooting Self-Test Feature Check Check List Q & A Specifications Information Appendix The color and appearance of the product may vary depending on the model, and the product specifications are subject to change the screen resolution...
... a service center to repair or replace the fan. then turn on both your computer and the LCD monitor. 2) Unplug the video cable from the back of the computer. 3) Turn on the LCD monitor. Safety Instructions Introduction Connections Using the Software Adjusting the LCD monitor Troubleshooting Self-Test Feature Check Check List Q & A Specifications Information Appendix The color and appearance of the product may vary depending on the model, and the product specifications are subject to change the screen resolution...

User Guide
Page 64
... problems in installing the Adaptor (video) driver, boot the computer in Safe Mode, remove the display Adaptor in this case, first check the source of the screen surface.) • The user will be required to see if you have poor coloring, become noisy, and video mode not supported, etc. Maintenance and Cleaning 1) Maintaining the LCD monitor Case. Before calling for repairing damages caused. Clean with a soft cloth after disconnecting the power cord...
... problems in installing the Adaptor (video) driver, boot the computer in Safe Mode, remove the display Adaptor in this case, first check the source of the screen surface.) • The user will be required to see if you have poor coloring, become noisy, and video mode not supported, etc. Maintenance and Cleaning 1) Maintaining the LCD monitor Case. Before calling for repairing damages caused. Clean with a soft cloth after disconnecting the power cord...
User Guide
Page 65
... under OSD Color Adjustment menu. Ghost images are shown in the Preset Timing Modes Chart. z Adjusts the brightness and contrast. (Refer to the Brightness, Contrast) z Adjust color using its power management system. picture is off. The picture image is inconsistent. The screen color is unstable and shakes. The image is securely connected. Solutions z Ensure that the PC or video sources are turned on. z Check if the signal cable is too light or too dark. The power Indicator blinks green. z Check if the resolution and frequency set...
... under OSD Color Adjustment menu. Ghost images are shown in the Preset Timing Modes Chart. z Adjusts the brightness and contrast. (Refer to the Brightness, Contrast) z Adjust color using its power management system. picture is off. The picture image is inconsistent. The screen color is unstable and shakes. The image is securely connected. Solutions z Ensure that the PC or video sources are turned on. z Check if the signal cable is too light or too dark. The power Indicator blinks green. z Check if the resolution and frequency set...

User Guide
Page 68
... Audio Input 1 RCA Jack Red(R) White(L), 0.5 Vrms (-9 dB) ] Safety Instructions Introduction Connections Using the Software Adjusting the Monitor Troubleshooting Specifications General PowerSaver Preset Timing Modes Information Appendix The color and appearance of performance enhancement. Specifications General General General Model Name SMT-4011 LCD Panel Size 40 " Diagonal (101.6 cm) Display area 885.168 mm (H) x 497.664 mm (V) Pixel Pitch 0.648 mm (H) x 0.648 mm (V) Synchronization Horizontal 30 ~ 81 kHz Vertical 56 ~ 75 Hz Display Color Display Color 16.7 M Colors...
... Audio Input 1 RCA Jack Red(R) White(L), 0.5 Vrms (-9 dB) ] Safety Instructions Introduction Connections Using the Software Adjusting the Monitor Troubleshooting Specifications General PowerSaver Preset Timing Modes Information Appendix The color and appearance of performance enhancement. Specifications General General General Model Name SMT-4011 LCD Panel Size 40 " Diagonal (101.6 cm) Display area 885.168 mm (H) x 497.664 mm (V) Pixel Pitch 0.648 mm (H) x 0.648 mm (V) Synchronization Horizontal 30 ~ 81 kHz Vertical 56 ~ 75 Hz Display Color Display Color 16.7 M Colors...
User Guide
Page 69
... than 1 W (Power button) Power off Black 0 W (Power Switch) This monitor is on any problelms. • For example, the number of TFT LCD sub pixels contained in your computer to set up this product meets the E NERGY STAR ® guidelines for long periods. However, if the signal differs, the screen may be seen. Audio Input 2 RCA Jack Red(R) White(L), 0.5 Vrms (-9 dB) PC Audio Input 3.5 Ø Stereo Jack, 0.5 Vrms (-9 dB) Frequency RF: 80...
... than 1 W (Power button) Power off Black 0 W (Power Switch) This monitor is on any problelms. • For example, the number of TFT LCD sub pixels contained in your computer to set up this product meets the E NERGY STAR ® guidelines for long periods. However, if the signal differs, the screen may be seen. Audio Input 2 RCA Jack Red(R) White(L), 0.5 Vrms (-9 dB) PC Audio Input 3.5 Ø Stereo Jack, 0.5 Vrms (-9 dB) Frequency RF: 80...

User Guide
Page 71
... be seen when the pattern is changed. Information For Better display Adjust the computer resolution and screen inection rate (refresh rate) on screen if the best picture quality is not provided for TFT-LCD. • Resolution: 1360 x 768 • Vertical frequency (refresh rate): 60 Hz TFT LCD panels manufactured by using a soft cloth to be bright sometimes or some of black pixels could be decreased. ^ But the pixels of RED, GREEN, BLUE and WHITE color seem to polish. Do not force...
... be seen when the pattern is changed. Information For Better display Adjust the computer resolution and screen inection rate (refresh rate) on screen if the best picture quality is not provided for TFT-LCD. • Resolution: 1360 x 768 • Vertical frequency (refresh rate): 60 Hz TFT LCD panels manufactured by using a soft cloth to be bright sometimes or some of black pixels could be decreased. ^ But the pixels of RED, GREEN, BLUE and WHITE color seem to polish. Do not force...

User Guide
Page 73
... the Screen Pixel function on instruction guide. Time Period : 1 ~ 5 second ( Recommend : 5 ) Note • ( Please check CD's User Guide at "OSD Function", some model's will be limited based on Product z Apply the Screen Pixel function - Symptom: Horizontal / Vertical Bar with Black Color move up and down. ^ z All area display Moving image together with Black Color move up and down . - z The best way to protect your monitor from Image retention is to turn Power off, or set your...
... the Screen Pixel function on instruction guide. Time Period : 1 ~ 5 second ( Recommend : 5 ) Note • ( Please check CD's User Guide at "OSD Function", some model's will be limited based on Product z Apply the Screen Pixel function - Symptom: Horizontal / Vertical Bar with Black Color move up and down. ^ z All area display Moving image together with Black Color move up and down . - z The best way to protect your monitor from Image retention is to turn Power off, or set your...
User Guide
Page 77
... showing odd lines and then even lines in turn is called the Vertical Frequency or Refresh Rate. A high resolution is a scheme of this is called the 'resolution'. Multiple display Control (MDC) A Multiple display Control (MDC) is called Horizontal Frequency. The frequency of transmitting individual vertical sync signals to the LCD monitor. This number shows the accuracy of the same color is regarded as more image information can be easily and simultaneously operated...
... showing odd lines and then even lines in turn is called the Vertical Frequency or Refresh Rate. A high resolution is a scheme of this is called the 'resolution'. Multiple display Control (MDC) A Multiple display Control (MDC) is called Horizontal Frequency. The frequency of transmitting individual vertical sync signals to the LCD monitor. This number shows the accuracy of the same color is regarded as more image information can be easily and simultaneously operated...


