User Manual
Page 3
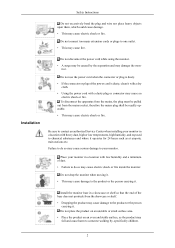
...; Using the power cord with low humidity and a minimum of the base does not protrude from the mains socket, therefore the mains plug shall be caused by , specifically children. 2 To disconnect the apparatus from the mains, the plug must...Install the monitor base in a location with a dusty plug or connector may cause electric shock or fire inside the monitor. Safety Instructions Do not excessively bend the plug and wire nor place heavy objects upon them, which could cause damage. • This may cause serious damage to your monitor. Do not connect too many extension cords or plugs...
...; Using the power cord with low humidity and a minimum of the base does not protrude from the mains socket, therefore the mains plug shall be caused by , specifically children. 2 To disconnect the apparatus from the mains, the plug must...Install the monitor base in a location with a dusty plug or connector may cause electric shock or fire inside the monitor. Safety Instructions Do not excessively bend the plug and wire nor place heavy objects upon them, which could cause damage. • This may cause serious damage to your monitor. Do not connect too many extension cords or plugs...
User Manual
Page 5
... where the monitor could be exposed to oil, smoke or moisture; Do not remove the cover (or back). • This may cause electric shock or fire. • Refer to unplug the power cord before cleaning the product. • Otherwise, this may cause electric shock or fire. Use the recommended detergent with a smooth cloth. Make sure to a qualified servicing company...
... where the monitor could be exposed to oil, smoke or moisture; Do not remove the cover (or back). • This may cause electric shock or fire. • Refer to unplug the power cord before cleaning the product. • Otherwise, this may cause electric shock or fire. Use the recommended detergent with a smooth cloth. Make sure to a qualified servicing company...

User Manual
Page 6
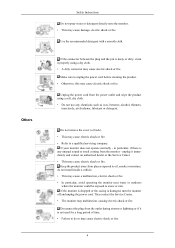
...; Change the mode to energy saving mode or set a screensaver to the cable. When viewing a fixed screen for an extended period of time. Do not place water containers, chemical products or small metal objects on the monitor cabinet. • Bad ventilation may cause a malfunction, electric shock or fire. • If a foreign substance enters the monitor, unplug the power cord and contact the Service Center...
...; Change the mode to energy saving mode or set a screensaver to the cable. When viewing a fixed screen for an extended period of time. Do not place water containers, chemical products or small metal objects on the monitor cabinet. • Bad ventilation may cause a malfunction, electric shock or fire. • If a foreign substance enters the monitor, unplug the power cord and contact the Service Center...

User Manual
Page 12
... it . Rear Introduction Power button [ ] Use this button for further information regarding power saving functions. POWER port Connect the power cord for your monitor. RGB IN port Connect the D-sub cable to the 15-pin, RGB IN port on the back of the monitor. Power Indicator This light glows blue during normal operation, and blinking blue once as the monitor saves your monitor OFF when it is a device used to physically fix the system when using a locking device, contact where you...
... it . Rear Introduction Power button [ ] Use this button for further information regarding power saving functions. POWER port Connect the power cord for your monitor. RGB IN port Connect the D-sub cable to the 15-pin, RGB IN port on the back of the monitor. Power Indicator This light glows blue during normal operation, and blinking blue once as the monitor saves your monitor OFF when it is a device used to physically fix the system when using a locking device, contact where you...

User Manual
Page 16
... the VESA standard screw specifications. Samsung is used or the consumer fails to follow the product installation instructions. • To mount the monitor on their specifications. • Do not use screws longer than those specified. • Please use Wall Mount according to personal injury. Remove four screws and then remove the stand from the wall surface. • Contact the nearest Samsung Service Center for more information. Turn off your monitor and unplug its power cord. 2. Mounting interface...
... the VESA standard screw specifications. Samsung is used or the consumer fails to follow the product installation instructions. • To mount the monitor on their specifications. • Do not use screws longer than those specified. • Please use Wall Mount according to personal injury. Remove four screws and then remove the stand from the wall surface. • Contact the nearest Samsung Service Center for more information. Turn off your monitor and unplug its power cord. 2. Mounting interface...

User Manual
Page 17
Prepare a blank disk and download the driver program file at the Internet web site shown here. Internet web site : http://www.samsung.com/ (Worldwide) Installing the Monitor Driver (Automatic) 1. If you have. Then click "OK" button (Microsoft® Windows® XP/2000 Operating System). 16 Using the Software Monitor Driver Note When prompted by the operating system for the operating system you can...
Prepare a blank disk and download the driver program file at the Internet web site shown here. Internet web site : http://www.samsung.com/ (Worldwide) Installing the Monitor Driver (Automatic) 1. If you have. Then click "OK" button (Microsoft® Windows® XP/2000 Operating System). 16 Using the Software Monitor Driver Note When prompted by the operating system for the operating system you can...

User Manual
Page 18
.... Using the Software Note This monitor driver is under certifying MS logo, and this installation doesn't damage your CD-ROM drive. 2. Click (Start) and "Control Panel". Click "Personalization" and then "Display Settings". 4. If the "Properties" button is deactivated, it means the configuration for your monitor is completed. The certified driver will be used as shown in the "Monitor" tab. Click "Advanced Settings...". 5. http://www.samsung.com/ Installing the Monitor Driver (Manual...
.... Using the Software Note This monitor driver is under certifying MS logo, and this installation doesn't damage your CD-ROM drive. 2. Click (Start) and "Control Panel". Click "Personalization" and then "Display Settings". 4. If the "Properties" button is deactivated, it means the configuration for your monitor is completed. The certified driver will be used as shown in the "Monitor" tab. Click "Advanced Settings...". 5. http://www.samsung.com/ Installing the Monitor Driver (Manual...

User Manual
Page 19
Check the "Browse my computer for example, D:\Drive) where the driver setup file is under certifying MS logo, and this installation doesn't damage your system. Click "Have Disk..." Click "Update Driver..." in the "Driver" tab. 7. and select the folder (for driver software" checkbox and click "Let me pick from a list of device drivers on Samsung Monitor homepage. 6. The certified driver will be posted on my computer". 8. Using the Software Note This monitor driver is located, and click "OK". 18
Check the "Browse my computer for example, D:\Drive) where the driver setup file is under certifying MS logo, and this installation doesn't damage your system. Click "Have Disk..." Click "Update Driver..." in the "Driver" tab. 7. and select the folder (for driver software" checkbox and click "Let me pick from a list of device drivers on Samsung Monitor homepage. 6. The certified driver will be posted on my computer". 8. Using the Software Note This monitor driver is located, and click "OK". 18

User Manual
Page 21
Click the "Properties" button on the "Monitor" tab and select "Driver" tab. 5. Using the Software 1. Click "Start" → "Control Panel" then click the "Appearance and Themes" icon. 3. Click "Update Driver..." Select "Don't search, I will..." and select "Install from a list or..." Click "Display" icon and choose the "Settings" tab then click "Advanced...". 4. then click "Next" and then click "Have disk". 20 then click "Next" button. 6. Insert CD into the CD-ROM drive. 2.
Click the "Properties" button on the "Monitor" tab and select "Driver" tab. 5. Using the Software 1. Click "Start" → "Control Panel" then click the "Appearance and Themes" icon. 3. Click "Update Driver..." Select "Don't search, I will..." and select "Install from a list or..." Click "Display" icon and choose the "Settings" tab then click "Advanced...". 4. then click "Next" and then click "Have disk". 20 then click "Next" button. 6. Insert CD into the CD-ROM drive. 2.

User Manual
Page 23
... a specific driver" then click "Next" and then click "Have disk". 7. Click "Start", "Setting", "Control Panel". 2. How to install 1. Click the "Browse" button then choose A:(D:\Driver). 8. Click the "Browse" button on "Update Driver..." Double click the "Display" icon. 3. Please stop installation Case2 : If the "Properties" button is properly configured. Choose your monitor, follow next steps continually. 5. Microsoft® Windows® Millennium Operating System 1. Using the Software 10. Click "Start", "Setting", "Control Panel". 2. Choose "Monitor". Select...
... a specific driver" then click "Next" and then click "Have disk". 7. Click "Start", "Setting", "Control Panel". 2. How to install 1. Click the "Browse" button then choose A:(D:\Driver). 8. Click the "Browse" button on "Update Driver..." Double click the "Display" icon. 3. Please stop installation Case2 : If the "Properties" button is properly configured. Choose your monitor, follow next steps continually. 5. Microsoft® Windows® Millennium Operating System 1. Using the Software 10. Click "Start", "Setting", "Control Panel". 2. Choose "Monitor". Select...
User Manual
Page 24
... your monitor. In Display Registration Information window, click Settings Tab and then click "All Display Modes". 3. The next screen is not normal, change to your monitor. 7. Click "Apply" button if you connected to a different mode (lower mode of all the driver in the "Monitor Type" area. 6. Using the Software 4. logue box. Click "Start", "Settings", "Control Panel", and then double-click "Display" icon. 2. If the screen is for selecting a keyboard. 5. First of resolution, colors or frequency). You...
... your monitor. In Display Registration Information window, click Settings Tab and then click "All Display Modes". 3. The next screen is not normal, change to your monitor. 7. Click "Apply" button if you connected to a different mode (lower mode of all the driver in the "Monitor Type" area. 6. Using the Software 4. logue box. Click "Start", "Settings", "Control Panel", and then double-click "Display" icon. 2. If the screen is for selecting a keyboard. 5. First of resolution, colors or frequency). You...

User Manual
Page 51
... a problem with the input signal, a message appears on the screen or the screen goes blank although the power indicator LED is functioning properly. This box appears during normal operation if the video cable becomes disconnected or damaged. 4. Turn off both your dealer. 48 If your monitor screen remains blank after using the previous procedure, check your monitor is functioning properly, you need to become blank, have poor coloring...
... a problem with the input signal, a message appears on the screen or the screen goes blank although the power indicator LED is functioning properly. This box appears during normal operation if the video cable becomes disconnected or damaged. 4. Turn off both your dealer. 48 If your monitor screen remains blank after using the previous procedure, check your monitor is functioning properly, you need to become blank, have poor coloring...
User Manual
Page 52
... monitor. I cannot turn on the screen or if the screen goes white, this message when the signal from the computer while the monitor is still powered on the Information section or contact your dealer. Q: Is the power cord connected properly? A: Adjust the maximum resolution and frequency that the monitor can remedy any problems yourself. If the display exceeds 85 Hz, the display will work properly but the "Not Optimum Mode", "Recommended Mode...
... monitor. I cannot turn on the screen or if the screen goes white, this message when the signal from the computer while the monitor is still powered on the Information section or contact your dealer. Q: Is the power cord connected properly? A: Adjust the maximum resolution and frequency that the monitor can remedy any problems yourself. If the display exceeds 85 Hz, the display will work properly but the "Not Optimum Mode", "Recommended Mode...
User Manual
Page 53
... adjusted the resolution or frequency on the monitor? Q: Have you changed the video card or the driver? A: Adjust the resolution and frequency of the video card signals. A: Unlock the OSD by referring to the OSD. A: Make sure the video card is still no images on the screen. plications? The screen suddenly has become strange after running a program or due to a crash between ap- A: Adjust screen image position and size using the OSD. Q: Have you locked the On Screen Display (OSD) Menu to prevent changes? A: Adjust the resolution and frequency...
... adjusted the resolution or frequency on the monitor? Q: Have you changed the video card or the driver? A: Adjust the resolution and frequency of the video card signals. A: Unlock the OSD by referring to the OSD. A: Make sure the video card is still no images on the screen. plications? The screen suddenly has become strange after running a program or due to a crash between ap- A: Adjust screen image position and size using the OSD. Q: Have you locked the On Screen Display (OSD) Menu to prevent changes? A: Adjust the resolution and frequency...

User Manual
Page 54
... installing the program for MagicTune™ MAC. 51 Note Visit the MagicTune™ website and download the installation software for the first time. The screen colors have a problem with Window OS that reads "Unrecognized monitor, Plug & Play (VESA DDC) monitor found only on the screen. A: Set the video card by searching new Hardware. Q: See the video card manual to operate normally after changing the video card. Check when MagicTune™ does not function properly. Control Panel...
... installing the program for MagicTune™ MAC. 51 Note Visit the MagicTune™ website and download the installation software for the first time. The screen colors have a problem with Window OS that reads "Unrecognized monitor, Plug & Play (VESA DDC) monitor found only on the screen. A: Set the video card by searching new Hardware. Q: See the video card manual to operate normally after changing the video card. Check when MagicTune™ does not function properly. Control Panel...

User Manual
Page 55
... maximum resolution.) If you assembled the PC, check if the installed the adapter(video) driver and the monitor driver. Q: How can I clean the outer case/LCD Panel? 52 A: Windows XP: Set the resolution in the "Control Panel → System → Device Administrator" and then reboot the computer to the Windows / Computer Manual). Check if the scanning ratio of the computer. (Refer to reinstall the adapter (video) driver. Q: How can I change the frequency? A: Windows ME/2000: Set the resolution...
... maximum resolution.) If you assembled the PC, check if the installed the adapter(video) driver and the monitor driver. Q: How can I clean the outer case/LCD Panel? 52 A: Windows XP: Set the resolution in the "Control Panel → System → Device Administrator" and then reboot the computer to the Windows / Computer Manual). Check if the scanning ratio of the computer. (Refer to reinstall the adapter (video) driver. Q: How can I change the frequency? A: Windows ME/2000: Set the resolution...

User Manual
Page 58
... compatible system. This system saves energy by using advanced semiconductor technology with precision of RED, GREEN, BLUE and WHITE color appear to be bright sometimes or some black pixels may be used for residential use and can be seen. But the pixels of 1ppm (one millionth) above are 3,932,160. For energy conservation, turn your computer. Use the software utility installed on any problems. For example, the number of the monitor...
... compatible system. This system saves energy by using advanced semiconductor technology with precision of RED, GREEN, BLUE and WHITE color appear to be bright sometimes or some black pixels may be used for residential use and can be seen. But the pixels of 1ppm (one millionth) above are 3,932,160. For energy conservation, turn your computer. Use the software utility installed on any problems. For example, the number of the monitor...

User Manual
Page 61
... the best operating conditions and monitor settings. Note Design and specifications are subject to be bright sometimes or some black pixels may be installed on any problems. For example, the number of TFT-LCD sub pixels contained in this product are 3,932,160. The PowerSaver system operates with the Electromagnetic Compatibility Directives for long periods. State Normal Operation Power saving mode Power off (Power button) EPA/ENERGY 2000 Power Indicator Blue Blue blinking Off Power...
... the best operating conditions and monitor settings. Note Design and specifications are subject to be bright sometimes or some black pixels may be installed on any problems. For example, the number of TFT-LCD sub pixels contained in this product are 3,932,160. The PowerSaver system operates with the Electromagnetic Compatibility Directives for long periods. State Normal Operation Power saving mode Power off (Power button) EPA/ENERGY 2000 Power Indicator Blue Blue blinking Off Power...

User Manual
Page 63
... previous image is Image retention ? PRODUCT INFORMATION (Image Retention Free) LCD Monitors and TVs may cause the liquid crystal to be bright sometimes or some of the display. Information For Better Display Adjust the computer resolution and screen injection rate (refresh rate) on screen if the best picture quality is not provided for an extended period of 1ppm (one image to be away from Image retention. But the pixels of RED, GREEN, BLUE and WHITE color...
... previous image is Image retention ? PRODUCT INFORMATION (Image Retention Free) LCD Monitors and TVs may cause the liquid crystal to be bright sometimes or some of the display. Information For Better Display Adjust the computer resolution and screen injection rate (refresh rate) on screen if the best picture quality is not provided for an extended period of 1ppm (one image to be away from Image retention. But the pixels of RED, GREEN, BLUE and WHITE color...

Brochure
Page 2
... Viewing Angle (H/V) Display Color Response Time Video System Panel Life Filter Type Interface Video Connector S-Video Connector Connector Input signal RGB Available Format HDMI Connector Available Format Audio Connector Output signal Application Support On Screen Display Functions Language General 371 (14.61") Electrical Input Voltage Power consumption Environmental Operating Temperature Humidity Dimensions with Stand (WxHxD) Dimensions without Stand (WxHxD) Mechanical Weight LCD Protection Glass Cabinet Color VESA Mounts Interface SMT-1912 SMT-1922 SMT...
... Viewing Angle (H/V) Display Color Response Time Video System Panel Life Filter Type Interface Video Connector S-Video Connector Connector Input signal RGB Available Format HDMI Connector Available Format Audio Connector Output signal Application Support On Screen Display Functions Language General 371 (14.61") Electrical Input Voltage Power consumption Environmental Operating Temperature Humidity Dimensions with Stand (WxHxD) Dimensions without Stand (WxHxD) Mechanical Weight LCD Protection Glass Cabinet Color VESA Mounts Interface SMT-1912 SMT-1922 SMT...


