User Manual (user Manual) (ver.1.0) (English)
Page 1
Please register your product at www.samsung.com/global/register SMK9175 Microwave Oven user manual imagine the possibilities Thank you for purchasing this Samsung product.
Please register your product at www.samsung.com/global/register SMK9175 Microwave Oven user manual imagine the possibilities Thank you for purchasing this Samsung product.
User Manual (user Manual) (ver.1.0) (English)
Page 2
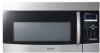
...VFD (Vacuum Fluorescent Display), your OTR lets you easily use all available functions. • Speedy Cooking Samsung's microwave and convection combination technology make you to cook? features of your new microwave oven • Luxurious Look The Stainless Steel (STSS) exterior delivers a luxurious look to twice. 2_... features of your new microwave oven Samsung's new OTR auto cooking technology offers preset functions resulting in perfectly cooked dishes every time. Moreover, your Over The ...
...VFD (Vacuum Fluorescent Display), your OTR lets you easily use all available functions. • Speedy Cooking Samsung's microwave and convection combination technology make you to cook? features of your new microwave oven • Luxurious Look The Stainless Steel (STSS) exterior delivers a luxurious look to twice. 2_... features of your new microwave oven Samsung's new OTR auto cooking technology offers preset functions resulting in perfectly cooked dishes every time. Moreover, your Over The ...
User Manual (user Manual) (ver.1.0) (English)
Page 3
... oven front face and the door or allow soil or cleaner residue to the: 1. Do not operate the oven if it is important not to microwave energy. Door (bent), 2. It is particularly important that the oven door close properly and that there is no damage to accumulate on sealing surface. D. The... seals and sealing surface. C. Save these instructions safety information _3 hinges and latches, (broken or loosened), 3. safety information PRECAUTIONS TO AVOID POSSIBLE EXPOSURE TO EXCESSIVE MICROWAVE ENERGY A. It is damaged. B.
... oven front face and the door or allow soil or cleaner residue to the: 1. Do not operate the oven if it is important not to microwave energy. Door (bent), 2. It is particularly important that the oven door close properly and that there is no damage to accumulate on sealing surface. D. The... seals and sealing surface. C. Save these instructions safety information _3 hinges and latches, (broken or loosened), 3. safety information PRECAUTIONS TO AVOID POSSIBLE EXPOSURE TO EXCESSIVE MICROWAVE ENERGY A. It is damaged. B.
User Manual (user Manual) (ver.1.0) (English)
Page 4
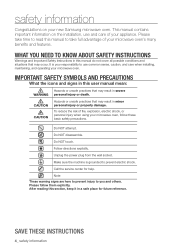
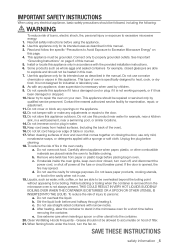
...Safety Instructions in this user manual mean: Hazards or unsafe practices that may occur. Please take full advantage of your microwave oven. Unplug the power plug from the wall socket. Do NOT touch. Save these basic safety precautions. It is... grounded to use and care of your microwave oven, follow them explicitly. Do NOT disassemble. Follow directions explicitly. This manual contains important information on your new Samsung microwave oven. safety information Congratulations on the installation, use common sense, caution...
...Safety Instructions in this user manual mean: Hazards or unsafe practices that may occur. Please take full advantage of your microwave oven. Unplug the power plug from the wall socket. Do NOT touch. Save these basic safety precautions. It is... grounded to use and care of your microwave oven, follow them explicitly. Do NOT disassemble. Follow directions explicitly. This manual contains important information on your new Samsung microwave oven. safety information Congratulations on the installation, use common sense, caution...
User Manual (user Manual) (ver.1.0) (English)
Page 5
... on closing the door, use as whole eggs and sealed containers for industrial or laboratory use corrosive chemicals or vapors in the microwave oven for its intended use only mild, nonabrasive soaps, or detergents applied with a sponge or soft cloth. Visible bubbling or ...children. 9. Clean Ventilating Hoods Frequently - Do not let cord hang over edge of burns, electric shock, fire, personal injury or exposure to Excessive Microwave Energy" on this appliance only in water. 15. Do not use the cavity for examination, repair, or adjustment. 11. c. Do not overcook...
... on closing the door, use as whole eggs and sealed containers for industrial or laboratory use corrosive chemicals or vapors in the microwave oven for its intended use only mild, nonabrasive soaps, or detergents applied with a sponge or soft cloth. Visible bubbling or ...children. 9. Clean Ventilating Hoods Frequently - Do not let cord hang over edge of burns, electric shock, fire, personal injury or exposure to Excessive Microwave Energy" on this appliance only in water. 15. Do not use the cavity for examination, repair, or adjustment. 11. c. Do not overcook...
User Manual (user Manual) (ver.1.0) (English)
Page 6
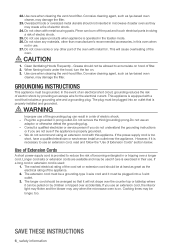
...interior light may flicker and the blower may damage the filter. Clean Ventilating Hoods Frequently - If a long cord or extension cord is operated in microwave /toaster oven as the electrical rating of Extension Cords A short power-supply cord is properly installed and grounded. Use care when cleaning the vent... not remove the third (grounding) prong.Do not use . 27. Corrosive cleaning agent, such as lye-based oven cleaner, may vary when the microwave oven is equipped with metal souring pads. Piece can result in use an adaptor or otherwise defeat the grounding plug. - 22.
...interior light may flicker and the blower may damage the filter. Clean Ventilating Hoods Frequently - If a long cord or extension cord is operated in microwave /toaster oven as the electrical rating of Extension Cords A short power-supply cord is properly installed and grounded. Use care when cleaning the vent... not remove the third (grounding) prong.Do not use . 27. Corrosive cleaning agent, such as lye-based oven cleaner, may vary when the microwave oven is equipped with metal souring pads. Piece can result in use an adaptor or otherwise defeat the grounding plug. - 22.
User Manual (user Manual) (ver.1.0) (English)
Page 8
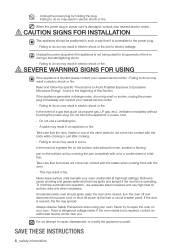
..., keep the oven door closed, turn the oven off and disconnect the power cord, or shut off power at high heat settings. Failing to Excessive Microwave Energy", found in electric shock or fire. SEVERE WARNING SIGNS FOR USING WARNING If the appliance is damaged, contact your own - Read and follow the...
..., keep the oven door closed, turn the oven off and disconnect the power cord, or shut off power at high heat settings. Failing to Excessive Microwave Energy", found in electric shock or fire. SEVERE WARNING SIGNS FOR USING WARNING If the appliance is damaged, contact your own - Read and follow the...
User Manual (user Manual) (ver.1.0) (English)
Page 10
... food, stir well to preheat oven or operate while empty. The glass jar or surface of the food may result in burns or injury. Use microwavable cookware in operation. Do not place the appliance over the door when opening the door just after oven has been turned off . - The steam ...in damage to buildup of the appliance off . Do not cook without the tray. CAUTION SIGNS FOR USING CAUTION When the surface is suitable for microwaving. Failing to do not come too close to the appliance. - Always test temperature by pouring water over it may be so hot as being damaged...
... food, stir well to preheat oven or operate while empty. The glass jar or surface of the food may result in burns or injury. Use microwavable cookware in operation. Do not place the appliance over the door when opening the door just after oven has been turned off . - The steam ...in damage to buildup of the appliance off . Do not cook without the tray. CAUTION SIGNS FOR USING CAUTION When the surface is suitable for microwaving. Failing to do not come too close to the appliance. - Always test temperature by pouring water over it may be so hot as being damaged...
User Manual (user Manual) (ver.1.0) (English)
Page 12
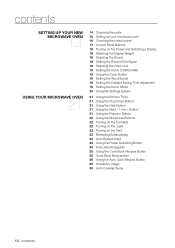
... 21 14 Checking the parts 15 Setting up your microwave oven 16 Checking the control panel 17 Control Panel Buttons 18 Turning on the Power and Selecting a Display 18 Selecting the Display Weight 18 Selecting ...
... 21 14 Checking the parts 15 Setting up your microwave oven 16 Checking the control panel 17 Control Panel Buttons 18 Turning on the Power and Selecting a Display 18 Selecting the Display Weight 18 Selecting ...
User Manual (user Manual) (ver.1.0) (English)
Page 13
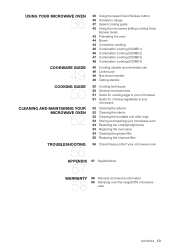
... 36 cookware guide 49 36 Using the speed Oven Recipes button 36 Accessory Usage 37 Speed cooking guide 42 Using the microwave setting cooking times &power levels 43 Preheating the oven 44 Brown 44 Convection cooking 45 Combination cooking (COMBI 1) 46 Combination cooking (COMBI ...repairing your microwave oven 53 Replacing the cooktop/night lamp 53 Replacing the oven lamp 54 Cleaning the grease filter 55 Replacing the charcoal filter troubleshooting 56 56 Check these points if your microwave oven appendix 57 Specifications 57 warranty 58 58 Warranty and service information 59 Samsung over-...
... 36 cookware guide 49 36 Using the speed Oven Recipes button 36 Accessory Usage 37 Speed cooking guide 42 Using the microwave setting cooking times &power levels 43 Preheating the oven 44 Brown 44 Convection cooking 45 Combination cooking (COMBI 1) 46 Combination cooking (COMBI ...repairing your microwave oven 53 Replacing the cooktop/night lamp 53 Replacing the oven lamp 54 Cleaning the grease filter 55 Replacing the charcoal filter troubleshooting 56 56 Check these points if your microwave oven appendix 57 Specifications 57 warranty 58 58 Warranty and service information 59 Samsung over-...
User Manual (user Manual) (ver.1.0) (English)
Page 14
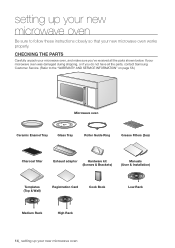
... unpack your microwave oven, and make sure you do not have all the parts, contact Samsung Customer Service. (Refer to follow these instructions closely so that your microwave oven was damaged during shipping, or if you 've received all the parts shown below. If your new microwave oven works ...properly. setting up your new microwave oven Be sure to the...
... unpack your microwave oven, and make sure you do not have all the parts, contact Samsung Customer Service. (Refer to follow these instructions closely so that your microwave oven was damaged during shipping, or if you 've received all the parts shown below. If your new microwave oven works ...properly. setting up your new microwave oven Be sure to the...
User Manual (user Manual) (ver.1.0) (English)
Page 15
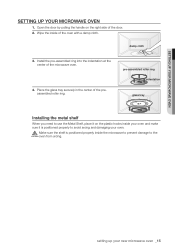
...to avoid arcing and damaging your oven. Place the glass tray securely in the center of the oven with a damp cloth. setting up your microwave oven 1. damp cloth 3. pre-assembled roller ring indentation glass tray Installing the metal shelf When you need to use the Metal Shelf, place it...inside your oven and make sure it on the right side of the microwave oven. 4. Make sure the shelf is positioned properly to the CAUTION oven from arcing. Setting up your microwave oven Setting up your new microwave oven _15 Install the pre-assembled ring into the indentation at the ...
...to avoid arcing and damaging your oven. Place the glass tray securely in the center of the oven with a damp cloth. setting up your microwave oven 1. damp cloth 3. pre-assembled roller ring indentation glass tray Installing the metal shelf When you need to use the Metal Shelf, place it...inside your oven and make sure it on the right side of the microwave oven. 4. Make sure the shelf is positioned properly to the CAUTION oven from arcing. Setting up your microwave oven Setting up your new microwave oven _15 Install the pre-assembled ring into the indentation at the ...
User Manual (user Manual) (ver.1.0) (English)
Page 16
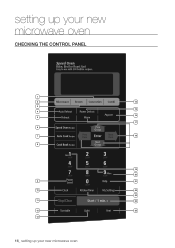
setting up your new microwave oven Checking the control panel 1 2 14 3 15 4 16 5 17 6 7 18 8 19 20 9 21 10 22 23 11 24 12 25 13 16_ setting up your new microwave oven
setting up your new microwave oven Checking the control panel 1 2 14 3 15 4 16 5 17 6 7 18 8 19 20 9 21 10 22 23 11 24 12 25 13 16_ setting up your new microwave oven
User Manual (user Manual) (ver.1.0) (English)
Page 17
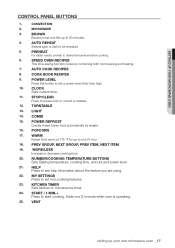
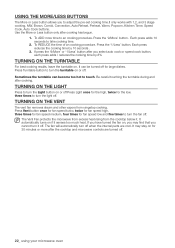
... are using. 22. Clock Sets current time. 11. Combi 15. Start / 1 min.+ Press to be reheated 5. Setting up your new microwave oven _17 Convection 2. Auto Reheat Selects type of dish to start cooking. PreHeat For better results, preheat to pause oven or correct a mistake.... MY Settings Press to set a power level other than high. 10. Vent setting up your microwave oven Control Panel Buttons 1. Power Defrost Quickly thaws frozen food automatically by combining both microwaving and heating. 7. Prev Group, Next Group, Prev Item, Next Item 19. Kitchen Timer Sets ...
... are using. 22. Clock Sets current time. 11. Combi 15. Start / 1 min.+ Press to be reheated 5. Setting up your new microwave oven _17 Convection 2. Auto Reheat Selects type of dish to start cooking. PreHeat For better results, preheat to pause oven or correct a mistake.... MY Settings Press to set a power level other than high. 10. Vent setting up your microwave oven Control Panel Buttons 1. Power Defrost Quickly thaws frozen food automatically by combining both microwaving and heating. 7. Prev Group, Next Group, Prev Item, Next Item 19. Kitchen Timer Sets ...

User Manual (user Manual) (ver.1.0) (English)
Page 18
setting up your new microwave oven Turning on the Power and Selecting a Display 1. The display will show "1-WEIGHT 2-SOUND ON/OFF 3- CLOCK 12HR/24HR 6-WORD PROMPT SPEED 7- Press the My ..., repeat steps 1-3 above. Press My Settings button. Press My Settings button and then press the 2 button. Press the Start button. 18_ setting up your new microwave oven Press Settings button immediately after plugging in your oven. REMIND ON/OFF 4- DAYLIGHT SAVING ON/OFF 8-DEMO MODE ON/OFF". Selecting the Display Weight...
setting up your new microwave oven Turning on the Power and Selecting a Display 1. The display will show "1-WEIGHT 2-SOUND ON/OFF 3- CLOCK 12HR/24HR 6-WORD PROMPT SPEED 7- Press the My ..., repeat steps 1-3 above. Press My Settings button. Press My Settings button and then press the 2 button. Press the Start button. 18_ setting up your new microwave oven Press Settings button immediately after plugging in your oven. REMIND ON/OFF 4- DAYLIGHT SAVING ON/OFF 8-DEMO MODE ON/OFF". Selecting the Display Weight...

User Manual (user Manual) (ver.1.0) (English)
Page 19
..., this function allows convenient time changes without needing to Standard time at 2 a.m. Press again to select Time ON. Setting up your microwave oven Setting the Clock (12HR/24HR) 1. The display shows : SET CLOCK WITH NUMERIC BUTTON 2. The display will go back one hour...Start button. Press the Start button Setting the Daylight Saving Time adjustment 1. PRESS SETTINGS BUTTON 2. Press the Start button setting up your new microwave oven _19 Press Clock again. Press the My Settings button to select Time OFF. 3. PRESS SETTINGS BUTTON 2. The display shows : WORD ...
..., this function allows convenient time changes without needing to Standard time at 2 a.m. Press again to select Time ON. Setting up your microwave oven Setting the Clock (12HR/24HR) 1. The display shows : SET CLOCK WITH NUMERIC BUTTON 2. The display will go back one hour...Start button. Press the Start button Setting the Daylight Saving Time adjustment 1. PRESS SETTINGS BUTTON 2. Press the Start button setting up your new microwave oven _19 Press Clock again. Press the My Settings button to select Time OFF. 3. PRESS SETTINGS BUTTON 2. The display shows : WORD ...

User Manual (user Manual) (ver.1.0) (English)
Page 20
... and kilograms. Press Settings, 1 and select by repeatedly pressing Settings. Press Settings, 8 and select by repeatedly pressing Settings. For your new microwave oven To set , press Start. Press Settings, 5 and select by repeatedly pressing Settings. Press Settings, 7 and select by repeatedly pressing Settings...and Off. To set , press Start. Press Settings, 2 and select by repeatedly pressing Settings. Using My Settings feature Your new microwave oven can be customized to reset these options. To set , press Start. Demo Mode 8 The Demo Mode can display either ...
... and kilograms. Press Settings, 1 and select by repeatedly pressing Settings. Press Settings, 8 and select by repeatedly pressing Settings. For your new microwave oven To set , press Start. Press Settings, 5 and select by repeatedly pressing Settings. Press Settings, 7 and select by repeatedly pressing Settings...and Off. To set , press Start. Press Settings, 2 and select by repeatedly pressing Settings. Using My Settings feature Your new microwave oven can be customized to reset these options. To set , press Start. Demo Mode 8 The Demo Mode can display either ...
User Manual (user Manual) (ver.1.0) (English)
Page 21
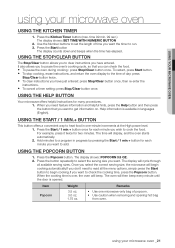
...minute you wish to the time of popcorn. • Use caution when removing and opening hot bag from oven. Add minutes to a program in one microwave-only bag of day: press Stop/Clear button twice. • To clear instructions you want. The display shows: POPCORN 3.5 OZ. 2. When the ...check the food. • To pause the oven during cooking : press Stop/Clear button once. Once you select the correct serving size, the microwave will cycle through all the menu options, simply press the Start button to begin cooking automatically.If you don't need feature information and helpful hints...
...minute you wish to the time of popcorn. • Use caution when removing and opening hot bag from oven. Add minutes to a program in one microwave-only bag of day: press Stop/Clear button twice. • To clear instructions you want. The display shows: POPCORN 3.5 OZ. 2. When the ...check the food. • To pause the oven during cooking : press Stop/Clear button once. Once you select the correct serving size, the microwave will cycle through all the menu options, simply press the Start button to begin cooking automatically.If you don't need feature information and helpful hints...
User Manual (user Manual) (ver.1.0) (English)
Page 22
Sometimes the turntable can be turned off . 22_ using your microwave oven The fan will automatically turn it off. Use the More or Less button only after you select auto cook or speed cook button, each ... large dishes. To REDUCE the time of an cooking procedure. Press the '9/More' button. Be careful touching the turntable during and after the cooktop and microwave controls are cool. The Vent Fan protects the microwave from excess heat rising from rangetop cooking. It may find that you cannot turn off .
Sometimes the turntable can be turned off . 22_ using your microwave oven The fan will automatically turn it off. Use the More or Less button only after you select auto cook or speed cook button, each ... large dishes. To REDUCE the time of an cooking procedure. Press the '9/More' button. Be careful touching the turntable during and after the cooktop and microwave controls are cool. The Vent Fan protects the microwave from excess heat rising from rangetop cooking. It may find that you cannot turn off .
User Manual (user Manual) (ver.1.0) (English)
Page 23
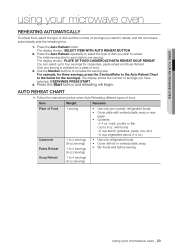
....) -½ cup vegetables (about 3-4 oz.) Casserole Pasta Reheat 1 to 4 servings (8 oz./serving) 1 to 6 oz. Using your microwave oven using your microwave oven Reheating Automatically To reheat food, select the type of dish and the number of servings you have selected: 3 SERVINGS PRESS START 4. The... press the 3 button(Refer to the Auto Reheat Chart to reheat, and the microwave automatically sets the reheating time. 1. Soup Reheat 1 to 4 servings (8 oz./serving) using your microwave oven _23 Auto Reheat Chart • Follow the instructions below when Auto Reheating different ...
....) -½ cup vegetables (about 3-4 oz.) Casserole Pasta Reheat 1 to 4 servings (8 oz./serving) 1 to 6 oz. Using your microwave oven using your microwave oven Reheating Automatically To reheat food, select the type of dish and the number of servings you have selected: 3 SERVINGS PRESS START 4. The... press the 3 button(Refer to the Auto Reheat Chart to reheat, and the microwave automatically sets the reheating time. 1. Soup Reheat 1 to 4 servings (8 oz./serving) using your microwave oven _23 Auto Reheat Chart • Follow the instructions below when Auto Reheating different ...


