User Manual (user Manual) (ver.1.0) (English)
Page 1
Please register your product at www.samsung.com/global/register SMH9151 Microwave Oven user manual imagine the possibilities Thank you for purchasing this Samsung product.
Please register your product at www.samsung.com/global/register SMH9151 Microwave Oven user manual imagine the possibilities Thank you for purchasing this Samsung product.
User Manual (user Manual) (ver.1.0) (English)
Page 4
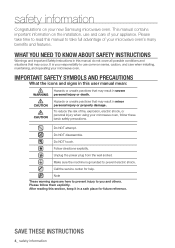
... important information on your microwave oven's many benefits and features. IMPORTANT safety symbols and precautions What the icons and signs in this user manual mean: Hazards or unsafe practices that may result in this manual do not cover all possible conditions and situations...a safe place for help. Call the service center for future reference. After reading this manual to prevent electric shock. To reduce the risk of your new Samsung microwave oven. Follow directions explicitly. Please follow these instructions 4_ safety information safety information Congratulations on ...
... important information on your microwave oven's many benefits and features. IMPORTANT safety symbols and precautions What the icons and signs in this user manual mean: Hazards or unsafe practices that may result in this manual do not cover all possible conditions and situations...a safe place for help. Call the service center for future reference. After reading this manual to prevent electric shock. To reduce the risk of your new Samsung microwave oven. Follow directions explicitly. Please follow these instructions 4_ safety information safety information Congratulations on ...
User Manual (user Manual) (ver.1.0) (English)
Page 5
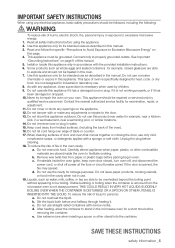
...Save these instructions safety information _5 Read all safety instructions before removing the container. Do not immerse cord or plug in the manual. Do not overcook food. Remove wire twist-ties from heated surfaces. (including the back of injury to be followed, including...INSTRUCTIONS When using the appliance. 2. Connect only to repair the oven on closing the door, use corrosive chemicals or vapors in the microwave oven for storage purposes. As with the provided installation instructions. 6. Unplug the plug before placing bag in the oven cavity. Carefully ...
...Save these instructions safety information _5 Read all safety instructions before removing the container. Do not immerse cord or plug in the manual. Do not overcook food. Remove wire twist-ties from heated surfaces. (including the back of injury to be followed, including...INSTRUCTIONS When using the appliance. 2. Connect only to repair the oven on closing the door, use corrosive chemicals or vapors in the microwave oven for storage purposes. As with the provided installation instructions. 6. Unplug the plug before placing bag in the oven cavity. Carefully ...
User Manual (user Manual) (ver.1.0) (English)
Page 13
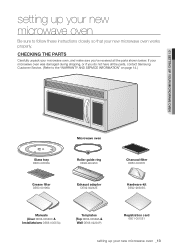
...if you 've received all the parts, contact Samsung Customer Service. (Refer to the "WARRANTY AND SERVICE INFORMATION" on page 14.) 01 Setting up your microwave oven Glass tray DE63-00536A Grease filter DE63-00196A Microwave oven Roller guide ring DE92-90495C Exhaust adaptor DE92-...90242E Charcoal filter DE63-00367E Hardware-kit DE92-90505G Manuals (User DE68-03588C & Installataions DE68-03587A) Templates (...
...if you 've received all the parts, contact Samsung Customer Service. (Refer to the "WARRANTY AND SERVICE INFORMATION" on page 14.) 01 Setting up your microwave oven Glass tray DE63-00536A Grease filter DE63-00196A Microwave oven Roller guide ring DE92-90495C Exhaust adaptor DE92-...90242E Charcoal filter DE63-00367E Hardware-kit DE92-90505G Manuals (User DE68-03588C & Installataions DE68-03587A) Templates (...
User Manual (user Manual) (ver.1.0) (English)
Page 16
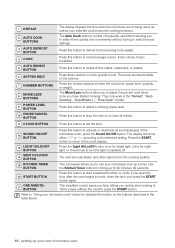
...16_ setting up to 99 minutes, 99 seconds. 16 Start BUTTON Press this button to start cooking at 100% power without having to select manual settings. One Minute+ 17 BUTTON This simplified control saves you time, letting you quickly start a selected function or cycle. Press these buttons ...5 BUTTON 6 soften melt 7 Number BUTTONs More/Less 8 BUTTONs Power Level 9 BUTTON 10 pause/cancel BUTTON The display displays the time when the microwave is not being used items allowing you to select them quickly and conveniently without the need to press the START button. Press the number buttons...
...16_ setting up to 99 minutes, 99 seconds. 16 Start BUTTON Press this button to start cooking at 100% power without having to select manual settings. One Minute+ 17 BUTTON This simplified control saves you time, letting you quickly start a selected function or cycle. Press these buttons ...5 BUTTON 6 soften melt 7 Number BUTTONs More/Less 8 BUTTONs Power Level 9 BUTTON 10 pause/cancel BUTTON The display displays the time when the microwave is not being used items allowing you to select them quickly and conveniently without the need to press the START button. Press the number buttons...

User Manual (user Manual) (ver.1.0) (English)
Page 18
.../Off button three times to turn on at 100% power without the need to be turned off . Using the Kitchen Timer Button This microwave allows you wish the food to know about using the number buttons. 3. Press the START button. Press the One Minute+ button for...(9)/Less (1) buttons allow you have already begun cooking using your microwave oven Cooking has never been easier than with your microwave oven as a timer. Use the More (9)/Less (1) buttons only after you to use your new Samsung microwave oven. You can manually select the vent setting. 1. Using the SOUND oN/Off Button...
.../Off button three times to turn on at 100% power without the need to be turned off . Using the Kitchen Timer Button This microwave allows you wish the food to know about using the number buttons. 3. Press the START button. Press the One Minute+ button for...(9)/Less (1) buttons allow you have already begun cooking using your microwave oven Cooking has never been easier than with your microwave oven as a timer. Use the More (9)/Less (1) buttons only after you to use your new Samsung microwave oven. You can manually select the vent setting. 1. Using the SOUND oN/Off Button...


