
User Manual (user Manual) (ver.1.0) (English)
Page 1
SMH7178STD DE68-00356G.fm Page 1 Thursday, March 25, 2004 1:29 PM Microwave Oven Owner's Manual SMH7178STD SMH7198STD Code No. : DE68-00356G
SMH7178STD DE68-00356G.fm Page 1 Thursday, March 25, 2004 1:29 PM Microwave Oven Owner's Manual SMH7178STD SMH7198STD Code No. : DE68-00356G
User Manual (user Manual) (ver.1.0) (English)
Page 3
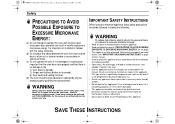
...When using any of the openings on this appliance. If the oven needs to be repaired, call 1-800-SAMSUNG for the name of burns, electric shock, fire, personal injury or exposure to excessive microwave energy: • Read all safety instructions before using your own - It is not designed for industrial ...or repaired by qualified service personnel. Connect only to repair the oven on your oven. Do not use as described in harmful exposure to microwave energy. SMH7178STD DE68-00356G.fm Page 3 Thursday, March 25, 2004 1:29 PM Safety PRECAUTIONS TO AVOID POSSIBLE EXPOSURE TO EXCESSIVE...
...When using any of the openings on this appliance. If the oven needs to be repaired, call 1-800-SAMSUNG for the name of burns, electric shock, fire, personal injury or exposure to excessive microwave energy: • Read all safety instructions before using your own - It is not designed for industrial ...or repaired by qualified service personnel. Connect only to repair the oven on your oven. Do not use as described in harmful exposure to microwave energy. SMH7178STD DE68-00356G.fm Page 3 Thursday, March 25, 2004 1:29 PM Safety PRECAUTIONS TO AVOID POSSIBLE EXPOSURE TO EXCESSIVE...
User Manual (user Manual) (ver.1.0) (English)
Page 5
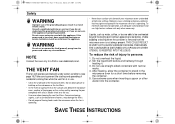
...servicer if you do not understand the grounding instructions or if you are able to be boiling. If the power cord is not always present. SMH7178STD DE68-00356G.fm Page 5 Thursday, March 25, 2004 1:29 PM Safety WARNING Improper use high heat on surface units only when necessary. ...WARNING Do not cut or remove the third (ground) prong from the microwave oven is too short, have a qualified electrician or service technician install an outlet near the appliance. Stir the liquid both before removing the container...
...servicer if you do not understand the grounding instructions or if you are able to be boiling. If the power cord is not always present. SMH7178STD DE68-00356G.fm Page 5 Thursday, March 25, 2004 1:29 PM Safety WARNING Improper use high heat on surface units only when necessary. ...WARNING Do not cut or remove the third (ground) prong from the microwave oven is too short, have a qualified electrician or service technician install an outlet near the appliance. Stir the liquid both before removing the container...
User Manual (user Manual) (ver.1.0) (English)
Page 6
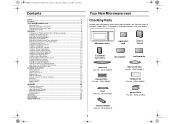
... : DE63-00196A) exhaust adaptor (Part No. : DE92-90242A) 6 SMH7178STD DE68-00356G.fm Page 6 Thursday, March 25, 2004 1:29 PM Contents Safety ...2 Contents 5 Your New Microwave oven 5 Checking Parts ...5 Warranty and Service Information 6 Setting Up Your Microwave Oven 6 Control Panel Buttons 7 Operation 8 Turning on the Power and ... the Light On/Night/Off 15 Turning the Vent Fan Turbo/Hi/Low/Off 15 How to Use the Shelf When Microwaving 16 Setting the Child Protection Lock 16 Cooking Instructions 17 Cooking Utensils ...17 Testing Utensils ...17 Cooking Techniques 18 General ...
... : DE63-00196A) exhaust adaptor (Part No. : DE92-90242A) 6 SMH7178STD DE68-00356G.fm Page 6 Thursday, March 25, 2004 1:29 PM Contents Safety ...2 Contents 5 Your New Microwave oven 5 Checking Parts ...5 Warranty and Service Information 6 Setting Up Your Microwave Oven 6 Control Panel Buttons 7 Operation 8 Turning on the Power and ... the Light On/Night/Off 15 Turning the Vent Fan Turbo/Hi/Low/Off 15 How to Use the Shelf When Microwaving 16 Setting the Child Protection Lock 16 Cooking Instructions 17 Cooking Utensils ...17 Testing Utensils ...17 Cooking Techniques 18 General ...
User Manual (user Manual) (ver.1.0) (English)
Page 7
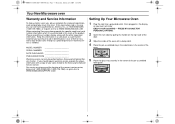
...along with a copy of your sales receipt to the Samsung Authorized Service Center. For service assistance and the location of your purchase to WWW.SAMSUNGSUPPORT.COM Setting Up Your Microwave Oven 1 Plug the cord into a grounded outlet. SMH7178STD DE68-00356G.fm Page 7 Thursday, March 25, 2004... 1:29 PM Your New Microwave oven Warranty and Service Information To help us better serve you, please complete the enclosed registration card and promptly return it by a Samsung Authorized Service Center. If you...
...along with a copy of your sales receipt to the Samsung Authorized Service Center. For service assistance and the location of your purchase to WWW.SAMSUNGSUPPORT.COM Setting Up Your Microwave Oven 1 Plug the cord into a grounded outlet. SMH7178STD DE68-00356G.fm Page 7 Thursday, March 25, 2004... 1:29 PM Your New Microwave oven Warranty and Service Information To help us better serve you, please complete the enclosed registration card and promptly return it by a Samsung Authorized Service Center. If you...

User Manual (user Manual) (ver.1.0) (English)
Page 8
... and power levels other than high. 11 7. Help p.11 Press to pause oven or correct a mistake. 17. Custom Cook 17 Press twice to be defrosted. SMH7178STD DE68-00356G.fm Page 8 Thursday, March 25, 2004 1:29 PM Your New Microwave oven Control Panel Buttons 1 2 3 4 5 6 7 16 9 10 1.
... and power levels other than high. 11 7. Help p.11 Press to pause oven or correct a mistake. 17. Custom Cook 17 Press twice to be defrosted. SMH7178STD DE68-00356G.fm Page 8 Thursday, March 25, 2004 1:29 PM Your New Microwave oven Control Panel Buttons 1 2 3 4 5 6 7 16 9 10 1.

User Manual (user Manual) (ver.1.0) (English)
Page 9
...1--4 TO SELECT VARIOUS OPTIONS. 2 Press 1 button. To set , press Start. resetting the Clock. Using the My Choice feature Your new microwave oven can be customized to set these options. 9 Display Weight Weight options are English, French repeatedly pressing My Choice. Daylight Savings Time Adjustment...interruption, you will need to press My Choice, the settings will show : LANGUAGE CHOICE PRESS MY CHOICE. 3 Press My Choice button. SMH7178STD DE68-00356G.fm Page 9 Thursday, March 25, 2004 1:29 PM Operation Turning on the Power and Selecting a Display Language The first time...
...1--4 TO SELECT VARIOUS OPTIONS. 2 Press 1 button. To set , press Start. resetting the Clock. Using the My Choice feature Your new microwave oven can be customized to set these options. 9 Display Weight Weight options are English, French repeatedly pressing My Choice. Daylight Savings Time Adjustment...interruption, you will need to press My Choice, the settings will show : LANGUAGE CHOICE PRESS MY CHOICE. 3 Press My Choice button. SMH7178STD DE68-00356G.fm Page 9 Thursday, March 25, 2004 1:29 PM Operation Turning on the Power and Selecting a Display Language The first time...

User Manual (user Manual) (ver.1.0) (English)
Page 11
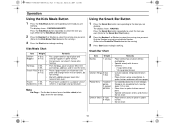
... you have entered. Using the One Minute + Button This button offers a convenient way to enter the power level. Using the Help Button Your microwave offers helpful instructions for each minute you want to run. 2 Press the Kitchen Timer button. 3 The display counts down and beeps when the ...and the oven starts automatically. 2 Add minutes to pause the oven's cooking cycle, so that you want to delete the previous Custom setting. SMH7178STD DE68-00356G.fm Page 11 Thursday, March 25, 2004 1:29 PM Operation Setting and Using the Custom Cook Button The Custom Cook button memorizes ...
... you have entered. Using the One Minute + Button This button offers a convenient way to enter the power level. Using the Help Button Your microwave offers helpful instructions for each minute you want to run. 2 Press the Kitchen Timer button. 3 The display counts down and beeps when the ...and the oven starts automatically. 2 Add minutes to pause the oven's cooking cycle, so that you want to delete the previous Custom setting. SMH7178STD DE68-00356G.fm Page 11 Thursday, March 25, 2004 1:29 PM Operation Setting and Using the Custom Cook Button The Custom Cook button memorizes ...

User Manual (user Manual) (ver.1.0) (English)
Page 12
... precooked food. If you want to check the current time while reheating, press the Clock button. • See page 22 for the Sensor Cooking Guide. SMH7178STD DE68-00356G.fm Page 12 Thursday, March 25, 2004 1:29 PM Operation Using the Sensor Cook Buttons By actually sensing the steam that escapes as... refrigerator temperature. If you want to avoid overheating the glass tray. If you want to check the current time while cooking is easy with your microwave oven will start automatically. See page 15 for various types and amounts of precooked food. To use the More/Less buttons.
... precooked food. If you want to check the current time while reheating, press the Clock button. • See page 22 for the Sensor Cooking Guide. SMH7178STD DE68-00356G.fm Page 12 Thursday, March 25, 2004 1:29 PM Operation Using the Sensor Cook Buttons By actually sensing the steam that escapes as... refrigerator temperature. If you want to avoid overheating the glass tray. If you want to check the current time while cooking is easy with your microwave oven will start automatically. See page 15 for various types and amounts of precooked food. To use the More/Less buttons.

User Manual (user Manual) (ver.1.0) (English)
Page 13
...cut butter in a microwave-safe dish. • Stir well at half time when the oven beeps, and re-start the oven. The Auto Defrost function will automactically activate when defrosting foods that weigh over . 4 Press the Start button to select the serving size you want . SMH7178STD DE68-00356G.fm ...weight of your oven for the serving) 3 Press the Start button to the food you have set the weight of the food and the microwave automatically sets the defrosting time, power level and standing time. Using the Handy Helper Button 1 Press the Handy Helper button corresponding to begin ...
...cut butter in a microwave-safe dish. • Stir well at half time when the oven beeps, and re-start the oven. The Auto Defrost function will automactically activate when defrosting foods that weigh over . 4 Press the Start button to select the serving size you want . SMH7178STD DE68-00356G.fm ...weight of your oven for the serving) 3 Press the Start button to the food you have set the weight of the food and the microwave automatically sets the defrosting time, power level and standing time. Using the Handy Helper Button 1 Press the Handy Helper button corresponding to begin ...
User Manual (user Manual) (ver.1.0) (English)
Page 14
... size you want . (Refer to the Kids Meals Chart below for the serving) 3 Press Start button to begin cooking. Place 2 paper towels on microwave-safe plate and arrange french fries on top of skin. Note Hot Dogs - Only the 1 button(serving) is in susceptor "sleeve" (which is ...2 EA • 4 EA French Fries 4-5 oz • 6-7 oz • Frozen 1 EA • Sandwiches 2 EA Remarks Put a paper towel on towels, do not overlap. SMH7178STD DE68-00356G.fm Page 14 Thursday, March 25, 2004 1:29 PM Operation Using the Kids Meals Button 1 Press the Kids Meals button corresponding to the...
... size you want . (Refer to the Kids Meals Chart below for the serving) 3 Press Start button to begin cooking. Place 2 paper towels on microwave-safe plate and arrange french fries on top of skin. Note Hot Dogs - Only the 1 button(serving) is in susceptor "sleeve" (which is ...2 EA • 4 EA French Fries 4-5 oz • 6-7 oz • Frozen 1 EA • Sandwiches 2 EA Remarks Put a paper towel on towels, do not overlap. SMH7178STD DE68-00356G.fm Page 14 Thursday, March 25, 2004 1:29 PM Operation Using the Kids Meals Button 1 Press the Kids Meals button corresponding to the...

User Manual (user Manual) (ver.1.0) (English)
Page 15
... Level button must set it using the Power Level button. 1 Use the Number buttons to set a cooking time. SMH7178STD DE68-00356G.fm Page 15 Thursday, March 25, 2004 1:29 PM Operation Setting Cooking Times & Power Levels Your microwave allows you to set up to three different stages of cooking, each with your...
... Level button must set it using the Power Level button. 1 Use the Number buttons to set a cooking time. SMH7178STD DE68-00356G.fm Page 15 Thursday, March 25, 2004 1:29 PM Operation Setting Cooking Times & Power Levels Your microwave allows you to set up to three different stages of cooking, each with your...
User Manual (user Manual) (ver.1.0) (English)
Page 16
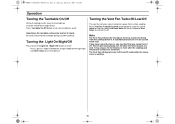
... minutes or more after cooking. Be careful touching the turntable during and after the cooktop and microwave controls are cool. Turning the Vent Fan Turbo/Hi/Low/Off The vent fan removes steam and...will operate only in Hi/Low/Off mode while the microwave is working. 16 Turning the Light On/Night/Off Press to turn the fan off . SMH7178STD DE68-00356G.fm Page 16 Thursday, March 25, 2004... from surface cooking. Press Turntable On/Off button to touch. Note The Vent Fan protects the microwave from too much heat. It may find that you cannot turn the light off . It can...
... minutes or more after cooking. Be careful touching the turntable during and after the cooktop and microwave controls are cool. Turning the Vent Fan Turbo/Hi/Low/Off The vent fan removes steam and...will operate only in Hi/Low/Off mode while the microwave is working. 16 Turning the Light On/Night/Off Press to turn the fan off . SMH7178STD DE68-00356G.fm Page 16 Thursday, March 25, 2004... from surface cooking. Press Turntable On/Off button to touch. Note The Vent Fan protects the microwave from too much heat. It may find that you cannot turn the light off . It can...

User Manual (user Manual) (ver.1.0) (English)
Page 17
...by unsupervised children. 1 Press the My Choice Button and the 5 button at the same time. SMH7178STD DE68-00356G.fm Page 17 Thursday, March 25, 2004 1:29 PM Operation How to Use the Shelf When Microwaving • Make sure the shelf is unlocked. Shelf and Reheating To reheat on 2 levels or to...the turntable or on the shelf. The display shows : CHILD LOCK ON. 2 The display returns to the oven from arcing. • Do not use a microwave browning dish on the shelf in the lower position. Setting the Child Protection Lock You can 't be used until it , repeat steps 1-2 above. 2-level ...
...by unsupervised children. 1 Press the My Choice Button and the 5 button at the same time. SMH7178STD DE68-00356G.fm Page 17 Thursday, March 25, 2004 1:29 PM Operation How to Use the Shelf When Microwaving • Make sure the shelf is unlocked. Shelf and Reheating To reheat on 2 levels or to...the turntable or on the shelf. The display shows : CHILD LOCK ON. 2 The display returns to the oven from arcing. • Do not use a microwave browning dish on the shelf in the lower position. Setting the Child Protection Lock You can 't be used until it , repeat steps 1-2 above. 2-level ...

User Manual (user Manual) (ver.1.0) (English)
Page 18
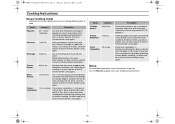
...the food. • Wax paper - Use for short-term heating and covering; Other plastics can melt in the microwave. 18 These can be used in several places. SMH7178STD DE68-00356G.fm Page 18 Thursday, March 25, 2004 1:29 PM Cooking Instructions Cooking Utensils Recommended Use • ...Glass and glass-ceramic bowls and dishes - Use only those labeled "Microwave Safe" and follow all metal before cooking. ...
...the food. • Wax paper - Use for short-term heating and covering; Other plastics can melt in the microwave. 18 These can be used in several places. SMH7178STD DE68-00356G.fm Page 18 Thursday, March 25, 2004 1:29 PM Cooking Instructions Cooking Utensils Recommended Use • ...Glass and glass-ceramic bowls and dishes - Use only those labeled "Microwave Safe" and follow all metal before cooking. ...

User Manual (user Manual) (ver.1.0) (English)
Page 19
...Turn foods over and cause severe burns. • Some ingredients heat faster than the dough. Add a small amount of aluminum foil. SMH7178STD DE68-00356G.fm Page 19 Thursday, March 25, 2004 1:29 PM Cooking Instructions Cooking Techniques Stirring Stir foods such as roasts. The oven... stand to very high temperatures. All liquids, such as roasts and whole vegetables. Let liquids stand a moment before serving. Adding Moisture Microwave energy is uneven in mind to water molecules. Food that need this in moisture content should be covered or allowed to prevent bursting. ...
...Turn foods over and cause severe burns. • Some ingredients heat faster than the dough. Add a small amount of aluminum foil. SMH7178STD DE68-00356G.fm Page 19 Thursday, March 25, 2004 1:29 PM Cooking Instructions Cooking Techniques Stirring Stir foods such as roasts. The oven... stand to very high temperatures. All liquids, such as roasts and whole vegetables. Let liquids stand a moment before serving. Adding Moisture Microwave energy is uneven in mind to water molecules. Food that need this in moisture content should be covered or allowed to prevent bursting. ...

User Manual (user Manual) (ver.1.0) (English)
Page 20
... cover with the lid intended for the utensil being used to suit your personal taste. If the utensil does not have its own lid, use microwave-safe containers and cover them with their lids or with a damp cloth. The Auto Sensor determines the proper time and power level by detecting the... use volatile detergent to clean your oven. When using plastic wrap, turn back one cooking operation immediately after the time has started to count down . SMH7178STD DE68-00356G.fm Page 20 Thursday, March 25, 2004 1:29 PM Cooking Instructions Auto Sensor Cook The Auto Sensor allows you to cook your food...
... cover with the lid intended for the utensil being used to suit your personal taste. If the utensil does not have its own lid, use microwave-safe containers and cover them with their lids or with a damp cloth. The Auto Sensor determines the proper time and power level by detecting the... use volatile detergent to clean your oven. When using plastic wrap, turn back one cooking operation immediately after the time has started to count down . SMH7178STD DE68-00356G.fm Page 20 Thursday, March 25, 2004 1:29 PM Cooking Instructions Auto Sensor Cook The Auto Sensor allows you to cook your food...
User Manual (user Manual) (ver.1.0) (English)
Page 21
...at a time. Prick each potato several times with lid or vented plastic wrap during cooking and stir before standing. Place on a microwave safe plate and cover with wax paper. Place the beverage in microwavesafe ceramic, glass or plastic dish and add 2~4 Tbs. Do not... Vegetables 1 to 3 Slices Put 1~3 slices of food. Food Amount Procedure Popcorn 3.0 ~ 3.5 oz 1 package Use only one microwave-only bag of 170 degrees F. SMH7178STD DE68-00356G.fm Page 21 Thursday, March 25, 2004 1:29 PM Cooking Instructions Sensor Cooking Guide • Follow the instructions below when...
...at a time. Prick each potato several times with lid or vented plastic wrap during cooking and stir before standing. Place on a microwave safe plate and cover with wax paper. Place the beverage in microwavesafe ceramic, glass or plastic dish and add 2~4 Tbs. Do not... Vegetables 1 to 3 Slices Put 1~3 slices of food. Food Amount Procedure Popcorn 3.0 ~ 3.5 oz 1 package Use only one microwave-only bag of 170 degrees F. SMH7178STD DE68-00356G.fm Page 21 Thursday, March 25, 2004 1:29 PM Cooking Instructions Sensor Cooking Guide • Follow the instructions below when...

User Manual (user Manual) (ver.1.0) (English)
Page 22
SMH7178STD DE68-00356G.fm Page 22 Thursday, March 25, 2004 ... sauce, salt and pepper ; toss until smooth. Stir in brandy. Let stand, covered, for 2 to 3 minutes until melted. Microwave at HIGH (0) for 2 to 9 minutes or use Sensor Popcorn. 3. Using buttered hands, form into 3-inch balls. 4. Cool ...- 4 oz.) Use only refrigerated foods. Set aside. 2. Pour caramel mixture over popcorn ; Procedure Use only pre-cooked, refrigerated foods. Microwave at HIGH (0) for 8 to 3 minutes or use Sensor Fresh Vegetable. 2. Cover plate with lid or vented plastic wrap. Snap Crackle ...
SMH7178STD DE68-00356G.fm Page 22 Thursday, March 25, 2004 ... sauce, salt and pepper ; toss until smooth. Stir in brandy. Let stand, covered, for 2 to 3 minutes until melted. Microwave at HIGH (0) for 2 to 9 minutes or use Sensor Popcorn. 3. Using buttered hands, form into 3-inch balls. 4. Cool ...- 4 oz.) Use only refrigerated foods. Set aside. 2. Pour caramel mixture over popcorn ; Procedure Use only pre-cooked, refrigerated foods. Microwave at HIGH (0) for 8 to 3 minutes or use Sensor Fresh Vegetable. 2. Cover plate with lid or vented plastic wrap. Snap Crackle ...

User Manual (user Manual) (ver.1.0) (English)
Page 23
SMH7178STD DE68-00356G.fm Page 23 Thursday, March 25, 2004 1:29 PM Cooking Instructions Peas With Lettuce (4 servings) 2 cups fresh shelled green peas 1/3 cup thinly sliced celery 2 tablespoons water 3 cups shredded head lettuce 1 tablespoon butter or magarine 1 tablespoon all . 3. Microwave...flowerets, 3/4 to 1 inch in diameter 1 medium yellow squash, cut into 1/4 inch diagonal slices 1 medium zucchini, cut into shells. 3. Microwave at HIGH (0) for 1 to taste 1. Remove wrap immediately, scatter olive slices attractively over vegetables. Pour over all -purpose flour 1/2 teaspoon...
SMH7178STD DE68-00356G.fm Page 23 Thursday, March 25, 2004 1:29 PM Cooking Instructions Peas With Lettuce (4 servings) 2 cups fresh shelled green peas 1/3 cup thinly sliced celery 2 tablespoons water 3 cups shredded head lettuce 1 tablespoon butter or magarine 1 tablespoon all . 3. Microwave...flowerets, 3/4 to 1 inch in diameter 1 medium yellow squash, cut into 1/4 inch diagonal slices 1 medium zucchini, cut into shells. 3. Microwave at HIGH (0) for 1 to taste 1. Remove wrap immediately, scatter olive slices attractively over vegetables. Pour over all -purpose flour 1/2 teaspoon...


