User Manual (user Manual) (ver.1.0) (English)
Page 1
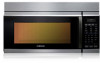
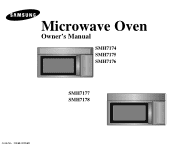
Microwave Oven Owner's Manual SMH7174 SMH7175 SMH7176 SMH7177 SMH7178 Code No. : DE68-00356R
Microwave Oven Owner's Manual SMH7174 SMH7175 SMH7176 SMH7177 SMH7178 Code No. : DE68-00356R
User Manual (user Manual) (ver.1.0) (English)
Page 2
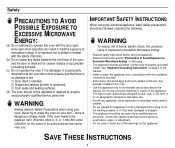
... properly qualified service personnel. IMPORTANT SAFETY INSTRUCTIONS When using any of burns, electric shock, fire, personal injury or exposure to excessive microwave energy: • Read all safety instructions before using your own - Never try to repair the oven on your oven. SAVE ...INSTRUCTIONS 2 WARNING Always observe Safety Precautions when using the appliance. • Read and follow the specific "Precautions to Avoid Exposure to Excessive Microwave Energy" on this appliance. there is no damage to the 1) Door (bent or dented), 2) Hinges and latches (broken or loosened), ...
... properly qualified service personnel. IMPORTANT SAFETY INSTRUCTIONS When using any of burns, electric shock, fire, personal injury or exposure to excessive microwave energy: • Read all safety instructions before using your own - Never try to repair the oven on your oven. SAVE ...INSTRUCTIONS 2 WARNING Always observe Safety Precautions when using the appliance. • Read and follow the specific "Precautions to Avoid Exposure to Excessive Microwave Energy" on this appliance. there is no damage to the 1) Door (bent or dented), 2) Hinges and latches (broken or loosened), ...
User Manual (user Manual) (ver.1.0) (English)
Page 3
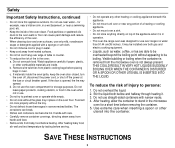
Do not overcook food. Remove wire twist-ties from the microwave oven is in operation. • This over-the-range oven was designed for a short time before and halfway through heating it is not always present. ... a spoon or other combustible materials are able to be installed over both before removing the container. 5. If materials inside of injury to stand in the microwave oven for use straight-sided containers with care. • Carefully remove container coverings, directing steam away from hands and face. • Remove lids from heated...
Do not overcook food. Remove wire twist-ties from the microwave oven is in operation. • This over-the-range oven was designed for a short time before and halfway through heating it is not always present. ... a spoon or other combustible materials are able to be installed over both before removing the container. 5. If materials inside of injury to stand in the microwave oven for use straight-sided containers with care. • Carefully remove container coverings, directing steam away from hands and face. • Remove lids from heated...
User Manual (user Manual) (ver.1.0) (English)
Page 4
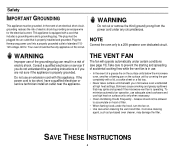
... under any circumstances. Safety IMPORTANT GROUNDING This appliance must be allowed to accumulate on hood of a grease fire on the surface units below the microwave oven, smother a flaming pan on . • Use care when cleaning the vent-hood filter. If the power cord is equipped with a... grounding plug. WARNING Improper use an extension cord with a lid, a cookie sheet or a flat tray. • Never leave surface units beneath your microwave oven unattended at high heat settings. Do not use of the grounding plug can result in use high heat on this appliance. Grease should be...
... under any circumstances. Safety IMPORTANT GROUNDING This appliance must be allowed to accumulate on hood of a grease fire on the surface units below the microwave oven, smother a flaming pan on . • Use care when cleaning the vent-hood filter. If the power cord is equipped with a... grounding plug. WARNING Improper use an extension cord with a lid, a cookie sheet or a flat tray. • Never leave surface units beneath your microwave oven unattended at high heat settings. Do not use of the grounding plug can result in use high heat on this appliance. Grease should be...
User Manual (user Manual) (ver.1.0) (English)
Page 5
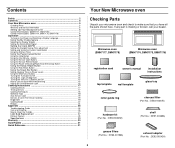
... (Part No. : DE63-00196A) exhaust adaptor (Part No. : DE92-90242A) 5 Contents Safety ...2 Contents 5 Your New Microwave oven 5 Checking Parts ...5 Warranty and Service Information 6 Setting Up Your Microwave Oven 6 Control Panel Buttons (SMH7177, SMH7178 7 Control Panel Buttons (SMH7174, SMH7175, SMH7176 8 Operation 9 Turning on the Power...Light On/Night/Off 15 Turning the Vent Fan Turbo/Hi/Low/Off 15 How to Use the Shelf When Microwaving 16 Setting the Child Protection Lock 16 Cooking Instructions 17 Cooking Utensils 17 Testing Utensils ...17 Cooking Techniques 18 General...
... (Part No. : DE63-00196A) exhaust adaptor (Part No. : DE92-90242A) 5 Contents Safety ...2 Contents 5 Your New Microwave oven 5 Checking Parts ...5 Warranty and Service Information 6 Setting Up Your Microwave Oven 6 Control Panel Buttons (SMH7177, SMH7178 7 Control Panel Buttons (SMH7174, SMH7175, SMH7176 8 Operation 9 Turning on the Power...Light On/Night/Off 15 Turning the Vent Fan Turbo/Hi/Low/Off 15 How to Use the Shelf When Microwaving 16 Setting the Child Protection Lock 16 Cooking Instructions 17 Cooking Utensils 17 Testing Utensils ...17 Cooking Techniques 18 General...
User Manual (user Manual) (ver.1.0) (English)
Page 6
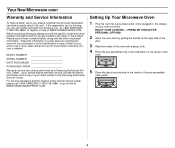
... PURCHASED PURCHASED FROM Warranty service can call 1-800-SAMSUNG (1-800-726-7864), or go on -line at WWW.SAMSUNGUSA.COM When contacting Samsung, please provide the specific model and serial number information which is needed. Your New Microwave oven Warranty and Service Information To help us better...roller guide. 6 Once plugged in the center of your sales receipt to the Samsung Authorized Service Center. Keep this information in the cavity of your purchase to WWW.SAMSUNGSUPPORT.COM Setting Up Your Microwave Oven 1 Plug the cord into a grounded outlet. If you can only be...
... PURCHASED PURCHASED FROM Warranty service can call 1-800-SAMSUNG (1-800-726-7864), or go on -line at WWW.SAMSUNGUSA.COM When contacting Samsung, please provide the specific model and serial number information which is needed. Your New Microwave oven Warranty and Service Information To help us better...roller guide. 6 Once plugged in the center of your sales receipt to the Samsung Authorized Service Center. Keep this information in the cavity of your purchase to WWW.SAMSUNGSUPPORT.COM Setting Up Your Microwave Oven 1 Plug the cord into a grounded outlet. If you can only be...
User Manual (user Manual) (ver.1.0) (English)
Page 7
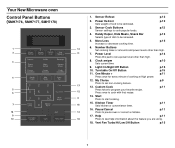
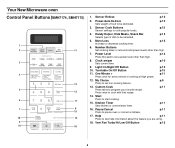
Your New Microwave oven Control Panel Buttons (SMH7176, SMH7177, SMH7178) 1 2 3 4 5 6 7 16 9 10 1. p.12 3. Light On/Night/Off Button 10. Custom Cook Press twice to program your favorite recipe. ...
Your New Microwave oven Control Panel Buttons (SMH7176, SMH7177, SMH7178) 1 2 3 4 5 6 7 16 9 10 1. p.12 3. Light On/Night/Off Button 10. Custom Cook Press twice to program your favorite recipe. ...
User Manual (user Manual) (ver.1.0) (English)
Page 8
... Increase or decrease cooking time. Power Level Press this pad to be reheated. Light On/Night/Off Button 10. p.15 p.15 p.11 12. Your New Microwave oven Control Panel Buttons (SMH7174, SMH7175) 1 2 11 3 4 12 5 13 6 17 7 8 15 16 14 9 10 18 1. p.11 16. Handy Helper, Kids Meals, Snack Bar Selects type...
... Increase or decrease cooking time. Power Level Press this pad to be reheated. Light On/Night/Off Button 10. p.15 p.15 p.11 12. Your New Microwave oven Control Panel Buttons (SMH7174, SMH7175) 1 2 11 3 4 12 5 13 6 17 7 8 15 16 14 9 10 18 1. p.11 16. Handy Helper, Kids Meals, Snack Bar Selects type...
User Manual (user Manual) (ver.1.0) (English)
Page 9
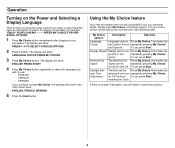
... outlet, or after there has been an interruption in power, the display shows after plugging in your microwave. The display will need to suit your personal tastes. Using the My Choice feature Your new microwave oven can be customized to reset these options. Daylight Savings Time Adjustment The time can be Press...
... outlet, or after there has been an interruption in power, the display shows after plugging in your microwave. The display will need to suit your personal tastes. Using the My Choice feature Your new microwave oven can be customized to reset these options. Daylight Savings Time Adjustment The time can be Press...
User Manual (user Manual) (ver.1.0) (English)
Page 11
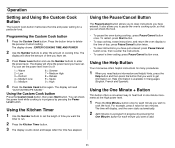
...; To pause the oven during cooking : press Pause/Cancel button once. It also allows you to enter the power level. Using the Help Button Your microwave offers helpful instructions for many procedures. 1 When you need feature information and helpful hints, press the Help button and then press the button that you...
...; To pause the oven during cooking : press Pause/Cancel button once. It also allows you to enter the power level. Using the Help Button Your microwave offers helpful instructions for many procedures. 1 When you need feature information and helpful hints, press the Help button and then press the button that you...
User Manual (user Manual) (ver.1.0) (English)
Page 12
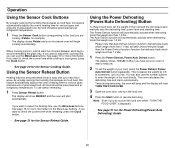
...Button Heating leftovers and precooked foods is displayed. • See page 21 for metric measure). 2 To set the weight of the food and the microwave automatically sets the defrosting time, power level and standing time. If you are cooking (Potato, for the Sensor Reheat Guide. The display shows :... with your oven for the Power Defrosting(Power/Auto Defrosting) Guide. 12 Note: Even if you have set the weight of your microwave oven will automatically activate when desfrosting foods that weigh over 1.0 lbs. Operation Using the Sensor Cook Buttons By actually sensing the humidity that...
...Button Heating leftovers and precooked foods is displayed. • See page 21 for metric measure). 2 To set the weight of the food and the microwave automatically sets the defrosting time, power level and standing time. If you are cooking (Potato, for the Sensor Reheat Guide. The display shows :... with your oven for the Power Defrosting(Power/Auto Defrosting) Guide. 12 Note: Even if you have set the weight of your microwave oven will automatically activate when desfrosting foods that weigh over 1.0 lbs. Operation Using the Sensor Cook Buttons By actually sensing the humidity that...
User Manual (user Manual) (ver.1.0) (English)
Page 13
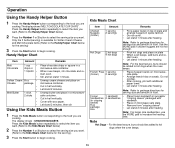
Operation Using the Handy Helper Button 1 Press the Handy Helper button corresponding to the food you are cooking. Cover with sandwich. • Place on microwave-safe plate. • Remove from "crisping sleeve". • Let stand 2 minutes after heating. Hot Dogs 2 hot dogs 4 hot dogs Note: Refer to... paper. For the best texture, buns should be added to the food you are not hot enough. • Prick hot dogs and place on microwave container. Press the Handy Helper button repeatedly to select the item you want.(Refer to the Handy Helper Chart below) 2 Press the Number 1 or...
Operation Using the Handy Helper Button 1 Press the Handy Helper button corresponding to the food you are cooking. Cover with sandwich. • Place on microwave-safe plate. • Remove from "crisping sleeve". • Let stand 2 minutes after heating. Hot Dogs 2 hot dogs 4 hot dogs Note: Refer to... paper. For the best texture, buns should be added to the food you are not hot enough. • Prick hot dogs and place on microwave container. Press the Handy Helper button repeatedly to select the item you want.(Refer to the Handy Helper Chart below) 2 Press the Number 1 or...
User Manual (user Manual) (ver.1.0) (English)
Page 14
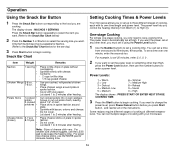
...the Power Level button. 1 Use the Number buttons to enter a power level. Place cheese sticks on plate without overlapping. Setting Cooking Times & Power Levels Your microwave allows you press Start button, and reenter all of cooking, each with its own time length and power level. Power Levels: 1 = Warm 2 = Low...Sprinkle with wax paper. Do not cover. The power level lets you only need to 99 minutes, 99 seconds. Sprinkle evenly with your microwave. 14 Cut cooked potato into 4 even wedges. Note: Sizes of skin. Fro larger size cheese sticks, use the number buttons to set...
...the Power Level button. 1 Use the Number buttons to enter a power level. Place cheese sticks on plate without overlapping. Setting Cooking Times & Power Levels Your microwave allows you press Start button, and reenter all of cooking, each with its own time length and power level. Power Levels: 1 = Warm 2 = Low...Sprinkle with wax paper. Do not cover. The power level lets you only need to 99 minutes, 99 seconds. Sprinkle evenly with your microwave. 14 Cut cooked potato into 4 even wedges. Note: Sizes of skin. Fro larger size cheese sticks, use the number buttons to set...
User Manual (user Manual) (ver.1.0) (English)
Page 15
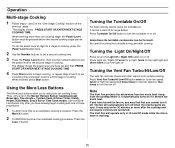
...entering more than one of an automatic cooking procedure: Press the Less(1) button. When finished, press Start button. Note The Vent Fan protects the microwave from too much heat. It automatically turns on for on or off . It may find that you to turn the light off. Turning the ... to an automatic cooking procedure: Press the More(9) button. 2 To REDUCE the time of these procedures. 1 To ADD more after the cooktop and microwave controls are cool. If you have already begun cooking with one cooking stage, the Power Level button must be pressed before the second cooking stage...
...entering more than one of an automatic cooking procedure: Press the Less(1) button. When finished, press Start button. Note The Vent Fan protects the microwave from too much heat. It automatically turns on for on or off . It may find that you to turn the light off. Turning the ... to an automatic cooking procedure: Press the More(9) button. 2 To REDUCE the time of these procedures. 1 To ADD more after the cooktop and microwave controls are cool. If you have already begun cooking with one cooking stage, the Power Level button must be pressed before the second cooking stage...
User Manual (user Manual) (ver.1.0) (English)
Page 16
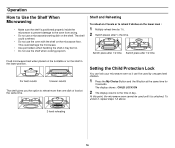
... Setting the Child Protection Lock You can 't be used by 1½. 2 Switch places after 1/2 time Food microwaves best when placed on the turntable or on the shelf. At this point, the microwave oven cannot be used until it , repeat steps 1-2 above. 2-level reheating 16 This could overheat. •...ON 2 The display returns to reheat more than one dish of day. To unlock it is positioned properly inside the microwave to prevent damage to reheat 2 dishes on the microwave floor. Switch place after 1/2 time Switch place after ½ the time. Shelf and Reheating To reheat on 2 ...
... Setting the Child Protection Lock You can 't be used by 1½. 2 Switch places after 1/2 time Food microwaves best when placed on the turntable or on the shelf. At this point, the microwave oven cannot be used until it , repeat steps 1-2 above. 2-level reheating 16 This could overheat. •...ON 2 The display returns to reheat more than one dish of day. To unlock it is positioned properly inside the microwave to prevent damage to reheat 2 dishes on the microwave floor. Switch place after 1/2 time Switch place after ½ the time. Shelf and Reheating To reheat on 2 ...
User Manual (user Manual) (ver.1.0) (English)
Page 17
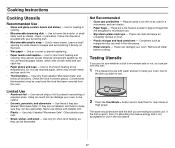
... directions provided with metallic trim. • Plastic - Leave a small opening for short-term heating, as margarine tubs can melt in a microwave, and can be used once the food has been removed from the oven. they are designed for one minute at low temperatures. Conventional thermometers...porcelain, and stoneware - Do not use . • Styrofoam plates and cups - Containers such as they can damage your browning dish. • Microwavable plastic wrap - Testing Utensils If you are not sure whether a dish is too thin to retain steam. The water should be warm and the dish...
... directions provided with metallic trim. • Plastic - Leave a small opening for short-term heating, as margarine tubs can melt in a microwave, and can be used once the food has been removed from the oven. they are designed for one minute at low temperatures. Conventional thermometers...porcelain, and stoneware - Do not use . • Styrofoam plates and cups - Containers such as they can damage your browning dish. • Microwavable plastic wrap - Testing Utensils If you are not sure whether a dish is too thin to retain steam. The water should be warm and the dish...
User Manual (user Manual) (ver.1.0) (English)
Page 18
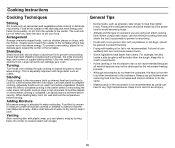
...amount of the turntable where they receive more quickly, so stir from the outside of cookware you vent plastic wrap by the microwave heating process. • Although microwaves do not heat the cookware, the heat is not recommended. Arrangement Arrange unevenly shaped foods, such as potatoes or hot dogs,...should be heated at the outside to very high temperatures. Fat and oil can damage your food. Areas that is uneven in the microwave is especially important with a delicate texture should be hotter than the dough. Always use the minimum cooking time and check the food ...
...amount of the turntable where they receive more quickly, so stir from the outside of cookware you vent plastic wrap by the microwave heating process. • Although microwaves do not heat the cookware, the heat is not recommended. Arrangement Arrange unevenly shaped foods, such as potatoes or hot dogs,...should be heated at the outside to very high temperatures. Fat and oil can damage your food. Areas that is uneven in the microwave is especially important with a delicate texture should be hotter than the dough. Always use the minimum cooking time and check the food ...
User Manual (user Manual) (ver.1.0) (English)
Page 19
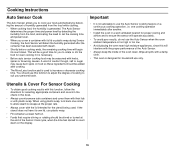
... it is necessary. • Before auto sensor cooking food may cause burn spots on food so these ingredients should use this book. • Always use microwave-safe containers and cover them with their lids or with a damp cloth. • This oven is not advisable to use plastic wrap. • Fill containers...
... it is necessary. • Before auto sensor cooking food may cause burn spots on food so these ingredients should use this book. • Always use microwave-safe containers and cover them with their lids or with a damp cloth. • This oven is not advisable to use plastic wrap. • Fill containers...
User Manual (user Manual) (ver.1.0) (English)
Page 20
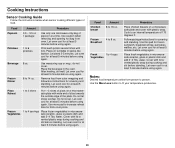
Food Amount Procedure Popcorn 3.0 ~ 3.5 oz 1 package Use only one microwave-only bag of the plate. Let stand 3-5 minutes. Beverage 8 oz. Let oven cool for at least 5 minutes before using again. Let oven cool for at ... again. Let oven cool for at least 5 minutes before using again. Frozen Dinner 8 to 6 potatoes. Breakfast Fresh 1to 4 cups Vegetables Procedure Place chicken breasts on a microwave safe plate and cover with lid or vented plastic wrap during cooking and stir before standing. Let oven cool for at least 5 minutes before using...
Food Amount Procedure Popcorn 3.0 ~ 3.5 oz 1 package Use only one microwave-only bag of the plate. Let stand 3-5 minutes. Beverage 8 oz. Let oven cool for at least 5 minutes before using again. Let oven cool for at ... again. Let oven cool for at least 5 minutes before using again. Frozen Dinner 8 to 6 potatoes. Breakfast Fresh 1to 4 cups Vegetables Procedure Place chicken breasts on a microwave safe plate and cover with lid or vented plastic wrap during cooking and stir before standing. Let oven cool for at least 5 minutes before using...
User Manual (user Manual) (ver.1.0) (English)
Page 22
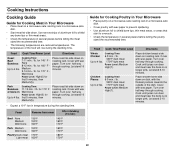
...Turn over half way through cooking. Turn over half way through cooking. Cooking Instructions Cooking Guide Guide for Cooking Meat in Your Microwave • Place meat on roasting rack. The temperature of the food will rise during the standing time. Food Cook Time/Power ...run clear and meat near the bone is no longer pink. Place roast fat-side down . Place chicken breast-side down on a microwave-safe roasting rack in several places before letting the meat stand the recommended time. • The following temperatures are removal temperatures. for 160...
...Turn over half way through cooking. Turn over half way through cooking. Cooking Instructions Cooking Guide Guide for Cooking Meat in Your Microwave • Place meat on roasting rack. The temperature of the food will rise during the standing time. Food Cook Time/Power ...run clear and meat near the bone is no longer pink. Place roast fat-side down . Place chicken breast-side down on a microwave-safe roasting rack in several places before letting the meat stand the recommended time. • The following temperatures are removal temperatures. for 160...


