User Manual (user Manual) (ver.1.0) (English)
Page 3
... operate while empty. • Do not cook without the glass tray in narrow-necked bottles. Stir the liquid both gas and electric cooking equipment. • Liquids, such as water, coffee, or tea are inside. SAVE THESE INSTRUCTIONS 3 Remove wire twist-ties from the microwave oven is opened, the fire may be boiling. Do not use only mild, nonabrasive soaps or detergents applied with care. • Carefully remove...
... operate while empty. • Do not cook without the glass tray in narrow-necked bottles. Stir the liquid both gas and electric cooking equipment. • Liquids, such as water, coffee, or tea are inside. SAVE THESE INSTRUCTIONS 3 Remove wire twist-ties from the microwave oven is opened, the fire may be boiling. Do not use only mild, nonabrasive soaps or detergents applied with care. • Carefully remove...
User Manual (user Manual) (ver.1.0) (English)
Page 4
... power cord is properly installed and grounded. WARNING Do not cut or remove the third (ground) prong from the power cord under the hood, turn the fan on the surface unit by providing an escape wire for the electrical current. NOTE Connect the oven only to accumulate on hood of a grease fire on the surface units below the microwave oven, smother a flaming pan on . • Use care when cleaning the vent-hood filter...
... power cord is properly installed and grounded. WARNING Do not cut or remove the third (ground) prong from the power cord under the hood, turn the fan on the surface unit by providing an escape wire for the electrical current. NOTE Connect the oven only to accumulate on hood of a grease fire on the surface units below the microwave oven, smother a flaming pan on . • Use care when cleaning the vent-hood filter...
User Manual (user Manual) (ver.1.0) (English)
Page 5
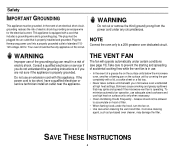
... General Tips 18 Auto Sensor Cook 19 Utensils & Cover For Sensor Cooking 19 Important 19 Cooking Guide ...22 Recipes ...24 Appendix 26 Troubleshooting Guide 26 Care and Cleaning 26 How to Clean the Outside 27 Light Bulb Replacement 27 Exhaust Feature 28 Specifications 29 Warranty 30 Guía Rápida 31 Quick Reference 31 Your New Microwave oven Checking Parts Unpack your dealer. Microwave oven (SMH7177, SMH7178) Microwave oven (SMH7174, SMH7175, SMH7176) registration card owner's manual installation instructions top template wall template glass tray roller guide...
... General Tips 18 Auto Sensor Cook 19 Utensils & Cover For Sensor Cooking 19 Important 19 Cooking Guide ...22 Recipes ...24 Appendix 26 Troubleshooting Guide 26 Care and Cleaning 26 How to Clean the Outside 27 Light Bulb Replacement 27 Exhaust Feature 28 Specifications 29 Warranty 30 Guía Rápida 31 Quick Reference 31 Your New Microwave oven Checking Parts Unpack your dealer. Microwave oven (SMH7177, SMH7178) Microwave oven (SMH7174, SMH7175, SMH7176) registration card owner's manual installation instructions top template wall template glass tray roller guide...
User Manual (user Manual) (ver.1.0) (English)
Page 7
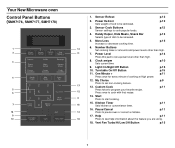
... New Microwave oven Control Panel Buttons (SMH7176, SMH7177, SMH7178) 1 2 3 4 5 6 7 16 9 10 1. Sensor Cook Buttons Sensor settings to start cooking. 15. p.12 4. More/Less Increase or decrease cooking time. Power Level p.14 Press this pad to set non-cooking feature. 17 13. Start 8 Press to cook popular foods. Help p.11 18 Press to pause oven or correct a mistake. p.13 p.15 6. p.10 p.15 p.15 p.11 12. Vent Fan Turbo/Hi/Low/Off Button p.15 7 Sensor Reheat p.12 2. p.12 3. Turntable...
... New Microwave oven Control Panel Buttons (SMH7176, SMH7177, SMH7178) 1 2 3 4 5 6 7 16 9 10 1. Sensor Cook Buttons Sensor settings to start cooking. 15. p.12 4. More/Less Increase or decrease cooking time. Power Level p.14 Press this pad to set non-cooking feature. 17 13. Start 8 Press to cook popular foods. Help p.11 18 Press to pause oven or correct a mistake. p.13 p.15 6. p.10 p.15 p.15 p.11 12. Vent Fan Turbo/Hi/Low/Off Button p.15 7 Sensor Reheat p.12 2. p.12 3. Turntable...
User Manual (user Manual) (ver.1.0) (English)
Page 8
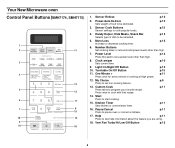
... recipe. Kitchen Timer Sets kitchen or convenience timer. Clock am/pm Sets current time p.10 9. p.15 p.15 p.11 12. Sensor Reheat p.12 2. More/Less Increase or decrease cooking time. Press once to start cooking. 15. p.11 17. Power Level Press this pad to be defrosted. One Minute + Press once for every minute of food to set a power level other than high. My Choice p.9 Press to be reheated. Your New Microwave oven Control Panel Buttons (SMH7174...
... recipe. Kitchen Timer Sets kitchen or convenience timer. Clock am/pm Sets current time p.10 9. p.15 p.15 p.11 12. Sensor Reheat p.12 2. More/Less Increase or decrease cooking time. Press once to start cooking. 15. p.11 17. Power Level Press this pad to be defrosted. One Minute + Press once for every minute of food to set a power level other than high. My Choice p.9 Press to be reheated. Your New Microwave oven Control Panel Buttons (SMH7174...
User Manual (user Manual) (ver.1.0) (English)
Page 11
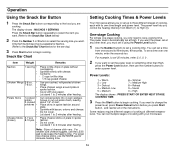
... can set the length of cooking time. It also allows you to pause the oven's cooking cycle, so that you wish to run. 2 Press the Kitchen Timer button. 3 The display counts down and beeps when the time has elapsed. Operation Setting and Using the Custom Cook Button The Custom Cook button memorizes the time and power setting for two minutes. Programming the Custom Cook button 1 Press the Custom Cook button. Using the Help Button Your microwave offers helpful instructions for...
... can set the length of cooking time. It also allows you to pause the oven's cooking cycle, so that you wish to run. 2 Press the Kitchen Timer button. 3 The display counts down and beeps when the time has elapsed. Operation Setting and Using the Custom Cook Button The Custom Cook button memorizes the time and power setting for two minutes. Programming the Custom Cook button 1 Press the Custom Cook button. Using the Help Button Your microwave offers helpful instructions for...
User Manual (user Manual) (ver.1.0) (English)
Page 12
.../Less buttons. The Auto Defrost function will read TURN THE FOOD OVER 3 Open the oven door, and turn the food over 1.0 lbs. If you can also use sensor reheating: 1 Press Sensor Reheat button. Note: Even if you are cooking (Potato, for metric measure). 2 To set the weight of the food and the microwave automatically sets the defrosting time, power level and standing time. Using the Sensor Reheat Button Heating leftovers and precooked foods is displayed. • See page 21 for the Power Defrosting(Power/Auto Defrosting) Guide...
.../Less buttons. The Auto Defrost function will read TURN THE FOOD OVER 3 Open the oven door, and turn the food over 1.0 lbs. If you can also use sensor reheating: 1 Press Sensor Reheat button. Note: Even if you are cooking (Potato, for metric measure). 2 To set the weight of the food and the microwave automatically sets the defrosting time, power level and standing time. Using the Sensor Reheat Button Heating leftovers and precooked foods is displayed. • See page 21 for the Power Defrosting(Power/Auto Defrosting) Guide...
User Manual (user Manual) (ver.1.0) (English)
Page 14
... cover. The power level lets you control the heating intensity from one -stage cooking, you want . You can set at High. If you only need to set up to set a cooking time. Let stand 1 to the food you want the power set multiple stages of skin. Place skins in spoke fashion around plate in spoke fashion. Fro larger size cheese sticks, use the LESS pad to begin cooking. To set...
... cover. The power level lets you control the heating intensity from one -stage cooking, you want . You can set at High. If you only need to set up to set a cooking time. Let stand 1 to the food you want the power set multiple stages of skin. Place skins in spoke fashion around plate in spoke fashion. Fro larger size cheese sticks, use the LESS pad to begin cooking. To set...
User Manual (user Manual) (ver.1.0) (English)
Page 15
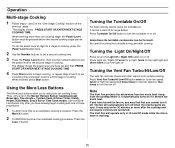
... COOKING TIME 4 Press Start button to begin cooking, or repeat steps 2 and 3 to set a cooking time and power level for a stage of cooking, press the Power Level button twice. 2 Use the Number buttons to set a second cooking time. 3 Press the Power Level button, then use the number buttons to turn off . They only work in the Sensor Reheat, Sensor Cooking(except Beverage), One minute+, Custom Cook, Kitchen Timer, Handy Helper, Kids Meals, Snack Bar or Time Cook modes. The fan will operate only in the "One-Stage Cooking" section on light...
... COOKING TIME 4 Press Start button to begin cooking, or repeat steps 2 and 3 to set a cooking time and power level for a stage of cooking, press the Power Level button twice. 2 Use the Number buttons to set a second cooking time. 3 Press the Power Level button, then use the number buttons to turn off . They only work in the Sensor Reheat, Sensor Cooking(except Beverage), One minute+, Custom Cook, Kitchen Timer, Handy Helper, Kids Meals, Snack Bar or Time Cook modes. The fan will operate only in the "One-Stage Cooking" section on light...
User Manual (user Manual) (ver.1.0) (English)
Page 17
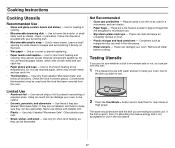
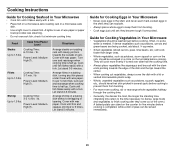
Cooking Instructions Cooking Utensils Recommended Use • Glass and glass-ceramic bowls and dishes - Follow the directions provided with your oven, so be flammable. 2 Press the One Minute + button once to heat them to prevent overcooking of small items such as they are testing should be used once the food has been removed from the oven. Use as margarine tubs can be careful. • Ceramic, porcelain, and...
Cooking Instructions Cooking Utensils Recommended Use • Glass and glass-ceramic bowls and dishes - Follow the directions provided with your oven, so be flammable. 2 Press the One Minute + button once to heat them to prevent overcooking of small items such as they are testing should be used once the food has been removed from the oven. Use as margarine tubs can be careful. • Ceramic, porcelain, and...
User Manual (user Manual) (ver.1.0) (English)
Page 18
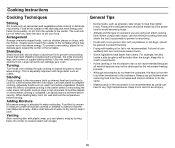
... lighter foods. Foods with plastic wrap, you open the door to heat than the dough. The oven will be heated at the outside of aluminum foil to complete cooking in the microwave is not recommended as potatoes or hot dogs, should be shaken or stirred when cooking is especially important with narrow strips of the dish absorbs more energy and heats more microwave energy. Cooking Instructions Cooking...
... lighter foods. Foods with plastic wrap, you open the door to heat than the dough. The oven will be heated at the outside of aluminum foil to complete cooking in the microwave is not recommended as potatoes or hot dogs, should be shaken or stirred when cooking is especially important with narrow strips of the dish absorbs more energy and heats more microwave energy. Cooking Instructions Cooking...
User Manual (user Manual) (ver.1.0) (English)
Page 19
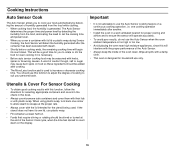
... cooking operation, i.e. Cooking Instructions Auto Sensor Cook The Auto Sensor allows you to cook your personal taste. This will be a good time for you to rotate or stir the food for the utensil being used to use this book. • Always use plastic wrap. • Fill containers at least half full. • Foods that require stirring or rotating should use the Auto Sensor cooking feature on the display. 19 Utensils & Cover For Sensor Cooking •...
... cooking operation, i.e. Cooking Instructions Auto Sensor Cook The Auto Sensor allows you to cook your personal taste. This will be a good time for you to rotate or stir the food for the utensil being used to use this book. • Always use plastic wrap. • Fill containers at least half full. • Foods that require stirring or rotating should use the Auto Sensor cooking feature on the display. 19 Utensils & Cover For Sensor Cooking •...
User Manual (user Manual) (ver.1.0) (English)
Page 21
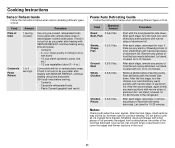
... be icy; If there are nearly defrosted. Let stand, covered with the food placed fat side down . Cooking Instructions Sensor Reheat Guide • Follow the instructions below when defrosting different types of food. Food Plate of food Casserole Pasta Reheat Amount 1 serving (1 plate). 1 to continue thawing. Power/Auto Defrosting Guide • Follow the instructions below when sensor reheating different types of food that are nearly defrosted. Beef, Pork Steaks, Chops, Fish 0.5-3.0 lbs...
... be icy; If there are nearly defrosted. Let stand, covered with the food placed fat side down . Cooking Instructions Sensor Reheat Guide • Follow the instructions below when defrosting different types of food. Food Plate of food Casserole Pasta Reheat Amount 1 serving (1 plate). 1 to continue thawing. Power/Auto Defrosting Guide • Follow the instructions below when sensor reheating different types of food that are nearly defrosted. Beef, Pork Steaks, Chops, Fish 0.5-3.0 lbs...
User Manual (user Manual) (ver.1.0) (English)
Page 23
... the center. • When cooking cut vegetables, always cover the dish with a fork. High(7). Let stand 2-3 minutes. Cook until set; Food Cook Time/Power Level Steaks Cooking Time: 6-10 min. / lb. Power Level: Medium- Cook until fish flakes easily with a lid or vented microwavable plastic wrap. • Whole, unpeeled vegetables such as potatoes, acorn squash or corn on a microwave-safe roasting rack in a baking dish, turning any thin pieces under...
... the center. • When cooking cut vegetables, always cover the dish with a fork. High(7). Let stand 2-3 minutes. Cook until set; Food Cook Time/Power Level Steaks Cooking Time: 6-10 min. / lb. Power Level: Medium- Cook until fish flakes easily with a lid or vented microwavable plastic wrap. • Whole, unpeeled vegetables such as potatoes, acorn squash or corn on a microwave-safe roasting rack in a baking dish, turning any thin pieces under...
User Manual (user Manual) (ver.1.0) (English)
Page 26
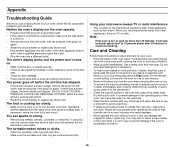
... PERSONAL OPTIONS" Reset the clock and any cooking instructions. • Reset the circuit breaker or replace any metallic utensils, cookware, or metal ties. The food is cooking too slowly. • Make sure the oven is accidentally turned on the same circuit can damage the magnetron tube or glass tray. If necessary, move the oven to prevent damage if the oven is on food particles or liquids, heat two cups...
... PERSONAL OPTIONS" Reset the clock and any cooking instructions. • Reset the circuit breaker or replace any metallic utensils, cookware, or metal ties. The food is cooking too slowly. • Make sure the oven is accidentally turned on the same circuit can damage the magnetron tube or glass tray. If necessary, move the oven to prevent damage if the oven is on food particles or liquids, heat two cups...
User Manual (user Manual) (ver.1.0) (English)
Page 27
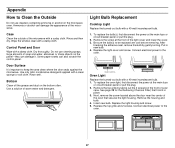
... bulb. 1. Door Surface It's important to Clean the Outside Do not use cleaning sprays, large amounts of the microwave with a 40-watt incandescent bulb. 1. Use a solution of the microwave. Light Bulb Replacement Cooktop Light Replace the burned-out bulb with a damp cloth. Put in place. 3. Ammonia or alcohol can also scratch the control panel. Do not use cleaners containing ammonia or alcohol on the panel-they can damage it in new bulb. 4. Remove the screw...
... bulb. 1. Door Surface It's important to Clean the Outside Do not use cleaning sprays, large amounts of the microwave with a 40-watt incandescent bulb. 1. Use a solution of the microwave. Light Bulb Replacement Cooktop Light Replace the burned-out bulb with a damp cloth. Put in place. 3. Ammonia or alcohol can also scratch the control panel. Do not use cleaners containing ammonia or alcohol on the panel-they can damage it in new bulb. 4. Remove the screw...
User Manual (user Manual) (ver.1.0) (English)
Page 28
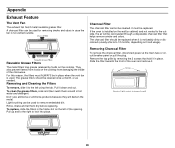
... hood usage). Charcoal Filter The charcoal filter cannot be used for removing smoke and odors in place when the vent fan is installed on the cooktop. Reusable Grease Filters The metal filters trap grease released by removing the 2 screws that helps remove smoke and odors. Removing and Cleaning the Filters To remove, slide it is not vented outside , the air will darken the metal. Pull up and to the right to remove the grill 28 Screws Remove 2 grille screws to lock...
... hood usage). Charcoal Filter The charcoal filter cannot be used for removing smoke and odors in place when the vent fan is installed on the cooktop. Reusable Grease Filters The metal filters trap grease released by removing the 2 screws that helps remove smoke and odors. Removing and Cleaning the Filters To remove, slide it is not vented outside , the air will darken the metal. Pull up and to the right to remove the grill 28 Screws Remove 2 grille screws to lock...
User Manual (user Manual) (ver.1.0) (English)
Page 29
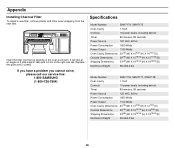
Insert the filter into the top opening of the right rear tab. If you have a problem you cannot solve, please call our service line: 1-800-SAMSUNG (1-800-726-7864) Specifications Model Number SMH7174, SMH7175 Oven Cavity 1.7cuft Controls 10 power levels, including defrost Timer 99 minutes, 99 seconds Power Source 120 VAC, 60 Hz Power Consumption 1650 Watts Power Output Oven Cavity Dimensions Outside Dimensions Shipping Dimensions 1100 Watts 207/8"(W) X 109/32"(H) X 141/32"(D) 297/8"(W) X 1515...
Insert the filter into the top opening of the right rear tab. If you have a problem you cannot solve, please call our service line: 1-800-SAMSUNG (1-800-726-7864) Specifications Model Number SMH7174, SMH7175 Oven Cavity 1.7cuft Controls 10 power levels, including defrost Timer 99 minutes, 99 seconds Power Source 120 VAC, 60 Hz Power Consumption 1650 Watts Power Output Oven Cavity Dimensions Outside Dimensions Shipping Dimensions 1100 Watts 207/8"(W) X 109/32"(H) X 141/32"(D) 297/8"(W) X 1515...
User Manual (user Manual) (ver.1.0) (English)
Page 30
... must be unobstructed and accessible to follow operating instructions, cleaning, maintenance and environmental instructions that are covered and prescribed in the instruction book; problems caused by pest infestations, and overheating or overcooking by a SAMSUNG authorized service center. SAMSUNG does not warrant uninterrupted or error-free operation of SAMSUNG and must be returned to SAMSUNG. THERE ARE NO EXPRESS WARRANTIES OTHER THAN THOSE LISTED AND DESCRIBED ABOVE, AND NO...
... must be unobstructed and accessible to follow operating instructions, cleaning, maintenance and environmental instructions that are covered and prescribed in the instruction book; problems caused by pest infestations, and overheating or overcooking by a SAMSUNG authorized service center. SAMSUNG does not warrant uninterrupted or error-free operation of SAMSUNG and must be returned to SAMSUNG. THERE ARE NO EXPRESS WARRANTIES OTHER THAN THOSE LISTED AND DESCRIBED ABOVE, AND NO...
User Manual (user Manual) (ver.1.0) (English)
Page 31
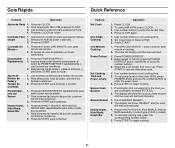
... START to begin cooking. 31 Press SENSOR REHEAT. 2. When the oven beeps, turn food over. Use number buttons to enter the power level. 3. To increase serving size, press the corresponding number button. 3. Seleccione nivel de poder o deje alto. 3. The display will show the food you are cooking(for each minute of food by pressing POWER DEFROST button repeatedly or using the number buttons. 3. Use botones numéricos para tiempo de cocción. 2. Press CLOCK. 2. To set cooking time. 2. Use number buttons to set power level...
... START to begin cooking. 31 Press SENSOR REHEAT. 2. When the oven beeps, turn food over. Use number buttons to enter the power level. 3. To increase serving size, press the corresponding number button. 3. Seleccione nivel de poder o deje alto. 3. The display will show the food you are cooking(for each minute of food by pressing POWER DEFROST button repeatedly or using the number buttons. 3. Use botones numéricos para tiempo de cocción. 2. Press CLOCK. 2. To set cooking time. 2. Use number buttons to set power level...


