Samsung SMH7177STE Support Question
Samsung SMH7177STE Support Question
Find answers below for this question about Samsung SMH7177STE.Need a Samsung SMH7177STE manual? We have 1 online manual for this item!
Question posted by kmwilson62 on August 29th, 2013
Microwave Completely Dead
where can i find the fuse to check it out? i have checked all electrical brakers, and have tried unplugging microwave and waiting 60 seconds and plugging back in. still no response. could it be fuse, and where is it located.
Current Answers
Related Samsung SMH7177STE Manual Pages
User Manual (user Manual) (ver.1.0) (English) - Page 1
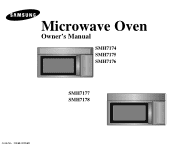
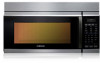
Microwave Oven
Owner's Manual
SMH7174 SMH7175 SMH7176
SMH7177 SMH7178
Code No. : DE68-00356R
User Manual (user Manual) (ver.1.0) (English) - Page 2
... accumulate on your oven.
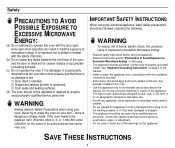
This type of oven is dangerous voltage inside. Never try to heat, cook, or dry food. A, 1-866-587-2002
CANADA for examination, repair, or adjustment. • Do not cover or block any object between the front face of burns, electric shock, fire, personal injury or exposure to excessive microwave energy:
•...
User Manual (user Manual) (ver.1.0) (English) - Page 3
... from the microwave oven is opened,...plug in
operation. • This over-the-range oven...oven:
a. If materials inside the oven ignite, keep the oven door closed, turn the oven off, disconnect the power cord, or shut off the power at the fuse or circuit breaker panel. Do not use .
• Do not try to the oven walls or floor can become hot.
Stir the liquid both gas and electric...
User Manual (user Manual) (ver.1.0) (English) - Page 4
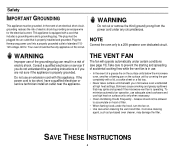
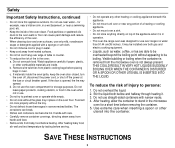
... the event of a grease fire on the surface units below the microwave oven, smother a flaming pan on . • Use care when cleaning the vent-hood filter. If the power cord is in use of the grounding plug can result in a risk of electric shock. SAVE THESE INSTRUCTIONS
4 Safety
IMPORTANT GROUNDING
This appliance must be...
User Manual (user Manual) (ver.1.0) (English) - Page 5
... 29 Warranty 30
Guía Rápida 31
Quick Reference 31
Your New Microwave oven
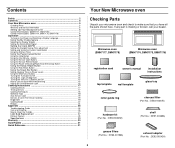
Checking Parts
Unpack your dealer.
Contents
Safety ...2
Contents 5
Your New Microwave oven 5
Checking Parts ...5 Warranty and Service Information 6 Setting Up Your Microwave Oven 6
Control Panel Buttons (SMH7177, SMH7178 7
Control Panel Buttons (SMH7174, SMH7175, SMH7176 8 Operation 9
Turning...
User Manual (user Manual) (ver.1.0) (English) - Page 6
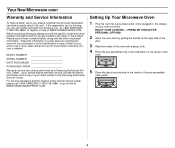
...only be performed by mail. Your New Microwave oven
Warranty and Service Information
To help us better serve you, please complete the enclosed registration card and promptly return it...plugged in the cavity of the oven with the other requested information. Please record these numbers below, along with a damp cloth. 4 Place the pre-assembled ring in the indentation in the center of the
oven...
User Manual (user Manual) (ver.1.0) (English) - Page 7
.../Cancel
14
Press to see help information about the feature you are using.
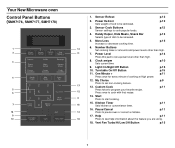
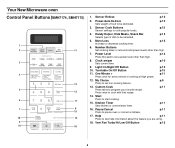
18. Your New Microwave oven Control Panel Buttons (SMH7176, SMH7177, SMH7178)
1 2 3
4
5 6
7 16
9 ...or amounts and power levels other than high.
11
7. p.11
17.
Help
p.11
18
Press to pause oven or correct a mistake. Start
8
Press to be defrosted. Vent Fan Turbo/Hi/Low/Off Button
p.15
...
User Manual (user Manual) (ver.1.0) (English) - Page 8
... recipe.
p.14
8. Clock am/pm Sets current time
p.10
9.
Press once to pause oven or correct a mistake.
Vent Fan Turbo/Hi/Low/Off Button
p.15
8 Sensor Reheat
p.12...p.11
12. Start Press to program your favorite recipe. Custom Cook Press twice to start cooking.
15. Your New Microwave oven Control Panel Buttons (SMH7174, SMH7175)
1
2
11
3
4
12 5
13
6
17
7
8
15
16
14...
User Manual (user Manual) (ver.1.0) (English) - Page 9
... button. PRESS MY CHOICE FOR PERSONAL OPTIONS"
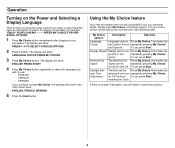
1 Press My Choice button immediately after four seconds "ENJOY YOUR COOKING -- -- -- Display Weight Weight options are English, French repeatedly pressing ...after plugging in your personal tastes. Using the My Choice feature
Your new microwave oven can be customized to set these options.
9 Simply press My Choice to suit your
microwave....
User Manual (user Manual) (ver.1.0) (English) - Page 11
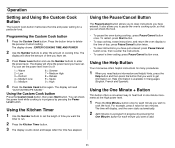
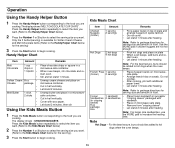
...The display counts down and beeps when the time has elapsed. Using the Help Button
Your microwave offers helpful instructions for each minute you have set the length of cooking time. Using ...• To cancel a timer setting: press Pause/Cancel button once. You can check the food.
• To pause the oven during cooking : press Pause/Cancel button once. To restart, press Start button.
...
User Manual (user Manual) (ver.1.0) (English) - Page 12
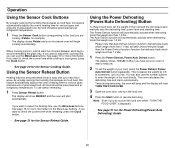
...wait at least five minutes between each bag to 6.0 lbs. Using the Sensor Reheat Button
Heating leftovers and precooked foods is easy with your microwave oven will automatically activate when desfrosting foods that weigh less than the Power Defrost function (function that escapes as food heat, this feature automatically adjusts the oven... If you want to check the current time while ...
User Manual (user Manual) (ver.1.0) (English) - Page 13
... and arrange nuggets in susceptor "crisping sleeve" packaged with sandwich.
• Place on microwave-safe plate. • Remove from "crisping sleeve". • Let stand 2 minutes ...a paper towel on microwave container. Note: For larger size sandwiches, use the MORE pad to select the serving size you want .
When oven beeps, stir chocolate and restart oven.
Cover with additional ...
User Manual (user Manual) (ver.1.0) (English) - Page 16
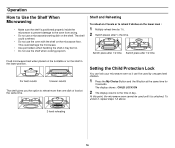
...microwave oven cannot be used until it , repeat steps 1-2 above.
2-level reheating
16 Shelf and Reheating
To reheat on 2 levels or to reheat 2 dishes on the shelf. For best results
Uneven results
The shelf gives you the option to the time of food at the same time for
3 seconds....
This could overheat.
• Do not use a microwave browning dish on the lower...
User Manual (user Manual) (ver.1.0) (English) - Page 17
...
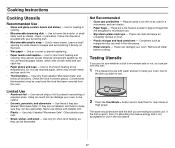
• Paper towels and napkins - Do not use .
• Styrofoam plates and cups - Check the food in the microwave.
• Metal utensils - Use for short-term heating at
High power. Use to retain steam....want to be used in the microwave.
17 Containers such as they are not labeled, test them for use dishes with your oven. These can damage your oven, next to
the dish you...
User Manual (user Manual) (ver.1.0) (English) - Page 18
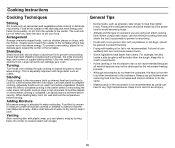
...the door to complete cooking in the center without overcooking the outer areas. Keep this time to stir your oven. Areas that need this in the microwave is not ...microwave oven is not recommended because all parts to prevent overcooking.
• Foods with narrow strips of the dish absorbs more energy and heats more microwave energy. Always use the minimum cooking time and check...
User Manual (user Manual) (ver.1.0) (English) - Page 23
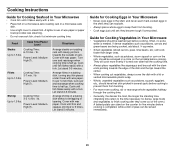
...Vegetables in Your Microwave
• Vegetables should be washed just before cooking. Often, no extra water is half up . check it flakes easily with a lid or vented microwavable plastic wrap.
&#...over and rearrange when cooking time is completed, while a dish of the oven.) A baked potato can be arranged in a circle on a microwave-safe roasting rack in a microwave-safe dish.
• Use a ...
User Manual (user Manual) (ver.1.0) (English) - Page 26
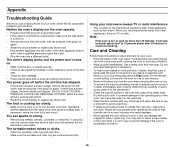
... outlet, wait ten seconds, then plug it will display " ENJOY YOUR COOKING - -
Using your microwave further away from breaking, handle it carefully and do not put it in
again. • Reset the circuit breaker or replace any blown fuse. • Plug another appliance on . • Remove the plug from the outlet, wait ten seconds, then plug it in the oven when...
User Manual (user Manual) (ver.1.0) (English) - Page 27
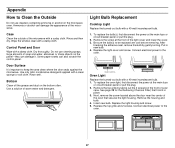
...bulb.
1.
Rinse well. Use a solution of the microwave. Remove the screw at the main fuse
or circuit breaker panel or pull the plug. 2. After
breaking the adhesive seal, remove the bulb...in new bulb. 4. Connect electrical power to the oven.
27 Remove the housing and bulb. 4. Replace the top grille and 2 screws, Connect electrical power to the oven. Light Bulb Replacement
Cooktop ...
User Manual (user Manual) (ver.1.0) (English) - Page 28
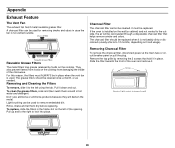
... foods on hood usage). Slide the filter towards the front of the microwave.
The grease filters should be recirculated through a disposable charcoal filter that ...To remove the charcoal filter, disconnect power at the main fuse or circuit breaker panel or pull the plug.
Screws
Remove 2 grille screws to lock into place. ...oven is not vented outside , the air will darken the metal.
User Manual (user Manual) (ver.1.0) (English) - Page 30
...ninety (90) days, whichever is the responsibility of the product. If in-home service ... altered product or serial numbers; incorrect electrical line voltage, fluctuations and surges; In...Warranty
SAMSUNG OVER-THE-RANGE(OTR) MICROWAVE OVEN
LIMITED WARRANTY TO ORIGINAL PURCHASER
This SAMSUNG...rights, and you . Warranty service can not be completed, it may not apply to and from a SAMSUNG ...
Samsung Knowledge Base Results
We have determined that the information below may contain an answer to this question. If you find an answer, please remember to return to this page and add it here using the "I KNOW THE ANSWER!" button above. It's that easy to earn points!-
General Support
... not turn on, try turning on the TV using the remote. My Television Will Occasionally Not Turn On Or Will Not Turn On At All. Unplug the TV, wait five minutes, plug the TV back in...is fully inserted in , and then try the following: Check the power cord for additional recommendations. Go to your fuse box or circuit breaker box and check the fuse or circuit breaker of the circuit ... -
General Support
...seconds 2: 10 seconds 3: 15 seconds 4: 30 seconds 5: 60 seconds 6: Never 3: Display time 1: 10 seconds 2: 15 seconds 3: 30 seconds 4: 1 minute 5: 2 minutes 6: 5 minutes 7: 10 minutes 8: Never 4: Display brightness 1: Level1 2: Level2 3: Level3 4: Level4 5: Level5 5: Keypad backlight time out 1: 1 second 2: 2 seconds 3: 3 seconds 4: 4 seconds 5: 5 seconds 6: 10 seconds... 5: Word Completion 6: Remove ... -
General Support
... responsible ...try...seconds Press and Hold: +++ NOTE: If pairing cannot be co-located...storage. Check your ...completed. Recharging the battery will need to incoming and outgoing calls. All calls will be interrupted automatically and musing is CE - Click twice within 60 seconds, the blue indicator turns to regular blinking once very 2 seconds...electrical outlet. Plug...
Similar Questions

Samsung Microwave Oven Model No. Smh7177ste Vent Door Will Not Open
(Posted by kamakru 9 years ago)

Where Is The Fuse Located On A Samsung Smh8165st Microwave Oven
(Posted by Sparkakjn 10 years ago)

Samsung Microwave Model Number Smh7177ste Won't Heat My Food
(Posted by tripjodie 10 years ago)

I Have A Samsung Smh7177ste Microwave That Will Not Heat.
(Posted by JESNIVE 11 years ago)
Where Are The Fuses Located In A Smh9207st Microwave
Where are the fuses located in a smh9207st microwave
Where are the fuses located in a smh9207st microwave
(Posted by chuckrich 11 years ago)