User Manual (ENGLISH)
Page 2
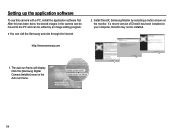
..., install the application software first. Setting up the application software To use a card reader to copy the images on the memory card due to the use the supplied USB cable to connect the camera to your camera Use this camera with the camera to your PC, the images could be damaged. for any loss or damage that may result from camera malfunction. å Keep this manual in the following order. Check [Removable Disk] Open Windows...
..., install the application software first. Setting up the application software To use a card reader to copy the images on the memory card due to the use the supplied USB cable to connect the camera to your camera Use this camera with the camera to your PC, the images could be damaged. for any loss or damage that may result from camera malfunction. å Keep this manual in the following order. Check [Removable Disk] Open Windows...
User Manual (ENGLISH)
Page 4
... How to use the DIS mode 022 Using the Photo Help Guide mode 023 How to use the Scene modes 3 After use the memory card 017 When using the AC adapter. Avoid leaving magnetic strip cards near case. Then make sure that any connector cords or cables to the USB port of time. When changing the composition, there may be an after using it is switched on how to turn on the LCD monitor. å...
... How to use the DIS mode 022 Using the Photo Help Guide mode 023 How to use the Scene modes 3 After use the memory card 017 When using the AC adapter. Avoid leaving magnetic strip cards near case. Then make sure that any connector cords or cables to the USB port of time. When changing the composition, there may be an after using it is switched on how to turn on the LCD monitor. å...

User Manual (ENGLISH)
Page 6
... Quick view 048 Display SAVE 049 Settings 049 Formatting a memory 049 Initialisation 050 Setting up the Date / Time / Date type 050 Time Zone 050 File name 051 Imprinting the recording date 051 Auto power off 052 Selecting Video out type 053 Auto Focus lamp 053 Setting the USB PLAY 054 54 054 054 055 055 055 056 056 056 058 Starting play mode Playing back a still image Playing back a movie clip Movie clip capture function Playing back a recorded voice Playing back a voice memo LCD monitor Indicator Using the camera buttons...
... Quick view 048 Display SAVE 049 Settings 049 Formatting a memory 049 Initialisation 050 Setting up the Date / Time / Date type 050 Time Zone 050 File name 051 Imprinting the recording date 051 Auto power off 052 Selecting Video out type 053 Auto Focus lamp 053 Setting the USB PLAY 054 54 054 054 055 055 055 056 056 056 058 Starting play mode Playing back a still image Playing back a movie clip Movie clip capture function Playing back a recorded voice Playing back a voice memo LCD monitor Indicator Using the camera buttons...
User Manual (ENGLISH)
Page 21
... the battery chamber cover. 4. Press the shutter button to capture an image. å If the auto focus frame turns to use the MENU button 1. Press the Up / Down button to insert the memory card. Auto Program DIS Photo Help Guide Scene Movie Exit Back 20 Mode Functions Sound Display Settings Exit Auto Program DIS Photo Help Guide Scene Movie Change Auto Program DIS Photo Help Guide Scene Movie Exit Back Auto Program DIS Photo Help Guide Scene Movie Exit Back Auto Program DIS Photo Help Guide Scene Movie Change How to red when you do not need...
... the battery chamber cover. 4. Press the shutter button to capture an image. å If the auto focus frame turns to use the MENU button 1. Press the Up / Down button to insert the memory card. Auto Program DIS Photo Help Guide Scene Movie Exit Back 20 Mode Functions Sound Display Settings Exit Auto Program DIS Photo Help Guide Scene Movie Change Auto Program DIS Photo Help Guide Scene Movie Exit Back Auto Program DIS Photo Help Guide Scene Movie Exit Back Auto Program DIS Photo Help Guide Scene Movie Change How to red when you do not need...

User Manual (ENGLISH)
Page 22
... and save the images. 21 Select the DIS mode by pressing the MENU button. (p.20) 2. If the lighting condition is darker than fluorescent lighting condi- The submenus for using the LCD monitor. 3. You can still manually configure all functions except the aperture value and shutter speed. 1. Press the Shutter button to watch out for the functions are as follows: Description EV White Balance ISO Face Detection Photo Size / Movie Size Quality...
... and save the images. 21 Select the DIS mode by pressing the MENU button. (p.20) 2. If the lighting condition is darker than fluorescent lighting condi- The submenus for using the LCD monitor. 3. You can still manually configure all functions except the aperture value and shutter speed. 1. Press the Shutter button to watch out for the functions are as follows: Description EV White Balance ISO Face Detection Photo Size / Movie Size Quality...

User Manual (ENGLISH)
Page 26
Lightly press the shutter button to Watch Out for When Taking Pictures å Pressing the shutter button down to flash shot mode. å Shooting against the light : Please do not take pictures against the light, please use a tripod, support the camera on shooting conditions and camera settings. å When the Flash Off, Slow synchro mode or DIS mode is moving at high speed. - When the subject matter has only horizontal lines or the subject...
Lightly press the shutter button to Watch Out for When Taking Pictures å Pressing the shutter button down to flash shot mode. å Shooting against the light : Please do not take pictures against the light, please use a tripod, support the camera on shooting conditions and camera settings. å When the Flash Off, Slow synchro mode or DIS mode is moving at high speed. - When the subject matter has only horizontal lines or the subject...
User Manual (ENGLISH)
Page 27
... recording, the recording will have no operation during the specified time, the camera's power will zoom into the subject i.e. Using both will appear nearer. This will be set the camera The recording mode function can be turned off automatically to save battery life. If you wish to page 51 for turning the camera's power on / off function. This camera has a 3X optical zoom and a 3X digital zoom function. Press the shutter button once and the movie...
... recording, the recording will have no operation during the specified time, the camera's power will zoom into the subject i.e. Using both will appear nearer. This will be set the camera The recording mode function can be turned off automatically to save battery life. If you wish to page 51 for turning the camera's power on / off function. This camera has a 3X optical zoom and a 3X digital zoom function. Press the shutter button once and the movie...

User Manual (ENGLISH)
Page 32
... Movie clip mode, the flash function will appear on the LCD monitor. When a shot with the flash, there may be automatically controlled to obtain a balanced correct exposure. Auto & Red eye reduction If a subject or background is dark, the camera flash will work automatically and will display on the LCD monitor. 31 The intensity of flash). In poor lighting conditions the camera shake warning indicator...
... Movie clip mode, the flash function will appear on the LCD monitor. When a shot with the flash, there may be automatically controlled to obtain a balanced correct exposure. Auto & Red eye reduction If a subject or background is dark, the camera flash will work automatically and will display on the LCD monitor. 31 The intensity of flash). In poor lighting conditions the camera shake warning indicator...
User Manual (ENGLISH)
Page 35
... STILL IMAGE mode. Mode Functions Sound Display Settings Exit Auto Program DIS Photo Help Guide Scene Movie [Pressing the OK button] Change Auto Program DIS Photo Help Guide Scene Movie Exit Back Functions ( ) Use the menu that enables the functions, or the Fn button, to the sub menu or for shifting the cursor to bring up the menus below: Mode Menu Available mode Page EV p.35 White Balance p.36 ISO p.37 Face Detection p.37 Face Tone p.39 Face Retouch p.39 Photo Size / Movie Size p.39...
... STILL IMAGE mode. Mode Functions Sound Display Settings Exit Auto Program DIS Photo Help Guide Scene Movie [Pressing the OK button] Change Auto Program DIS Photo Help Guide Scene Movie Exit Back Functions ( ) Use the menu that enables the functions, or the Fn button, to the sub menu or for shifting the cursor to bring up the menus below: Mode Menu Available mode Page EV p.35 White Balance p.36 ISO p.37 Face Detection p.37 Face Tone p.39 Face Retouch p.39 Photo Size / Movie Size p.39...
User Manual (ENGLISH)
Page 48
.... - Volume Start Sound Shutter Sound Beep Sound AF Sound Self-Portrait Back :Medium :Off :1 :1 Off :On On :On Set Setup menu In this mode, you can be displayed on the LCD monitor. Language :English Function Description Start Image Display Brightness :On Off :Off On :Auto Quick View Power Save :0.5sec :Off Back Set 47 Sound ( ) AF sound If you set AF sound to change without prior notice. Even if the battery is removed and inserted again, the language setting will be activated when the Shutter button...
.... - Volume Start Sound Shutter Sound Beep Sound AF Sound Self-Portrait Back :Medium :Off :1 :1 Off :On On :On Set Setup menu In this mode, you can be displayed on the LCD monitor. Language :English Function Description Start Image Display Brightness :On Off :Off On :Auto Quick View Power Save :0.5sec :Off Back Set 47 Sound ( ) AF sound If you set AF sound to change without prior notice. Even if the battery is removed and inserted again, the language setting will be activated when the Shutter button...

User Manual (ENGLISH)
Page 51
... will be set up the Date / Time / Date type You can change the image file name, the image may not play back. 50 Imprint Auto Power Off Back :2008/12/01 :London :Series Reset Serie:Os ff :3 min Set numbers that will be displayed on the LCD monitor when travelling overseas. - File names are assigned sequentially from 0001 even after deleting all or inserting a new memory card. [Series...
... will be set up the Date / Time / Date type You can change the image file name, the image may not play back. 50 Imprint Auto Power Off Back :2008/12/01 :London :Series Reset Serie:Os ff :3 min Set numbers that will be displayed on the LCD monitor when travelling overseas. - File names are assigned sequentially from 0001 even after deleting all or inserting a new memory card. [Series...

User Manual (ENGLISH)
Page 69
... memory card, the unprotected files in the camera's internal memory (i.e., not on the memory card) and it will not be deleted even if you protect an image, the protect icon will be displayed on the LCD monitor. (An unprotected image has no indicator) - And then press the Right button. 2. Delete Protect Voice memo DPOF Copy To Card Off :Off On Back Set [Voice memo menu] Start [Ready for 10 seconds. - OK button : Protect / release the image - An image in LOCK mode...
... memory card, the unprotected files in the camera's internal memory (i.e., not on the memory card) and it will not be deleted even if you protect an image, the protect icon will be displayed on the LCD monitor. (An unprotected image has no indicator) - And then press the Right button. 2. Delete Protect Voice memo DPOF Copy To Card Off :Off On Back Set [Voice memo menu] Start [Ready for 10 seconds. - OK button : Protect / release the image - An image in LOCK mode...

User Manual (ENGLISH)
Page 70
... an image carries DPOF instructions, the DPOF indicator ( ) will display. Zoom button : Select the number of prints. [All] : Configure number of prints for an image to print is displayed. - Select the pictures to be printed and how many prints to print. - Check that your memory card's MISC folder. Press the OK button to confirm the setting. Images can support the wide angle image when you print the image. Delete Protect Voice mSeemleoct Image DPOF Select All Copy To Card Reset :Off Standard Index Size 3. File...
... an image carries DPOF instructions, the DPOF indicator ( ) will display. Zoom button : Select the number of prints. [All] : Configure number of prints for an image to print is displayed. - Select the pictures to be printed and how many prints to print. - Check that your memory card's MISC folder. Press the OK button to confirm the setting. Images can support the wide angle image when you print the image. Delete Protect Voice mSeemleoct Image DPOF Select All Copy To Card Reset :Off Standard Index Size 3. File...
User Manual (ENGLISH)
Page 72
... display [Memory Full] message. When the [Series] of the file name. - And then Protect press the Right button. 2. Please be sure to delete any unnecessary files to free up space before inserting the memory card into the camera. å When you to copy image files, movie clips and voice recording files to the playback mode. Then the system will return to play mode. - [No] : Cancels "Copy to the memory card after the [Copying] message is set : The copied file names start...
... display [Memory Full] message. When the [Series] of the file name. - And then Protect press the Right button. 2. Please be sure to delete any unnecessary files to free up space before inserting the memory card into the camera. å When you to copy image files, movie clips and voice recording files to the playback mode. Then the system will return to play mode. - [No] : Cancels "Copy to the memory card after the [Copying] message is set : The copied file names start...
User Manual (ENGLISH)
Page 75
... time å Sand can be particularly troublesome to the user's guide that came with wet hands. - Environments where there is selected : All print and image settings will not be reset. Do not let sand get inside of sand. - To avoid dangerous electrical shocks, never hold or operate the camera with your printer's default setting, refer to cameras. - And then press File Name :Auto the Right button...
... time å Sand can be particularly troublesome to the user's guide that came with wet hands. - Environments where there is selected : All print and image settings will not be reset. Do not let sand get inside of sand. - To avoid dangerous electrical shocks, never hold or operate the camera with your printer's default setting, refer to cameras. - And then press File Name :Auto the Right button...
User Manual (ENGLISH)
Page 76
... or going on the surface of the lens. å If the digital camera is transferred from photo stores) to come into contact with a soft cloth. Take care to protect the memory card. å Camera Maintenance - In this occurs, turn off the camera and remove the memory card. It is not a malfunction. å When images are uploaded or downloaded, the data transfer may adopt the default settings by static electricity. Rough handling can...
... or going on the surface of the lens. å If the digital camera is transferred from photo stores) to come into contact with a soft cloth. Take care to protect the memory card. å Camera Maintenance - In this occurs, turn off the camera and remove the memory card. It is not a malfunction. å When images are uploaded or downloaded, the data transfer may adopt the default settings by static electricity. Rough handling can...

User Manual (ENGLISH)
Page 79
... default settings ÃReset the date and time correctly The camera buttons do not operate åCamera malfunction à Remove/re-insert battery and switch the camera on A card error has occurred while the memory card is in the camera. åIncorrect memory card format à Re-format the memory card The images don't play back åIncorrect file name (Violation of DCF format) à Do not change the image file name Colour of image is different to the original scene åWhite balance...
... default settings ÃReset the date and time correctly The camera buttons do not operate åCamera malfunction à Remove/re-insert battery and switch the camera on A card error has occurred while the memory card is in the camera. åIncorrect memory card format à Re-format the memory card The images don't play back åIncorrect file name (Violation of DCF format) à Do not change the image file name Colour of image is different to the original scene åWhite balance...

User Manual (ENGLISH)
Page 81
... Samsung standard conditions and may vary depending on shooting conditions and camera settings. Specifications Storage - Media ·Internal memory : About 9MB flash memory ·External Memory (Optional) : MMC card (Up to 1GB guaranteed) SD card (Up to 2GB guaranteed) SDHC card (Up to 8GB guaranteed) - File Format ·Still Image : JPEG (DCF), EXIF 2.21, DPOF 1.1, PictBridge 1.0 ·Movie Clip : AVI (MJPEG) ·Audio : WAV - Video output : NTSC, PAL (user...
... Samsung standard conditions and may vary depending on shooting conditions and camera settings. Specifications Storage - Media ·Internal memory : About 9MB flash memory ·External Memory (Optional) : MMC card (Up to 1GB guaranteed) SD card (Up to 2GB guaranteed) SDHC card (Up to 8GB guaranteed) - File Format ·Still Image : JPEG (DCF), EXIF 2.21, DPOF 1.1, PictBridge 1.0 ·Movie Clip : AVI (MJPEG) ·Audio : WAV - Video output : NTSC, PAL (user...
User Manual (ENGLISH)
Page 85
... application software first. Install DirectX, Samsung Master by an image editing program. å You can be installed. Setting up the application software To use this has been done, the stored images in the Auto run frame will display. If a recent version of DirectX has been installed on your computer, DirectX may not be edited by selecting a button shown on the monitor. Click the [Samsung Digital Camera Installer] menu...
... application software first. Install DirectX, Samsung Master by an image editing program. å You can be installed. Setting up the application software To use this has been done, the stored images in the Auto run frame will display. If a recent version of DirectX has been installed on your computer, DirectX may not be edited by selecting a button shown on the monitor. Click the [Samsung Digital Camera Installer] menu...

User Manual (ENGLISH)
Page 95
... recognised by clicking Start (Settings) Control Panel (Performance and Maintenance) System (Hardware) Device Manager), there are not compatible. Transfer the file again. Case 1 USB cable is not connected or it is connected to the camera. Case 4 When using the USB hub. Ã There may not recognise the camera. Case 5 Are other USB cable, and connect only one USB cable to the PC at the same time as a removable disk. Ã Stop the...
... recognised by clicking Start (Settings) Control Panel (Performance and Maintenance) System (Hardware) Device Manager), there are not compatible. Transfer the file again. Case 1 USB cable is not connected or it is connected to the camera. Case 4 When using the USB hub. Ã There may not recognise the camera. Case 5 Are other USB cable, and connect only one USB cable to the PC at the same time as a removable disk. Ã Stop the...


