User Manual (user Manual) (ver.f6) (English)
Page 1
SGH-A737 PORTABLE Quad-BAND MOBILE PHONE User Manual Please read this manual before operating your phone, and keep it for future reference.
SGH-A737 PORTABLE Quad-BAND MOBILE PHONE User Manual Please read this manual before operating your phone, and keep it for future reference.

User Manual (user Manual) (ver.f6) (English)
Page 2
...to , inventions (patentable or unpatentable), patents, trade secrets, copyrights, software, computer programs, and related documentation and other works of authorship. Samsung Telecommunications America (STA), LLC Headquarters: Customer Care Center: 1301 E. and its suppliers. Richardson, TX 75082 Plano, TX 75074 Toll Free ... System (Automated Response System) at: www.samsungwireless.com/support GH68-15819A Printed in the Intellectual Property is transferred to Samsung and protected under one or more of the following patents: U.S. Lookout Drive 1000 Klein St. No title to or...
...to , inventions (patentable or unpatentable), patents, trade secrets, copyrights, software, computer programs, and related documentation and other works of authorship. Samsung Telecommunications America (STA), LLC Headquarters: Customer Care Center: 1301 E. and its suppliers. Richardson, TX 75082 Plano, TX 75074 Toll Free ... System (Automated Response System) at: www.samsungwireless.com/support GH68-15819A Printed in the Intellectual Property is transferred to Samsung and protected under one or more of the following patents: U.S. Lookout Drive 1000 Klein St. No title to or...

User Manual (user Manual) (ver.f6) (English)
Page 3
...AS SET FORTH IN THE EXPRESS WARRANTY CONTAINED ON THE WARRANTY PAGE ENCLOSED WITH THE PRODUCT, THE PURCHASER TAKES THE PRODUCT "AS IS", AND SAMSUNG MAKES NO EXPRESS OR IMPLIED WARRANTY OF ANY KIND WHATSOEVER WITH RESPECT TO THE PRODUCT, INCLUDING BUT NOT LIMITED TO THE MERCHANTABILITY OF THE ... CONSTRUED TO CREATE AN EXPRESS OR IMPLIED WARRANTY OF ANY KIND WHATSOEVER WITH RESPECT TO THE PRODUCT. Exclusion of Warranties; A737_UCGI3_JS_092007_F6 IN ADDITION, SAMSUNG SHALL NOT BE LIABLE FOR ANY DAMAGES OF ANY KIND RESULTING FROM THE PURCHASE OR USE OF THE PRODUCT OR ARISING FROM THE BREACH OF...
...AS SET FORTH IN THE EXPRESS WARRANTY CONTAINED ON THE WARRANTY PAGE ENCLOSED WITH THE PRODUCT, THE PURCHASER TAKES THE PRODUCT "AS IS", AND SAMSUNG MAKES NO EXPRESS OR IMPLIED WARRANTY OF ANY KIND WHATSOEVER WITH RESPECT TO THE PRODUCT, INCLUDING BUT NOT LIMITED TO THE MERCHANTABILITY OF THE ... CONSTRUED TO CREATE AN EXPRESS OR IMPLIED WARRANTY OF ANY KIND WHATSOEVER WITH RESPECT TO THE PRODUCT. Exclusion of Warranties; A737_UCGI3_JS_092007_F6 IN ADDITION, SAMSUNG SHALL NOT BE LIABLE FOR ANY DAMAGES OF ANY KIND RESULTING FROM THE PURCHASE OR USE OF THE PRODUCT OR ARISING FROM THE BREACH OF...
User Manual (user Manual) (ver.f6) (English)
Page 4
Table of Contents Section 1: Getting Started 5 SIM Card Information 5 Install and charge the phone 5 Charging a Battery ...7 Installing the microSD Card 8 Turning the Phone On or Off 10 Setting Up Your Voice Mail 10 Section 2: Understanding Your Phone 12 Features of Your Phone 12 Open View of Your Phone 13 Closed View of Your Phone 15 Side Views of Your Phone 15 Display Layout ...16 Multitasking Menu 19 Selecting Functions and Options 19 Command Keys ...20 Section 3: Call Functions 23 Making a Call ...23 Answering a Call ...25 Video Share ...25 Play a Video Share Recording 26 ...
Table of Contents Section 1: Getting Started 5 SIM Card Information 5 Install and charge the phone 5 Charging a Battery ...7 Installing the microSD Card 8 Turning the Phone On or Off 10 Setting Up Your Voice Mail 10 Section 2: Understanding Your Phone 12 Features of Your Phone 12 Open View of Your Phone 13 Closed View of Your Phone 15 Side Views of Your Phone 15 Display Layout ...16 Multitasking Menu 19 Selecting Functions and Options 19 Command Keys ...20 Section 3: Call Functions 23 Making a Call ...23 Answering a Call ...25 Video Share ...25 Play a Video Share Recording 26 ...
User Manual (user Manual) (ver.f6) (English)
Page 5
Section 6: Understanding Your Address Book 46 Using Contacts ...46 Address Book Entry Options 47 Adding a New Contact 48 Dialing a Number from the SIM Card using the Location Number 51 Speed Dial List ...51 Finding My Own Phone Number 53 FDN Mode ...53 Group Settings ...54 Managing Address Book Entries 54 Section 7: Messaging 57 Types of Messages 57 Creating and Sending Text Messages 57 Creating and Sending Multimedia Messages 60 Locating a Message 63 Using Message Options 64 Using Instant Messenger (IM 65 Signing into Your Mobile Email 66 Signing into Your IM Account 66 Using ...
Section 6: Understanding Your Address Book 46 Using Contacts ...46 Address Book Entry Options 47 Adding a New Contact 48 Dialing a Number from the SIM Card using the Location Number 51 Speed Dial List ...51 Finding My Own Phone Number 53 FDN Mode ...53 Group Settings ...54 Managing Address Book Entries 54 Section 7: Messaging 57 Types of Messages 57 Creating and Sending Text Messages 57 Creating and Sending Multimedia Messages 60 Locating a Message 63 Using Message Options 64 Using Instant Messenger (IM 65 Signing into Your Mobile Email 66 Signing into Your IM Account 66 Using ...

User Manual (user Manual) (ver.f6) (English)
Page 6
Section 10: AT&T Music 96 Accessing AT&T Music 96 Using the Music Player 99 Playing Music while Multitasking 100 Using Playlists ...102 Using MusicID ...104 Streaming Music 106 Music Video ...107 The Buzz ...108 Community ...109 Music Apps ...109 Section 11: Cellular Video 110 Cellular Video Options 111 Media Clip Options 112 Using the Video Categories 113 Customizing Cellular Video 114 My Purchases ...115 Parental Controls 115 Section 12: Using the Applications 117 Shop Applications 117 Using the Camera 117 Using the Camcorder 122 Music Player ...125 Record Audio ...125 Alarms ...
Section 10: AT&T Music 96 Accessing AT&T Music 96 Using the Music Player 99 Playing Music while Multitasking 100 Using Playlists ...102 Using MusicID ...104 Streaming Music 106 Music Video ...107 The Buzz ...108 Community ...109 Music Apps ...109 Section 11: Cellular Video 110 Cellular Video Options 111 Media Clip Options 112 Using the Video Categories 113 Customizing Cellular Video 114 My Purchases ...115 Parental Controls 115 Section 12: Using the Applications 117 Shop Applications 117 Using the Camera 117 Using the Camcorder 122 Music Player ...125 Record Audio ...125 Alarms ...

User Manual (user Manual) (ver.f6) (English)
Page 7
Section 15: Health and Safety Information 146 Health and Safety Information 146 Samsung Mobile Products and Recycling 148 UL Certified Travel Adapter 148 Consumer Information on Wireless Phones 149 Road Safety ...155 Responsible Listening 157 Operating Environment 159 ...
Section 15: Health and Safety Information 146 Health and Safety Information 146 Samsung Mobile Products and Recycling 148 UL Certified Travel Adapter 148 Consumer Information on Wireless Phones 149 Road Safety ...155 Responsible Listening 157 Operating Environment 159 ...

User Manual (user Manual) (ver.f6) (English)
Page 8
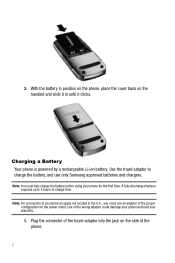
key until the 2. Install and charge the phone 1. Section 1: Getting Started Topics Covered • SIM Card Information • Charging a Battery • Installing the microSD Card • Turning the Phone On or Off • Setting Up Your Voice Mail This section describes the first steps to operating your PIN, and available optional services. Remove the battery by holding down and slide the battery cover away, as your phone. SIM Card Information When you subscribe for 3G cellular network services, you receive a plug-in USIM (Universal Subscriber Identity Module) card ...
key until the 2. Install and charge the phone 1. Section 1: Getting Started Topics Covered • SIM Card Information • Charging a Battery • Installing the microSD Card • Turning the Phone On or Off • Setting Up Your Voice Mail This section describes the first steps to operating your PIN, and available optional services. Remove the battery by holding down and slide the battery cover away, as your phone. SIM Card Information When you subscribe for 3G cellular network services, you receive a plug-in USIM (Universal Subscriber Identity Module) card ...

User Manual (user Manual) (ver.f6) (English)
Page 9
Install and charge the phone Inserting and Removing the SIM card Important!: The plug-in SIM card and its contacts can be easily damaged by scratches or bending. Use caution when inserting or removing the card and keep all SIM cards out of reach of the card are face down until it clicks into the socket. Press the battery down , then slide the SIM card into place. Make sure the gold contacts of children. Make sure that the battery is properly installed before switching on the phone. Align the battery tabs with the slots at the bottom of the phone. 2. Installing the Battery 1....
Install and charge the phone Inserting and Removing the SIM card Important!: The plug-in SIM card and its contacts can be easily damaged by scratches or bending. Use caution when inserting or removing the card and keep all SIM cards out of reach of the card are face down until it clicks into the socket. Press the battery down , then slide the SIM card into place. Make sure the gold contacts of children. Make sure that the battery is properly installed before switching on the phone. Align the battery tabs with the slots at the bottom of the phone. 2. Installing the Battery 1....
User Manual (user Manual) (ver.f6) (English)
Page 10
... in position on the phone, place the cover back on the side of the proper configuration for the first time. Note: You must use only Samsung approved batteries and chargers. A fully discharged battery requires up to charge the battery, and use an adaptor of the phone. 7 Use of charge time. With...
... in position on the phone, place the cover back on the side of the proper configuration for the first time. Note: You must use only Samsung approved batteries and chargers. A fully discharged battery requires up to charge the battery, and use an adaptor of the phone. 7 Use of charge time. With...

User Manual (user Manual) (ver.f6) (English)
Page 11
Installing the microSD Card Note: The previous illustration is the correct and incorrect method for proper insertion and removal. 1. Installing the microSD Card To add additional memory to avoid damage. Open the side slot to the accessory port will occur therefore voiding the phone's warranty. 2. Important!: The battery charging function may stop if you can insert a microSD card into the side of the phone. Use the following instructions and illustrations for connecting the charger. Getting Started 8 If the incorrect method is completely charged (the battery icon becomes still...
Installing the microSD Card Note: The previous illustration is the correct and incorrect method for proper insertion and removal. 1. Installing the microSD Card To add additional memory to avoid damage. Open the side slot to the accessory port will occur therefore voiding the phone's warranty. 2. Important!: The battery charging function may stop if you can insert a microSD card into the side of the phone. Use the following instructions and illustrations for connecting the charger. Getting Started 8 If the incorrect method is completely charged (the battery icon becomes still...

User Manual (user Manual) (ver.f6) (English)
Page 12
Low Battery Indicator When the battery is weak and only a few minutes of up to conserve the remaining battery power. 9 Warning!: Please note that the side with the metal connectors should be facing down when inserting the card. 3. The backlight turns off to 4GB. Push the microSD card into the slot until it clicks into place. Important!: The handset supports micro-SD cards of talk time remain, a warning tone sounds, the "Battery Low" message repeats at regular intervals on the display, and the empty battery icon blinks. To remove the card, a quick press releases the card from ...
Low Battery Indicator When the battery is weak and only a few minutes of up to conserve the remaining battery power. 9 Warning!: Please note that the side with the metal connectors should be facing down when inserting the card. 3. The backlight turns off to 4GB. Push the microSD card into the slot until it clicks into place. Important!: The handset supports micro-SD cards of talk time remain, a warning tone sounds, the "Battery Low" message repeats at regular intervals on the display, and the empty battery icon blinks. To remove the card, a quick press releases the card from ...
User Manual (user Manual) (ver.f6) (English)
Page 13
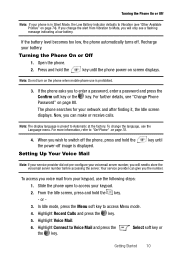
If you change the language, use the Language menu. Note: Do not turn on screen displays. To change the alert from your keypad, use is prohibited. 3. When you to Voice Mail and press the the key. Highlight Voice Mail. 6. Highlight Connect to enter a password, enter a password and press the Confirm soft key or the key. Open the phone. 2. If the phone asks you wish to Vibration (see 'Other Available Profiles" on page 74). From the Idle screen, press and hold the the power-off . or - 3. To access you voice mail from Vibration to Mute, you will only see...
If you change the language, use the Language menu. Note: Do not turn on screen displays. To change the alert from your keypad, use is prohibited. 3. When you to Voice Mail and press the the key. Highlight Voice Mail. 6. Highlight Connect to enter a password, enter a password and press the Confirm soft key or the key. Open the phone. 2. If the phone asks you wish to Vibration (see 'Other Available Profiles" on page 74). From the Idle screen, press and hold the the power-off . or - 3. To access you voice mail from Vibration to Mute, you will only see...

User Manual (user Manual) (ver.f6) (English)
Page 14
Highlight Recent Calls and press Select soft key or the key. 3. Highlight Voice Server Number and press the Select soft key or the key. 5. Press the key to return to access Menu mode. 2. In Idle mode, press the Menu soft key to Idle mode. 11 or - 7. To edit the Voice Mail Number, highlight Center Address and press to save this new number. 9. Use the following procedures to change the number. Highlight Voice Mail and press Select soft key or the key. 4. However, you default service number of the voice mail center. Press the Edit softkey. 6. To edit the Voice...
Highlight Recent Calls and press Select soft key or the key. 3. Highlight Voice Server Number and press the Select soft key or the key. 5. Press the key to return to access Menu mode. 2. In Idle mode, press the Menu soft key to Idle mode. 11 or - 7. To edit the Voice Mail Number, highlight Center Address and press to save this new number. 9. Use the following procedures to change the number. Highlight Voice Mail and press Select soft key or the key. 4. However, you default service number of the voice mail center. Press the Edit softkey. 6. To edit the Voice...

User Manual (user Manual) (ver.f6) (English)
Page 15
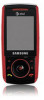
Features of the features included in use and offers many significant features. It also displays the screen and the icons that are displayed when the phone is lightweight, easy-to features and options. • Bluetooth • Camera and camcorder • Video Sharing • Multitasking • Instant Messaging capability • E-mail • Featured applications provide alarms, calendar, task lists, notes, calculator, record audio, converter, timer, stopwatch, and world time. • File viewer • Name card • Multimedia Message Service (MMS) • Multimedia ...
Features of the features included in use and offers many significant features. It also displays the screen and the icons that are displayed when the phone is lightweight, easy-to features and options. • Bluetooth • Camera and camcorder • Video Sharing • Multitasking • Instant Messaging capability • E-mail • Featured applications provide alarms, calendar, task lists, notes, calculator, record audio, converter, timer, stopwatch, and world time. • File viewer • Name card • Multimedia Message Service (MMS) • Multimedia ...

User Manual (user Manual) (ver.f6) (English)
Page 16
Navigation keys: This key allows you to scroll through phone menu options and provides a shortcut to the open and front view illustrations. 1. Display: This screen displays all the information needed to operate your phone: Keys The following list correlates to phone functions from standby mode. 13 • Speakerphone capability • Web browser Open View of Your Phone The following illustrations show the main elements of your phone. 2.
Navigation keys: This key allows you to scroll through phone menu options and provides a shortcut to the open and front view illustrations. 1. Display: This screen displays all the information needed to operate your phone: Keys The following list correlates to phone functions from standby mode. 13 • Speakerphone capability • Web browser Open View of Your Phone The following illustrations show the main elements of your phone. 2.

User Manual (user Manual) (ver.f6) (English)
Page 17
Soft keys: Perform the functions indicated by the screen text on /off/Menu Exit key: Ends a call. If you press and hold the key down, you to enter numbers, letters and some special characters. Special Function keys: Asterisk/Shift key ( )-enters the [*] character for calling features. Alphanumeric keypad: Use these keys to access both local and web-based Music applications. 5. Power on the bottom of Your Phone 3. Menu access/Confirm key (WAP browser): When navigating through a menu accepts the highlighted choice in an application. Pound/Space key-enters the pound [#] ...
Soft keys: Perform the functions indicated by the screen text on /off/Menu Exit key: Ends a call. If you press and hold the key down, you to enter numbers, letters and some special characters. Special Function keys: Asterisk/Shift key ( )-enters the [*] character for calling features. Alphanumeric keypad: Use these keys to access both local and web-based Music applications. 5. Power on the bottom of Your Phone 3. Menu access/Confirm key (WAP browser): When navigating through a menu accepts the highlighted choice in an application. Pound/Space key-enters the pound [#] ...

User Manual (user Manual) (ver.f6) (English)
Page 18
The volume keys can also be used when the Music Player is active. 15 To mute the ringer during a call , press the up or down volume key. This key is closed, press and hold these keys to navigate through the different menu options. Closed View of Your Phone Side Views of Your Phone Keys The following list correlates to adjust the ringer volume in standby mode or adjust the voice volume during an incoming call . When the phone is also used to scroll up or down to toggle the display on or off. Volume keys/Menu Navigation: Allows you to the side view illustrations. 1.
The volume keys can also be used when the Music Player is active. 15 To mute the ringer during a call , press the up or down volume key. This key is closed, press and hold these keys to navigate through the different menu options. Closed View of Your Phone Side Views of Your Phone Keys The following list correlates to adjust the ringer volume in standby mode or adjust the voice volume during an incoming call . When the phone is also used to scroll up or down to toggle the display on or off. Volume keys/Menu Navigation: Allows you to the side view illustrations. 1.

User Manual (user Manual) (ver.f6) (English)
Page 19
Display Layout The display has 3 areas: Icons Shows the received signal strength. When data is being transferred, this key to gain access to the music player keys when the flip is closed. Multitasking key: Launches the menu for additional data storage. 3. The greater the number of time, and/or dims the light, depending on page 76. Memory Card slot: Used to plug in the travel adapter (power), PC connection cable (data transfer), and optional headset for safe, convenient, hands-free conversations. 4. Back Light A back light illuminates the display and the keypad when you press...
Display Layout The display has 3 areas: Icons Shows the received signal strength. When data is being transferred, this key to gain access to the music player keys when the flip is closed. Multitasking key: Launches the menu for additional data storage. 3. The greater the number of time, and/or dims the light, depending on page 76. Memory Card slot: Used to plug in the travel adapter (power), PC connection cable (data transfer), and optional headset for safe, convenient, hands-free conversations. 4. Back Light A back light illuminates the display and the keypad when you press...

User Manual (user Manual) (ver.f6) (English)
Page 20
Appears when a TTY adapter is set to T-Coil ON, to adapt to another number. Appears when a new voice mail has been received. Appears when a new Over the Air (OTA) software update file has been received. Appears when the phone is accessing services in an EDGE network. Appears when an alarm is plugged into the handset, making it accessible via a keyboard for the hearing or speech impaired. Appears when a new multimedia message has been received. Appears when a push-messages has been received from the WAP server. Appears when a call is no network coverage available. Appears ...
Appears when a TTY adapter is set to T-Coil ON, to adapt to another number. Appears when a new voice mail has been received. Appears when a new Over the Air (OTA) software update file has been received. Appears when the phone is accessing services in an EDGE network. Appears when an alarm is plugged into the handset, making it accessible via a keyboard for the hearing or speech impaired. Appears when a new multimedia message has been received. Appears when a push-messages has been received from the WAP server. Appears when a call is no network coverage available. Appears ...
