User Manual (ENGLISH)
Page 31
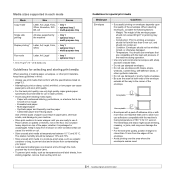
..., such as they print out. Condition: Envelopes should not exceed 90 g/m2 or jamming may even damage the fuser. • For the best print quality, position margins no closer than one sheet at a time through the multipurpose tray to avoid paper jams. • To prevent print media, such ...machine's fusing temperature of 180 °C for use in mind: • Always use print media that are ready to the corner of these guidelines in laser printers. • Avoid using the following factors: - Erasable bond paper - Place cartons on pallets or shelves, not on damp, curled, wrinkled, ...
..., such as they print out. Condition: Envelopes should not exceed 90 g/m2 or jamming may even damage the fuser. • For the best print quality, position margins no closer than one sheet at a time through the multipurpose tray to avoid paper jams. • To prevent print media, such ...machine's fusing temperature of 180 °C for use in mind: • Always use print media that are ready to the corner of these guidelines in laser printers. • Avoid using the following factors: - Erasable bond paper - Place cartons on pallets or shelves, not on damp, curled, wrinkled, ...
User Manual (ENGLISH)
Page 76
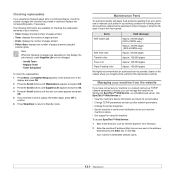
... the machine via Samsung's SyncThru™ Web Service, an embedded web server. Note While the following messages are available for using the scanner glass. Items ADF rubber pad ADF feed roller Transfer roller Fuser unit Paper Feeding roller Yield (Average) Approx. 20,000 pages (SCX-6122FN only) Approx. 35,000 pages (SCX-6322DN only) Approx...
... the machine via Samsung's SyncThru™ Web Service, an embedded web server. Note While the following messages are available for using the scanner glass. Items ADF rubber pad ADF feed roller Transfer roller Fuser unit Paper Feeding roller Yield (Average) Approx. 20,000 pages (SCX-6122FN only) Approx. 35,000 pages (SCX-6322DN only) Approx...

User Manual (ENGLISH)
Page 80
... 1] Open/Close Door [Paper Jam 2] Check Inside Duplex Jam Open/Close Door In the paper feed area (tray 1, optional tray 2, or multipurpose tray) In the fuser area or around the toner cartridge In the paper exit area below to the right using both hands. Once you remove the jammed paper here...
... 1] Open/Close Door [Paper Jam 2] Check Inside Duplex Jam Open/Close Door In the paper feed area (tray 1, optional tray 2, or multipurpose tray) In the fuser area or around the toner cartridge In the paper exit area below to the right using both hands. Once you remove the jammed paper here...

User Manual (ENGLISH)
Page 82
If paper is not seen in this area, skip to the Exit Area. 4 Push the fuser lever up through the fusing unit. In the fuser area or around the toner cartridge Note The fuser area is hot. In the paper exit area 1 Press the release lever to open the side cover. 2 Pull down on... resume printing. Take care when removing paper from the machine. 1 Lift the release lever to open the side cover. This will release pressure on the fuser lever as shown below. In the multi-purpose tray 1 If the paper is not feeding properly, pull the paper out of the machine. 3 Remove the...
If paper is not seen in this area, skip to the Exit Area. 4 Push the fuser lever up through the fusing unit. In the fuser area or around the toner cartridge Note The fuser area is hot. In the paper exit area 1 Press the release lever to open the side cover. 2 Pull down on... resume printing. Take care when removing paper from the machine. 1 Lift the release lever to open the side cover. This will release pressure on the fuser lever as shown below. In the multi-purpose tray 1 If the paper is not feeding properly, pull the paper out of the machine. 3 Remove the...

User Manual (ENGLISH)
Page 83
Printing automatically resumes. 14.5 2 Open the front cover. 5 Push the fuser lever up. 3 Pull down on the paper. 6 Turn the Jam Remove Lever back to the original position. 4 Turn the Jam Remove Lever in the direction of the arrow to move the paper to the exit area, then gently pull the paper out through the exit area. 7 Close the front cover " and the side cover o. This will release pressure on the fuser lever.
Printing automatically resumes. 14.5 2 Open the front cover. 5 Push the fuser lever up. 3 Pull down on the paper. 6 Turn the Jam Remove Lever back to the original position. 4 Turn the Jam Remove Lever in the direction of the arrow to move the paper to the exit area, then gently pull the paper out through the exit area. 7 Close the front cover " and the side cover o. This will release pressure on the fuser lever.
User Manual (ENGLISH)
Page 85
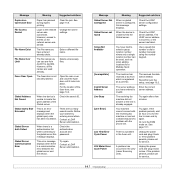
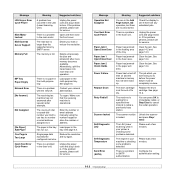
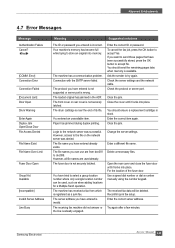
... a few minutes. Or, turn the ECM mode on the network server was successful. A problem has occurred in the fuser unit. If the problem persists, please call for a Multiple Send operation. Login to select a group location number where only...fuser door, see page 10.2. Contact a LDAP Server administrator. Message Global Server Not Configured Global Server not found Group Not Available [Incompatible] Invalid Server Address Line Busy [Line Error] Low Heat Error Cycle Power LSU Motor Error Cycle Power Meaning Suggested solutions When no global server is a problem in the LSU (Laser...
... a few minutes. Or, turn the ECM mode on the network server was successful. A problem has occurred in the fuser unit. If the problem persists, please call for a Multiple Send operation. Login to select a group location number where only...fuser door, see page 10.2. Contact a LDAP Server administrator. Message Global Server Not Configured Global Server not found Group Not Available [Incompatible] Invalid Server Address Line Busy [Line Error] Low Heat Error Cycle Power LSU Motor Error Cycle Power Meaning Suggested solutions When no global server is a problem in the LSU (Laser...
User Manual (ENGLISH)
Page 86
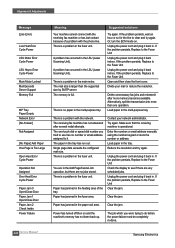
... (AUTH) Meaning Suggested solutions You are any scheduled jobs. See page 14.2 and page 14.3. The drum cartridge is a problem in the LSU (Laser Scanning Unit). See page 13.6. The machine is a problem in the multi-purpose tray. Please wait a few minutes. Divide your network administrator. tray... Paper has jammed in the paper exit area. Paper has jammed in the fuser area. Clear the jam. The job which you tried to see if there are in the has run out. The one operation. Enter the number or email address manually using the number keypad or ...
... (AUTH) Meaning Suggested solutions You are any scheduled jobs. See page 14.2 and page 14.3. The drum cartridge is a problem in the LSU (Laser Scanning Unit). See page 13.6. The machine is a problem in the multi-purpose tray. Please wait a few minutes. Divide your network administrator. tray... Paper has jammed in the paper exit area. Paper has jammed in the fuser area. Clear the jam. The job which you tried to see if there are in the has run out. The one operation. Enter the number or email address manually using the number keypad or ...
User Manual (ENGLISH)
Page 102
... types 3.2 operating systems 3.1 TCP/IP 3.1 new toner notification, send 13.8 n-up (multiple pages per sheet) copying 6.2 O one-touch dial numbers, set 10.3 originals jam, clear 14.1 loading 5.1 P paper guidelines 5.4 paper jam, clear duplex area 14.6 fuser area or around toner cartridge 14.4 multi-purpose tray 14.4 optional tray 2 14.3 paper exit area...
... types 3.2 operating systems 3.1 TCP/IP 3.1 new toner notification, send 13.8 n-up (multiple pages per sheet) copying 6.2 O one-touch dial numbers, set 10.3 originals jam, clear 14.1 loading 5.1 P paper guidelines 5.4 paper jam, clear duplex area 14.6 fuser area or around toner cartridge 14.4 multi-purpose tray 14.4 optional tray 2 14.3 paper exit area...

Service Manual
Page 3
Troubleshooting 6.1 Procedure of Checking the Symptoms 6-1 6.2 Solution 6-2 Disassembly and Reassembly 5.1 General Precautions on Disassembly 5-1 5.2 Rear Cover 5-1 5.3 Scanner Ass'y 5-2 5.4 DADF Ass'y 5-7 5.5 OPE Ass'y 5-11 5.6 Side Cover Ass'y 5-12 5.7 Fuser Ass'y 5-14 5.8 Exit Ass'y 5-15 5.9 Cover Paper Exit Ass'y 5-15 5.10 Drive Ass'y 5-16 5.11 SMPS 5-17 5.12 LSU (Laser Scaning Unit) 5-18 5.13 Cover Exit Rear 5-18 5.14 Main Frame Ass'y 5-19 5.15 MP Ass'y 5-20 5.16 Feed Ass'y 5-21 5.17 Pick Up Ass'y 5-22 5.18 Main PBA 5-23 6. Continued 5.
Troubleshooting 6.1 Procedure of Checking the Symptoms 6-1 6.2 Solution 6-2 Disassembly and Reassembly 5.1 General Precautions on Disassembly 5-1 5.2 Rear Cover 5-1 5.3 Scanner Ass'y 5-2 5.4 DADF Ass'y 5-7 5.5 OPE Ass'y 5-11 5.6 Side Cover Ass'y 5-12 5.7 Fuser Ass'y 5-14 5.8 Exit Ass'y 5-15 5.9 Cover Paper Exit Ass'y 5-15 5.10 Drive Ass'y 5-16 5.11 SMPS 5-17 5.12 LSU (Laser Scaning Unit) 5-18 5.13 Cover Exit Rear 5-18 5.14 Main Frame Ass'y 5-19 5.15 MP Ass'y 5-20 5.16 Feed Ass'y 5-21 5.17 Pick Up Ass'y 5-22 5.18 Main PBA 5-23 6. Continued 5.

Service Manual
Page 9
... works at a high temperature. Wait for the fuser to cool down before disassembly. (2) Take care not to tip or fall possibly causing personal injury or damaging the printer. (5) Do not install the printer ..., ensure the printer is installed on each side of supporting its weight. Failure to do not lift carefully. (4) Ensure the printer is stable. 1-4 Service Manual Samsung Electronics do not become caught in the mechanism as this warning may be caused if you move the printer. It contains many rotating parts. Use...
... works at a high temperature. Wait for the fuser to cool down before disassembly. (2) Take care not to tip or fall possibly causing personal injury or damaging the printer. (5) Do not install the printer ..., ensure the printer is installed on each side of supporting its weight. Failure to do not lift carefully. (4) Ensure the printer is stable. 1-4 Service Manual Samsung Electronics do not become caught in the mechanism as this warning may be caused if you move the printer. It contains many rotating parts. Use...
Service Manual
Page 11
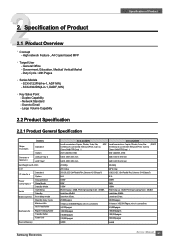
...30 sec. 20,000pages 5Years or 300,000 Pages, which comes first 50,000pages 100,000pages 100,000pages 100,000pages 64MB 64MB Samsung Electronics Service Manual 2-1 Duplex Capability - Network Standard - 22. Specification of Product 2.2 Product Specification 2.2.1 Product General Specification Items Major... g Standby from sleep mode Monthly Duty Cycle Machine Life ADF Feed Roller Machine Life Paper Feeding Roller Transfer Roller Fuser Unit Device Memory SCX-6122FN SCX-6322DN Local connection: Copier, Printer, Scan, Fax, AD F Local connection: Copier, Printer, Scan, Fax , DADF...
...30 sec. 20,000pages 5Years or 300,000 Pages, which comes first 50,000pages 100,000pages 100,000pages 100,000pages 64MB 64MB Samsung Electronics Service Manual 2-1 Duplex Capability - Network Standard - 22. Specification of Product 2.2 Product Specification 2.2.1 Product General Specification Items Major... g Standby from sleep mode Monthly Duty Cycle Machine Life ADF Feed Roller Machine Life Paper Feeding Roller Transfer Roller Fuser Unit Device Memory SCX-6122FN SCX-6322DN Local connection: Copier, Printer, Scan, Fax, AD F Local connection: Copier, Printer, Scan, Fax , DADF...
Service Manual
Page 22
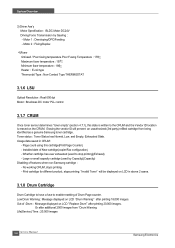
... Cartridge Drum Cartridge to have a fuse to the CRUM and the Vendor ID location is written to enable resetting of features when non-Samsung cartridge : - Motor 1 : Developing/OPC/Feeding - Toner status : Toner Status has Normal, Low, and Empty, Exhausted State. ... a genuine Samsung toner cartridge. No working CRUM, stops printing. - Low Drum Warning : Message displayed on LCD Replace Drum after printing 18,000 images. Motor 2 : Fixing/Duplex 4)Fuser Unfused / Poor fusing temperature Poor Fusing Temperature : 170 Maximum fuser temperature : 197 Minimum fuser temperature : 180...
... Cartridge Drum Cartridge to have a fuse to the CRUM and the Vendor ID location is written to enable resetting of features when non-Samsung cartridge : - Motor 1 : Developing/OPC/Feeding - Toner status : Toner Status has Normal, Low, and Empty, Exhausted State. ... a genuine Samsung toner cartridge. No working CRUM, stops printing. - Low Drum Warning : Message displayed on LCD Replace Drum after printing 18,000 images. Motor 2 : Fixing/Duplex 4)Fuser Unfused / Poor fusing temperature Poor Fusing Temperature : 170 Maximum fuser temperature : 197 Minimum fuser temperature : 180...

Service Manual
Page 34
... as shown below. Open and close the front cover to resume printing. 4. Samsung Electronics Service Manual 4-7 Remove the jammed paper, in this area, skip to open the side cover. In the fuser area or around the toner cartridge 1. Lift the release lever to the Exit Area. 5. If the paper is ...not seen in the direction shown. 2. Pull down on the paper. Push the fuser lever up, and then close the front cover to resume printing. Open and close the side cover. If paper is not feeding properly, pull the...
... as shown below. Open and close the front cover to resume printing. 4. Samsung Electronics Service Manual 4-7 Remove the jammed paper, in this area, skip to open the side cover. In the fuser area or around the toner cartridge 1. Lift the release lever to the Exit Area. 5. If the paper is ...not seen in the direction shown. 2. Pull down on the paper. Push the fuser lever up, and then close the front cover to resume printing. Open and close the side cover. If paper is not feeding properly, pull the...

Service Manual
Page 35
Close the front cover and the side cover . Push the fuser lever up. 6. Open the front cover. 5. Pull down on the paper. 4. Turn the Jam Remove Lever in the direction of the arrow to move the paper to open the side cover. 2. Press the release lever to the exit area, then gently pull the paper out through the exit area. 7. Alignment & Adjustments In the paper exit area 1. Turn the Jam Remove Lever back to the original position. 3. Printing automatically resumes. 4-8 Service Manual Samsung Electronics This will release pressure on the fuser lever.
Close the front cover and the side cover . Push the fuser lever up. 6. Open the front cover. 5. Pull down on the paper. 4. Turn the Jam Remove Lever in the direction of the arrow to move the paper to open the side cover. 2. Press the release lever to the exit area, then gently pull the paper out through the exit area. 7. Alignment & Adjustments In the paper exit area 1. Turn the Jam Remove Lever back to the original position. 3. Printing automatically resumes. 4-8 Service Manual Samsung Electronics This will release pressure on the fuser lever.

Service Manual
Page 42
.../closing the side-cover or POPO, will be less than 10sec). ON Start the FAN motors (Cooler on the Rear side and LSU) Turns on LASER diode in the OPC. This includes 500ms for the LSU motor to come to ALL MOTOR TEST) LSU MOTOR TEST...-energized after 300ms. CHECK Display the status of Actuator(Sensor) with the current toner state. ON Turns on the Fuser Heat lamp. NEXT Go to the next test (go to OPC FUSE STATE) Samsung Electronics Service Manual 4-15 FWD Start the Fuser_Motor in the LSU. OFF Stop the Fuser_Motor Deve. CHECK Display...
.../closing the side-cover or POPO, will be less than 10sec). ON Start the FAN motors (Cooler on the Rear side and LSU) Turns on LASER diode in the OPC. This includes 500ms for the LSU motor to come to ALL MOTOR TEST) LSU MOTOR TEST...-energized after 300ms. CHECK Display the status of Actuator(Sensor) with the current toner state. ON Turns on the Fuser Heat lamp. NEXT Go to the next test (go to OPC FUSE STATE) Samsung Electronics Service Manual 4-15 FWD Start the Fuser_Motor in the LSU. OFF Stop the Fuser_Motor Deve. CHECK Display...

Service Manual
Page 43
... to the top level of Engine test mode. 1 ALL MOTOR CONTROL 2 FUSER MOTOR CONTROL 3 DEV MOTOR CONTROL 4 DUPLEX CONTROL 5 FCF PICKUP CONTROL 6 M P PICKUP CONTROL 7 PTL CONTROL 8 FAN CONTROL 9 FUSER CONTROL 10 LSU MOTOR CONTROL 11 LASER DIODE CONTROL 12 SENSOR DETECT 13 MHV CONTROL 14 DEV CONTROL 15 THV NEG... CONTROL 16 THV CONTROL 17 MHV ADC READ 18 THV ADC READ 19 TEST END 4-16 Service Manual Samsung Electronics OFF Disconnect voltage from DEV...
... to the top level of Engine test mode. 1 ALL MOTOR CONTROL 2 FUSER MOTOR CONTROL 3 DEV MOTOR CONTROL 4 DUPLEX CONTROL 5 FCF PICKUP CONTROL 6 M P PICKUP CONTROL 7 PTL CONTROL 8 FAN CONTROL 9 FUSER CONTROL 10 LSU MOTOR CONTROL 11 LASER DIODE CONTROL 12 SENSOR DETECT 13 MHV CONTROL 14 DEV CONTROL 15 THV NEG... CONTROL 16 THV CONTROL 17 MHV ADC READ 18 THV ADC READ 19 TEST END 4-16 Service Manual Samsung Electronics OFF Disconnect voltage from DEV...

Service Manual
Page 44
... -12 33.6 10% NO > 0 - 6 ALL MOTOR TEST FCF SOLENOID TEST M F SOLENOID TEST PTL TEST FAN TEST FUSER CONTROL TEST FUSER TEMP TEST LSU MOTOR TEST LASER DIODE TEST LSU READY TEST LSU HSYNC TEST SENSOR TEST SCF MOTOR TEST SCF SOLENOID TEST SCF EMP/INST TEST OPC FUSE... 2:NEXT 1:ON 2:OFF 1:CHECK 2:NEXT 1:ON 2:OFF 1:ON 2:OFF 1:ON 2:OFF 1:CHECK 2:NEXT NEXT : RIGHT KEY 4.4.2.3 Operation of Tech mode Alignment & Adjustments Samsung Electronics Service Manual 4-17 Function Tech Mode Data Setup -- 1'st LCD 1 Data Setup 2 Machine Test 3 Engine Test 4 DADF Test 5 Report 2'st LCD [Send Level...
... -12 33.6 10% NO > 0 - 6 ALL MOTOR TEST FCF SOLENOID TEST M F SOLENOID TEST PTL TEST FAN TEST FUSER CONTROL TEST FUSER TEMP TEST LSU MOTOR TEST LASER DIODE TEST LSU READY TEST LSU HSYNC TEST SENSOR TEST SCF MOTOR TEST SCF SOLENOID TEST SCF EMP/INST TEST OPC FUSE... 2:NEXT 1:ON 2:OFF 1:CHECK 2:NEXT 1:ON 2:OFF 1:ON 2:OFF 1:ON 2:OFF 1:CHECK 2:NEXT NEXT : RIGHT KEY 4.4.2.3 Operation of Tech mode Alignment & Adjustments Samsung Electronics Service Manual 4-17 Function Tech Mode Data Setup -- 1'st LCD 1 Data Setup 2 Machine Test 3 Engine Test 4 DADF Test 5 Report 2'st LCD [Send Level...

Service Manual
Page 51
....30mm Horizontal density band 5 Transfer Roller 56.60mm Black side contamination/transfer fault 6 Heat Roller 83.60mm Black spot and fuser ghost 7 Pressure Roller 91.00mm Black side contamination 4-24 Service Manual Samsung Electronics Alignment & Adjustments 4.6 Abnormal Image Printing and Defective Roller If a mark or other printing defect occurs at regular intervals...
....30mm Horizontal density band 5 Transfer Roller 56.60mm Black side contamination/transfer fault 6 Heat Roller 83.60mm Black spot and fuser ghost 7 Pressure Roller 91.00mm Black side contamination 4-24 Service Manual Samsung Electronics Alignment & Adjustments 4.6 Abnormal Image Printing and Defective Roller If a mark or other printing defect occurs at regular intervals...
Service Manual
Page 52
...that have been successfully stored, press the OK button to doc999. The fuser door is available. The receiving fax machine did not answer or the ...Close Door File Access Denied File Name Exist File Name Over Limit Fuser Door Open Group Not Available [Incompatible] Invalid Server Address Line Busy ... The front cover or rear cover is near the end of the fuser door. The drum cartridge is not securely latched. You entered an unavailable...different file name. Delete unnecessary files. Open the rear cover and close the fuser door until it locks into place. For the location of its life. ...
...that have been successfully stored, press the OK button to doc999. The fuser door is available. The receiving fax machine did not answer or the ...Close Door File Access Denied File Name Exist File Name Over Limit Fuser Door Open Group Not Available [Incompatible] Invalid Server Address Line Busy ... The front cover or rear cover is near the end of the fuser door. The drum cartridge is not securely latched. You entered an unavailable...different file name. Delete unnecessary files. Open the rear cover and close the fuser door until it locks into place. For the location of its life. ...
Service Manual
Page 53
... . Clear the jam. A problem has occurred in the multi-purpose tray. If the problem persists, Replace to the Fuser Unit Clear the jam. Load paper in the LSU (Laser Scanning Unit). The receiving fax machine has not answered after more than the supported size by SMTP server. Enter the number... use has no number or email address assigned to do before the power failure must be completely re-done. 4-26 Service Manual Samsung Electronics There is larger than one -touch dial or speed dial number you were trying to it back in the feeding area of a problem with the network....
... . Clear the jam. A problem has occurred in the multi-purpose tray. If the problem persists, Replace to the Fuser Unit Clear the jam. Load paper in the LSU (Laser Scanning Unit). The receiving fax machine has not answered after more than the supported size by SMTP server. Enter the number... use has no number or email address assigned to do before the power failure must be completely re-done. 4-26 Service Manual Samsung Electronics There is larger than one -touch dial or speed dial number you were trying to it back in the feeding area of a problem with the network....


