Universal Print Driver Guide (ENGLISH)
Page 6
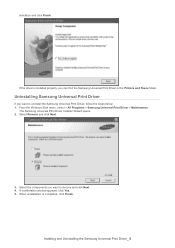
... the driver is completed, click Finish. Select Remove and click Next. 3. Installing and Uninstalling the Samsung Universal Print Driver_ 6 From the Windows Start menu, select > All Programs > Samsung Universal Print Driver > Maintenance. A confirmation window appears, click Yes. 5. checkbox and click Finish. Uninstalling Samsung Universal Print Driver If you want to remove and click Next. 4.
... the driver is completed, click Finish. Select Remove and click Next. 3. Installing and Uninstalling the Samsung Universal Print Driver_ 6 From the Windows Start menu, select > All Programs > Samsung Universal Print Driver > Maintenance. A confirmation window appears, click Yes. 5. checkbox and click Finish. Uninstalling Samsung Universal Print Driver If you want to remove and click Next. 4.
User Manual (ENGLISH)
Page 6
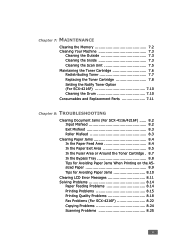
...MAINTENANCE Clearing the Memory 7.2 Cleaning Your Machine 7.3 Cleaning the Outside 7.3 Cleaning the Inside 7.3 Cleaning the Scan Unit 7.5 Maintaining the Toner Cartridge 7.6 Redistributing Toner 7.7 Replacing the Toner Cartridge 7.8 Setting the Notify Toner Option (For SCX-4216F 7.10 Cleaning the Drum 7.10 Consumables and Replacement Parts 7.11 Chapter 8: TROUBLESHOOTING Clearing Document Jams (For SCX... Problems 8.14 Paper Feeding Problems 8.14 Printing Problems 8.15 Printing Quality Problems 8.18 Fax Problems (For SCX-4216F 8.22 Copying Problems 8.24 Scanning Problems 8.25 v
...MAINTENANCE Clearing the Memory 7.2 Cleaning Your Machine 7.3 Cleaning the Outside 7.3 Cleaning the Inside 7.3 Cleaning the Scan Unit 7.5 Maintaining the Toner Cartridge 7.6 Redistributing Toner 7.7 Replacing the Toner Cartridge 7.8 Setting the Notify Toner Option (For SCX-4216F 7.10 Cleaning the Drum 7.10 Consumables and Replacement Parts 7.11 Chapter 8: TROUBLESHOOTING Clearing Document Jams (For SCX... Problems 8.14 Paper Feeding Problems 8.14 Printing Problems 8.15 Printing Quality Problems 8.18 Fax Problems (For SCX-4216F 8.22 Copying Problems 8.24 Scanning Problems 8.25 v

User Manual (ENGLISH)
Page 9
... LEN. STR LEN R FARLIG. viii Avoid using this machine during normal operation, user maintenance, or prescribed service condition. WARNING Never operate or service the printer with the protective cover removed from lightning. VARNING - SAVE THESE INSTRUCTIONS. INVISIBLE LASER RADIATION WHEN THIS COVER OPEN. There may require extensive work by the operating instructions...
... LEN. STR LEN R FARLIG. viii Avoid using this machine during normal operation, user maintenance, or prescribed service condition. WARNING Never operate or service the printer with the protective cover removed from lightning. VARNING - SAVE THESE INSTRUCTIONS. INVISIBLE LASER RADIATION WHEN THIS COVER OPEN. There may require extensive work by the operating instructions...
User Manual (ENGLISH)
Page 106
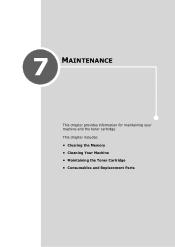
7 MAINTENANCE This chapter provides information for maintaining your machine and the toner cartridge. This chapter includes: • Clearing the Memory • Cleaning Your Machine • Maintaining the Toner Cartridge • Consumables and Replacement Parts
7 MAINTENANCE This chapter provides information for maintaining your machine and the toner cartridge. This chapter includes: • Clearing the Memory • Cleaning Your Machine • Maintaining the Toner Cartridge • Consumables and Replacement Parts

User Manual (ENGLISH)
Page 107
...• Sound/Volume: (only for SCX-4216F) Clears the speed dial or group dial numbers stored in the memory. 4 Press Enter. Clearing the Memory You can selectively clear information stored in your machine's memory. 1 Press Menu on the control panel until "Maintenance" appears on the top line of the... (only for SCX-4216F) Resets the sound and volume settings to the factory default. • Machine Setup: Resets all of records of the system settings, such as the machine ID, date and time, display language and save modes, to continue clearing the next item. 7.2 MAINTENANCE The first available ...
...• Sound/Volume: (only for SCX-4216F) Clears the speed dial or group dial numbers stored in the memory. 4 Press Enter. Clearing the Memory You can selectively clear information stored in your machine's memory. 1 Press Menu on the control panel until "Maintenance" appears on the top line of the... (only for SCX-4216F) Resets the sound and volume settings to the factory default. • Machine Setup: Resets all of records of the system settings, such as the machine ID, date and time, display language and save modes, to continue clearing the next item. 7.2 MAINTENANCE The first available ...
User Manual (ENGLISH)
Page 108
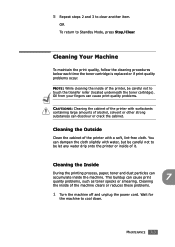
... reduces these problems. 1 Turn the machine off and unplug the power cord. This buildup can accumulate inside of the printer with a soft, lint-free cloth. MAINTENANCE 7.3 NOTE: While cleaning the inside of the printer, be careful not to be careful not to touch the transfer roller (located underneath the toner cartridge...
... reduces these problems. 1 Turn the machine off and unplug the power cord. This buildup can accumulate inside of the printer with a soft, lint-free cloth. MAINTENANCE 7.3 NOTE: While cleaning the inside of the printer, be careful not to be careful not to touch the transfer roller (located underneath the toner cartridge...
User Manual (ENGLISH)
Page 109
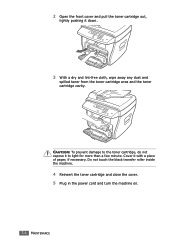
2 Open the front cover and pull the toner cartridge out, lightly pushing it to light for more than a few minute. CAUTION: To prevent damage to the toner cartridge, do not expose it down. 3 With a dry and lint-free cloth, wipe away any dust and spilled toner from the toner cartridge area and the toner cartridge cavity. Cover it with a piece of paper, if necessary. Do not touch the black transfer roller inside the machine. 4 Reinsert the toner cartridge and close the cover. 5 Plug in the power cord and turn the machine on. 7.4 MAINTENANCE
2 Open the front cover and pull the toner cartridge out, lightly pushing it to light for more than a few minute. CAUTION: To prevent damage to the toner cartridge, do not expose it down. 3 With a dry and lint-free cloth, wipe away any dust and spilled toner from the toner cartridge area and the toner cartridge cavity. Cover it with a piece of paper, if necessary. Do not touch the black transfer roller inside the machine. 4 Reinsert the toner cartridge and close the cover. 5 Plug in the power cord and turn the machine on. 7.4 MAINTENANCE

User Manual (ENGLISH)
Page 110
White sheet ADF glass Document cover Document glass 4 Wipe the underside of the document glass and ADF glass (for SCX-4116/4216F) until it is clean and dry. Cleaning the Scan Unit Keeping the scan unit clean helps ensure the best possible copies. We suggest ... a soft lint-free cloth or paper towel with water. 2 Open the document cover. 3 Wipe the surface of the white document cover and white sheet (for SCX-4116/4216F) until it is clean and dry. 5 Close the document cover. 7 MAINTENANCE 7.5
White sheet ADF glass Document cover Document glass 4 Wipe the underside of the document glass and ADF glass (for SCX-4116/4216F) until it is clean and dry. Cleaning the Scan Unit Keeping the scan unit clean helps ensure the best possible copies. We suggest ... a soft lint-free cloth or paper towel with water. 2 Open the document cover. 3 Wipe the surface of the white document cover and white sheet (for SCX-4116/4216F) until it is clean and dry. 5 Close the document cover. 7 MAINTENANCE 7.5
User Manual (ENGLISH)
Page 111
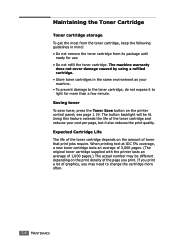
...; Do not refill the toner cartridge. Maintaining the Toner Cartridge Toner cartridge storage To get the most from its package until ready for more often. 7.6 MAINTENANCE The button backlight will be different depending on the print density of the toner cartridge depends on the printer control panel; Expected Cartridge Life The...
...; Do not refill the toner cartridge. Maintaining the Toner Cartridge Toner cartridge storage To get the most from its package until ready for more often. 7.6 MAINTENANCE The button backlight will be different depending on the print density of the toner cartridge depends on the printer control panel; Expected Cartridge Life The...

User Manual (ENGLISH)
Page 112
... print quality by redistributing the remaining toner in cold water. Hot water sets the toner into fabric. 3 Reinstall the cartridge and close the front cover. 7 MAINTENANCE 7.7
... print quality by redistributing the remaining toner in cold water. Hot water sets the toner into fabric. 3 Reinstall the cartridge and close the front cover. 7 MAINTENANCE 7.7
User Manual (ENGLISH)
Page 113
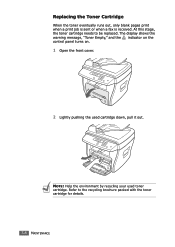
Refer to be replaced. Replacing the Toner Cartridge When the toner eventually runs out, only blank pages print when a print job is sent or when a fax is received. The display shows the warning message, "Toner Empty," and the indicator on the control panel turns on. 1 Open the front cover. 2 Lightly pushing the used toner cartridge. NOTE: Help the environment by recycling your used cartridge down, pull it out. At this stage, the toner cartridge needs to the recycling brochure packed with the toner cartridge for details. 7.8 MAINTENANCE
Refer to be replaced. Replacing the Toner Cartridge When the toner eventually runs out, only blank pages print when a print job is sent or when a fax is received. The display shows the warning message, "Toner Empty," and the indicator on the control panel turns on. 1 Open the front cover. 2 Lightly pushing the used toner cartridge. NOTE: Help the environment by recycling your used cartridge down, pull it out. At this stage, the toner cartridge needs to the recycling brochure packed with the toner cartridge for details. 7.8 MAINTENANCE
User Manual (ENGLISH)
Page 114
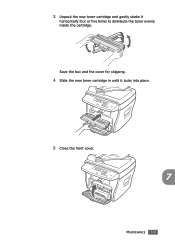
Save the box and the cover for shipping. 4 Slide the new toner cartridge in until it horizontally four or five times to distribute the toner evenly inside the cartridge. 3 Unpack the new toner cartridge and gently shake it locks into place. 5 Close the front cover. 7 MAINTENANCE 7.9
Save the box and the cover for shipping. 4 Slide the new toner cartridge in until it horizontally four or five times to distribute the toner evenly inside the cartridge. 3 Unpack the new toner cartridge and gently shake it locks into place. 5 Close the front cover. 7 MAINTENANCE 7.9

User Manual (ENGLISH)
Page 115
...to your service company or the dealer to change the setting. Setting the Notify Toner Option (For SCX-4216F) If you bought your machine. 1 Press Menu on the control panel until "Maintenance" appears on the top line of the display. Selecting "Off" disables this feature. Cleaning the ... bottom line. 2 Press the scroll button (¥ or Š) to the paper. 4 If the problem remains, repeat steps 1 through 3. 7.10 MAINTENANCE Toner particles on the top line of the cartridge may require cleaning. 1 Before setting the cleaning procedure, make sure that your selection. The fax number...
...to your service company or the dealer to change the setting. Setting the Notify Toner Option (For SCX-4216F) If you bought your machine. 1 Press Menu on the control panel until "Maintenance" appears on the top line of the display. Selecting "Off" disables this feature. Cleaning the ... bottom line. 2 Press the scroll button (¥ or Š) to the paper. 4 If the problem remains, repeat steps 1 through 3. 7.10 MAINTENANCE Toner particles on the top line of the cartridge may require cleaning. 1 Before setting the cleaning procedure, make sure that your selection. The fax number...
User Manual (ENGLISH)
Page 116
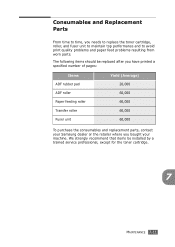
... Transfer roller Fuser unit Yield (Average) 20,000 60,000 60,000 60,000 60,000 To purchase the consumables and replacement parts, contact your Samsung dealer or the retailer where you needs to replace the toner cartridge, roller, and fuser unit to maintain top performance and to time, you bought... quality problems and paper feed problems resulting from worn parts. The following items should be installed by a trained service professional, except for the toner cartridge. 7 MAINTENANCE 7.11
... Transfer roller Fuser unit Yield (Average) 20,000 60,000 60,000 60,000 60,000 To purchase the consumables and replacement parts, contact your Samsung dealer or the retailer where you needs to replace the toner cartridge, roller, and fuser unit to maintain top performance and to time, you bought... quality problems and paper feed problems resulting from worn parts. The following items should be installed by a trained service professional, except for the toner cartridge. 7 MAINTENANCE 7.11

User Manual (KOREAN)
Page 160
45 ³" ÙÞz 45 ³" KÛ yI[ ~·XO Ÿº9ß
45 ³" ÙÞz 45 ³" KÛ yI[ ~·XO Ÿº9ß
