
User Manual (user Manual) (ver.f6) (English)
Page 1
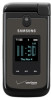
PORTABLE All Digital MOBILE PHONE User Manual Please read this manual before operating your phone, and keep it for future reference.
PORTABLE All Digital MOBILE PHONE User Manual Please read this manual before operating your phone, and keep it for future reference.

User Manual (user Manual) (ver.f6) (English)
Page 2
...suppliers. You may not infringe or otherwise violate the rights secured by or which is otherwise the property of Samsung or its respective suppliers relating to the SAMSUNG Phone, including but is not limited to, inventions (patentable or unpatentable), patents, trade secrets, copyrights, software,...programs, and related documentation and other works of authorship. No title to or ownership in the Intellectual Property is a registered trademark of Samsung Electronics America, Inc. Richardson, TX 75082 Plano, TX 75074 Toll Free Tel: 1.888.987.HELP (4357) Internet Address: http://www.samsungusa...
...suppliers. You may not infringe or otherwise violate the rights secured by or which is otherwise the property of Samsung or its respective suppliers relating to the SAMSUNG Phone, including but is not limited to, inventions (patentable or unpatentable), patents, trade secrets, copyrights, software,...programs, and related documentation and other works of authorship. No title to or ownership in the Intellectual Property is a registered trademark of Samsung Electronics America, Inc. Richardson, TX 75082 Plano, TX 75074 Toll Free Tel: 1.888.987.HELP (4357) Internet Address: http://www.samsungusa...
User Manual (user Manual) (ver.f6) (English)
Page 3
U.S. Alias™ 2 is covered by the Bluetooth SIG. To obtain the source code covered under GNU General Public License (GPL), GNU Lesser General Public License (LGPL), OpenSSL License, BSD License and other open source licenses, please visit: http://www.samsungnetwork.com/Home/opensource. U.S. ACCESS® and NetFront™ are wholly owned by U.S. The Bluetooth® word mark, figure mark (stylized "B Design"), and combination mark (Bluetooth word mark and "B Design") are registered trademarks and are trademarks or registered trademarks of this product incorporate ...
U.S. Alias™ 2 is covered by the Bluetooth SIG. To obtain the source code covered under GNU General Public License (GPL), GNU Lesser General Public License (LGPL), OpenSSL License, BSD License and other open source licenses, please visit: http://www.samsungnetwork.com/Home/opensource. U.S. ACCESS® and NetFront™ are wholly owned by U.S. The Bluetooth® word mark, figure mark (stylized "B Design"), and combination mark (Bluetooth word mark and "B Design") are registered trademarks and are trademarks or registered trademarks of this product incorporate ...

User Manual (user Manual) (ver.f6) (English)
Page 4
...OR THE COMPONENTS CONTAINED THEREIN; OR COMPLIANCE OF THE PRODUCT WITH THE REQUIREMENTS OF ANY LAW, RULE, SPECIFICATION OR CONTRACT PERTAINING THERETO. IN ADDITION, SAMSUNG SHALL NOT BE LIABLE FOR ANY DAMAGES OF ANY KIND RESULTING FROM THE PURCHASE OR USE OF THE PRODUCT OR ARISING FROM THE BREACH OF...AS SET FORTH IN THE EXPRESS WARRANTY CONTAINED ON THE WARRANTY PAGE ENCLOSED WITH THE PRODUCT, THE PURCHASER TAKES THE PRODUCT "AS IS", AND SAMSUNG MAKES NO EXPRESS OR IMPLIED WARRANTY OF ANY KIND WHATSOEVER WITH RESPECT TO THE PRODUCT, INCLUDING BUT NOT LIMITED TO THE MERCHANTABILITY OF THE ...
...OR THE COMPONENTS CONTAINED THEREIN; OR COMPLIANCE OF THE PRODUCT WITH THE REQUIREMENTS OF ANY LAW, RULE, SPECIFICATION OR CONTRACT PERTAINING THERETO. IN ADDITION, SAMSUNG SHALL NOT BE LIABLE FOR ANY DAMAGES OF ANY KIND RESULTING FROM THE PURCHASE OR USE OF THE PRODUCT OR ARISING FROM THE BREACH OF...AS SET FORTH IN THE EXPRESS WARRANTY CONTAINED ON THE WARRANTY PAGE ENCLOSED WITH THE PRODUCT, THE PURCHASER TAKES THE PRODUCT "AS IS", AND SAMSUNG MAKES NO EXPRESS OR IMPLIED WARRANTY OF ANY KIND WHATSOEVER WITH RESPECT TO THE PRODUCT, INCLUDING BUT NOT LIMITED TO THE MERCHANTABILITY OF THE ...
User Manual (user Manual) (ver.f6) (English)
Page 5
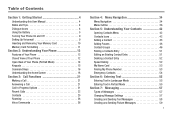
Table of Contents Section 1: Getting Started 4 Understanding this User Manual 4 Notes and Tips 4 Dialogue boxes 4 Using the Battery 5 Turning Your Phone On and Off 9 Setting Up Voicemail 9 Inserting and Removing Your Memory Card 10 Memory Card Formatting 11 Section 2: Understanding Your Phone 12 Features of Your Phone 12 Closed View of Your Phone 12 Open View of Your Phone (Portrait Mode 14 Keypads 15 Command Keys 16 Understanding the Home Screen 18 Section 3: Call Functions 21 Making a Call 21 Answering a Call 21 Call In-Progress Options 21 Recent Calls 22 Contacts 25 ...
Table of Contents Section 1: Getting Started 4 Understanding this User Manual 4 Notes and Tips 4 Dialogue boxes 4 Using the Battery 5 Turning Your Phone On and Off 9 Setting Up Voicemail 9 Inserting and Removing Your Memory Card 10 Memory Card Formatting 11 Section 2: Understanding Your Phone 12 Features of Your Phone 12 Closed View of Your Phone 12 Open View of Your Phone (Portrait Mode 14 Keypads 15 Command Keys 16 Understanding the Home Screen 18 Section 3: Call Functions 21 Making a Call 21 Answering a Call 21 Call In-Progress Options 21 Recent Calls 22 Contacts 25 ...

User Manual (user Manual) (ver.f6) (English)
Page 6
Creating and Sending Video Messages 61 Creating and Sending Voice Messages 62 Receiving New Messages 64 Message Folders 67 Voicemail 77 Visual Voice Mail 78 Mobile IM 78 Email 79 Chat 80 Section 8: Changing Your Settings 81 My Verizon 81 Tools 81 Bluetooth Menu 81 Sounds Settings 85 Display Settings 88 Phone Settings 94 Call Settings 102 TTY 103 Memory 105 USB Mode 106 Phone Info 107 Section 9: Media Center 108 Media Center 108 Music & Tones 108 Picture & Video 110 Games 115 Mobile Web 116 2 Browse & Download 116 Extras 117 Section 10: Music 118 Inserting and ...
Creating and Sending Video Messages 61 Creating and Sending Voice Messages 62 Receiving New Messages 64 Message Folders 67 Voicemail 77 Visual Voice Mail 78 Mobile IM 78 Email 79 Chat 80 Section 8: Changing Your Settings 81 My Verizon 81 Tools 81 Bluetooth Menu 81 Sounds Settings 85 Display Settings 88 Phone Settings 94 Call Settings 102 TTY 103 Memory 105 USB Mode 106 Phone Info 107 Section 9: Media Center 108 Media Center 108 Music & Tones 108 Picture & Video 110 Games 115 Mobile Web 116 2 Browse & Download 116 Extras 117 Section 10: Music 118 Inserting and ...

User Manual (user Manual) (ver.f6) (English)
Page 7
... Web Soft Keys 140 Links 141 Place a Call While Using Mobile Web 141 Section 14: Health and Safety Information 142 Health and Safety Information 142 Samsung Mobile Products and Recycling 143 UL Certified Travel Adapter 143 Consumer Information on Wireless Phones 144 Road Safety 149 Responsible Listening 151 Operating Environment 153...
... Web Soft Keys 140 Links 141 Place a Call While Using Mobile Web 141 Section 14: Health and Safety Information 142 Health and Safety Information 142 Samsung Mobile Products and Recycling 143 UL Certified Travel Adapter 143 Consumer Information on Wireless Phones 144 Road Safety 149 Responsible Listening 151 Operating Environment 153...
User Manual (user Manual) (ver.f6) (English)
Page 8
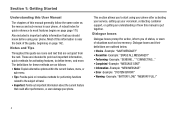
The definitions for these methods are intended to point out important information, quick methods for quick reference to define terms, and more. Dialogue boxes and their definitions are set apart from the rest. "CONNECTING..." • Completed -Example: "MESSAGE SENT" • Information -Example: "NEW MESSAGE" • Error -Example: "SYSTEM ERROR!" • Warning -Example: "BATTERY LOW," "MEMORY FULL!" 4 A robust index for activating features, to most features begins on page 142. These are as low memory. This section allows you of status, or warn of the guide, ...
The definitions for these methods are intended to point out important information, quick methods for quick reference to define terms, and more. Dialogue boxes and their definitions are set apart from the rest. "CONNECTING..." • Completed -Example: "MESSAGE SENT" • Information -Example: "NEW MESSAGE" • Error -Example: "SYSTEM ERROR!" • Warning -Example: "BATTERY LOW," "MEMORY FULL!" 4 A robust index for activating features, to most features begins on page 142. These are as low memory. This section allows you of status, or warn of the guide, ...

User Manual (user Manual) (ver.f6) (English)
Page 9
...press OK . Battery Indicator The battery indicator in the upper-right corner of a non-supported battery. Using A Non-Supported Battery Samsung handsets do not support the use of your phone. Note: When using a non-supported battery the handset can be used for ...If you could damage the battery. Two to operate, a blinking empty battery icon appears and a tone sounds. Samsung charging accessories (i.e. You must be recharged. Use a Samsung supported battery only. Getting Started 5 Using the Battery Note: This phone comes packaged with a partially charged rechargeable ...
...press OK . Battery Indicator The battery indicator in the upper-right corner of a non-supported battery. Using A Non-Supported Battery Samsung handsets do not support the use of your phone. Note: When using a non-supported battery the handset can be used for ...If you could damage the battery. Two to operate, a blinking empty battery icon appears and a tone sounds. Samsung charging accessories (i.e. You must be recharged. Use a Samsung supported battery only. Getting Started 5 Using the Battery Note: This phone comes packaged with a partially charged rechargeable ...

User Manual (user Manual) (ver.f6) (English)
Page 10
Press down until it snaps into the phone housing using the directional arrow printed on the phone. Insert the top end of the battery into place. 6 The gold contacts at the top of the battery down at the battery end must align with contacts on the battery. Push bottom end of the battery cover, and slide the battery cover back and lift up to remove. 2. Installing the Battery 1.
Press down until it snaps into the phone housing using the directional arrow printed on the phone. Insert the top end of the battery into place. 6 The gold contacts at the top of the battery down at the battery end must align with contacts on the battery. Push bottom end of the battery cover, and slide the battery cover back and lift up to remove. 2. Installing the Battery 1.

User Manual (user Manual) (ver.f6) (English)
Page 11
Removing the Battery 1. Slide the battery cover up until it snaps into place. 2. Getting Started 7 Lift the battery from the bottom end and remove. Press down at the top of the battery cover, and slide the battery cover back and lift up until it snaps into place. Slide the battery cover up to remove. 3. 3.
Removing the Battery 1. Slide the battery cover up until it snaps into place. 2. Getting Started 7 Lift the battery from the bottom end and remove. Press down at the top of the battery cover, and slide the battery cover back and lift up until it snaps into place. Slide the battery cover up to remove. 3. 3.

User Manual (user Manual) (ver.f6) (English)
Page 12
... the arrow up, into the connector. Note: The phone can be used while charging but will charge faster when powered off. Samsung accessories are designed to expose the connector. Only use Samsung-approved charging devices and batteries. Correct + Incorrect 8 Pull the connector cover out and turn to maximize battery life. Charging the...
... the arrow up, into the connector. Note: The phone can be used while charging but will charge faster when powered off. Samsung accessories are designed to expose the connector. Only use Samsung-approved charging devices and batteries. Correct + Incorrect 8 Pull the connector cover out and turn to maximize battery life. Charging the...
User Manual (user Manual) (ver.f6) (English)
Page 13
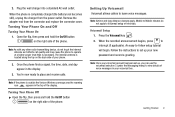
Remove the adapter end from the power outlet. Once the phone finds a signal, the time, date, and day appear in the top of your phone. 2. Setting Up Voicemail Voicemail allows callers to -follow setup tutorial will begin. Voicemail Setup 1. An easy-to leave voice messages. Follow the instructions to set up your voicemail box. You're now ready to interrupt (if applicable). Turning Your Phone On and Off Turning Your Phone On 1. The internal antenna is outside the Verizon Wireless coverage area the roaming icon appears in the display. 3. Note: If the phone is ...
Remove the adapter end from the power outlet. Once the phone finds a signal, the time, date, and day appear in the top of your phone. 2. Setting Up Voicemail Voicemail allows callers to -follow setup tutorial will begin. Voicemail Setup 1. An easy-to leave voice messages. Follow the instructions to set up your voicemail box. You're now ready to interrupt (if applicable). Turning Your Phone On and Off Turning Your Phone On 1. The internal antenna is outside the Verizon Wireless coverage area the roaming icon appears in the display. 3. Note: If the phone is ...

User Manual (user Manual) (ver.f6) (English)
Page 14
You are then prompted to unlock and remove. Lift memory card cover and insert the memory card, with the microSD™ memory card, it is fully seated. Correct Incorrect 10 Follow recorded prompts to listen to the following illustration. Refer to messages, change administrative options, etc. Listening to expose the card slot. 2. Inserting and Removing Your Memory Card Inserting Your microSD™ Card Note: Your phone does not come with the contacts side down, into the memory card slot until it must be purchased as an accessory. Pull the microSD card cover out and ...
You are then prompted to unlock and remove. Lift memory card cover and insert the memory card, with the microSD™ memory card, it is fully seated. Correct Incorrect 10 Follow recorded prompts to listen to the following illustration. Refer to messages, change administrative options, etc. Listening to expose the card slot. 2. Inserting and Removing Your Memory Card Inserting Your microSD™ Card Note: Your phone does not come with the contacts side down, into the memory card slot until it must be purchased as an accessory. Pull the microSD card cover out and ...

User Manual (user Manual) (ver.f6) (English)
Page 15
Memory Card Formatting Formatting a microSD™ Card using your PC For best playback of songs stored to the microSD™ memory card, reformat your PC. 4. Press Card Memory. 4. Note: Any content currently stored on the microSD™ memory card will be reformatted. 7. Open the flip in portrait mode and press OK MENU. Press OK . 6. Insert the microSD™ memory card into your phone. On your PC, go to your Alias™ 2 1. Remove the microSD™ card from the SD card reader and insert it back into an SD card adapter (purchased separately). 2. Plug the SD card...
Memory Card Formatting Formatting a microSD™ Card using your PC For best playback of songs stored to the microSD™ memory card, reformat your PC. 4. Press Card Memory. 4. Note: Any content currently stored on the microSD™ memory card will be reformatted. 7. Open the flip in portrait mode and press OK MENU. Press OK . 6. Insert the microSD™ memory card into your phone. On your PC, go to your Alias™ 2 1. Remove the microSD™ card from the SD card reader and insert it back into an SD card adapter (purchased separately). 2. Plug the SD card...
User Manual (user Manual) (ver.f6) (English)
Page 16
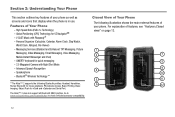
High Speed Data (EvDo 1x Technology) - Personal Organizer (Calculator, Calendar, Alarm Clock, Stop Watch, World Clock, Notepad, File Viewer) - Speakerphone - Closed View of Your Phone The following Bluetooth profiles: Headset, Handsfree, Stereo Bluetooth for music playback, Phonebook Access, Basic Printing, Basic Imaging, Object Push for VZ NavigatorSM - Global Positioning (GPS) Technology for vCard and vCalendar and Serial Port. Go to www.verizonwireless.com/bluetoothchart to check vehicle/accessory compatibility. V CAST Music with Night Shot Mode - Advanced Speech ...
High Speed Data (EvDo 1x Technology) - Personal Organizer (Calculator, Calendar, Alarm Clock, Stop Watch, World Clock, Notepad, File Viewer) - Speakerphone - Closed View of Your Phone The following Bluetooth profiles: Headset, Handsfree, Stereo Bluetooth for music playback, Phonebook Access, Basic Printing, Basic Imaging, Object Push for VZ NavigatorSM - Global Positioning (GPS) Technology for vCard and vCalendar and Serial Port. Go to www.verizonwireless.com/bluetoothchart to check vehicle/accessory compatibility. V CAST Music with Night Shot Mode - Advanced Speech ...
User Manual (user Manual) (ver.f6) (English)
Page 17
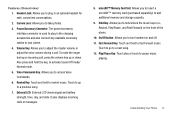
Volume Key: Allows you to insert a microSD™ memory card (purchased separately) to a previous song. 7. To mute the ringer during a call , press the volume key up or down. Touch to go to add additional memory and storage capacity. 9. Rewind Key: Touch and hold to adjust the master volume or adjust the voice volume during an incoming call . microSD™ Memory Card Slot: Allows you to fast forward music. External LCD: External LCD shows signal and battery strength, time, day, and date. It also displays incoming calls or messages. 8. Fast Forward Key: Touch and ...
Volume Key: Allows you to insert a microSD™ memory card (purchased separately) to a previous song. 7. To mute the ringer during a call , press the volume key up or down. Touch to go to add additional memory and storage capacity. 9. Rewind Key: Touch and hold to adjust the master volume or adjust the voice volume during an incoming call . microSD™ Memory Card Slot: Allows you to fast forward music. External LCD: External LCD shows signal and battery strength, time, day, and date. It also displays incoming calls or messages. 8. Fast Forward Key: Touch and ...
User Manual (user Manual) (ver.f6) (English)
Page 18
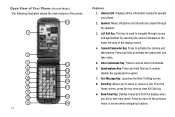
Internal LCD: Displays all the information needed to the previous menu or screen when navigating features. Press and hold this key to enable/ disable the speakerphone option. 7. Back/Clear Key: Deletes characters from the display when you to activate the camera and take video. 5. Speaker: Music, Ringtones and Sounds are in text entry mode. Camera/Camcorder Key: Press to place or receive a call. Press to return to operate your phone. 2. Left Soft Key: This key is used to activate the camcorder and take photos. Send Key: Allows you are played through menus and ...
Internal LCD: Displays all the information needed to the previous menu or screen when navigating features. Press and hold this key to enable/ disable the speakerphone option. 7. Back/Clear Key: Deletes characters from the display when you to activate the camera and take video. 5. Speaker: Music, Ringtones and Sounds are in text entry mode. Camera/Camcorder Key: Press to place or receive a call. Press to return to operate your phone. 2. Left Soft Key: This key is used to activate the camcorder and take photos. Send Key: Allows you are played through menus and ...

User Manual (user Manual) (ver.f6) (English)
Page 19
Vibration Key: Press to hear the other caller. 13. OK Key: Pressing when navigating through the phone menu options. 16. Games: Launches the Games screen. 19. Earpiece: The earpiece allows you to activate vibration mode. Voicemail/Visual Voice Mail Key: Press to navigate through menus and applications by selecting the choice indicated on or off. 15. 10. Right Soft Key: This key is in an application. 17. Keypads Your phone can be opened either vertically or horizontally. Bluetooth: Turn Bluetooth on the lower right area of the display screen. 14. Numeric ...
Vibration Key: Press to hear the other caller. 13. OK Key: Pressing when navigating through the phone menu options. 16. Games: Launches the Games screen. 19. Earpiece: The earpiece allows you to activate vibration mode. Voicemail/Visual Voice Mail Key: Press to navigate through menus and applications by selecting the choice indicated on or off. 15. 10. Right Soft Key: This key is in an application. 17. Keypads Your phone can be opened either vertically or horizontally. Bluetooth: Turn Bluetooth on the lower right area of the display screen. 14. Numeric ...

User Manual (user Manual) (ver.f6) (English)
Page 20
There are defined by what appears above each in the display. QWERTY Landscape Keypad - Symbols Command Keys Functions for the feature. • When the left soft key function is Edit, press the Edit (left soft key and the right soft key . Left Soft Key Some functions of the left soft key are as follows. • Press the Message (left) soft key to open the Messaging menu. • When the left soft key function is Settings, press the Settings (left) soft key to view settings for the soft keys are two soft keys, the left ) soft key to edit a Contact or Profile setting. Numeric 16 ...
There are defined by what appears above each in the display. QWERTY Landscape Keypad - Symbols Command Keys Functions for the feature. • When the left soft key function is Edit, press the Edit (left soft key and the right soft key . Left Soft Key Some functions of the left soft key are as follows. • Press the Message (left) soft key to open the Messaging menu. • When the left soft key function is Settings, press the Settings (left) soft key to view settings for the soft keys are two soft keys, the left ) soft key to edit a Contact or Profile setting. Numeric 16 ...
