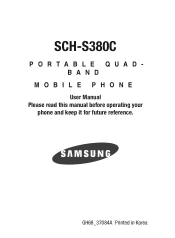
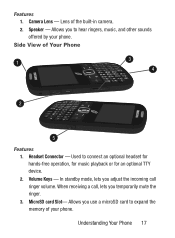
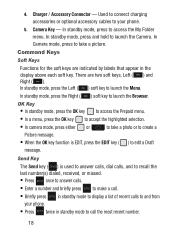
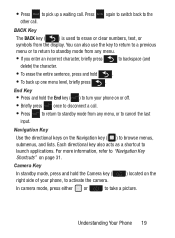
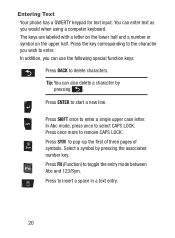
User Manual Ver.fd04_f2 (English(north America))
Page 1
SCH-S380C PORTABLE QUADBAND MOBILE PHONE User Manual Please read this manual before operating your phone and keep it for future reference. GH68_37084A Printed in Korea
User Manual Ver.fd04_f2 (English(north America))
Page 2
... Exclusion of Warranties; You may not infringe or otherwise violate the rights secured by or which is otherwise the property of Samsung or its suppliers. Open Source Software Some software components of , reverse engineer, decompile, disassemble, or otherwise attempt to ,... . All applicable rights of the Intellectual Property shall remain with SAMSUNG and its respective suppliers relating to the SAMSUNG Phone, including but is transferred to you will not (and will not attempt to Samsung and protected under federal laws, state laws, and international treaty...
User Manual Ver.fd04_f2 (English(north America))
Page 5
Table of Contents Section 1: Getting Started 5 Setting Up Your Phone 5 Charging the Battery 8 Activating Your Phone 10 Memory Card 12 Section 2: Understanding Your Phone 13 Features of Your Phone 13 Front View of Your Phone 14 Back View of Your Phone 16 Side View of Your Phone 17 Command Keys 18 Entering Text 20 Understanding the Display Screens...
User Manual Ver.fd04_f2 (English(north America))
Page 7
... 78 Section 13: Changing Your Settings 79 Accessing Your Settings 79 Location 79 Display Settings 80 Sound Settings 81 Call Settings 81 Phone Settings 83 Phone Info 83 Section 14: Health and Safety Information 84 Exposure to Radio Frequency (RF) Signals 84 Specific Absorption Rate (SAR) ...Certification Information 90 FCC Part 15 Information to User 91 Smart Practices While Driving 92 Battery Use and Safety 94 Samsung Mobile Products and ...
User Manual Ver.fd04_f2 (English(north America))
Page 9
...Use the Navigation key ( ) to move a highlighting effect onto a menu item or screen item of the device. 3. Press the outer ring up your phone. Ex: Settings ➔ Call Settings ➔ Call Answer. Removing the Battery Cover 1. Remove the battery cover by charging your battery, setting up , ...down (1) and away from the camera lens (2). If the phone is turned on, press and hold until the phone turns off. 2. In a single motion, use your voicemail and installing a memory card. Setting Up Your Phone Text Conventions This manual provides condensed information about how to use your...
User Manual Ver.fd04_f2 (English(north America))
Page 10
Slide the battery into place. 6 Carefuly complete the removal of the battery to those inside the phone battery compartment. 2. 4. Installing the Battery Your phone comes packaged with a partially charged rechargeable standard Li-Ion battery and travel adapter. Lightly press the end of the battery down into the phone until it slips into the open compartment and align the matching gold contacts of the cover. Note: Make sure the battery is properly installed before switching on the phone. 1.
User Manual Ver.fd04_f2 (English(north America))
Page 11
Use your thumbs to firmly slide the cover back onto the back of the phone and press down (1). 2. Getting Started 7 Place the battery cover on the back of the phone until it clicks into place (2). Replacing the Battery Cover 1.
User Manual Ver.fd04_f2 (English(north America))
Page 12
...connection to maximize battery life. Samsung accessories are designed to an electrical supply not located in North America, you could damage your phone and void your warranty. 2. Important! Only use your warranty and may invalidate your phone. Use of your phone from any 120/220 VAC ...connector on the right side of other accessories may cause damage. Charging the Battery Your phone is a convenient, light-weight charger that rapidly charges your phone. 8 Otherwise you must fully charge the battery the first time you use Samsung-approved charging devices and batteries.
User Manual Ver.fd04_f2 (English(north America))
Page 13
If you have two to three minutes before removing the battery from the phone during charging to avoid damage. Incorrect Correct Important! Monitor the battery strength and ensure your phone without charging its battery, the phone will shut down. Low Battery Indicator The battery indicator ( ) in the upper-right corner of the display indicates... a full charge. • An empty battery icon ( ) indicates a near empty battery. • A blinking empty battery icon ( ) and a tone sounding indicate you continue to operate the phone.
User Manual Ver.fd04_f2 (English(north America))
Page 14
... being turned off . Press and hold for less than one second, the phone will not power off. You're now ready to fully understand the services your phone supports. Your phone powers off accidentally. 10 Note: If you read this guide to place and receive calls. We suggest that ...), the No Service icon ( ) appears at another location. If you press for two or more seconds. Activating Your Phone Contact your Wireless Carrier and follow their instructions for a network signal. 3. Once the phone finds a signal, the time, date, and day appear at the top of the display. Note: If your...
User Manual Ver.fd04_f2 (English(north America))
Page 16
... back cover. 12 You can install a microSD™ card to operate your Music Player. Install a Memory Card 1. Incorrect Correct 3. Open the back cover of your phone. 2. Press the memory card inward until the card locks into place. 4. into the slot until the card lock releases. 3. Remove the memory card from the... the memory card into the memory card slot. Remove a Memory Card 1. A Memory Card is required to provide additional memory for storing files. Memory Card Your phone has a Memory Card slot located under the back cover.
User Manual Ver.fd04_f2 (English(north America))
Page 17
...) Messaging • Built-in use. It describes the screen format and the icons displayed when the phone is in 1.3 Megapixel Digital Camera • Voice Dial • Music Player (MP3 - up to 16 GB) Note: Your phone supports the wireless headset, hands-free, A2DP, Phonebook Access, serial port, file transfer profiles for Bluetooth...
User Manual Ver.fd04_f2 (English(north America))
Page 18
Press the Left soft key to navigate through a menu, accepts the highlighted choice. 3. Left Soft Key - OK Key - When navigating through menus and applications. Display Screen - Used to access the Main menu from the Idle screen and to select the function indicated at the lower left corner of the display. 14 Provides information about calls, messages, features, functions and the status of Your Phone 211 1 21 210 13 119 41 118 51 117 116 61 115 71 114 81 91 110 111 112 113 Features 1. Front View of your phone. 2.
User Manual Ver.fd04_f2 (English(north America))
Page 19
...mode, press to enter numbers, characters and symbols. 7. Press Unlock ➔ Space key to access the Messages menu. Space Key - Microphone - Understanding Your Phone 15 Shift Key - Toggles the text input mode to let you use the QWERTY keypad to enter numbers and symbols as well as selected until... 10. Voice Command Key - In text entry mode, allows you are speaking. 14. 4. Press to send your voice to be heard over the phone when you to lock the keypad. In standby mode, press to display the Calendar with the current day highlighted. 13. Speakerphone Key - Press and ...
User Manual Ver.fd04_f2 (English(north America))
Page 20
.... 15. In text entry mode, deletes characters from the display. 17. If you to select the function indicated at the lower right corner of Your Phone 1 12 16 In Standby mode, allows you press and hold the END key, the power goes On or Off. 19. In menu mode, returns you...
User Manual Ver.fd04_f2 (English(north America))
Page 21
Allows you to hear ringers, music, and other sounds offered by your phone. When receiving a call ringer volume. Allows you temporarily mute the ringer. 3. Understanding Your Phone 17 Camera Lens - Side View of the built-in camera. 2. MicroSD card Slot- Features 1. Speaker - In standby mode, lets you adjust the incoming call , lets ... to connect an optional headset for hands-free operation, for music playback or for an optional TTY device. 2. Used to expand the memory of your phone. Lens of Your Phone 13 1 14 21 51 Features 1. Headset Connector - Volume Keys -
User Manual Ver.fd04_f2 (English(north America))
Page 22
In standby mode, press the Right ( ) soft key to launch the Camera. Send Key The Send key ( ) is EDIT, press the EDIT key ( ) to your phone. • Press twice in the display above each soft key. In standby mode, press and hold to launch the Browser. In standby mode, press the .... • Enter a number and briefly press to make a call. • Briefly press in standby mode to display a list of recent calls to and from your phone. 5. 4. Charger / Accessory Connector - Used to connect charging accessories or optional accessory cables to edit a Draft message.
User Manual Ver.fd04_f2 (English(north America))
Page 23
... briefly press to backspace (and delete) the character. • To erase the entire sentence, press and hold the Camera key ( right side of your phone on the In camera mode, press either or to take a picture. Camera Key In standby mode, press and hold . • To back up a...Press again to switch back to the other call . Each directional key also acts as a shortcut to browse menus, submenus, and lists. Understanding Your Phone 19 Navigation Key Use the directional keys on page 31. • Press to pick up one menu level, briefly press . For more information, refer...
User Manual Ver.fd04_f2 (English(north America))
Page 24
... Abc and 123/Sym. The keys are labeled with a letter on the lower half and a number or symbol on the upper half. Entering Text Your phone has a QWERTY keypad for text input. You can also delete a character by pressing the associated number key. Press SYM to delete characters.
User Manual Ver.fd04_f2 (English(north America))
Page 25
... definitions of the Idle screen in an Icon Glossary. Ⅲ In standby mode, use the Left softkey ( Settings ➔ Phone Info ➔ Icon Glossary. ) to launch the Browser. The center portion of the display shows current soft key functions. The top line of screen displays ... mode, press the Left soft key (Menu) to display the Main Menu and press the Right soft key (Browser) to select Menu ➔ Understanding Your Phone 21 Understanding the Display Screens Main Display 1 12 31 41 1.