User Manual (ENGLISH)
Page 1
XJ22.05_PM_A670_111204_F6 SCH-A670 Series All Digital Mobile Phone User Guide Please read this guide before operating your phone, and keep it for future reference.
XJ22.05_PM_A670_111204_F6 SCH-A670 Series All Digital Mobile Phone User Guide Please read this guide before operating your phone, and keep it for future reference.

User Manual (ENGLISH)
Page 2
...in South Korea Revised November 12, 2004 GH68-05798A Openwave® is not limited to the SAMSUNG Phone, including but is a registered Trademark of Openwave, Inc. Lookout Dr. 1601 E. Samsung is a registered Trademark RSA Security, Inc. and its respective suppliers relating to , inventions (patentable... will not (and will not attempt to) modify, prepare derivative works of, reverse engineer, decompile, disassemble, or otherwise attempt to Samsung and protected under one or more of the following patents: U.S. Moreover, you agree that you . Intellectual Property includes, but not ...
...in South Korea Revised November 12, 2004 GH68-05798A Openwave® is not limited to the SAMSUNG Phone, including but is a registered Trademark of Openwave, Inc. Lookout Dr. 1601 E. Samsung is a registered Trademark RSA Security, Inc. and its respective suppliers relating to , inventions (patentable... will not (and will not attempt to) modify, prepare derivative works of, reverse engineer, decompile, disassemble, or otherwise attempt to Samsung and protected under one or more of the following patents: U.S. Moreover, you agree that you . Intellectual Property includes, but not ...
User Manual (ENGLISH)
Page 5
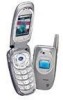
Contents SCH-A670 closed view 1 SCH-A670 open view 2 Quick Reference 3 Introduction 5 Key features of the SCH-A670 5 How to use this guide 5 Install the battery 6 Remove the battery 6 Charge the battery 7 Battery indicator 7 Understand your phone 8 The antenna 8 Backlight features 8 Power Save mode 9 Left soft key 9 Right soft key 10 ... LED 11 Microphone 11 Alpha-Numeric keypad 11 Speaker 11 Send key 12 Navigation key 12 Camera key 12 Your phone's display 12 Your phone's modes 15 Call Answer mode 15 Input mode 15 Lock mode 15 Standby mode 16 Talk mode 16 Enter/Exit...
Contents SCH-A670 closed view 1 SCH-A670 open view 2 Quick Reference 3 Introduction 5 Key features of the SCH-A670 5 How to use this guide 5 Install the battery 6 Remove the battery 6 Charge the battery 7 Battery indicator 7 Understand your phone 8 The antenna 8 Backlight features 8 Power Save mode 9 Left soft key 9 Right soft key 10 ... LED 11 Microphone 11 Alpha-Numeric keypad 11 Speaker 11 Send key 12 Navigation key 12 Camera key 12 Your phone's display 12 Your phone's modes 15 Call Answer mode 15 Input mode 15 Lock mode 15 Standby mode 16 Talk mode 16 Enter/Exit...
User Manual (ENGLISH)
Page 6
Turn your phone on 18 Turn your phone off 19 Make and answer calls 19 Call Waiting 20 Caller ID 21 Call Block 21 Three-way ...shortcut 27 In-Use menu 28 My Metro 29 Monthly Bill 29 MetroConnect 29 MetroPCS Card 30 Contacts 31 Open Contacts 31 Find 32 Rename group 35 Edit Contacts numbers 36 Add pauses 37 Store pauses in a Contacts entry 37 Pause dial from Contacts 38 ... Assign speed dial types 41 Assign a picture to a Contacts entry 42 Store numbers after a call 42 Shortcuts to storing phone numbers 44 One-Touch dialing 44 Two-Touch dialing 44 Three-Touch dialing 45 My...
Turn your phone on 18 Turn your phone off 19 Make and answer calls 19 Call Waiting 20 Caller ID 21 Call Block 21 Three-way ...shortcut 27 In-Use menu 28 My Metro 29 Monthly Bill 29 MetroConnect 29 MetroPCS Card 30 Contacts 31 Open Contacts 31 Find 32 Rename group 35 Edit Contacts numbers 36 Add pauses 37 Store pauses in a Contacts entry 37 Pause dial from Contacts 38 ... Assign speed dial types 41 Assign a picture to a Contacts entry 42 Store numbers after a call 42 Shortcuts to storing phone numbers 44 One-Touch dialing 44 Two-Touch dialing 44 Three-Touch dialing 45 My...
User Manual (ENGLISH)
Page 8
View an event 104 Jump to date 105 To Do List 105 Memo pad 107 Count Down 108 Alarm clock 110 World Time 112 Calculator 113 Setup 114 Location 114 Display 115 Sounds 119 Network 123 Security 123 Call Options 128 Shortcut 131 Usage guidelines: all about performance and safety 133 Getting the Most Out of Your Reception 133 Maintaining Safe Use of and Access to Your Phone 135 Caring for the Battery 139 Acknowledging Special Precautions and FCC 140 FDA Consumer Update 144 Owner's record 158 User Guide Proprietary Notice 158 Limited Warranty 159 Index 165 iv
View an event 104 Jump to date 105 To Do List 105 Memo pad 107 Count Down 108 Alarm clock 110 World Time 112 Calculator 113 Setup 114 Location 114 Display 115 Sounds 119 Network 123 Security 123 Call Options 128 Shortcut 131 Usage guidelines: all about performance and safety 133 Getting the Most Out of Your Reception 133 Maintaining Safe Use of and Access to Your Phone 135 Caring for the Battery 139 Acknowledging Special Precautions and FCC 140 FDA Consumer Update 144 Owner's record 158 User Guide Proprietary Notice 158 Limited Warranty 159 Index 165 iv

User Manual (ENGLISH)
Page 11
✂ Quick Reference 1) MY METRO 1) Monthly Bill 2) MetroConnect 3) MetroPCS Card 2) CONTACTS 1) Find 2) Add 3) Rename Group 4) My Phone# 5) Memory 3) CALLS 1) Outgoing 2) Incoming 3) Missed 4) Erase Logs 5) Call Timer 6) Data Counter 4) MESSAGES 1) New Text Msg 2) New Pix Msg 3) Voice Mail 4) Inbox 5) Outbox 6) Draft Box 7) Saved ...
✂ Quick Reference 1) MY METRO 1) Monthly Bill 2) MetroConnect 3) MetroPCS Card 2) CONTACTS 1) Find 2) Add 3) Rename Group 4) My Phone# 5) Memory 3) CALLS 1) Outgoing 2) Incoming 3) Missed 4) Erase Logs 5) Call Timer 6) Data Counter 4) MESSAGES 1) New Text Msg 2) New Pix Msg 3) Voice Mail 4) Inbox 5) Outbox 6) Draft Box 7) Saved ...

User Manual (ENGLISH)
Page 12
..., press again. 3. View Today's Calendar • In standby mode, press the left soft key ( ) Menu, then press , , ,. 2. ✂ Quick Reference (cont.) Turn the Phone On and Off Press and hold to open the Voice menu. 2. Use the navigation up or down keys to navigate the wallpaper source, then press..., press the left side of wallpaper, then press . Save a Number Quickly 1. Name Dial an Entry in your choice of the phone. • Press the volume key up /down to turn the phone off (if on) and on the left soft key ( ) Menu, then press , . To exit, press and hold . Check...
..., press again. 3. View Today's Calendar • In standby mode, press the left soft key ( ) Menu, then press , , ,. 2. ✂ Quick Reference (cont.) Turn the Phone On and Off Press and hold to open the Voice menu. 2. Use the navigation up or down keys to navigate the wallpaper source, then press..., press the left side of wallpaper, then press . Save a Number Quickly 1. Name Dial an Entry in your choice of the phone. • Press the volume key up /down to turn the phone off (if on) and on the left soft key ( ) Menu, then press , . To exit, press and hold . Check...
User Manual (ENGLISH)
Page 13
...to read this guide and become familiar with flash and video capture capabilities, voice recognition applications, and more. Key features of the Samsung SCHA670 mobile phone. Introduction 5 Also included is near the back of features such as a high-resolution display, PIM (Personal Information Manager) functions, a... are arranged in similar order to the menus and sub menus in digital camera with your phone. We ask that you take time to most features begins on page 133. The SCH-A670 offers a mixture of the guide, beginning on page 165. A robust index for this ...
...to read this guide and become familiar with flash and video capture capabilities, voice recognition applications, and more. Key features of the Samsung SCHA670 mobile phone. Introduction 5 Also included is near the back of features such as a high-resolution display, PIM (Personal Information Manager) functions, a... are arranged in similar order to the menus and sub menus in digital camera with your phone. We ask that you take time to most features begins on page 133. The SCH-A670 offers a mixture of the guide, beginning on page 165. A robust index for this ...
User Manual (ENGLISH)
Page 14
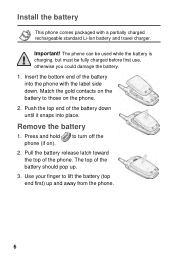
.... Use your finger to lift the battery (top end first) up . 3. Insert the bottom end of the battery down until it snaps into the phone with a partially charged rechargeable standard Li-Ion battery and travel charger. Important! Match the gold contacts on the battery to turn off the 2. to those... on ). The top of the phone. Press and hold phone (if on the phone. 2. Pull the battery release latch toward the top of the battery should pop up and away from the...
.... Use your finger to lift the battery (top end first) up . 3. Insert the bottom end of the battery down until it snaps into the phone with a partially charged rechargeable standard Li-Ion battery and travel charger. Important! Match the gold contacts on the battery to turn off the 2. to those... on ). The top of the phone. Press and hold phone (if on the phone. 2. Pull the battery release latch toward the top of the battery should pop up and away from the...
User Manual (ENGLISH)
Page 15
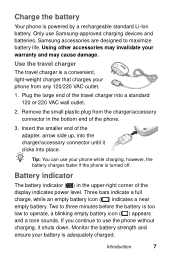
...blinking empty battery icon ( ) appears and a tone sounds. If you continue to maximize battery life. Tip: You can use your phone from the charger/accessory connector in the upper-right corner of the adapter, arrow side up, into the charger/accessory connector until it shuts..., while an empty battery icon ( ) indicates a near empty battery. Introduction 7 Samsung accessories are designed to use Samsung-approved charging devices and batteries. Plug the large end of the phone. 3. Only use the phone without charging, it clicks into a standard 120 or 220 VAC wall outlet. 2. Battery...
...blinking empty battery icon ( ) appears and a tone sounds. If you continue to maximize battery life. Tip: You can use your phone from the charger/accessory connector in the upper-right corner of the adapter, arrow side up, into the charger/accessory connector until it shuts..., while an empty battery icon ( ) indicates a near empty battery. Introduction 7 Samsung accessories are designed to use Samsung-approved charging devices and batteries. Plug the large end of the phone. 3. Only use the phone without charging, it clicks into a standard 120 or 220 VAC wall outlet. 2. Battery...
User Manual (ENGLISH)
Page 16
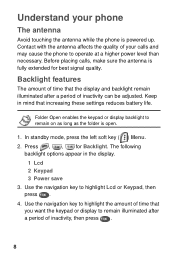
Backlight features The amount of time that you want the keypad or display to remain illuminated after a period of your phone The antenna Avoid touching the antenna while the phone is powered up. Before placing calls, make sure the antenna is open. 1. Use the navigation key to highlight the amount of time that... antenna affects the quality of inactivity can be adjusted. In standby mode, press the left soft key ( ) Menu. 2. Understand your calls and may cause the phone to operate at a higher power level than necessary.
Backlight features The amount of time that you want the keypad or display to remain illuminated after a period of your phone The antenna Avoid touching the antenna while the phone is powered up. Before placing calls, make sure the antenna is open. 1. Use the navigation key to highlight the amount of time that... antenna affects the quality of inactivity can be adjusted. In standby mode, press the left soft key ( ) Menu. 2. Understand your calls and may cause the phone to operate at a higher power level than necessary.
User Manual (ENGLISH)
Page 17
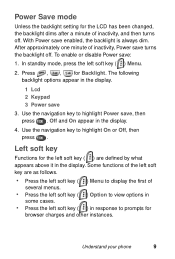
... of several menus. • Press the left soft key ( ) Option to view options in some cases. • Press the left soft key ( ) Menu. 2. Understand your phone 9 Power Save mode Unless the backlight setting for the LCD has been changed, the backlight dims after a minute of inactivity, and then turns off .
... of several menus. • Press the left soft key ( ) Option to view options in some cases. • Press the left soft key ( ) Menu. 2. Understand your phone 9 Power Save mode Unless the backlight setting for the LCD has been changed, the backlight dims after a minute of inactivity, and then turns off .
User Manual (ENGLISH)
Page 18
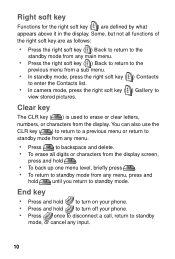
... up one menu level, briefly press . • To return to standby mode from the display. End key • Press and hold to turn off your phone. • Press and hold until you return to standby mode, or cancel any input. 10 Clear key The CLR key ( ) is used to view stored... mode, press the right soft key ( ) Gallery to erase or clear letters, numbers, or characters from any menu, press and hold to turn on your phone. • Press once to disconnect a call, return to standby mode. You can also use the CLR key ( ) to return to a previous menu or return to...
... up one menu level, briefly press . • To return to standby mode from the display. End key • Press and hold to turn off your phone. • Press and hold until you return to standby mode, or cancel any input. 10 Clear key The CLR key ( ) is used to view stored... mode, press the right soft key ( ) Gallery to erase or clear letters, numbers, or characters from any menu, press and hold to turn on your phone. • Press once to disconnect a call, return to standby mode. You can also use the CLR key ( ) to return to a previous menu or return to...
User Manual (ENGLISH)
Page 19
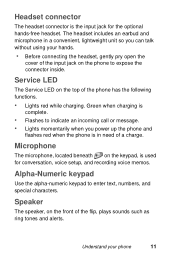
...to indicate an incoming call or message. • Lights momentarily when you power up the phone and flashes red when the phone is in a convenient, lightweight unit so you can talk without using your phone 11 Understand your hands. • Before connecting the headset, gently pry open the cover of...the optional hands-free headset. Service LED The Service LED on the front of the phone has the following functions. • Lights red while charging. Microphone The microphone, located beneath on the phone to enter text, numbers, and special characters. Speaker The speaker, on the top ...
...to indicate an incoming call or message. • Lights momentarily when you power up the phone and flashes red when the phone is in a convenient, lightweight unit so you can talk without using your phone 11 Understand your hands. • Before connecting the headset, gently pry open the cover of...the optional hands-free headset. Service LED The Service LED on the front of the phone has the following functions. • Lights red while charging. Microphone The microphone, located beneath on the phone to enter text, numbers, and special characters. Speaker The speaker, on the top ...
User Manual (ENGLISH)
Page 20
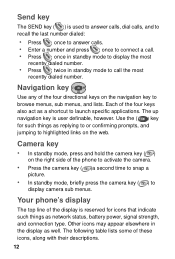
... the ( ) key for icons that indicate such things as replying to or confirming prompts, and jumping to highlighted links on the right side of the phone to activate the camera. • Press the camera key ( )a second time to snap a picture. • In standby mode, briefly press the camera key ( ) ...status, battery power, signal strength, and connection type. Camera key • In standby mode, press and hold the camera key ( ) on the web. Your phone's display The top line of the four keys also act as well. Each of the display is user definable, however. Navigation key Use any of...
... the ( ) key for icons that indicate such things as replying to or confirming prompts, and jumping to highlighted links on the right side of the phone to activate the camera. • Press the camera key ( )a second time to snap a picture. • In standby mode, briefly press the camera key ( ) ...status, battery power, signal strength, and connection type. Camera key • In standby mode, press and hold the camera key ( ) on the web. Your phone's display The top line of the four keys also act as well. Each of the display is user definable, however. Navigation key Use any of...
User Manual (ENGLISH)
Page 21
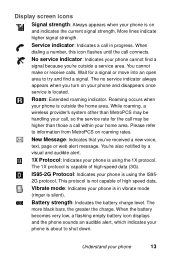
...Indicates a call in vibrate mode (ringer is in progress. You're also notified by a visual and audible alert. 1X Protocol: Indicates your phone is not capable of high-speed data (3G). This protocol is using the IS95- 2G protocol. When dialing a number, this icon flashes ...current signal strength. The 1X protocol is outside a service area. IS95-2G Protocol: Indicates your phone is on roaming rates. Display screen icons Signal strength: Always appears when your phone is using the 1X protocol. New Message: Indicates that you 're outside the home area. Vibrate...
...Indicates a call in vibrate mode (ringer is in progress. You're also notified by a visual and audible alert. 1X Protocol: Indicates your phone is not capable of high-speed data (3G). This protocol is using the IS95- 2G protocol. When dialing a number, this icon flashes ...current signal strength. The 1X protocol is outside a service area. IS95-2G Protocol: Indicates your phone is on roaming rates. Display screen icons Signal strength: Always appears when your phone is using the 1X protocol. New Message: Indicates that you 're outside the home area. Vibrate...

User Manual (ENGLISH)
Page 22
... activate the camera shutter. GPS: Indicates GPS is on for 911. Self Timer in use: Indicates the camera flash is set . Silent mode: Indicates your phone is in use : Delays the camera shutter from 5 to On. GPS (911 only): This icon represents Global Positioning Service (GPS) for location. ringer is silenced...
... activate the camera shutter. GPS: Indicates GPS is on for 911. Self Timer in use: Indicates the camera flash is set . Silent mode: Indicates your phone is in use : Delays the camera shutter from 5 to On. GPS (911 only): This icon represents Global Positioning Service (GPS) for location. ringer is silenced...

User Manual (ENGLISH)
Page 23
... to menus and the volume key. Input mode Input mode determines how you want to select the method for emergency numbers) until you unlock the phone. Lock Mode also restricts access to highlight an option. 3. In standby mode, press the left soft key ( ) Option, then choose the input mode from.... You can also cycle between T9 Word, ABC, and 123 by entering the lock code when prompted. Send Key Folder Open Any Key 2. Unlock your phone by repeatedly pressing and holding . Press to answer a call answer options appear in Lock Mode, restrictions are T9 Word, ABC, Symbol, and 123, and ...
... to menus and the volume key. Input mode Input mode determines how you want to select the method for emergency numbers) until you unlock the phone. Lock Mode also restricts access to highlight an option. 3. In standby mode, press the left soft key ( ) Option, then choose the input mode from.... You can also cycle between T9 Word, ABC, and 123 by entering the lock code when prompted. Send Key Folder Open Any Key 2. Unlock your phone by repeatedly pressing and holding . Press to answer a call answer options appear in Lock Mode, restrictions are T9 Word, ABC, Symbol, and 123, and ...
User Manual (ENGLISH)
Page 24
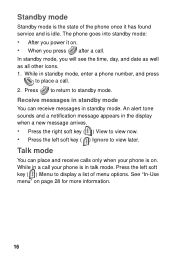
... ( ) View to view now. • Press the left soft key ( ) Menu to view later. Press the left soft key ( ) Ignore to display a list of the phone once it on. • When you will see the time, day, and date as well as all other icons. 1. While in standby mode. Receive messages... in standby mode You can place and receive calls only when your phone is in a call . See "In-Use menu" on . While in talk mode. Talk mode You can receive messages in standby mode, enter...
... ( ) View to view now. • Press the left soft key ( ) Menu to view later. Press the left soft key ( ) Ignore to display a list of the phone once it on. • When you will see the time, day, and date as well as all other icons. 1. While in standby mode. Receive messages... in standby mode You can place and receive calls only when your phone is in a call . See "In-Use menu" on . While in talk mode. Talk mode You can receive messages in standby mode, enter...
User Manual (ENGLISH)
Page 25
... mode, repeatedly press the volume key ( ) down . In standby mode, press the volume key ( ) on the left side of the phone up or down until Vibrate appears in the display when the phone is on the left soft key ( ) Menu, then , , , . Press once you press a key. • In standby mode,...Vib+Ring • Level 1 • Level 2 • Level 3 • Level 4 • Level 5 2. Adjust the ringer 1. The volume key is in the display and your phone returns to standby mode. Your phone's modes 17 Tip: You can also enter the Volume/Vibrate sub menu by pressing the left side of...
... mode, repeatedly press the volume key ( ) down . In standby mode, press the volume key ( ) on the left side of the phone up or down until Vibrate appears in the display when the phone is on the left soft key ( ) Menu, then , , , . Press once you press a key. • In standby mode,...Vib+Ring • Level 1 • Level 2 • Level 3 • Level 4 • Level 5 2. Adjust the ringer 1. The volume key is in the display and your phone returns to standby mode. Your phone's modes 17 Tip: You can also enter the Volume/Vibrate sub menu by pressing the left side of...


