
User Manual (ENGLISH)
Page 2
... ...8 Quick Start ...9 Notes and Safety Instructions 10 Getting to Know Your Device 15 Features ...15 Accessories Supplied with the Camcorder ...16 Basic Accessories ...16 Front & Left View ...17 Rear & Left View ...18 Rear & Right View ...19 Rear & Bottom View ...20 Remote ...Control ...21 OSD (On Screen Display in REC / PLAY Modes) ...22 OSD (On Screen Display) in (Camera) Modes ...23 Turning the OSD (On Screen Display) On / Off ...24 The Camcorder...
... ...8 Quick Start ...9 Notes and Safety Instructions 10 Getting to Know Your Device 15 Features ...15 Accessories Supplied with the Camcorder ...16 Basic Accessories ...16 Front & Left View ...17 Rear & Left View ...18 Rear & Right View ...19 Rear & Bottom View ...20 Remote ...Control ...21 OSD (On Screen Display in REC / PLAY Modes) ...22 OSD (On Screen Display) in (Camera) Modes ...23 Turning the OSD (On Screen Display) On / Off ...24 The Camcorder...
User Manual (ENGLISH)
Page 9
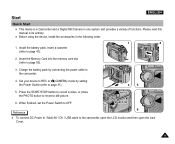
Insert the Memory Card into the memory card slot (refer to the camcorder. 4. Start ENGLISH Quick Start ✤ This device is a Camcorder and a Digital Still Camera in the following order: 1. PPPHHHOOOTTTOOO 6. Charge the battery pack by setting the Power Switch (refer to page 31). 34 5....When finished, set the Power Switch to the camcorder, open the LCD monitor and then open the Jack Cover. 9 Install the battery pack. Please read this manual in its entirety. ✤ Before using the device, install the accessories in one system and provides a variety of functions...
Insert the Memory Card into the memory card slot (refer to the camcorder. 4. Start ENGLISH Quick Start ✤ This device is a Camcorder and a Digital Still Camera in the following order: 1. PPPHHHOOOTTTOOO 6. Charge the battery pack by setting the Power Switch (refer to page 31). 34 5....When finished, set the Power Switch to the camcorder, open the LCD monitor and then open the Jack Cover. 9 Install the battery pack. Please read this manual in its entirety. ✤ Before using the device, install the accessories in one system and provides a variety of functions...
User Manual (ENGLISH)
Page 16
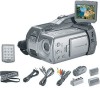
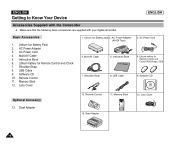
... 6. Lithium battery for Remote Control and Clock 7. Scart Adapter 16 AC Power Adapter 3. Multi-AV Cable 5. Software CD Optional Accessory 13. Lens Cover 13. Basic Accessories 1. AC Power Adapter (AA-E8 Type) 4. Remote Control 11. Remote Control 11. Lithium Ion Battery Pack 2. Shoulder Strap ... Lithium Ion Battery pack 2. USB Cable ENGLISH 3. Scart Adapter 10. USB Cable 9. ENGLISH Getting to Know Your Device Accessories Supplied with the Camcorder ✤ Make sure that the following basic accessories are supplied with your digital camcorder.
... 6. Lithium battery for Remote Control and Clock 7. Scart Adapter 16 AC Power Adapter 3. Multi-AV Cable 5. Software CD Optional Accessory 13. Lens Cover 13. Basic Accessories 1. AC Power Adapter (AA-E8 Type) 4. Remote Control 11. Remote Control 11. Lithium Ion Battery Pack 2. Shoulder Strap ... Lithium Ion Battery pack 2. USB Cable ENGLISH 3. Scart Adapter 10. USB Cable 9. ENGLISH Getting to Know Your Device Accessories Supplied with the Camcorder ✤ Make sure that the following basic accessories are supplied with your digital camcorder.

User Manual (ENGLISH)
Page 2
This symbol is intended to alert the user to constitute a risk of fire or electric shock. ACCESSORIES: Do not place this CAMCORDER near a swimming pool or lake. 8. Any mounting of important operating and maintenance instructions in the operating instructions should be moved with...combination to the unit. Do not use attachments not recommended by the manufacturer. WATER AND MOISTURE: Do not use a mounting accessory recommended by the CAMCORDER product manufacturer as they may fall, causing serious injury to a child or adult, and serious damage to overturn. ATTACHMENTS: Do...
This symbol is intended to alert the user to constitute a risk of fire or electric shock. ACCESSORIES: Do not place this CAMCORDER near a swimming pool or lake. 8. Any mounting of important operating and maintenance instructions in the operating instructions should be moved with...combination to the unit. Do not use attachments not recommended by the manufacturer. WATER AND MOISTURE: Do not use a mounting accessory recommended by the CAMCORDER product manufacturer as they may fall, causing serious injury to a child or adult, and serious damage to overturn. ATTACHMENTS: Do...

User Manual (ENGLISH)
Page 6
...Getting to Know Your Device 14 Features ...14 Accessories Supplied with the Camcorder ...15 Basic Accessories ...15 Front & Left View ...16 Left side View ...17 Right & Top View ...18 Rear & Bottom View ...19 Remote Control ...20 OSD (On Screen Display in CAMERA and PLAYER Modes) ...21 OSD (On Screen... Display in CAMERA / M.PLAY Modes) ...22 Turning the OSD on/...
...Getting to Know Your Device 14 Features ...14 Accessories Supplied with the Camcorder ...15 Basic Accessories ...15 Front & Left View ...16 Left side View ...17 Right & Top View ...18 Rear & Bottom View ...19 Remote Control ...20 OSD (On Screen Display in CAMERA and PLAYER Modes) ...21 OSD (On Screen... Display in CAMERA / M.PLAY Modes) ...22 Turning the OSD on/...

User Manual (ENGLISH)
Page 13
...; Before using the device, install the accessories in one system. When finished, set the Power Switch to the camcorder. 1 4. Insert the Memory Stick into the slot. 3. Charge the battery pack by flipping the lens body block. 3 4 5. Set the Power Switch to CAMCORDER mode or CAMERA mode by connecting the power cable to ...6 FADE TAPE MEMORY S.SHOW BLC OFF REC REV FWD 9 Start ENGLISH Quick Start ✤ This device provides a variety of functions because it is a Camcorder and Digital Still Camera in the following order: 1. Set your device to proposed position. 6.
...; Before using the device, install the accessories in one system. When finished, set the Power Switch to the camcorder. 1 4. Insert the Memory Stick into the slot. 3. Charge the battery pack by flipping the lens body block. 3 4 5. Set the Power Switch to CAMCORDER mode or CAMERA mode by connecting the power cable to ...6 FADE TAPE MEMORY S.SHOW BLC OFF REC REV FWD 9 Start ENGLISH Quick Start ✤ This device provides a variety of functions because it is a Camcorder and Digital Still Camera in the following order: 1. Set your device to proposed position. 6.

User Manual (ENGLISH)
Page 19
... Manual 6. Lithium Battery for Remote Control. (TYPE: CR2025) 7. Getting to Know Your Device Accessories Supplied with the Camcorder Make sure that the following basic accessories are supplied with your digital video camera. Remote Control (AD59-00100A) START/STOP PHOTO F.ADV TW STILL ZERO MEM. Tripod Adapter (AD97-06770A) 15 USB Cable 9. AUDIO/VIDEO cable (AD39-00099A...
... Manual 6. Lithium Battery for Remote Control. (TYPE: CR2025) 7. Getting to Know Your Device Accessories Supplied with the Camcorder Make sure that the following basic accessories are supplied with your digital video camera. Remote Control (AD59-00100A) START/STOP PHOTO F.ADV TW STILL ZERO MEM. Tripod Adapter (AD97-06770A) 15 USB Cable 9. AUDIO/VIDEO cable (AD39-00099A...

User Manual (ENGLISH)
Page 9
...mode appareil photo en basculant le bloc d'objectif. Please read this manual thoroughly. ✤ Before using the device, install the accessories in one system. When finished, set the Power Switch to proposed position. 6. Veuillez lire attentivement ce mode d'emploi. ✤... by connecting the power cable to CAMCORDER mode or CAMERA mode by flipping the lens body block. 5. Set your device to the camcorder. 3 4. ENGLISH Start Quick Start ✤ This device provides a variety of functions because it is a Camcorder and Digital Still Camera in the following order: 1. Apr...
...mode appareil photo en basculant le bloc d'objectif. Please read this manual thoroughly. ✤ Before using the device, install the accessories in one system. When finished, set the Power Switch to proposed position. 6. Veuillez lire attentivement ce mode d'emploi. ✤... by connecting the power cable to CAMCORDER mode or CAMERA mode by flipping the lens body block. 5. Set your device to the camcorder. 3 4. ENGLISH Start Quick Start ✤ This device provides a variety of functions because it is a Camcorder and Digital Still Camera in the following order: 1. Apr...

User Manual (ENGLISH)
Page 15
...199;AIS Familiarisez-vous avec votre appareil Accessories Supplied with the Camcorder Make sure that the following basic accessories are supplied with your digital video camera. Shoulder Strap 8. Memory Stick 12.... Lithium Ion Battery pack 2. Câble AUDIO/VIDEO 5. Bandoulière 8. Memory Stick 12. Instruction Manual 6. USB Cable 9. AC cord 4. Instruction Book 6. Software CD 10. Tripod Adapter START/STOP PHOTO F.ADV TW STILL...
...199;AIS Familiarisez-vous avec votre appareil Accessories Supplied with the Camcorder Make sure that the following basic accessories are supplied with your digital video camera. Shoulder Strap 8. Memory Stick 12.... Lithium Ion Battery pack 2. Câble AUDIO/VIDEO 5. Bandoulière 8. Memory Stick 12. Instruction Manual 6. USB Cable 9. AC cord 4. Instruction Book 6. Software CD 10. Tripod Adapter START/STOP PHOTO F.ADV TW STILL...

User Manual (ENGLISH)
Page 2
...Instructions 10 Getting to Know Your Device 14 Features 14 Accessories Supplied with the Camcorder 15 Basic Accessories 15 Front & Left View 16 Left side View 17 Right & Top View 18 Rear & Bottom View 19 Remote Control 20 OSD (On Screen Display in CAMERA and PLAYER Modes 21 OSD (On Screen Display in... CAMERA / M.PLAY Modes 22 Turning the OSD on/off (On Screen...
...Instructions 10 Getting to Know Your Device 14 Features 14 Accessories Supplied with the Camcorder 15 Basic Accessories 15 Front & Left View 16 Left side View 17 Right & Top View 18 Rear & Bottom View 19 Remote Control 20 OSD (On Screen Display in CAMERA and PLAYER Modes 21 OSD (On Screen Display in... CAMERA / M.PLAY Modes 22 Turning the OSD on/off (On Screen...

User Manual (ENGLISH)
Page 9
...5. When finished, set the Power Switch to proposed position. 6. Set your device to CAMCORDER mode or CAMERA mode by connecting the power cable to the camcorder. 3 4. Please read ✤ this manual thoroughly. ✤ Before using the device, install the accessories in one system. Set the Power Switch to OFF. 5 FADE S.SHOW BLC PLAY ... Memory Stick into the slot. 1 3. Install the battery pack. 2 2. ENGLISH Start Quick Start ✤ This device provides a variety of functions because it is a ✤ Camcorder and Digital Still Camera in the following order: 1.
...5. When finished, set the Power Switch to proposed position. 6. Set your device to CAMCORDER mode or CAMERA mode by connecting the power cable to the camcorder. 3 4. Please read ✤ this manual thoroughly. ✤ Before using the device, install the accessories in one system. Set the Power Switch to OFF. 5 FADE S.SHOW BLC PLAY ... Memory Stick into the slot. 1 3. Install the battery pack. 2 2. ENGLISH Start Quick Start ✤ This device provides a variety of functions because it is a ✤ Camcorder and Digital Still Camera in the following order: 1.

User Manual (ENGLISH)
Page 15
...4. Software CD 10. ENGLISH Getting to Know Your Device Accessories Supplied with the Camcorder Make sure that the following basic accessories are supplied with your digital video camera. Instruction Manual 6. Software CD 10. Instruction Book 6. Shoulder strap 8. Tripod Adapter START/STOP PHOTO F.ADV TW STILL ZERO MEM. Shoulder Strap 8. AC Power Adapter 3. Tripod...AUDIO/VIDEO cable 5. USB cable 9. AUDIO/VIDEO Cable 5. USB Cable 9. Lithium Battery for Remote Control. (TYPE: CR2025) 7. Remote Control 11. Basic Accessories 1. Lithium Ion Battery pack 2.
...4. Software CD 10. ENGLISH Getting to Know Your Device Accessories Supplied with the Camcorder Make sure that the following basic accessories are supplied with your digital video camera. Instruction Manual 6. Software CD 10. Instruction Book 6. Shoulder strap 8. Tripod Adapter START/STOP PHOTO F.ADV TW STILL ZERO MEM. Shoulder Strap 8. AC Power Adapter 3. Tripod...AUDIO/VIDEO cable 5. USB cable 9. AUDIO/VIDEO Cable 5. USB Cable 9. Lithium Battery for Remote Control. (TYPE: CR2025) 7. Remote Control 11. Basic Accessories 1. Lithium Ion Battery pack 2.

User Manual (ENGLISH)
Page 3
...uneven surfaces may be retained for dusting cabinets. 7. HEED WARNINGS: All warnings on an unstable cart, stand, tripod, bracket or table. ACCESSORIES: Do not place this CAMCORDER near a swimming pool or lake. 8. Use only with a cart, stand, tripod, bracket, or table recommended by the manufacturer. An... of plug to the presence of fire or electric shock. Do not use a mounting accessory recommended by the manufacturer or sold with care. ATTACHMENTS: Do not use this CAMCORDER on the CAMCORDER and in a wet basement, near water; This symbol is intended to alert the user...
...uneven surfaces may be retained for dusting cabinets. 7. HEED WARNINGS: All warnings on an unstable cart, stand, tripod, bracket or table. ACCESSORIES: Do not place this CAMCORDER near a swimming pool or lake. 8. Use only with a cart, stand, tripod, bracket, or table recommended by the manufacturer. An... of plug to the presence of fire or electric shock. Do not use a mounting accessory recommended by the manufacturer or sold with care. ATTACHMENTS: Do not use this CAMCORDER on the CAMCORDER and in a wet basement, near water; This symbol is intended to alert the user...

User Manual (ENGLISH)
Page 7
...Getting to Know Your Device 14 Features ...14 Accessories Supplied with the Camcorder ...15 Basic Accessories ...15 Front & Left View ...16 Left side View ...17 Right & Top View ...18 Rear & Bottom View ...19 Remote Control ...20 OSD (On Screen Display in CAMERA and PLAYER Modes) ...21 OSD (On Screen... Display in CAMERA / M.PLAY Modes) ...22 Turning the OSD on/...
...Getting to Know Your Device 14 Features ...14 Accessories Supplied with the Camcorder ...15 Basic Accessories ...15 Front & Left View ...16 Left side View ...17 Right & Top View ...18 Rear & Bottom View ...19 Remote Control ...20 OSD (On Screen Display in CAMERA and PLAYER Modes) ...21 OSD (On Screen... Display in CAMERA / M.PLAY Modes) ...22 Turning the OSD on/...

User Manual (ENGLISH)
Page 14
...the battery pack by flipping the lens body block. 3 4 5. Please read this manual thoroughly. ✤ Before using the device, install the accessories in one system. Insert the Memory Stick into the slot. 3. Set the Power Switch to OFF. 5 FADE S.SHOW BLC PLAY TAPE MEMORY ...When finished, set the Power Switch to proposed position. 6. Start ENGLISH Quick Start ✤ This device provides a variety of functions because it is a Camcorder and Digital Still Camera in the following order: 1. Set your device to CAMCORDER mode or CAMERA mode by connecting the power cable to the...
...the battery pack by flipping the lens body block. 3 4 5. Please read this manual thoroughly. ✤ Before using the device, install the accessories in one system. Insert the Memory Stick into the slot. 3. Set the Power Switch to OFF. 5 FADE S.SHOW BLC PLAY TAPE MEMORY ...When finished, set the Power Switch to proposed position. 6. Start ENGLISH Quick Start ✤ This device provides a variety of functions because it is a Camcorder and Digital Still Camera in the following order: 1. Set your device to CAMCORDER mode or CAMERA mode by connecting the power cable to the...

User Manual (ENGLISH)
Page 20
...2. Lithium Battery for Remote Control. (TYPE: CR2025) 7. Lithium Ion Battery pack 2. Remote Control (AD59-00100A) START/STOP PHOTO F.ADV TW STILL ZERO MEM. Tripod Adaptor 1. AC Power Adapter (AD43-00112A, AD43-00113A) (AD44-00065A) 3. Tripod Adapter (AD97-06770A) 15 AUDIO/VIDEO... 3. Memory Stick (1109-001222) 12. Instruction Manual 6. Lithium battery (AD43-10130H) 7. Getting to Know Your Device Accessories Supplied with the Camcorder Make sure that the following basic accessories are supplied with your digital video camera. AUDIO/VIDEO cable (AD39-00099A) 5.
...2. Lithium Battery for Remote Control. (TYPE: CR2025) 7. Lithium Ion Battery pack 2. Remote Control (AD59-00100A) START/STOP PHOTO F.ADV TW STILL ZERO MEM. Tripod Adaptor 1. AC Power Adapter (AD43-00112A, AD43-00113A) (AD44-00065A) 3. Tripod Adapter (AD97-06770A) 15 AUDIO/VIDEO... 3. Memory Stick (1109-001222) 12. Instruction Manual 6. Lithium battery (AD43-10130H) 7. Getting to Know Your Device Accessories Supplied with the Camcorder Make sure that the following basic accessories are supplied with your digital video camera. AUDIO/VIDEO cable (AD39-00099A) 5.


