
Instruction Booklet
Page 2
... View ... 15 • OSD (On Screen Display) ...16 Accessories Supplied with the Camcorder 18 Remote Control ...19 • Self Timer Recording ...19 Adjusting the Hand Strap and Shoulder Strap 20 Lithium Battery Installation ...20 Connecting the Power Source ...21 • To use the AC Power Adaptor... and DC Cable 21 • To use the Battery Pack ...22 Using the Battery Pack ...23 • Refresh ...23 • Time Table ...23 • Battery Level Display ...24 Inserting and Ejecting a Cassette ...25 Making your First Recording "26 • ...
... View ... 15 • OSD (On Screen Display) ...16 Accessories Supplied with the Camcorder 18 Remote Control ...19 • Self Timer Recording ...19 Adjusting the Hand Strap and Shoulder Strap 20 Lithium Battery Installation ...20 Connecting the Power Source ...21 • To use the AC Power Adaptor... and DC Cable 21 • To use the Battery Pack ...22 Using the Battery Pack ...23 • Refresh ...23 • Time Table ...23 • Battery Level Display ...24 Inserting and Ejecting a Cassette ...25 Making your First Recording "26 • ...
Instruction Booklet
Page 4
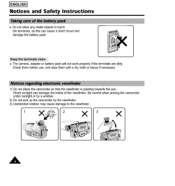
...with a dry cloth or tissue if necessary. 1) Do not place the camcorder so that the viewfinder is pointing towards the sun. Direct sunlight can cause a short circuit and damage the battery pack. + The camera, adapter or battery pack will not work properly if the terminals are dirty. I ENGLISH]... Notices and Safety Instructions + Do not allow any metal objects to the viewfinder. Be careful when placing the camcorder under sunlight or by a window. ...
...with a dry cloth or tissue if necessary. 1) Do not place the camcorder so that the viewfinder is pointing towards the sun. Direct sunlight can cause a short circuit and damage the battery pack. + The camera, adapter or battery pack will not work properly if the terminals are dirty. I ENGLISH]... Notices and Safety Instructions + Do not allow any metal objects to the viewfinder. Be careful when placing the camcorder under sunlight or by a window. ...
Instruction Booklet
Page 5
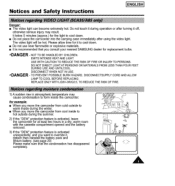
... unexpectedly, and you want to override it to warm inside during the winter. • • When you consult your nearest SAMSUNG dealer for at least two hours in atmospheric temperature may result. The video light will be hot. Please allow time for example:...DURINGUSEAND UNTILCOOL. DISCONNECTWHENNOT iN USE. *DANGER - for it , detach then reinstall the battery pack and lithium battery. (see page 20) Please make sure that you move tl_e camcorder from cool inside the camcorder. Notices and Safety Instructions ENGLISH I • The video light can become extremely hot....
... unexpectedly, and you want to override it to warm inside during the winter. • • When you consult your nearest SAMSUNG dealer for at least two hours in atmospheric temperature may result. The video light will be hot. Please allow time for example:...DURINGUSEAND UNTILCOOL. DISCONNECTWHENNOT iN USE. *DANGER - for it , detach then reinstall the battery pack and lithium battery. (see page 20) Please make sure that you move tl_e camcorder from cool inside the camcorder. Notices and Safety Instructions ENGLISH I • The video light can become extremely hot....
Instruction Booklet
Page 6
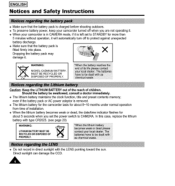
... about 5 seconds when you set the power switch to protect against unexpected battery discharge. ÷ Make sure that the battery pack is charged before shooting outdoors. + To preserve battery power, keep your camcorder turned off when you are not operating it. ÷ When your camcerder... is in direct sunlight with type CR202& (see page 20) LITHIUM BATTERY MUST BE WREACRYNCINLGED: OR DISPOSED...
... about 5 seconds when you set the power switch to protect against unexpected battery discharge. ÷ Make sure that the battery pack is charged before shooting outdoors. + To preserve battery power, keep your camcorder turned off when you are not operating it. ÷ When your camcerder... is in direct sunlight with type CR202& (see page 20) LITHIUM BATTERY MUST BE WREACRYNCINLGED: OR DISPOSED...
Instruction Booklet
Page 9
... antennadischarge unit, connection to grounding electrodes and requirements for ventilation to ensure reliable operation of the CAMCORDER and to protect it from overheating, These openings must not be operated from battery power, or other sources, refer to the operating instructions. 13. OUTDOOR ANTENNAGROUNDING: If an ...to fit, contact your electrician to replace your appliance dealer or local power company. G_D CL_ _ _W_R_E_EG_DNG 12. POWER SOURCES: The CAMCORDER should be routed so that they exit from the unit. Do not defeat the safety purpose of power source indicated on or near...
... antennadischarge unit, connection to grounding electrodes and requirements for ventilation to ensure reliable operation of the CAMCORDER and to protect it from overheating, These openings must not be operated from battery power, or other sources, refer to the operating instructions. 13. OUTDOOR ANTENNAGROUNDING: If an ...to fit, contact your electrician to replace your appliance dealer or local power company. G_D CL_ _ _W_R_E_EG_DNG 12. POWER SOURCES: The CAMCORDER should be routed so that they exit from the unit. Do not defeat the safety purpose of power source indicated on or near...

Instruction Booklet
Page 15
Getting to Know Your Camcorder ENGLISH I 27, Zoom 26. Window for DC Cable (see page 21) 35. BATTERY EJECT (see page 27) (SCA30/A33/A80 only) 39. Jack for cassette 37, External MIC Jack 40, S-VIDEO Out Lens cap 39. Lens cap (see page 22) 27. Cassette holder ...36. ZOOM see page 20) 40. Battery pack compartment (see page 20) 34. Hand strap...
Getting to Know Your Camcorder ENGLISH I 27, Zoom 26. Window for DC Cable (see page 21) 35. BATTERY EJECT (see page 27) (SCA30/A33/A80 only) 39. Jack for cassette 37, External MIC Jack 40, S-VIDEO Out Lens cap 39. Lens cap (see page 22) 27. Cassette holder ...36. ZOOM see page 20) 40. Battery pack compartment (see page 20) 34. Hand strap...
Instruction Booklet
Page 16
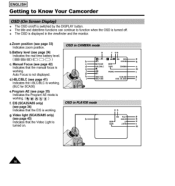
d,I-BLC/BLC (see page 41) Indicates the I ENGLISH] Getting to Know Your Camcorder ÷ The OSD on . Auto Focus is not displayed. a.Zoom position (see page 33) indicates zoom position, b.Battery level (see page 24) oso cA c, Manual Focus (see page 42) indicates that the EIS is working. 0S g. A EIS (SCA35/A85 only... to function when the OSD is turned off. ÷ The OSD is displayed in the viewfinder and the monitor. I -BLC/BLC is working. (BLC for SCA30) e.Program AE (see page 35) Indicates the Program AE mode is working. (_ _,_7 _ ) f.
d,I-BLC/BLC (see page 41) Indicates the I ENGLISH] Getting to Know Your Camcorder ÷ The OSD on . Auto Focus is not displayed. a.Zoom position (see page 33) indicates zoom position, b.Battery level (see page 24) oso cA c, Manual Focus (see page 42) indicates that the EIS is working. 0S g. A EIS (SCA35/A85 only... to function when the OSD is turned off. ÷ The OSD is displayed in the viewfinder and the monitor. I -BLC/BLC is working. (BLC for SCA30) e.Program AE (see page 35) Indicates the Program AE mode is working. (_ _,_7 _ ) f.
Instruction Booklet
Page 18
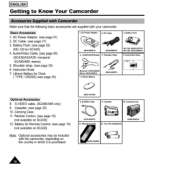
...Adaptor. (see page 21) 3. Carrying Case. 11. Cassette "_0. Carrying Case AC3_200_Z _1. Battery Pack. (see page 22) (NC-120 for SCA3O) 4, AudieNideo Cable, (see page 45) (SCA30/A33/A35: monaural SCAS0/A85: stereo) 5, Shoulder strap, (see page 25) 10. DC Cable...AD59_10377A NH.180: AD43_3Ot104A 6. Remote Control. (see page 19) (not available on SCA30) 12, Battery for Clock ( TYPE: CR2025) (see page 19) (not available on SCA30) Note: Optional accessones may be included with your camcorder. 1. AD43.10"_30A 8. AUDIO/VIDEOCabZe AD39-6000_A 5. Two R6 AA_lt_erles AD69_0_IA _D59...
...Adaptor. (see page 21) 3. Carrying Case. 11. Cassette "_0. Carrying Case AC3_200_Z _1. Battery Pack. (see page 22) (NC-120 for SCA3O) 4, AudieNideo Cable, (see page 45) (SCA30/A33/A35: monaural SCAS0/A85: stereo) 5, Shoulder strap, (see page 25) 10. DC Cable...AD59_10377A NH.180: AD43_3Ot104A 6. Remote Control. (see page 19) (not available on SCA30) 12, Battery for Clock ( TYPE: CR2025) (see page 19) (not available on SCA30) Note: Optional accessones may be included with your camcorder. 1. AD43.10"_30A 8. AUDIO/VIDEOCabZe AD39-6000_A 5. Two R6 AA_lt_erles AD69_0_IA _D59...
Instruction Booklet
Page 19
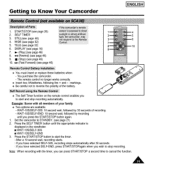
I_ (Play) (see page46) 8. ,*4 (Rewind) (see page 26) 2. You purchase the camcorder, - markings, + Be careful not to reverse the polarity of the battery. ÷ The Self ]liner function on the remote control enables you to start the timer. : After a 10 second wait, recording starts. :...see page 16) 7. SELF TIMER 3, STILL(see page 46) 4. Getting to Know Your Camcorder ENGLISH I (Stop)(see page46) 10. _-I_(Fast Forward) (see page 46) --4 --5 3_ --6 mlO ÷ You must insert or replace these batteries when: - WAIT-10S/SELF-END: 10 second wait, followed by 30 seconds of your ...
I_ (Play) (see page46) 8. ,*4 (Rewind) (see page 26) 2. You purchase the camcorder, - markings, + Be careful not to reverse the polarity of the battery. ÷ The Self ]liner function on the remote control enables you to start the timer. : After a 10 second wait, recording starts. :...see page 16) 7. SELF TIMER 3, STILL(see page 46) 4. Getting to Know Your Camcorder ENGLISH I (Stop)(see page46) 10. _-I_(Fast Forward) (see page 46) --4 --5 3_ --6 mlO ÷ You must insert or replace these batteries when: - WAIT-10S/SELF-END: 10 second wait, followed by 30 seconds of your ...
Instruction Booklet
Page 20
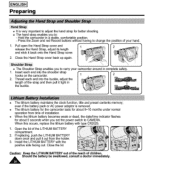
..., 2.1.Insert each end into the shoulder strap ti [" I hTleohnorgektashdooenf atthchehe sectnaradmpicnaotonrddtehtreh. Open the lid of your camcorder around in a stable comfortable position. • li2-] - I ENGLISH] Preparing ÷ It is removed. + The lithium battery for the camcorder lasts for about 8-10 months under normal operation from the holder. 3. When this occurs, replace the lithium...
..., 2.1.Insert each end into the shoulder strap ti [" I hTleohnorgektashdooenf atthchehe sectnaradmpicnaotonrddtehtreh. Open the lid of your camcorder around in a stable comfortable position. • li2-] - I ENGLISH] Preparing ÷ It is removed. + The lithium battery for the camcorder lasts for about 8-10 months under normal operation from the holder. 3. When this occurs, replace the lithium...
Instruction Booklet
Page 21
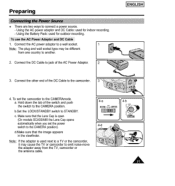
... to STANDBY. b.Set the LOCK/STANDBY switch to a wall socket. Note: The plug and wall socket type may cause the TV or camcorder to emit noise-move the adaptor away from one country to jack of the DC Cable to the CAMERAmode. Make sure that the image appears.... Note: If the adaptor is open. (On models SCA35/A85the LensCap opens automaticallywhen you set the camcorder to the camcorder. Using the Battery Pack: used next to a TV or the camcorder, it may be different from the TV, camcorder or the antenna cable. 4-b A Connect the DC Cable to another. 1 2. Connect the other...
... to STANDBY. b.Set the LOCK/STANDBY switch to a wall socket. Note: The plug and wall socket type may cause the TV or camcorder to emit noise-move the adaptor away from one country to jack of the DC Cable to the CAMERAmode. Make sure that the image appears.... Note: If the adaptor is open. (On models SCA35/A85the LensCap opens automaticallywhen you set the camcorder to the camcorder. Using the Battery Pack: used next to a TV or the camcorder, it may be different from the TV, camcorder or the antenna cable. 4-b A Connect the DC Cable to another. 1 2. Connect the other...
Instruction Booklet
Page 22
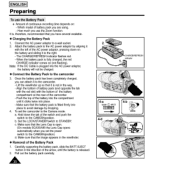
... the battery into place. 4-a 4-b - Which model of the battery compartment on the battery and sliding it to the CAMERAposition. When the battery pack is fitted firmly into the AC power adaptor, the battery will not be charged. • Connect the Battery Pack to the camcorder 3, Once the battery pack ...has been completely charged, you set the camcorder to the right. - Lift the viewfioder up so that the battery pack is fully charged, the red...
... the battery into place. 4-a 4-b - Which model of the battery compartment on the battery and sliding it to the CAMERAposition. When the battery pack is fitted firmly into the AC power adaptor, the battery will not be charged. • Connect the Battery Pack to the camcorder 3, Once the battery pack ...has been completely charged, you set the camcorder to the right. - Lift the viewfioder up so that the battery pack is fully charged, the red...
Instruction Booklet
Page 23
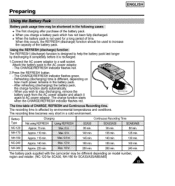
...min, 130 rain, 160 min. 240 min, The battery pack supplied with the camcorder may be used for SCA33/A35/A8O/A85) Attach the batterypack to increase the ...capacity of the battery pack. The charge function starts when the CHARGE/REFRESH indicator flashes red. Battery...power remains in a cold environment. The REFRESH (discharge) function is designed to help the battery pack last longer by environmental temperatures and conditions. Refreshing (discharging) time is recharged. 1.Connect...
...min, 130 rain, 160 min. 240 min, The battery pack supplied with the camcorder may be used for SCA33/A35/A8O/A85) Attach the batterypack to increase the ...capacity of the battery pack. The charge function starts when the CHARGE/REFRESH indicator flashes red. Battery...power remains in a cold environment. The REFRESH (discharge) function is designed to help the battery pack last longer by environmental temperatures and conditions. Refreshing (discharging) time is recharged. 1.Connect...
Instruction Booklet
Page 24
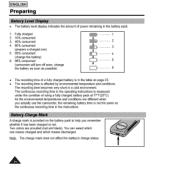
...conditions are provided (red and black). You can select which one ) 5. 95% consumed (change the battery) 6. 98% consumed (camcorder will turn off soon, change the battery as soon as the continuous recording time in the instructions, A charge mark is provided on page 23,..., Note: The charge mark does not affect the battery's charge status, A I ENGLISH] Preparing ÷ The battery level display indicates the amount of a fully charged battery is in the table on the battery pack to help you actually use the camcorder, the remaining battery time is not the same as possible) f 2...
...conditions are provided (red and black). You can select which one ) 5. 95% consumed (change the battery) 6. 98% consumed (camcorder will turn off soon, change the battery as soon as the continuous recording time in the instructions, A charge mark is provided on page 23,..., Note: The charge mark does not affect the battery's charge status, A I ENGLISH] Preparing ÷ The battery level display indicates the amount of a fully charged battery is in the table on the battery pack to help you actually use the camcorder, the remaining battery time is not the same as possible) f 2...
Instruction Booklet
Page 26
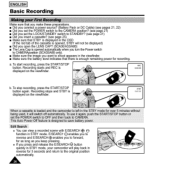
... as long as you keep pressing. + If you press and release the E/SEARCH _ button quickly in STBY mode, your camcorder will not be displayed) • Did you open the LENS CAP? (SCA30/A33/A80) • The Lens Cap is opened . To start recording, press the START/STOP button. STBY will play... 3 seconds and return to the original position automatically. I ENGLISH] Basic Recording Make sure that you make these preparations. • Did you connect a power source.,?(Battery Pack or DC Cable) (see pages 21, 22) • Did you set the POWER switch to the CAMERA position? (see page 21) • Did ...
... as long as you keep pressing. + If you press and release the E/SEARCH _ button quickly in STBY mode, your camcorder will not be displayed) • Did you open the LENS CAP? (SCA30/A33/A80) • The Lens Cap is opened . To start recording, press the START/STOP button. STBY will play... 3 seconds and return to the original position automatically. I ENGLISH] Basic Recording Make sure that you make these preparations. • Did you connect a power source.,?(Battery Pack or DC Cable) (see pages 21, 22) • Did you set the POWER switch to the CAMERA position? (see page 21) • Did ...
Instruction Booklet
Page 28
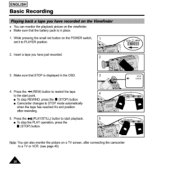
... 3. Press the _ (REW) button to rewind the tape to the start point. • To stop REWIND, press the • (STOP) button. • Camcorder changes to start playback. • To stop the PLAY operation, press the • (STOP) button. Press the Im41(PLAY/STILL)button to STOP mode automatically... + Make sure that STOP is in the OSD. 4. While pressing the small red button on a TV screen, after rewinding. 5. Make sure that the battery pack is displayed in place. 1. I ENGLISH] Basic Recording ÷ You can also monitor the picture on the POWER switch, set it 's end position ...
... 3. Press the _ (REW) button to rewind the tape to the start point. • To stop REWIND, press the • (STOP) button. • Camcorder changes to start playback. • To stop the PLAY operation, press the • (STOP) button. Press the Im41(PLAY/STILL)button to STOP mode automatically... + Make sure that STOP is in the OSD. 4. While pressing the small red button on a TV screen, after rewinding. 5. Make sure that the battery pack is displayed in place. 1. I ENGLISH] Basic Recording ÷ You can also monitor the picture on the POWER switch, set it 's end position ...
Instruction Booklet
Page 38
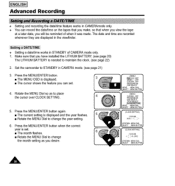
... A Press the MENU/ENTER button. • The MENU OSD is displayed. • The cursor shows the feature you have installed the LITHIUM BATTERY, (see page 20) The LITHIUM BATTERY is needed to maintain the clock. (see page 21) 3. You can set , • The month flashes, • Rotate the MENU ... the year flashes, • Rotate the MENU Dial to change the month setting as to STANDBY in CAMERA mode. (see page 22) 2, Set the camcorder to place the cursor over CLOCK SETTING. 5. The date and time are recorded whenever they are displayed in the viewfinder. + Setting a date/time works...
... A Press the MENU/ENTER button. • The MENU OSD is displayed. • The cursor shows the feature you have installed the LITHIUM BATTERY, (see page 20) The LITHIUM BATTERY is needed to maintain the clock. (see page 21) 3. You can set , • The month flashes, • Rotate the MENU ... the year flashes, • Rotate the MENU Dial to change the month setting as to STANDBY in CAMERA mode. (see page 22) 2, Set the camcorder to place the cursor over CLOCK SETTING. 5. The date and time are recorded whenever they are displayed in the viewfinder. + Setting a date/time works...
Instruction Booklet
Page 39
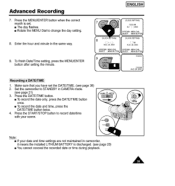
ENGLISH I 1. Press the START/STOP button to record date/time with your date and time settings are not maintained in camcorder, it means the installed LITHIUM BATTERY is set the DATE/TIME. (see page 20) • You cannot conceal the recorded date or time during playback. A Enter the ...way. 9. Note: • ft your scene. Press the MENU/ENTER button when the correct month is discharged. (see page 38) 2. Set the camcorder to change the day setting. 8. To finish Date/Time setting, press the MENU/ENTER button after setting the minute. Advanced Recording 7. Press the DATE...
ENGLISH I 1. Press the START/STOP button to record date/time with your date and time settings are not maintained in camcorder, it means the installed LITHIUM BATTERY is set the DATE/TIME. (see page 20) • You cannot conceal the recorded date or time during playback. A Enter the ...way. 9. Note: • ft your scene. Press the MENU/ENTER button when the correct month is discharged. (see page 38) 2. Set the camcorder to change the day setting. 8. To finish Date/Time setting, press the MENU/ENTER button after setting the minute. Advanced Recording 7. Press the DATE...

Instruction Booklet
Page 40
Press the MENU/ENTER button, • Rotate the MENU Dial so as to select the language you have installed the LITHIUM BATTERY. (see page 21) 3. GERMAN - RUSSIAN • Rotate the MENU Dial to place the cursor over LANGUAGE SELECT, 4 5. Press the MENU/ENTER button, ... default language is displayed. • Rotate the MENU Dial so as to place to STANDBY in CAMERA mode, (see page 20) 2. ITALIAN - Set the camcorder to the cursor over TITLE SELECT. 4. SPANISH - A (MENU} DZOOMOFF PROGRAMAE CLOCK SETtiNG 4OVE MENU DIAL ]ERT PICNIC THANKS GIVING WEDDING EXIT MOVE ; I ENGLISH...
Press the MENU/ENTER button, • Rotate the MENU Dial so as to select the language you have installed the LITHIUM BATTERY. (see page 21) 3. GERMAN - RUSSIAN • Rotate the MENU Dial to place the cursor over LANGUAGE SELECT, 4 5. Press the MENU/ENTER button, ... default language is displayed. • Rotate the MENU Dial so as to place to STANDBY in CAMERA mode, (see page 20) 2. ITALIAN - Set the camcorder to the cursor over TITLE SELECT. 4. SPANISH - A (MENU} DZOOMOFF PROGRAMAE CLOCK SETtiNG 4OVE MENU DIAL ]ERT PICNIC THANKS GIVING WEDDING EXIT MOVE ; I ENGLISH...

Instruction Booklet
Page 43
... INSERTING. • Even if the battery indicator (1=:3,)does not blink when the battery pack's charge is shortened when you use near flammable or explosive materials. • It is recommended that you consult your nearest SAMSUNG dealer for outdoor lighting. ÷ The life of the bulb is low, the camcorder may turn off , othe_ise serious...
... INSERTING. • Even if the battery indicator (1=:3,)does not blink when the battery pack's charge is shortened when you use near flammable or explosive materials. • It is recommended that you consult your nearest SAMSUNG dealer for outdoor lighting. ÷ The life of the bulb is low, the camcorder may turn off , othe_ise serious...


