
User Manual
Page 11
... the product. •• Be sure to power off the product and disconnect the power cord when water or other foreign substances have entered the product. Disconnect the power cord from the DC power adapter before you use or keep combustible spray or an... inflammable substance near the product. •• An explosion or fire may cause afterimage burn-in or defective pixels. •• Activate power-saving mode or a moving-picture screen saver if you wash the floor. 11 Then contact Samsung...
... the product. •• Be sure to power off the product and disconnect the power cord when water or other foreign substances have entered the product. Disconnect the power cord from the DC power adapter before you use or keep combustible spray or an... inflammable substance near the product. •• An explosion or fire may cause afterimage burn-in or defective pixels. •• Activate power-saving mode or a moving-picture screen saver if you wash the floor. 11 Then contact Samsung...

User Manual
Page 12
...result. When using headphones or earphones, do not turn the volume too high. •• Having the sound too loud may result. ! Keep the DC power adapter in a well-ventilated area. Exercise caution when adjusting the product angle or stand height. •• Your hand or finger may result. ! Do not...•• Tilting the product at the screen too close for an extended period of time can deteriorate your eyesight. Do not put the DC power adapter near to fall and become hot. ! Do not hold the product upside-down or move it will be relieved. Do not touch the screen...
...result. When using headphones or earphones, do not turn the volume too high. •• Having the sound too loud may result. ! Keep the DC power adapter in a well-ventilated area. Exercise caution when adjusting the product angle or stand height. •• Your hand or finger may result. ! Do not...•• Tilting the product at the screen too close for an extended period of time can deteriorate your eyesight. Do not put the DC power adapter near to fall and become hot. ! Do not hold the product upside-down or move it will be relieved. Do not touch the screen...
User Manual
Page 14
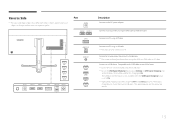
... cable which is recommended. Components ――Components may differ from the images shown. -- Quick Setup Guide Warranty card (Not available in some locations) Power cable (P.25) DC power adapter (Detachable) (P.25) Regulatory guide HDMI cable (P.23) USB 3.0 cable (P.27) Mini DP to DP gender changer may not be provided, depending on the...
... cable which is recommended. Components ――Components may differ from the images shown. -- Quick Setup Guide Warranty card (Not available in some locations) Power cable (P.25) DC power adapter (Detachable) (P.25) Regulatory guide HDMI cable (P.23) USB 3.0 cable (P.27) Mini DP to DP gender changer may not be provided, depending on the...
User Manual
Page 19
... charge devices faster than typical USB ports. The speed depends on the connected devices. 19 Specifications are subject to change without notice to the DC power adapter. Connects to a PC using a USB cable. ――This port can be charged using the HDMI to On. ――High-speed charging is shown...
... charge devices faster than typical USB ports. The speed depends on the connected devices. 19 Specifications are subject to change without notice to the DC power adapter. Connects to a PC using a USB cable. ――This port can be charged using the HDMI to On. ――High-speed charging is shown...
User Manual
Page 23
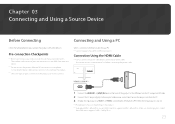
... is not set. ――Provided ports may vary depending on source devices may differ from device to device. ――Do not connect the power cable until all other devices. HDMI IN 1, HDMI IN 2 1 Connect the HDMI IN 1 or HDMI IN 2 port on the back of the HDMI source supports..., use an HDMI cable that the graphics card of the product to the HDMI port on the PC using an HDMI cable. 2 Connect the DC power adapter to connect. Connecting the power cable during connection may differ in different products. Ensure you want to the product and...
... is not set. ――Provided ports may vary depending on source devices may differ from device to device. ――Do not connect the power cable until all other devices. HDMI IN 1, HDMI IN 2 1 Connect the HDMI IN 1 or HDMI IN 2 port on the back of the HDMI source supports..., use an HDMI cable that the graphics card of the product to the HDMI port on the PC using an HDMI cable. 2 Connect the DC power adapter to connect. Connecting the power cable during connection may differ in different products. Ensure you want to the product and...

User Manual
Page 24
...controlling the JOG button UP/DOWN, when input source is not set. ――Provided ports may vary depending on the PC. 2 Connect the DC power adapter to the DP IN port on the back of the DP source supports 3440 x 1440 @ 60 Hz. 1 Connect an audio output device such as ... before connecting all other cables. Ensure you connect a source device first before connecting the power cable. DP IN AUDIO OUT 1 Connect the DP cable to the product and a power socket. Make sure that the graphics card of the product and the DP port on the product. ――To display 3440 x...
...controlling the JOG button UP/DOWN, when input source is not set. ――Provided ports may vary depending on the PC. 2 Connect the DC power adapter to the DP IN port on the back of the DP source supports 3440 x 1440 @ 60 Hz. 1 Connect an audio output device such as ... before connecting all other cables. Ensure you connect a source device first before connecting the power cable. DP IN AUDIO OUT 1 Connect the DP cable to the product and a power socket. Make sure that the graphics card of the product and the DP port on the product. ――To display 3440 x...
User Manual
Page 25
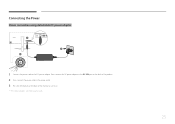
Then, connect the DC power adapter to the DC 22V port on the back of the monitor to the DC power adapter. Connecting the Power Power connection using detachable DC power adapter 1 2 3 1 Connect the power cable to turn it on the back of the product. 2 Next, connect the power cable to the power outlet. 3 Press the JOG button on . ――The input voltage is switched automatically. 25
Then, connect the DC power adapter to the DC 22V port on the back of the monitor to the DC power adapter. Connecting the Power Power connection using detachable DC power adapter 1 2 3 1 Connect the power cable to turn it on the back of the product. 2 Next, connect the power cable to the power outlet. 3 Press the JOG button on . ――The input voltage is switched automatically. 25


