
User Manual
Page 3
...48 49 SCREEN SETUP 50 50 Removing the Stand (S20D300BY / S20D300H / S20D340H / S20D300HY / S20D340HY / S22D300BY / S22D300HY / S22D340HY / S22D300NY / S24D300B / S24D300BL / S24D300H / S24D340H / S24D300HL / S24D340HL) Installing a Wall-mount Kit or Desktop Stand (S19D300HY / S19D340HY / ... Type) Connection Using the DVI Cable (S20D300BY / S22D300BY / S24D300B / S24D300BL) Connection Using the DVI-HDMI Cable (S20D300BY / S22D300BY / S24D300B / S24D300BL) Connection Using the HDMI Cable (S19D300HY / S19D340HY / S20D300H / S20D340H / S20D300HY / S20D340HY / S22D300HY / S22D340HY / S24D300H / ...
...48 49 SCREEN SETUP 50 50 Removing the Stand (S20D300BY / S20D300H / S20D340H / S20D300HY / S20D340HY / S22D300BY / S22D300HY / S22D340HY / S22D300NY / S24D300B / S24D300BL / S24D300H / S24D340H / S24D300HL / S24D340HL) Installing a Wall-mount Kit or Desktop Stand (S19D300HY / S19D340HY / ... Type) Connection Using the DVI Cable (S20D300BY / S22D300BY / S24D300B / S24D300BL) Connection Using the DVI-HDMI Cable (S20D300BY / S22D300BY / S24D300B / S24D300BL) Connection Using the HDMI Cable (S19D300HY / S19D340HY / S20D300H / S20D340H / S20D300HY / S20D340HY / S22D300HY / S22D340HY / S24D300H / ...
User Manual
Page 4
... 53 Game Mode 53 Configuring Game Mode 54 SAMSUNG MAGIC Bright 54 Configuring SAMSUNG MAGIC Bright 56 SAMSUNG MAGIC Angle (S20D300H / S20D340H / S24D300B / S24D300H / S24D340H) 56 Configuring SAMSUNG MAGIC Angle 58 SAMSUNG MAGIC Upscale 58 Configuring SAMSUNG MAGIC Upscale 59 Image Size 59 Changing the Image Size 61 HDMI Black Level (S19D300HY / S19D340HY / S20D300H / S20D340H / S20D300HY / S20D340HY...
... 53 Game Mode 53 Configuring Game Mode 54 SAMSUNG MAGIC Bright 54 Configuring SAMSUNG MAGIC Bright 56 SAMSUNG MAGIC Angle (S20D300H / S20D340H / S24D300B / S24D300H / S24D340H) 56 Configuring SAMSUNG MAGIC Angle 58 SAMSUNG MAGIC Upscale 58 Configuring SAMSUNG MAGIC Upscale 59 Image Size 59 Changing the Image Size 61 HDMI Black Level (S19D300HY / S19D340HY / S20D300H / S20D340H / S20D300HY / S20D340HY...

User Manual
Page 20
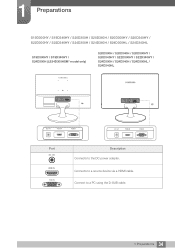
... adapter (Integrated) (optional) DC power adapter (Detachable) (optional) Power cable (Only provided with the detachable DC power adapter.) D-SUB cable (optional) DVI cable (optional) HDMI cable (optional) HDMI-DVI cable (optional) Stand base Stand neck Components may differ from whom you purchased the product if any item is missing. 1 Preparations 1.1 Checking the...
... adapter (Integrated) (optional) DC power adapter (Detachable) (optional) Power cable (Only provided with the detachable DC power adapter.) D-SUB cable (optional) DVI cable (optional) HDMI cable (optional) HDMI-DVI cable (optional) Stand base Stand neck Components may differ from whom you purchased the product if any item is missing. 1 Preparations 1.1 Checking the...
User Manual
Page 27
.... Use this button to the upper or lower menu or adjust the value for an option on the product or change the input source (Analog/HDMI). z Enable: To lock the OSD control, press and hold the [MENU] button for 10 seconds. z Disable: To unlock the OSD control, press and hold the...
.... Use this button to the upper or lower menu or adjust the value for an option on the product or change the input source (Analog/HDMI). z Enable: To lock the OSD control, press and hold the [MENU] button for 10 seconds. z Disable: To unlock the OSD control, press and hold the...
User Manual
Page 30
... on the product or change the input source by pressing the [ ] button, a message that shows the changed input source will change the input source (Analog/HDMI). Pressing the [ ] button when the OSD menu is enable. Press the [AUTO] button to enable or disable Game Mode.
... on the product or change the input source by pressing the [ ] button, a message that shows the changed input source will change the input source (Analog/HDMI). Pressing the [ ] button when the OSD menu is enable. Press the [AUTO] button to enable or disable Game Mode.
User Manual
Page 34
Connect to a source device via a HDMI cable. Connects to a PC using the D-SUB cable. 34 1 Preparations 1 Preparations S19D300HY / S19D340HY / S20D300H / S20D340H / S20D300HY / S20D340HY / S22D300HY / S22D340HY / S24D300H / S24D340H / S24D300HL / S24D340HL S19D300HY / S19D340HY / S24D300H (LS24D300HSM* model only) S20D300H / S20D340H / S20D300HY / S20D340HY / S22D300HY / S22D340HY / S24D300H / S24D340H / S24D300HL / S24D340HL Port DC 14V HDMI IN RGB IN Description Connects to the DC power adapter.
Connect to a source device via a HDMI cable. Connects to a PC using the D-SUB cable. 34 1 Preparations 1 Preparations S19D300HY / S19D340HY / S20D300H / S20D340H / S20D300HY / S20D340HY / S22D300HY / S22D340HY / S24D300H / S24D340H / S24D300HL / S24D340HL S19D300HY / S19D340HY / S24D300H (LS24D300HSM* model only) S20D300H / S20D340H / S20D300HY / S20D340HY / S22D300HY / S22D340HY / S24D300H / S24D340H / S24D300HL / S24D340HL Port DC 14V HDMI IN RGB IN Description Connects to the DC power adapter.
User Manual
Page 44
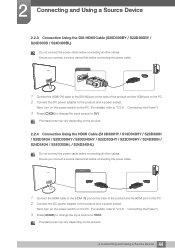
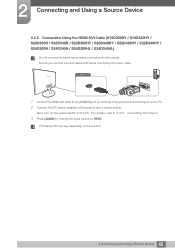
Ensure you connect a source device first before connecting the power cable. HDDVMI ININ 1 Connect the HDMI cable to the [HDMI IN] port on the back of the product and the HDMI port on the product. 2.2.4 Connection Using the HDMI Cable (S19D300HY / S19D340HY / S20D300H / S20D340H / S20D300HY / S20D340HY / S22D300HY / S22D340HY / ...Ensure you connect a source device first before connecting the power cable. DVI IN 1 Connect the HDMI-DVI cable to the [DVI IN] port on the back of the product and the HDMI port on the PC. (For details, refer to "2.2.6 Connecting the Power".) 3 Press [...
Ensure you connect a source device first before connecting the power cable. HDDVMI ININ 1 Connect the HDMI cable to the [HDMI IN] port on the back of the product and the HDMI port on the product. 2.2.4 Connection Using the HDMI Cable (S19D300HY / S19D340HY / S20D300H / S20D340H / S20D300HY / S20D340HY / S22D300HY / S22D340HY / ...Ensure you connect a source device first before connecting the power cable. DVI IN 1 Connect the HDMI-DVI cable to the [DVI IN] port on the back of the product and the HDMI port on the PC. (For details, refer to "2.2.6 Connecting the Power".) 3 Press [...
User Manual
Page 45
...and a power socket. Next, turn on the power switch on the PC. 2 Connect the DC power adapter to HDMI. Provided ports may vary depending on the product. 45 2 Connecting and Using a Source Device 2 Connecting and Using a Source Device 2.2.5 Connection Using the... HDMI-DVI Cable (S19D300HY / S19D340HY / S20D300H / S20D340H / S20D300HY / S20D340HY / S22D300HY / S22D340HY / S24D300H / S24D340H / S24D300HL / S24D340HL) Do not connect the ...
...and a power socket. Next, turn on the power switch on the PC. 2 Connect the DC power adapter to HDMI. Provided ports may vary depending on the product. 45 2 Connecting and Using a Source Device 2 Connecting and Using a Source Device 2.2.5 Connection Using the... HDMI-DVI Cable (S19D300HY / S19D340HY / S20D300H / S20D340H / S20D300HY / S20D340HY / S22D300HY / S22D340HY / S24D300H / S24D340H / S24D300HL / S24D340HL) Do not connect the ...
User Manual
Page 55
.... This also provides a sharp image. z Custom: Select this mode when the surroundings are preset at the factory. AUTO When the external input is connected through HDMI and PC/AV Mode is set to AV, MSAAMSGUINCGBright has four automatic picture settings (Dynamic, Standard, Movie and Custom) that are dark. You can select...
.... This also provides a sharp image. z Custom: Select this mode when the surroundings are preset at the factory. AUTO When the external input is connected through HDMI and PC/AV Mode is set to AV, MSAAMSGUINCGBright has four automatic picture settings (Dynamic, Standard, Movie and Custom) that are dark. You can select...
User Manual
Page 59
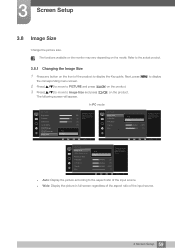
... V-Position Coarse Fine Auto Wide 75 50 2200 70 Choose the size and aspect ratio of the picture displayed on screen. AUTO PICTURE Image Size HDMI Black Level Response Time H-Position V-Position Coarse Fine Auto Wide 100 75 50 50 2200 0 Choose the size and aspect ratio of the input source...
... V-Position Coarse Fine Auto Wide 75 50 2200 70 Choose the size and aspect ratio of the picture displayed on screen. AUTO PICTURE Image Size HDMI Black Level Response Time H-Position V-Position Coarse Fine Auto Wide 100 75 50 50 2200 0 Choose the size and aspect ratio of the input source...
User Manual
Page 60
...aspect ratio of the picture displayed on screen. AUTO z 4:3: Display the picture with the product. † A digital output device is connected using the HDMI/DVI cable. † The input signal is 480p, 576p, 720p, or 1080p and monitor can display normally (Not every model can support all of these... signals.). † This can only be set when the external input is connected through HDMI/DVI and PC/AV Mode is available when the following conditions are satisfied. z 16:9: Display the picture with the original aspect ratio without ...
...aspect ratio of the picture displayed on screen. AUTO z 4:3: Display the picture with the product. † A digital output device is connected using the HDMI/DVI cable. † The input signal is 480p, 576p, 720p, or 1080p and monitor can display normally (Not every model can support all of these... signals.). † This can only be set when the external input is connected through HDMI/DVI and PC/AV Mode is available when the following conditions are satisfied. z 16:9: Display the picture with the original aspect ratio without ...
User Manual
Page 61
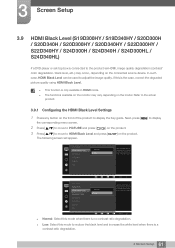
... display the corresponding menu screen. 2 Press [ ] to move to PICTURE and press [ ] on the product. 3 Press [ ] to move to HDMI Black Level and press [ The following screen will appear. ] on the model. z This function is no contrast ratio degradation. z The functions available on.../ S22D340HY / S24D300H / S24D340H / S24D300HL / S24D340HL) If a DVD player or set-top box is the case, correct the degraded picture quality using HDMI Black Level. Refer to reduce the black level and increase the white level when there is a contrast ratio degradation. 61 3 Screen Setup z Low: ...
... display the corresponding menu screen. 2 Press [ ] to move to PICTURE and press [ ] on the product. 3 Press [ ] to move to HDMI Black Level and press [ The following screen will appear. ] on the model. z This function is no contrast ratio degradation. z The functions available on.../ S22D340HY / S24D300H / S24D340H / S24D300HL / S24D340HL) If a DVD player or set-top box is the case, correct the degraded picture quality using HDMI Black Level. Refer to reduce the black level and increase the white level when there is a contrast ratio degradation. 61 3 Screen Setup z Low: ...
User Manual
Page 62
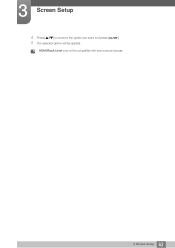
HDMI Black Level may not be applied. 3 Screen Setup 4 Press [ ] to move to the option you want and press [ ]. 5 The selected option will be compatible with some source devices. 62 3 Screen Setup
HDMI Black Level may not be applied. 3 Screen Setup 4 Press [ ] to move to the option you want and press [ ]. 5 The selected option will be compatible with some source devices. 62 3 Screen Setup

User Manual
Page 63
z The functions available on the monitor may vary depending on the front of the product to display the Key guide. PICTURE Image Size HDMI Black Level Response Time H-Position V-Position Coarse Fine Standard Faster Fastest Wide Accelerate the panel response rate to make video appear more vivid and natural. ...
z The functions available on the monitor may vary depending on the front of the product to display the Key guide. PICTURE Image Size HDMI Black Level Response Time H-Position V-Position Coarse Fine Standard Faster Fastest Wide Accelerate the panel response rate to make video appear more vivid and natural. ...
User Manual
Page 64
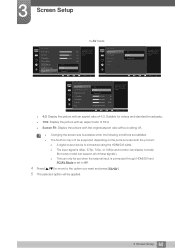
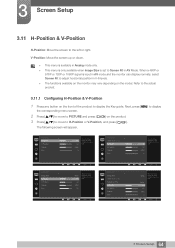
... Fine 50 50 2200 0 Move the image displayed on the screen to the left or right. V-Position: Move the screen up or down. PICTURE HDMI Black Level H-Position V-Position Coarse Fine 50 50 2200 0 Move the image displayed on the screen to the left or right. AUTO 64 3 Screen... and press [ ]. When a 480P or 576P or 720P or 1080P signal is input in AV Mode. The following screen will appear. AUTO PICTURE Image Size HDMI Black Level Response Time H-Position V-Position Coarse Fine AUTO Wide Faster 50 50 2200 0 Move the image displayed on the product. 3 Press [ ] to move...
... Fine 50 50 2200 0 Move the image displayed on the screen to the left or right. V-Position: Move the screen up or down. PICTURE HDMI Black Level H-Position V-Position Coarse Fine 50 50 2200 0 Move the image displayed on the screen to the left or right. AUTO 64 3 Screen... and press [ ]. When a 480P or 576P or 720P or 1080P signal is input in AV Mode. The following screen will appear. AUTO PICTURE Image Size HDMI Black Level Response Time H-Position V-Position Coarse Fine AUTO Wide Faster 50 50 2200 0 Move the image displayed on the product. 3 Press [ ] to move...

User Manual
Page 65
PICTURE HDMI Black Level H-Position V-Position Coarse Fine AUTO PICTURE Image Size H-Position V-Position Coarse Fine Wide 50 42 2200 70 Move the image displayed on the ... 0 Move the image displayed on the screen up or down. AUTO Wide Move the image displayed on the screen up or down . PICTURE Image Size HDMI Black Level Response Time H-Position V-Position Coarse Fine AUTO 4 Press [ ] to configure H-Position or V-Position. 5 The selected option will be applied. 50 50 2200 0 Move...
PICTURE HDMI Black Level H-Position V-Position Coarse Fine AUTO PICTURE Image Size H-Position V-Position Coarse Fine Wide 50 42 2200 70 Move the image displayed on the ... 0 Move the image displayed on the screen up or down. AUTO Wide Move the image displayed on the screen up or down . PICTURE Image Size HDMI Black Level Response Time H-Position V-Position Coarse Fine AUTO 4 Press [ ] to configure H-Position or V-Position. 5 The selected option will be applied. 50 50 2200 0 Move...
User Manual
Page 66
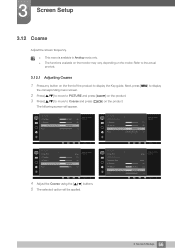
... Level Response Time H-Position V-Position Coarse Fine AUTO Wide Adjust the screen frequency. The following screen will be applied. PICTURE HDMI Black Level H-Position V-Position Coarse Fine 50 50 2200 0 Adjust the screen frequency. PICTURE Image Size H-Position V-Position Coarse Fine AUTO Wide 50 42 2200 ...
... Level Response Time H-Position V-Position Coarse Fine AUTO Wide Adjust the screen frequency. The following screen will be applied. PICTURE HDMI Black Level H-Position V-Position Coarse Fine 50 50 2200 0 Adjust the screen frequency. PICTURE Image Size H-Position V-Position Coarse Fine AUTO Wide 50 42 2200 ...

User Manual
Page 67
... model. PICTURE Image Size H-Position V-Position Coarse Fine AUTO Wide 50 42 2200 70 Fine-tune the screen to get a vivid picture. PICTURE Image Size HDMI Black Level Response Time H-Position V-Position Coarse Fine AUTO Wide Fine-tune the screen to get a vivid picture. Faster 50 50 2200 0 AUTO 67 3 Screen... Setup z This menu is available in Analog mode only. PICTURE HDMI Black Level H-Position V-Position Coarse Fine 50 50 2200 0 Fine-tune the screen to get a vivid picture.
... model. PICTURE Image Size H-Position V-Position Coarse Fine AUTO Wide 50 42 2200 70 Fine-tune the screen to get a vivid picture. PICTURE Image Size HDMI Black Level Response Time H-Position V-Position Coarse Fine AUTO Wide Fine-tune the screen to get a vivid picture. Faster 50 50 2200 0 AUTO 67 3 Screen... Setup z This menu is available in Analog mode only. PICTURE HDMI Black Level H-Position V-Position Coarse Fine 50 50 2200 0 Fine-tune the screen to get a vivid picture.
User Manual
Page 71
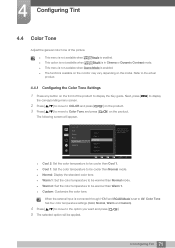
... [ ]. 5 The selected option will appear. z Warm 1: Set the color temperature to Color Tone and press [ ] on the product. When the external input is connected through HDMI and PC/AV Mode is enabled. z This menu is not available when MSAAMSGUINCGAngle is set to AV, Color Tone has four color temperature settings (Cool...
... [ ]. 5 The selected option will appear. z Warm 1: Set the color temperature to Color Tone and press [ ] on the product. When the external input is connected through HDMI and PC/AV Mode is enabled. z This menu is not available when MSAAMSGUINCGAngle is set to AV, Color Tone has four color temperature settings (Cool...
User Manual
Page 81
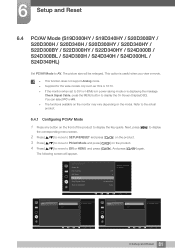
...PC or AV. And press [ ] again. AV Set to AV to DVI or HDMI, and press [ ]. Off Acceleration Auto AUTO PC/AV Mode HDMI PC AV Select the PC/AV mode for the HDMI source. AUTO AUTO 81 6 Setup and Reset z This function does not support Analog... / S20D300H / S20D340H / S20D300HY / S20D340HY / S22D300BY / S22D300HY / S22D340HY / S24D300B / S24D300BL / S24D300H / S24D340H / S24D300HL / S24D340HL) Set PC/AV Mode to DVI or HDMI) is in power saving mode or is useful when you view a movie. This option is displaying the message Check Signal Cable, press the MENU button...
...PC or AV. And press [ ] again. AV Set to AV to DVI or HDMI, and press [ ]. Off Acceleration Auto AUTO PC/AV Mode HDMI PC AV Select the PC/AV mode for the HDMI source. AUTO AUTO 81 6 Setup and Reset z This function does not support Analog... / S20D300H / S20D340H / S20D300HY / S20D340HY / S22D300BY / S22D300HY / S22D340HY / S24D300B / S24D300BL / S24D300H / S24D340H / S24D300HL / S24D340HL) Set PC/AV Mode to DVI or HDMI) is in power saving mode or is useful when you view a movie. This option is displaying the message Check Signal Cable, press the MENU button...

