
User Manual (user Manual) (ver.f6.1) (English)
Page 1
The WaferTM PORTABLE Dual-Mode TELEPHONE User Guide Please read this manual before operating your phone, and keep it for future reference. r510_AB21_cb_030707_F6_rev_1
The WaferTM PORTABLE Dual-Mode TELEPHONE User Guide Please read this manual before operating your phone, and keep it for future reference. r510_AB21_cb_030707_F6_rev_1
User Manual (user Manual) (ver.f6.1) (English)
Page 3
...AS SET FORTH IN THE EXPRESS WARRANTY CONTAINED ON THE WARRANTY PAGE ENCLOSED WITH THE PRODUCT, THE PURCHASER TAKES THE PRODUCT "AS IS", AND SAMSUNG MAKES NO EXPRESS OR IMPLIED WARRANTY OF ANY KIND WHATSOEVER WITH RESPECT TO THE PRODUCT, INCLUDING BUT NOT LIMITED TO THE MERCHANTABILITY OF THE PRODUCT... OR ITS FITNESS FOR ANY PARTICULAR PURPOSE OR USE; THE DESIGN, CONDITION OR QUALITY OF THE PRODUCT; NOTHING CONTAINED IN THE INSTRUCTION MANUAL SHALL BE CONSTRUED TO CREATE AN EXPRESS OR IMPLIED WARRANTY OF ANY KIND WHATSOEVER WITH RESPECT TO THE PRODUCT. OR COMPLIANCE OF THE PRODUCT ...
...AS SET FORTH IN THE EXPRESS WARRANTY CONTAINED ON THE WARRANTY PAGE ENCLOSED WITH THE PRODUCT, THE PURCHASER TAKES THE PRODUCT "AS IS", AND SAMSUNG MAKES NO EXPRESS OR IMPLIED WARRANTY OF ANY KIND WHATSOEVER WITH RESPECT TO THE PRODUCT, INCLUDING BUT NOT LIMITED TO THE MERCHANTABILITY OF THE PRODUCT... OR ITS FITNESS FOR ANY PARTICULAR PURPOSE OR USE; THE DESIGN, CONDITION OR QUALITY OF THE PRODUCT; NOTHING CONTAINED IN THE INSTRUCTION MANUAL SHALL BE CONSTRUED TO CREATE AN EXPRESS OR IMPLIED WARRANTY OF ANY KIND WHATSOEVER WITH RESPECT TO THE PRODUCT. OR COMPLIANCE OF THE PRODUCT ...
User Manual (user Manual) (ver.f6.1) (English)
Page 4
...3 Getting Started 7 Understanding this User Manual 8 Activating Your Phone 8 Charging the Battery 10 Setting Up Your Voice Mail 11 Memory Card (Optional 11 Understanding Your Phone 13 Features of Your Phone 13 Front View of Your Phone 14 Rear View of Your Phone 15 Rear View of Warranties; Speed Dialing... Contacts List 53 Adding a New Contacts Entry 53 Finding a Contacts Entry 56 4 Table of Contents Intellectual Property 2 Samsung Telecommunications America (STA), LLC 2 Disclaimer of Your Phone (Memory Card Slot 16 Command Keys ...17 Understanding the Display Screen 19 Your...
...3 Getting Started 7 Understanding this User Manual 8 Activating Your Phone 8 Charging the Battery 10 Setting Up Your Voice Mail 11 Memory Card (Optional 11 Understanding Your Phone 13 Features of Your Phone 13 Front View of Your Phone 14 Rear View of Your Phone 15 Rear View of Warranties; Speed Dialing... Contacts List 53 Adding a New Contacts Entry 53 Finding a Contacts Entry 56 4 Table of Contents Intellectual Property 2 Samsung Telecommunications America (STA), LLC 2 Disclaimer of Your Phone (Memory Card Slot 16 Command Keys ...17 Understanding the Display Screen 19 Your...
User Manual (user Manual) (ver.f6.1) (English)
Page 7
Section 1: Getting Started Topics Covered • Understanding this User Manual • Activating Your Phone • Charging the Battery • Setting Up Your Voice Mail • Memory Card (Optional) This section explains how to start using your phone by activating your service, setting up your voice mail, or getting an understanding of how this manual is put together. Getting Started 7
Section 1: Getting Started Topics Covered • Understanding this User Manual • Activating Your Phone • Charging the Battery • Setting Up Your Voice Mail • Memory Card (Optional) This section explains how to start using your phone by activating your service, setting up your voice mail, or getting an understanding of how this manual is put together. Getting Started 7
User Manual (user Manual) (ver.f6.1) (English)
Page 8
...Press the bottom end of the guide, beginning on page 181. Most of this guide to fully understand the services your phone. Important!: You must fully charge the battery the first time you use your Wireless Carrier and follow the same order as ... for obtaining service, if necessary. Activating Your Phone Contact your phone, otherwise you should know before using your phone. Install the Battery Note: Your phone comes packaged with a partially charged rechargeable standard Li-Ion battery and travel adapter. Understanding this User Manual The chapters of this guide are icons and ...
...Press the bottom end of the guide, beginning on page 181. Most of this guide to fully understand the services your phone. Important!: You must fully charge the battery the first time you use your Wireless Carrier and follow the same order as ... for obtaining service, if necessary. Activating Your Phone Contact your phone, otherwise you should know before using your phone. Install the Battery Note: Your phone comes packaged with a partially charged rechargeable standard Li-Ion battery and travel adapter. Understanding this User Manual The chapters of this guide are icons and ...
User Manual (user Manual) (ver.f6.1) (English)
Page 25
... the ten-digit number (includes area code). • Calling Voicemail from Mexico: Dial 001, plus your passcode. Press OK to your phone's Contacts list. A two-second pause stops the calling sequence for more information.) One-Touch Dialing Memory locations 002 through 009 by using that... contact's location number in your Contacts: 1. To manually call automated systems (like banking services), you hear the recorded prompt, press and enter your ten-digit wireless number. Use the navigation...
... the ten-digit number (includes area code). • Calling Voicemail from Mexico: Dial 001, plus your passcode. Press OK to your phone's Contacts list. A two-second pause stops the calling sequence for more information.) One-Touch Dialing Memory locations 002 through 009 by using that... contact's location number in your Contacts: 1. To manually call automated systems (like banking services), you hear the recorded prompt, press and enter your ten-digit wireless number. Use the navigation...
User Manual (user Manual) (ver.f6.1) (English)
Page 59
...further input from you are saved and a confirmation message appears in your Contacts list that contain the entered digits. 4. Then do one of manually entering the numbers each time, you can store the numbers in the display. When you can enter multiple two-second pauses to highlight the ...Contacts, an entry can also add numbers (such as a second Mobile number or a Fax number) to the entry, assign it to clear all phone numbers in the highlighted field. Note: You can be changed quite easily. 1. Your changes are often required to Contacts Numbers When you call automated...
...further input from you are saved and a confirmation message appears in your Contacts list that contain the entered digits. 4. Then do one of manually entering the numbers each time, you can store the numbers in the display. When you can enter multiple two-second pauses to highlight the ...Contacts, an entry can also add numbers (such as a second Mobile number or a Fax number) to the entry, assign it to clear all phone numbers in the highlighted field. Note: You can be changed quite easily. 1. Your changes are often required to Contacts Numbers When you call automated...
User Manual (user Manual) (ver.f6.1) (English)
Page 90
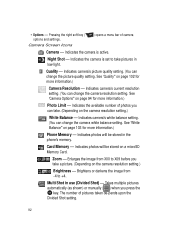
...Done (left) soft key ( ). • To discard the pictures, press the Erase (right) soft key ( ). The camera takes one picture (Manual) or multiple pictures in quick succession (Auto), then the multiple-photo screen appears in the display: • Series Shot - Use the Left and Right...) or to the camera screen. 90 Lets you select to take the multiple photos automatically (in the display. Lets you take each successive photo manually. 4. Press the Options (right) soft key ( ). Using the display as a progress bar while pictures are returned to take a series of 4...
...Done (left) soft key ( ). • To discard the pictures, press the Erase (right) soft key ( ). The camera takes one picture (Manual) or multiple pictures in quick succession (Auto), then the multiple-photo screen appears in the display: • Series Shot - Use the Left and Right...) or to the camera screen. 90 Lets you select to take the multiple photos automatically (in the display. Lets you take each successive photo manually. 4. Press the Options (right) soft key ( ). Using the display as a progress bar while pictures are returned to take a series of 4...
User Manual (user Manual) (ver.f6.1) (English)
Page 92
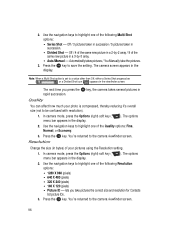
... balance setting. Indicates photos will be stored in use (Divided Shot) - Quality - See 'Quality" on page 103 for more information.) Phone Memory - See 'White Balance" on page 102 for more information.) Camera Resolution - Zoom - Indicates camera's current resolution setting. (You ...Indicates photos will be stored on the camera resolution setting.) Brightness - Brightens or darkens the image from X00 to +4. Multi Shot in the phone's memory. The number of camera Camera - Night Shot - Enlarges the image from -4 to X09 before you press the OK key. &#...
... balance setting. Indicates photos will be stored in use (Divided Shot) - Quality - See 'Quality" on page 103 for more information.) Phone Memory - See 'White Balance" on page 102 for more information.) Camera Resolution - Zoom - Indicates camera's current resolution setting. (You ...Indicates photos will be stored on the camera resolution setting.) Brightness - Brightens or darkens the image from X00 to +4. Multi Shot in the phone's memory. The number of camera Camera - Night Shot - Enlarges the image from -4 to X09 before you press the OK key. &#...
User Manual (user Manual) (ver.f6.1) (English)
Page 96
...camera mode, press the Options (right) soft key ( menu bar appears in the display. Press the OK key. Automatically takes pictures / You Manually take pictures the correct size and resolution for Contacts list picture IDs. 3. Quality You can affect how much your pictures using the Resolution setting. ...120 (pixels) • Picture ID - In camera mode, press the Options (right) soft key ( menu bar appears in a 3-by-3 array. • Auto/Manual - Off / 3 pictures taken in succession / 5 pictures taken in bytes) of the same new picture in the display. ). Press the OK key to the camera...
...camera mode, press the Options (right) soft key ( menu bar appears in the display. Press the OK key. Automatically takes pictures / You Manually take pictures the correct size and resolution for Contacts list picture IDs. 3. Quality You can affect how much your pictures using the Resolution setting. ...120 (pixels) • Picture ID - In camera mode, press the Options (right) soft key ( menu bar appears in a 3-by-3 array. • Auto/Manual - Off / 3 pictures taken in succession / 5 pictures taken in bytes) of the same new picture in the display. ). Press the OK key to the camera...
User Manual (user Manual) (ver.f6.1) (English)
Page 97
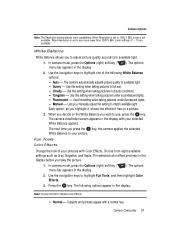
...the picture. 1. Use the navigation keys to available light. • Sunny - Use this setting when taking pictures under fluorescent lights. • Manual - In camera mode, press the Options (right) soft key ( menu bar appears in the display. ). The options 2. Use this setting...• Cloudy - The following White Balance options: • Auto - Use this setting when taking pictures in the display before you manually adjust the setting to available light. 1. White Balance White Balance allows you wish to any value lower than 1280 X 960, zoom ...
...the picture. 1. Use the navigation keys to available light. • Sunny - Use this setting when taking pictures under fluorescent lights. • Manual - In camera mode, press the Options (right) soft key ( menu bar appears in the display. ). The options 2. Use this setting...• Cloudy - The following White Balance options: • Auto - Use this setting when taking pictures in the display before you manually adjust the setting to available light. 1. White Balance White Balance allows you wish to any value lower than 1280 X 960, zoom ...
User Manual (user Manual) (ver.f6.1) (English)
Page 103
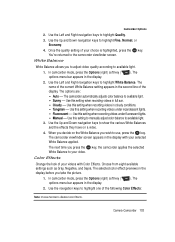
The options are: • Auto - Use this setting when recording videos under fluorescent lights. • Manual - In camcorder mode, press the Options (right) soft key ( options menu bar appears in the display. ). The 2. Camera-Camcorder... automatically adjusts color balance to available light. 3. Use this setting when recording videos in cloudy conditions. • Tungsten - Use this setting to manually adjust color balance to available light. • Sunny - Use this setting when recording videos under incandescent lights. • Fluorescent - Use this setting...
The options are: • Auto - Use this setting when recording videos under fluorescent lights. • Manual - In camcorder mode, press the Options (right) soft key ( options menu bar appears in the display. ). The 2. Camera-Camcorder... automatically adjusts color balance to available light. 3. Use this setting when recording videos in cloudy conditions. • Tungsten - Use this setting to manually adjust color balance to available light. • Sunny - Use this setting when recording videos under incandescent lights. • Fluorescent - Use this setting...
User Manual (user Manual) (ver.f6.1) (English)
Page 125
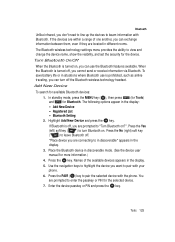
Add New Device To search for the selected device. 7. Press the Yes (left) soft key ( ) to beam information with the phone. Tools 125 Turn Bluetooth On/Off When the Bluetooth is off, you can exchange information between them, even if they are prompted to enter ... to pair the selected device with Bluetooth. The following options appear in discoverable mode. (See the device user manual for more information.) 4. If Bluetooth is turned on, you want to pair with your phone. 6. Press the OK key. You are located in situations where Bluetooth use is turned off, you can ...
Add New Device To search for the selected device. 7. Press the Yes (left) soft key ( ) to beam information with the phone. Tools 125 Turn Bluetooth On/Off When the Bluetooth is off, you can exchange information between them, even if they are prompted to enter ... to pair the selected device with Bluetooth. The following options appear in discoverable mode. (See the device user manual for more information.) 4. If Bluetooth is turned on, you want to pair with your phone. 6. Press the OK key. You are located in situations where Bluetooth use is turned off, you can ...
User Manual (user Manual) (ver.f6.1) (English)
Page 144
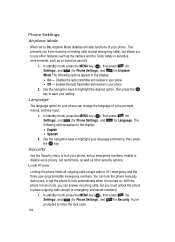
... preference, then press the OK key. With the phone in lock mode, you can lock the phone manually during use other security options. In standby mode, press the MENU key ( OK ), then press (for Settings), and (for Phone Settings), and for Language. Disables the radio transmitter ...and receiver in your phone • Off - Phone Settings Airplane Mode When set ...
... preference, then press the OK key. With the phone in lock mode, you can lock the phone manually during use other security options. In standby mode, press the MENU key ( OK ), then press (for Settings), and (for Phone Settings), and for Language. Disables the radio transmitter ...and receiver in your phone • Off - Phone Settings Airplane Mode When set ...
User Manual (user Manual) (ver.f6.1) (English)
Page 145
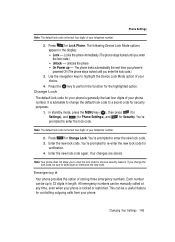
...changes are stored. Each number can be up - Press @ )) for controlling outgoing calls from your phone is advisable to change the lock code, be manually called at any time, even when your phone. You're prompted to enter the new lock code. 3. The following Device Lock Mode options appear...for the highlighted option. If you enter the lock code.) 3. It is locked or restricted. Emergency # Your phone provides the option of storing three emergency numbers. The phone locks automatically the next time your choice. 4. Press the OK key to enter the lock code. You're prompted...
...changes are stored. Each number can be up - Press @ )) for controlling outgoing calls from your phone is advisable to change the lock code, be manually called at any time, even when your phone. You're prompted to enter the new lock code. 3. The following Device Lock Mode options appear...for the highlighted option. If you enter the lock code.) 3. It is locked or restricted. Emergency # Your phone provides the option of storing three emergency numbers. The phone locks automatically the next time your choice. 4. Press the OK key to enter the lock code. You're prompted...

User Manual (user Manual) (ver.f6.1) (English)
Page 151
...to automatically (or manually) lock the keypad and side keys after a period of inactivity. In standby mode, press the MENU key ( OK ), then press (for Settings), and for Auto key lock. Save Options Lets you specify where you quickly and easily review and manage your phone memory usage. In... standby mode, press the MENU key ( OK ), then press (for Settings), and (for Phone Settings), and for Memory Info. Disable the automatic/manual keypad lock 2. Memory Info Memory Info lets you want your images...
...to automatically (or manually) lock the keypad and side keys after a period of inactivity. In standby mode, press the MENU key ( OK ), then press (for Settings), and for Auto key lock. Save Options Lets you specify where you quickly and easily review and manage your phone memory usage. In... standby mode, press the MENU key ( OK ), then press (for Settings), and (for Phone Settings), and for Memory Info. Disable the automatic/manual keypad lock 2. Memory Info Memory Info lets you want your images...
User Manual (user Manual) (ver.f6.1) (English)
Page 178
...; • "DESIGN, CONDITION, QUALITY, OR PERFORMANCE OF THE PRODUCT; • "THE WORKMANSHIP OF THE PRODUCT OR THE COMPONENTS CONTAINED THEREIN; SAMSUNG may, at 1-888-987-4357. OR • "COMPLIANCE OF THE PRODUCT WITH THE REQUIREMENTS OF ANY LAW, RULE, SPECIFICATION OR CONTRACT PERTAINING THERETO...shipping, and labor charges for the repair or return of ninety (90) days. WHAT ARE THE LIMITS ON SAMSUNG'S WARRANTY/LIABILITY? NOTHING CONTAINED IN THE INSTRUCTION MANUAL SHALL BE CONSTRUED TO CREATE AN EXPRESS WARRANTY OF ANY KIND WHATSOEVER WITH RESPECT TO THE PRODUCT. ALL IMPLIED...
...; • "DESIGN, CONDITION, QUALITY, OR PERFORMANCE OF THE PRODUCT; • "THE WORKMANSHIP OF THE PRODUCT OR THE COMPONENTS CONTAINED THEREIN; SAMSUNG may, at 1-888-987-4357. OR • "COMPLIANCE OF THE PRODUCT WITH THE REQUIREMENTS OF ANY LAW, RULE, SPECIFICATION OR CONTRACT PERTAINING THERETO...shipping, and labor charges for the repair or return of ninety (90) days. WHAT ARE THE LIMITS ON SAMSUNG'S WARRANTY/LIABILITY? NOTHING CONTAINED IN THE INSTRUCTION MANUAL SHALL BE CONSTRUED TO CREATE AN EXPRESS WARRANTY OF ANY KIND WHATSOEVER WITH RESPECT TO THE PRODUCT. ALL IMPLIED...

User Manual (user Manual) (ver.f6.1) (English)
Page 182
... Exit Axcess Web 83 F File Save Options 151 Formatting a Memory Card 155 Formatting a microSD Card 155 G Gallery, photo 107 Getting Started 7 Activating Your Phone 8 Understanding this User Manual 8 Voicemail 11 H Health and Safety Information 158 182 I Icon Glossary 156 Input mode 20 International Calls 24 In-use menu 38 L Language 144 Left...
... Exit Axcess Web 83 F File Save Options 151 Formatting a Memory Card 155 Formatting a microSD Card 155 G Gallery, photo 107 Getting Started 7 Activating Your Phone 8 Understanding this User Manual 8 Voicemail 11 H Health and Safety Information 158 182 I Icon Glossary 156 Input mode 20 International Calls 24 In-use menu 38 L Language 144 Left...


