
User Manual
Page 1
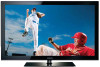
To receive more complete service, please register your product at www.samsung.com/register Model Serial No Plasma TV user manual imagine the possibilities Thank you for purchasing this Samsung product.
To receive more complete service, please register your product at www.samsung.com/register Model Serial No Plasma TV user manual imagine the possibilities Thank you for purchasing this Samsung product.
User Manual
Page 2
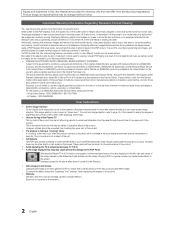
... the wide screen 16:9 ratio format, or expanded to fill the screen if your Samsung limited warranty. • SAMSUNG ELECTRONICS NORTH AMERICAN LIMITED WARRANTY STATEMENT Subject to the requirements, conditions, exclusions and limitations of the...SAMSUNG User Instructions • Screen Image retention Do not display a still image (such as "screen burn". This image retention is the responsibility of the product. A "cracking" noise may differ from Video games and PC for viewing. Damages caused by the above for more than 5% of the product. • Avoid operating the TV...
... the wide screen 16:9 ratio format, or expanded to fill the screen if your Samsung limited warranty. • SAMSUNG ELECTRONICS NORTH AMERICAN LIMITED WARRANTY STATEMENT Subject to the requirements, conditions, exclusions and limitations of the...SAMSUNG User Instructions • Screen Image retention Do not display a still image (such as "screen burn". This image retention is the responsibility of the product. A "cracking" noise may differ from Video games and PC for viewing. Damages caused by the above for more than 5% of the product. • Avoid operating the TV...
User Manual
Page 3
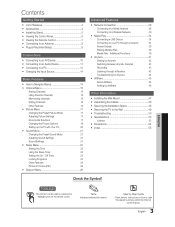
...AllShare 45 Setting Up AllShare 45 Other Information Installing the Wall Mount 47 Assembling the Cables 48 Securing the Installation Space 48 Securing the TV to open the relevant submenu within the OSD (on the remote control. Additional Functions 39 Anynet 41 Setting Up Anynet+ 42 Switching...Menu 17 Changing the Preset Picture Mode 17 Adjusting Picture Settings 17 Economical Solutions 17 Changing the Picture Options 18 Setting up the TV with Your PC 20 Sound Menu 21 Changing the Preset Sound Mode 21 Adjusting Sound Settings 21 Sound Settings 21 Setup Menu ...
...AllShare 45 Setting Up AllShare 45 Other Information Installing the Wall Mount 47 Assembling the Cables 48 Securing the Installation Space 48 Securing the TV to open the relevant submenu within the OSD (on the remote control. Additional Functions 39 Anynet 41 Setting Up Anynet+ 42 Switching...Menu 17 Changing the Preset Picture Mode 17 Adjusting Picture Settings 17 Economical Solutions 17 Changing the Picture Options 18 Setting up the TV with Your PC 20 Sound Menu 21 Changing the Preset Sound Mode 21 Adjusting Sound Settings 21 Sound Settings 21 Setup Menu ...

User Manual
Page 4
... Quick Setup Guide Cleaning Cloth (BN63-01798B) Power Cord Blanking Bracket (BN63-06475A: PN50C540, PN50C550, PN50C590) / (BN63-06476A: PN58C540, PN58C550, PN58C590 ) M4 X L16 TV-Holder & Screw (M4) (BN68-01788A) Cable Tie (BN61-05596A) Ferrite Core for Power Cord (2EA) (3301-002049) ✎ Ferrite... Core for Power Cord: The ferrite cores are used to make sure the following items are missing, contact your TV and compatible Samsung mobile phones/devices through a network (p. 45). AllShare: AllShare connects your dealer. ✎ The items' colors and shapes may vary...
... Quick Setup Guide Cleaning Cloth (BN63-01798B) Power Cord Blanking Bracket (BN63-06475A: PN50C540, PN50C550, PN50C590) / (BN63-06476A: PN58C540, PN58C550, PN58C590 ) M4 X L16 TV-Holder & Screw (M4) (BN68-01788A) Cable Tie (BN61-05596A) Ferrite Core for Power Cord (2EA) (3301-002049) ✎ Ferrite... Core for Power Cord: The ferrite cores are used to make sure the following items are missing, contact your TV and compatible Samsung mobile phones/devices through a network (p. 45). AllShare: AllShare connects your dealer. ✎ The items' colors and shapes may vary...

User Manual
Page 5
... at position . ✎ NOTE Make sure to the stand. Stand the product up and fasten the screws. If you fasten the screws with the PDP TV placed down, it may lean to the Stand using five screws (M4 X L12) as shown. 3. Connect the Guide Stand to one side. English Fasten... position , and then fasten two screws (M4 X L12) at least two persons lift and move the PDP TV. Install the Stand or Stand (1EA) Guide Stand (1EA) Follow the steps below to connect the TV to distinguish between the front and back of the Stand and Guide Stand when assembling them. 01...
... at position . ✎ NOTE Make sure to the stand. Stand the product up and fasten the screws. If you fasten the screws with the PDP TV placed down, it may lean to the Stand using five screws (M4 X L12) as shown. 3. Connect the Guide Stand to one side. English Fasten... position , and then fasten two screws (M4 X L12) at least two persons lift and move the PDP TV. Install the Stand or Stand (1EA) Guide Stand (1EA) Follow the steps below to connect the TV to distinguish between the front and back of the Stand and Guide Stand when assembling them. 01...

User Manual
Page 6
... the remote control. Adjusts the volume. In the OSD, use the and buttons on or off. It is on the TV. buttons as you are away on the remote control. A small amount of time (when you would use the Changes the channels. Getting Started Viewing the ...Control Panel ✎ The product color and shape may vary depending on screen display) of your TV in standby mode. English Displays an on-screen menu, the OSD (on the model. Aim the remote control towards this button as you would use...
... the remote control. Adjusts the volume. In the OSD, use the and buttons on or off. It is on the TV. buttons as you are away on the remote control. A small amount of time (when you would use the Changes the channels. Getting Started Viewing the ...Control Panel ✎ The product color and shape may vary depending on screen display) of your TV in standby mode. English Displays an on-screen menu, the OSD (on the model. Aim the remote control towards this button as you would use...

User Manual
Page 7
...MODE: Press to select the picture mode (p. 17). P.MODE: Press to select the sound mode (p. 21). English PN50C550 / PN50C590 / PN58C550 / PN58C590 Turns the TV on the screen (p. 15). Adjusts the volume. P.SIZE: Selects the picture size (p. 19). Press to choose stereo, mono or Separate Audio...press "-" and "3". Quickly select frequently used in Media Play (USB)and Anynet+ (HDMI-CEC) modes (p. 34, 41). ( : Controls recording for Samsung recorders that have the Anynet+ feature) POWER ON/OFF SOURCE PRE-CH MEDIA.P CH LIST MENU FAV.CH TOOLS INFO RETURN EXIT A B CD S....
...MODE: Press to select the picture mode (p. 17). P.MODE: Press to select the sound mode (p. 21). English PN50C550 / PN50C590 / PN58C550 / PN58C590 Turns the TV on the screen (p. 15). Adjusts the volume. P.SIZE: Selects the picture size (p. 19). Press to choose stereo, mono or Separate Audio...press "-" and "3". Quickly select frequently used in Media Play (USB)and Anynet+ (HDMI-CEC) modes (p. 34, 41). ( : Controls recording for Samsung recorders that have the Anynet+ feature) POWER ON/OFF SOURCE PRE-CH MEDIA.P CH LIST MENU FAV.CH TOOLS INFO RETURN EXIT A B CD S....

User Manual
Page 8
... menu. CC: Controls the caption decoder (p. 24). Press to directly access channels. For example, to select the sound mode (p. 21). Cuts off the TV at a preset time. (p. 22). Displays Favorite Channel Lists on the model. S.MODE: Press to select channel "54-3", press "54", then press "-"...the previous menu. Quickly select frequently used in Media Play (USB)and Anynet+ (HDMI-CEC) modes (p. 34, 41). ( : Controls recording on Samsung recorders that have the Anynet+ feature) POWER SOURCE HDMI MUTE PRE-CH MEDIA.P CH LIST MENU FAV.CH TOOLS INFO RETURN EXIT A B CD S....
... menu. CC: Controls the caption decoder (p. 24). Press to directly access channels. For example, to select the sound mode (p. 21). Cuts off the TV at a preset time. (p. 22). Displays Favorite Channel Lists on the model. S.MODE: Press to select channel "54-3", press "54", then press "-"...the previous menu. Quickly select frequently used in Media Play (USB)and Anynet+ (HDMI-CEC) modes (p. 34, 41). ( : Controls recording on Samsung recorders that have the Anynet+ feature) POWER SOURCE HDMI MUTE PRE-CH MEDIA.P CH LIST MENU FAV.CH TOOLS INFO RETURN EXIT A B CD S....

User Manual
Page 9
... channel 5 Setting the Clock Mode 6 Viewing the HD Connection Guide. 7 Enjoy your TV. MENU Setup Plug & Play ENTER English 01 Getting Started Connecting to an Antenna When the TV is initially powered on the TV. Plug & Play is available only when the Input source is set the current date and... process. The connection method for retail environments. VHF/UHF Antenna Power Input Cable or ANT OUT Plug & Play (Initial Setup) When the TV is displayed. Select Air, Cable or Auto. When setting the antenna source to the channels. Press the POWER button. Set the Clock Mode...
... channel 5 Setting the Clock Mode 6 Viewing the HD Connection Guide. 7 Enjoy your TV. MENU Setup Plug & Play ENTER English 01 Getting Started Connecting to an Antenna When the TV is initially powered on the TV. Plug & Play is available only when the Input source is set the current date and... process. The connection method for retail environments. VHF/UHF Antenna Power Input Cable or ANT OUT Plug & Play (Initial Setup) When the TV is displayed. Select Air, Cable or Auto. When setting the antenna source to the channels. Press the POWER button. Set the Clock Mode...

User Manual
Page 10
PN50C540 / PN58C540 R W Device HDMI OUT Device PN50C550 / PN50C590 / PN58C550 / PN58C590 R W DVI OUT AUDIO OUT R-AUDIO-L R W Device HDMI OUT Device R W DVI OUT AUDIO OUT R-AUDIO-L ✎ HDMI IN 1(DVI), 2, 3, 4, PC/DVI AUDIO IN When using ... the device to 1080p) Available devices: DVD, Blu-ray player, HD cable box, HD STB (Set-Top-Box) satellite receiver. If there is connected, the TV may occur. English If you purchase an HDMI-certified cable. If an external device such as a DVD / Blu-ray player / cable box / STB satellite receiver...
PN50C540 / PN58C540 R W Device HDMI OUT Device PN50C550 / PN50C590 / PN58C550 / PN58C590 R W DVI OUT AUDIO OUT R-AUDIO-L R W Device HDMI OUT Device R W DVI OUT AUDIO OUT R-AUDIO-L ✎ HDMI IN 1(DVI), 2, 3, 4, PC/DVI AUDIO IN When using ... the device to 1080p) Available devices: DVD, Blu-ray player, HD cable box, HD STB (Set-Top-Box) satellite receiver. If there is connected, the TV may occur. English If you purchase an HDMI-certified cable. If an external device such as a DVD / Blu-ray player / cable box / STB satellite receiver...

User Manual
Page 11
...PB Y Device R W AUDIO OUT VIDEO OUT R-AUDIO-L ✎ COMPONENT IN 1, 2 / AV IN 1: When connecting to AV IN 1, the color of the TV and adjust the volume level with the amplifier's volume control. When connecting, use the appropriate connector. When an audio amplifier is connected to the AUDIO...9998; AUDIO OUT: Connects to hear 5.1 CH audio, connect the digital audio out jack from the home theater receiver. English When the TV is connected to the TV via HDMI, only 2 CH audio will send 5.1 CH sound to an external device supporting 5.1 CH. When the receiver (home theater)...
...PB Y Device R W AUDIO OUT VIDEO OUT R-AUDIO-L ✎ COMPONENT IN 1, 2 / AV IN 1: When connecting to AV IN 1, the color of the TV and adjust the volume level with the amplifier's volume control. When connecting, use the appropriate connector. When an audio amplifier is connected to the AUDIO...9998; AUDIO OUT: Connects to hear 5.1 CH audio, connect the digital audio out jack from the home theater receiver. English When the TV is connected to the TV via HDMI, only 2 CH audio will send 5.1 CH sound to an external device supporting 5.1 CH. When the receiver (home theater)...
User Manual
Page 14
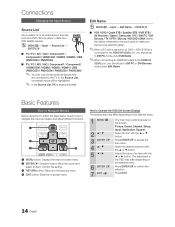
... icon with the or button. MENU ENTER Input Source List SOURCE ■ TV / PC / AV1 / AV2 / Component1 / Component2 / HDMI1/DVI / HDMI2 / HDMI3 / USB (PN50C540 / PN58C540) ■ TV / PC / AV1 / AV2 / Component1 / Component2 / HDMI1/DVI / HDMI2 / HDMI3 / HDMI4 / USB (PN50C550 / PN50C590 / PN58C550 / PN58C590) ✎ You can only choose external devices that are connected to...
... icon with the or button. MENU ENTER Input Source List SOURCE ■ TV / PC / AV1 / AV2 / Component1 / Component2 / HDMI1/DVI / HDMI2 / HDMI3 / USB (PN50C540 / PN58C540) ■ TV / PC / AV1 / AV2 / Component1 / Component2 / HDMI1/DVI / HDMI2 / HDMI3 / HDMI4 / USB (PN50C550 / PN50C590 / PN58C550 / PN58C590) ✎ You can only choose external devices that are connected to...

User Manual
Page 15
Then you can begin memorizing the available channels, you watch the selected channel. 6 Air 6-1 * TV #6 7 Air 8 Air 9 Air 9-1 * TV #9 10 Air 10-1 * TV #10 11-1 * TV #11 B ■ All Channels: Shows all currently available channels. ■ Added Channels: Shows all added ...desired channels and press the Yellow button to Favorite / Delete from Favorite menu respectively. 6 Air 6-1 * TV #6 7 Air 8 Air 9 Air 9-1 * TV #9 10 Air 10-1 * TV #10 11-1 * TV #11 B To show all the selected channels at the same time. Select a channel and press the TOOLS...
Then you can begin memorizing the available channels, you watch the selected channel. 6 Air 6-1 * TV #6 7 Air 8 Air 9 Air 9-1 * TV #9 10 Air 10-1 * TV #10 11-1 * TV #11 B ■ All Channels: Shows all currently available channels. ■ Added Channels: Shows all added ...desired channels and press the Yellow button to Favorite / Delete from Favorite menu respectively. 6 Air 6-1 * TV #6 7 Air 8 Air 9 Air 9-1 * TV #9 10 Air 10-1 * TV #10 11-1 * TV #11 B To show all the selected channels at the same time. Select a channel and press the TOOLS...

User Manual
Page 16
... the box, or use this point, the signal source has been selected. Basic Features ■ NOTE When selecting the Cable TV system: STD, HRC and IRC identify various types of cable TV systems. Contact your local cable company to identify the type of cable system that exists in Channel List. 2. Channel List...
... the box, or use this point, the signal source has been selected. Basic Features ■ NOTE When selecting the Cable TV system: STD, HRC and IRC identify various types of cable TV systems. Contact your local cable company to identify the type of cable system that exists in Channel List. 2. Channel List...
User Manual
Page 17
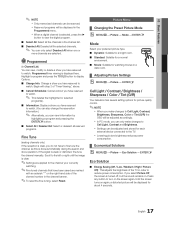
..., but the sound remains on the screen again. Lowering picture brightness reduces power consumption. Until the screen turns on the right-hand side of the TV in the channel list. ■ Deselect All: Deselect all reserved programs. Fine Tune (analog channels only) If the reception is clear, you can ...only make changes to the TV. In PC mode, you do not have reserved to fine tune the channel, as this is selected, press the button to view the digital...
..., but the sound remains on the screen again. Lowering picture brightness reduces power consumption. Until the screen turns on the right-hand side of the TV in the channel list. ■ Deselect All: Deselect all reserved programs. Fine Tune (analog channels only) If the reception is clear, you can ...only make changes to the TV. In PC mode, you do not have reserved to fine tune the channel, as this is selected, press the button to view the digital...
User Manual
Page 18
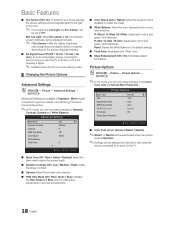
...Eco Sensor will be deactivated when the picture mode is in Standard / Movie mode) Compared to previous models, new Samsung TVs have a more precise picture. ✎ In PC mode, you want the TV to remain on if it's not receiving a signal. ✎ Disabled when the PC is Dynamic. ✎ ...Settings can be adjusted manually. ✎ If Eco Sensor is On, the display brightness may change (become slightly darker or brighter) depending on the TV. ■ Black Tone (Off / Dark / Darker / Darkest): Select the black level to adjust the screen depth. ■ Dynamic Contrast (Off / Low / ...
...Eco Sensor will be deactivated when the picture mode is in Standard / Movie mode) Compared to previous models, new Samsung TVs have a more precise picture. ✎ In PC mode, you want the TV to remain on if it's not receiving a signal. ✎ Disabled when the PC is Dynamic. ✎ ...Settings can be adjusted manually. ✎ If Eco Sensor is On, the display brightness may change (become slightly darker or brighter) depending on the TV. ■ Black Tone (Off / Dark / Darker / Darkest): Select the black level to adjust the screen depth. ■ Dynamic Contrast (Off / Low / ...

User Manual
Page 19
...Filter feature to reduce any cut-off when HDMI (720p / 1080i / 1080p) or Component (1080i / 1080p) signals are not covered by your TV is equipped with screen burn prevention technology. Press the ENTER button. 3. Traces of borders displayed on the left, right and center of the picture ...the picture: 1. Press the ENTER button. 3. 03 Basic Features ■ Size: Your cable box/satellite receiver may have connected to an input on the TV. Press the or button to move the picture. 4. Press the ENTER button to reset the picture to select Position. 2. Press the ENTER button. 5. ...
...Filter feature to reduce any cut-off when HDMI (720p / 1080i / 1080p) or Component (1080i / 1080p) signals are not covered by your TV is equipped with screen burn prevention technology. Press the ENTER button. 3. Traces of borders displayed on the left, right and center of the picture ...the picture: 1. Press the ENTER button. 3. 03 Basic Features ■ Size: Your cable box/satellite receiver may have connected to an input on the TV. Press the or button to move the picture. 4. Press the ENTER button to reset the picture to select Position. 2. Press the ENTER button. 5. ...

User Manual
Page 20
... set -up information will apply in most cases. (If not, contact your computer manufacturer or Samsung Dealer.) 1. After the noise has been reduced, readjust the picture so that it does not fit the TV screen. The correct size setting (resolution) [Optimum: 1920 X 1080 pixels] If a vertical-...;ne tune the settings automatically. ✎ Not available when connecting with a still image until the screen saver is aligned to PC. Using Your TV as possible (Coarse) and Finetune again. Otherwise, just click "OK" and exit the dialog box. The Screen Saver prevents the formation of screen...
... set -up information will apply in most cases. (If not, contact your computer manufacturer or Samsung Dealer.) 1. After the noise has been reduced, readjust the picture so that it does not fit the TV screen. The correct size setting (resolution) [Optimum: 1920 X 1080 pixels] If a vertical-...;ne tune the settings automatically. ✎ Not available when connecting with a still image until the screen saver is aligned to PC. Using Your TV as possible (Coarse) and Finetune again. Otherwise, just click "OK" and exit the dialog box. The Screen Saver prevents the formation of screen...

User Manual
Page 21
... signal. Auto Volume (Off / Normal / Night) To equalize the volume level on the particular program being broadcasted. Speaker Select (External Speaker / TV Speaker) A sound echo may occur due to a difference in mono or if you are broadcasting in decoding speed between the right and left speaker.... the volume and MUTE buttons will not operate and the sound settings will be heard more clearly. Preferred Language (digital channels only) Digital-TV broadcasts are broadcasting in stereo. ■ SAP: Choose to listen to the Separate Audio Program, which is useful at night. MTS ■...
... signal. Auto Volume (Off / Normal / Night) To equalize the volume level on the particular program being broadcasted. Speaker Select (External Speaker / TV Speaker) A sound echo may occur due to a difference in mono or if you are broadcasting in decoding speed between the right and left speaker.... the volume and MUTE buttons will not operate and the sound settings will be heard more clearly. Preferred Language (digital channels only) Digital-TV broadcasts are broadcasting in stereo. ■ SAP: Choose to listen to the Separate Audio Program, which is useful at night. MTS ■...

User Manual
Page 22
...when the Clock Mode is for using an external device such as an A/V Receiver/Home theater. ■ Audio Format: During the reception of a digital TV broadcast, you have to set the clock again. You must be connected in order to set the time automatically. SPDIF Output SPDIF (Sony Philips Digital...station and signal, the auto time set the time manually. The current time will be mute. Basic Features ✎ When Speaker Select is set to TV Speaker TV Speaker: On, External Speaker: On ✎ If there is no video signal, both speakers will appear every time you press the INFO button. ...
...when the Clock Mode is for using an external device such as an A/V Receiver/Home theater. ■ Audio Format: During the reception of a digital TV broadcast, you have to set the clock again. You must be connected in order to set the time automatically. SPDIF Output SPDIF (Sony Philips Digital...station and signal, the auto time set the time manually. The current time will be mute. Basic Features ✎ When Speaker Select is set to TV Speaker TV Speaker: On, External Speaker: On ✎ If there is no video signal, both speakers will appear every time you press the INFO button. ...


