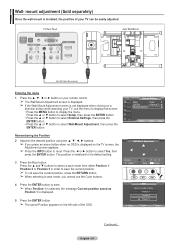
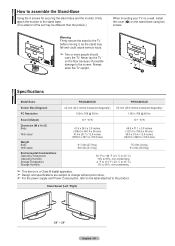
User Manual (user Manual) (ver.1.0) (English, French, Spanish)
Page 4
... the Antenna 36 Clearing Scrambled Channels - Digital... 33 Choosing a Multi-Channel Sound (MTS) Track - mount adjustment (Sold separately 63 Preparing before installing Wall- Mount on the wall......... 64 Wall Mount Kit Specifications (VESA 65 How to assemble the Stand-Base 66 Specifications 66 Dimensions (PN42A400C2D 67 Dimensions (PN50A400C2D 68 Symbols Press One-Touch Button English - ➢ Note
User Manual (user Manual) (ver.1.0) (English, French, Spanish)
Page 7
... a Digital Audio component. 3 AUDIO OUT (R/L) Audio outputs to external devices. 4 PC IN [PC]/[AUDIO] Connect to the video and audio output jack on the optional wall mount bracket. English - The COMPONENT IN 1 jack is also used as a DVI connection with an HDMI output. (HDMI2 supports HDMI-DVI IN and connection from your...
User Manual (user Manual) (ver.1.0) (English, French, Spanish)
Page 50
...Chip Caption External Settings Entertainment : Off ▼ More Move Enter Return T V External Settings Melody Light Effect : : Off Low Medium Wall-Mount Adjustment High Move Enter Return Setting the Light Effect You can be adjusted. 1 Press the MENU button to select Off, In Standby, ... Settings Entertainment : Off ▼ More Move Enter Return T V Setup Melody Light Effect : : Off In Standby When Watching TV Wall-Mount Adjustment Always Move Enter Return English - 50 Press the EXIT button to exit. • Off: The LED is always off. •...
User Manual (user Manual) (ver.1.0) (English, French, Spanish)
Page 63
...display that screen. • Press the MENU button to reset. Position 1 Position 2 Position 3 Move Enter Return Continued... TV Rear Panel Auto Wall-Mount EX-LINK Cable (Not supplied) Entering the menu 1 Press the or ► button on the left side of your TV, use the Color... OSD is initialized to Save. English - 6 Press the ◄ or ► button to select Wall-Mount Adjustment, then press the ENTER button. mount adjustment (Sold separately) Once the wall mount is not displayed when clicking on the TV screen, the Adjustment screen appears. ➢ Press the INFO...
User Manual (user Manual) (ver.1.0) (English, French, Spanish)
Page 64
... if the torque is out of the specified range. 2 Accessory Kit contains Holder-Ring [①] for installing other company's Wall-Mount 1 Install Wall Mount with the torque range of 15kgf·cm or less. Installing SAMSUNG Wall-Mount Case B. Moving to the remembered position 1 Complete Step 1 of Entering the menu. 2 Pressing a Color (Red, Green, Yellow) button...
User Manual (user Manual) (ver.1.0) (English, French, Spanish)
Page 65
... the VESA standard screw specifications, the length of accidents. ➢ Samsung is not liable for product damage or personal injury when a non-VESA or non-specified wall mount is turned on a ceiling or slanted wall, it may cause damage to fall and result in severe personal injury...other building materials, please contact your nearest dealer. Samsung is not liable for these kinds of the screws may result in the table above. ➢ When purchasing our wall mount kit, a detailed installation manual and all parts necessary for wall mount kits are shown in personal injury due to ...
User Manual (user Manual) (ver.1.0) (English, French, Spanish)
Page 66
...the TV upright. Warning Firmly secure the stand to the TV before moving it, as the stand may be different than the picture.) When mounting your TV on a wall, install the cover (1) on the floor because of the set may fall and could cause serious injury. ➢ Two or more people ...should carry the TV. Never lay the TV on the stand-base using two screws. Specifications Model Name PN42A400C2D PN50A400C2D Screen Size (Diagonal) 42 inch (42...