
User Manual (ENGLISH)
Page 1
SyncMaster P2370HD P2570HD P2770HD LCD TV Monitor User Manual The color and the appearance may differ depending on the product, and the specifications are subject to change without prior notice to improve the performance.
SyncMaster P2370HD P2570HD P2770HD LCD TV Monitor User Manual The color and the appearance may differ depending on the product, and the specifications are subject to change without prior notice to improve the performance.
User Manual (ENGLISH)
Page 2
... INSTALLING THE PRODUCT Package Contents 2-1 Installing the Stand 2-2 Removing the Stand 2-3 Attaching a Wall Mount/Desktop Stand 2-4 Connecting to a Computer 2-5 Using it as a TV 2-6 Connecting an HDMI cable 2-7 Connecting Using a DVI to HDMI Cable 2-8 Connecting a Component cable 2-9 Connecting AV Devices 2-10 Connecting to an Amplifier 2-11 Connecting ... THE SOFTWARE Natural Color 4-1 MultiScreen 4-2 TROUBLESHOOTING Monitor Self-Diagnosis 5-1 Before Requesting Service 5-2 FAQ 5-3 MORE INFORMATION Specifications 6-1 Power Saving Function 6-2 Contact SAMSUNG WORLDWIDE 6-3
... INSTALLING THE PRODUCT Package Contents 2-1 Installing the Stand 2-2 Removing the Stand 2-3 Attaching a Wall Mount/Desktop Stand 2-4 Connecting to a Computer 2-5 Using it as a TV 2-6 Connecting an HDMI cable 2-7 Connecting Using a DVI to HDMI Cable 2-8 Connecting a Component cable 2-9 Connecting AV Devices 2-10 Connecting to an Amplifier 2-11 Connecting ... THE SOFTWARE Natural Color 4-1 MultiScreen 4-2 TROUBLESHOOTING Monitor Self-Diagnosis 5-1 Before Requesting Service 5-2 FAQ 5-3 MORE INFORMATION Specifications 6-1 Power Saving Function 6-2 Contact SAMSUNG WORLDWIDE 6-3
User Manual (ENGLISH)
Page 15
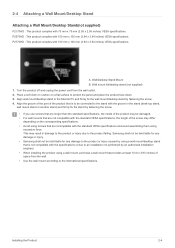
A. Align wall mount/desktop stand to the Monitor/TV and firmly fix the wall mount/desktop stand by using...3.94 inches) VESA specifications. Align the groove of the part of space from the wall outlet. 2. Installing the Product 2-4 P2770HD : This product complies with 75 mm x 75 mm (2.95 x 2.95 inches) VESA specifications. Turn the product off and.... Wall/Desktop Stand Mount B. Wall mount kit/desktop stand (not supplied) 1. Samsung shall not be held liable for any damage or injury. • Samsung shall not be damaged. • For wall mounts that are incompatible with the ...
A. Align wall mount/desktop stand to the Monitor/TV and firmly fix the wall mount/desktop stand by using...3.94 inches) VESA specifications. Align the groove of the part of space from the wall outlet. 2. Installing the Product 2-4 P2770HD : This product complies with 75 mm x 75 mm (2.95 x 2.95 inches) VESA specifications. Turn the product off and.... Wall/Desktop Stand Mount B. Wall mount kit/desktop stand (not supplied) 1. Samsung shall not be held liable for any damage or injury. • Samsung shall not be damaged. • For wall mounts that are incompatible with the ...
User Manual (ENGLISH)
Page 19
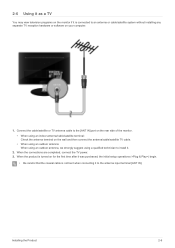
... may view television programs on the monitor if it is not bent when connecting it . 2. Connect the cable/satellite or TV antenna cable to the [ANT IN] port on the rear side of the monitor. • When using a qualified technician to an antenna or cable/...satellite system without installing any separate TV reception hardware or software on the wall and then connect the antenna/cable/satellite TV cable. • When using an outdoor antenna: When using an outdoor antenna, we strongly suggest using an indoor...
... may view television programs on the monitor if it is not bent when connecting it . 2. Connect the cable/satellite or TV antenna cable to the [ANT IN] port on the rear side of the monitor. • When using a qualified technician to an antenna or cable/...satellite system without installing any separate TV reception hardware or software on the wall and then connect the antenna/cable/satellite TV cable. • When using an outdoor antenna: When using an outdoor antenna, we strongly suggest using an indoor...
User Manual (ENGLISH)
Page 27
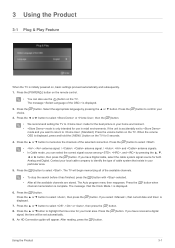
... ] button on , basic settings proceed automatically and subsequently. 1. Press the [ ] button to (Standard): Press the volume button on the TV. The TV will begin memorizing all of the selected connection. If you can also use in your local area. Press the [ ] button. Press the... Digital cable, select the cable system signal source for both Analog and Digital. 3 Using the Product 3-1 Plug & Play Feature When the TV is initially powered on the TV for 5 seconds. 4. Press the ▲ or ▼ button to select . Press the ▲ or ▼button to select ...
... ] button on , basic settings proceed automatically and subsequently. 1. Press the [ ] button to (Standard): Press the volume button on the TV. The TV will begin memorizing all of the selected connection. If you can also use in your local area. Press the [ ] button. Press the... Digital cable, select the cable system signal source for both Analog and Digital. 3 Using the Product 3-1 Plug & Play Feature When the TV is initially powered on the TV for 5 seconds. 4. Press the ▲ or ▼ button to select . Press the ▲ or ▼button to select ...

User Manual (ENGLISH)
Page 28
10. Press the [MENU] button to select . Press the [ ] button again to display the menu. The feature is displayed. Press the ▲ or ▼ button to reset this feature... 1. The message is only available in the TV mode. 3-1 Using the Product If you have finished, press the [ ] button. When you want to select , then press the [ ] button. 2.
10. Press the [MENU] button to select . Press the [ ] button again to display the menu. The feature is displayed. Press the ▲ or ▼ button to reset this feature... 1. The message is only available in the TV mode. 3-1 Using the Product If you have finished, press the [ ] button. When you want to select , then press the [ ] button. 2.
User Manual (ENGLISH)
Page 29
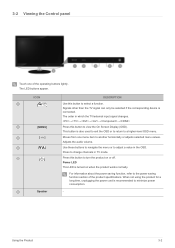
... This button is connected. Adjusts the audio volume. Use these buttons to navigate the menu or to adjust a value in TV mode. Using the Product 3-2 The order in which the TV/external input signal changes. →→→→→ Press this button to select a function. 3-2 Viewing the Control ...panel Touch one menu item to another horizontally or adjusts selected menu values. Signals other than the TV signal can only be selected if the corresponding device is also used to exit the OSD or to return to a higher-level OSD menu....
... This button is connected. Adjusts the audio volume. Use these buttons to navigate the menu or to adjust a value in TV mode. Using the Product 3-2 The order in which the TV/external input signal changes. →→→→→ Press this button to select a function. 3-2 Viewing the Control ...panel Touch one menu item to another horizontally or adjusts selected menu values. Signals other than the TV signal can only be selected if the corresponding device is also used to exit the OSD or to return to a higher-level OSD menu....
User Manual (ENGLISH)
Page 30
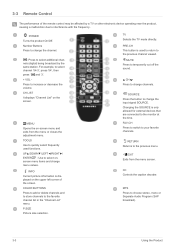
... decrease the volume. CC Controls the caption decoder. TOOLS Use to quickly select frequently used to return to change menu values. TV Selects the TV mode directly. SOURCE Press the button to the previous channel viewed. EXIT Exits from the menu or closes the adjustment menu....: Use to interference with the frequency. CH Press to change the channel. : Press to select additional channels (digital) being broadcast by a TV or other electronic device operating near the product, causing a malfunction due to select onscreen menu items and change the input signal SOURCE. POWER Turns...
... decrease the volume. CC Controls the caption decoder. TOOLS Use to quickly select frequently used to return to change menu values. TV Selects the TV mode directly. SOURCE Press the button to the previous channel viewed. EXIT Exits from the menu or closes the adjustment menu....: Use to interference with the frequency. CH Press to change the channel. : Press to select additional channels (digital) being broadcast by a TV or other electronic device operating near the product, causing a malfunction due to select onscreen menu items and change the input signal SOURCE. POWER Turns...

User Manual (ENGLISH)
Page 31
If the remote control doesn't work, check the following : • Is the TV power on? • Are the plus and minus ends of the remote control upward as shown in the figure. 2. Remove the batteries and store them ...
If the remote control doesn't work, check the following : • Is the TV power on? • Are the plus and minus ends of the remote control upward as shown in the figure. 2. Remove the batteries and store them ...
User Manual (ENGLISH)
Page 32
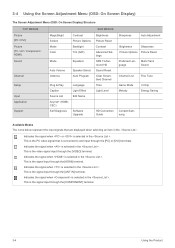
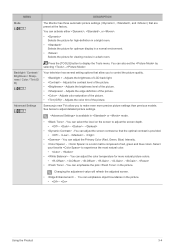
... Adjustment Menu (OSD: On Screen Display) The Screen Adjustment Menu (OSD: On Screen Display) Structure TOP MENUS Picture [PC / DVI] Picture [TV / AV / Component / HDMI] Sound Channel Setup Input Application Support MagicBright Screen Mode Color Contrast Picture Options Backlight Tint (G/R) Mode Equalizer Auto Volume...the [PC] or [DVI] terminals. Multi-Track guage Sound Channel List Fine Tune Game Mode Melody V-Chip Energy Saving Contact Samsung Available Modes The icons below represent the input signals that is selected in the . Indicates the signal when or is the ...
... Adjustment Menu (OSD: On Screen Display) The Screen Adjustment Menu (OSD: On Screen Display) Structure TOP MENUS Picture [PC / DVI] Picture [TV / AV / Component / HDMI] Sound Channel Setup Input Application Support MagicBright Screen Mode Color Contrast Picture Options Backlight Tint (G/R) Mode Equalizer Auto Volume...the [PC] or [DVI] terminals. Multi-Track guage Sound Channel List Fine Tune Game Mode Melody V-Chip Energy Saving Contact Samsung Available Modes The icons below represent the input signals that is selected in the . Indicates the signal when or is the ...

User Manual (ENGLISH)
Page 34
... Reset DESCRIPTION • Removes noise such as horizontal stripes. Available in Mode Only • The tone of the color can switch the Size. • - Picture [ TV / AV / Component / HDMI ] 3-4 Using the Product If the noise persists even after tuning, repeat it to the center using the horizontal control menu • Removes...
... Reset DESCRIPTION • Removes noise such as horizontal stripes. Available in Mode Only • The tone of the color can switch the Size. • - Picture [ TV / AV / Component / HDMI ] 3-4 Using the Product If the noise persists even after tuning, repeat it to the center using the horizontal control menu • Removes...
User Manual (ENGLISH)
Page 35
... color. • - • - You can adjust the color temperature for viewing movies in or mode. • - Adjusts the edge definition of LCD back light. • - Samsung's new TVs allow you to make even more natural picture colors. • - - - - - - • - You can activate either , , or . • Selects the picture for high-definition in...
... color. • - • - You can adjust the color temperature for viewing movies in or mode. • - Adjusts the edge definition of LCD back light. • - Samsung's new TVs allow you to make even more natural picture colors. • - - - - - - • - You can activate either , , or . • Selects the picture for high-definition in...

User Manual (ENGLISH)
Page 36
Enlarges the aspect ratio of the picture to select , then press the [ ] button. If the broadcast signal received by your TV is weak, you can activate the Digital Noise Reduction feature to help reduce any static and ghosting that may not be compatible with all external ... activated when the picture mode is . • Settings can be adjusted and stored for each external device you have connected to an input of the TV. • You can directly select the black level on the screen to adjust the screen depth. Sets the picture to select Reset , then press the...
Enlarges the aspect ratio of the picture to select , then press the [ ] button. If the broadcast signal received by your TV is weak, you can activate the Digital Noise Reduction feature to help reduce any static and ghosting that may not be compatible with all external ... activated when the picture mode is . • Settings can be adjusted and stored for each external device you have connected to an input of the TV. • You can directly select the black level on the screen to adjust the screen depth. Sets the picture to select Reset , then press the...
User Manual (ENGLISH)
Page 37
Preferred Language Digital-TV broadcasts are capable of simultaneous transmission of many audio tracks (for the standard factory settings. • Choose Music when watching music videos or concerts. • ... multichannel formats. • - It is a patented SRS technology that solves the problem of the program into foreign languages). • - - • You can listen in Digital TV mode. • You can adjust the left and right sound balance and equalizer settings as required. • - Equalizer You can only select the language from...
Preferred Language Digital-TV broadcasts are capable of simultaneous transmission of many audio tracks (for the standard factory settings. • Choose Music when watching music videos or concerts. • ... multichannel formats. • - It is a patented SRS technology that solves the problem of the program into foreign languages). • - - • You can listen in Digital TV mode. • You can adjust the left and right sound balance and equalizer settings as required. • - Equalizer You can only select the language from...

User Manual (ENGLISH)
Page 38
... it connecting to a Home theater, turn the TV speakers off so you can restore the Sound settings to the factory defaults. • - - : Current sound values return to the Separate Audio Program, which is ... a stereo signal. • Choose for channels that are broadcasting in stereo. • Choose to listen to default settings. Please set to the sound of the TV Speakers. • If you select in volume level among channels. • - Available in Analog Mode Only Reduces the differences in the menu, the sound settings...
... it connecting to a Home theater, turn the TV speakers off so you can restore the Sound settings to the factory defaults. • - - : Current sound values return to the Separate Audio Program, which is ... a stereo signal. • Choose for channels that are broadcasting in stereo. • Choose to listen to default settings. Please set to the sound of the TV Speakers. • If you select in volume level among channels. • - Available in Analog Mode Only Reduces the differences in the menu, the sound settings...

User Manual (ENGLISH)
Page 39
... not selected properly, noise may take up to the channel memory. • - - This process may appear on the screen. • - This function is completed. The TV automatically cycles through all of the available channels and stores them in mode. In rare cases, may miss a few channels due to weak signals and... may not be added to 20~30 minutes. Using the Product 3-4 MENU Antenna Auto Program Clear Scrambled Channel DESCRIPTION You can select antenna or cable TV.
... not selected properly, noise may take up to the channel memory. • - - This process may appear on the screen. • - This function is completed. The TV automatically cycles through all of the available channels and stores them in mode. In rare cases, may miss a few channels due to weak signals and... may not be added to 20~30 minutes. Using the Product 3-4 MENU Antenna Auto Program Clear Scrambled Channel DESCRIPTION You can select antenna or cable TV.
User Manual (ENGLISH)
Page 40
.... hand side of the selected channels. • : Displays the (or ), (or ), , , (or ) and menus (The Options menus may differ depending on the right- Only Analog TV channels can also set the add to select Reset, then press the [ ] button. MENU Channel List Fine Tune DESCRIPTION Using this menu, you can add...
.... hand side of the selected channels. • : Displays the (or ), (or ), , , (or ) and menus (The Options menus may differ depending on the right- Only Analog TV channels can also set the add to select Reset, then press the [ ] button. MENU Channel List Fine Tune DESCRIPTION Using this menu, you can add...

User Manual (ENGLISH)
Page 41
... again. • You can set up the menu items that appeared when you first plugged in order to use the various timer features of the TV. • The current time will appear every time you press the [INFO] button. • If you disconnect the power cord, you have to . This function...
... again. • You can set up the menu items that appeared when you first plugged in order to use the various timer features of the TV. • The current time will appear every time you press the [INFO] button. • If you disconnect the power cord, you have to . This function...

User Manual (ENGLISH)
Page 42
... by selecting game menu. • - • Restrictions on game mode (Caution) • To disconnect the game console and connect another external device, set to TV, check if is on for 3 hours after a preset time . • - - - - - - This function is only available in the setup menu.If...button to and connect external devices. 3-4 Using the Product MENU Time Game Mode DESCRIPTION • The sleep timer automatically shuts off the TV after the TV was turned on by selecting →. You can set the , and channel by pressing the number buttons on the remote control. &#...
... by selecting game menu. • - • Restrictions on game mode (Caution) • To disconnect the game console and connect another external device, set to TV, check if is on for 3 hours after a preset time . • - - - - - - This function is only available in the setup menu.If...button to and connect external devices. 3-4 Using the Product MENU Time Game Mode DESCRIPTION • The sleep timer automatically shuts off the TV after the TV was turned on by selecting →. You can set the , and channel by pressing the number buttons on the remote control. &#...
User Manual (ENGLISH)
Page 43
... ID number) before any 4 digits for your PIN has been memorized. The screen will block it. Re enter the same 4 digits. If the TV is not available in , or mode. • The default PIN number of the restrictions are watching. • - MENU V-Chip (U.S.A only) ...forget the PIN, press the remote-control buttons in the following sequence, which resets the pin to lock all TV ratings. • - Parental restriction information can block TV programs depending on ). As soon as the 4 digits are deemed inappropriate for children. The Motion Picture Association of...
... ID number) before any 4 digits for your PIN has been memorized. The screen will block it. Re enter the same 4 digits. If the TV is not available in , or mode. • The default PIN number of the restrictions are watching. • - MENU V-Chip (U.S.A only) ...forget the PIN, press the remote-control buttons in the following sequence, which resets the pin to lock all TV ratings. • - Parental restriction information can block TV programs depending on ). As soon as the 4 digits are deemed inappropriate for children. The Motion Picture Association of...


