User Manual (ENGLISH)
Page 2
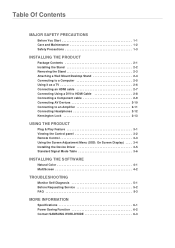
... a Component cable 2-9 Connecting AV Devices 2-10 Connecting to an Amplifier 2-11 Connecting Headphones 2-12 Kensington Lock 2-13 USING THE PRODUCT Plug & Play Feature 3-1 Viewing the Control panel 3-2 Remote Control 3-3 Using the Screen Adjustment Menu (OSD: On Screen Display) . . . . 3-4 Installing the Device Driver 3-5 Standard Signal Mode Table 3-6 INSTALLING THE SOFTWARE Natural Color 4-1 MultiScreen 4-2 TROUBLESHOOTING...
... a Component cable 2-9 Connecting AV Devices 2-10 Connecting to an Amplifier 2-11 Connecting Headphones 2-12 Kensington Lock 2-13 USING THE PRODUCT Plug & Play Feature 3-1 Viewing the Control panel 3-2 Remote Control 3-3 Using the Screen Adjustment Menu (OSD: On Screen Display) . . . . 3-4 Installing the Device Driver 3-5 Standard Signal Mode Table 3-6 INSTALLING THE SOFTWARE Natural Color 4-1 MultiScreen 4-2 TROUBLESHOOTING...
User Manual (ENGLISH)
Page 10
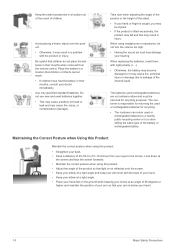
... so that your knees at an angle of 90 degrees or higher and maintain the position of 45~50 cm (15~19 inches) from the remote control. Be careful that children or infants cannot reach. • If children have had the battery in a problem with the back of your hand. • Keep...
... so that your knees at an angle of 90 degrees or higher and maintain the position of 45~50 cm (15~19 inches) from the remote control. Be careful that children or infants cannot reach. • If children have had the battery in a problem with the back of your hand. • Keep...

User Manual (ENGLISH)
Page 11
... in case you need to move the product at a later stage. CONTENTS Installation Manual Product Warranty (Not available in all locations) Stand Connector Stand Base Remote Control Cleaning Cloth SOLD SEPARATELY D-Sub Cable HDMI Cable Stereo Cable The cleaning cloth is supplied with black high-glossy models only.
... in case you need to move the product at a later stage. CONTENTS Installation Manual Product Warranty (Not available in all locations) Stand Connector Stand Base Remote Control Cleaning Cloth SOLD SEPARATELY D-Sub Cable HDMI Cable Stereo Cable The cleaning cloth is supplied with black high-glossy models only.
User Manual (ENGLISH)
Page 20
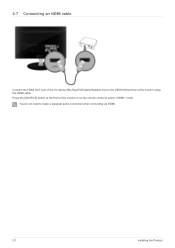
2-7 Connecting an HDMI cable Connect the HDMI OUT port of the AV device (Blu-Ray/DVD/Cable/Satellite box) to make a separate audio connection when connecting via HDMI. 2-7 Installing the Product You do not need to the [HDMI IN] terminal of the monitor or on the remote control to select mode. Press the [SOURCE] button at the front of the monitor using the HDMI cable.
2-7 Connecting an HDMI cable Connect the HDMI OUT port of the AV device (Blu-Ray/DVD/Cable/Satellite box) to make a separate audio connection when connecting via HDMI. 2-7 Installing the Product You do not need to the [HDMI IN] terminal of the monitor or on the remote control to select mode. Press the [SOURCE] button at the front of the monitor using the HDMI cable.
User Manual (ENGLISH)
Page 21
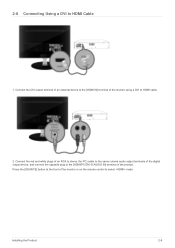
Connect the DVI output terminal of an external device to the [HDMI IN] terminal of the monitor or on the remote control to HDMI cable. 2. Press the [SOURCE] button at the front of the monitor using a DVI to select mode. Connect the red and white plugs of an RCA to stereo (for PC) cable to the same colored audio output terminals of the digital output device, and connect the opposite plug to HDMI Cable 1. 2-8 Connecting Using a DVI to the [HDMI/PC/DVI-D AUDIO IN] terminal of the product. Installing the Product 2-8
Connect the DVI output terminal of an external device to the [HDMI IN] terminal of the monitor or on the remote control to HDMI cable. 2. Press the [SOURCE] button at the front of the monitor using a DVI to select mode. Connect the red and white plugs of an RCA to stereo (for PC) cable to the same colored audio output terminals of the digital output device, and connect the opposite plug to HDMI Cable 1. 2-8 Connecting Using a DVI to the [HDMI/PC/DVI-D AUDIO IN] terminal of the product. Installing the Product 2-8
User Manual (ENGLISH)
Page 22
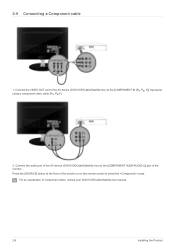
For an explanation of the monitor or on the remote control to the [COMPONENT IN [PR, PB, Y]] input ports using a component video cable [PR, PB,Y]. 2. Press the [SOURCE] button at the front of Component video, consult your DVD/VCR/Cable/Satellite box manual. 2-9 Installing the Product Connect the VIDEO OUT port of the monitor. 2-9 Connecting a Component cable 1. Connect the audio port of the AV device (DVD/VCR/Cable/Satellite box) to the [COMPONENT IN [[R-AUDIO-L]] port of the AV device (DVD/VCR/Cable/Satellite box) to select the mode.
For an explanation of the monitor or on the remote control to the [COMPONENT IN [PR, PB, Y]] input ports using a component video cable [PR, PB,Y]. 2. Press the [SOURCE] button at the front of Component video, consult your DVD/VCR/Cable/Satellite box manual. 2-9 Installing the Product Connect the VIDEO OUT port of the monitor. 2-9 Connecting a Component cable 1. Connect the audio port of the AV device (DVD/VCR/Cable/Satellite box) to the [COMPONENT IN [[R-AUDIO-L]] port of the AV device (DVD/VCR/Cable/Satellite box) to select the mode.
User Manual (ENGLISH)
Page 27
.... When the volume OSD is only intended for your local area. Press the ▲ or ▼ button to (Standard): Press the volume button on the remote control. • You can select the correct signal source among , , and by pressing the ▲ or ▼ button. If the unit is complete. After reading, press...
.... When the volume OSD is only intended for your local area. Press the ▲ or ▼ button to (Standard): Press the volume button on the remote control. • You can select the correct signal source among , , and by pressing the ▲ or ▼ button. If the unit is complete. After reading, press...
User Manual (ENGLISH)
Page 30
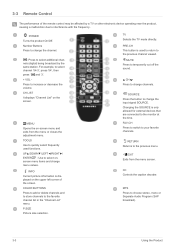
... or Separate Audio Program (SAP broadcast). 3-3 Using the Product CH LIST It displays "Channel List" on the upper left corner of the remote control may be affected by the same station. MENU Opens the on-screen menu and exits from the menu screen. PRE-CH This button is displayed... and to store channels to quickly select frequently used to return to your favorite channels. CH Press to the previous menu. 3-3 Remote Control The performance of the screen. RETURN Returns to change the input signal SOURCE. EXIT Exits from the menu or closes the adjustment menu.
... or Separate Audio Program (SAP broadcast). 3-3 Using the Product CH LIST It displays "Channel List" on the upper left corner of the remote control may be affected by the same station. MENU Opens the on-screen menu and exits from the menu screen. PRE-CH This button is displayed... and to store channels to quickly select frequently used to return to your favorite channels. CH Press to the previous menu. 3-3 Remote Control The performance of the screen. RETURN Returns to change the input signal SOURCE. EXIT Exits from the menu or closes the adjustment menu.

User Manual (ENGLISH)
Page 31
Lift the cover at the back of the remote control upward as shown in a cool, dry place if you won't be using the remote control for a long time. ends of the batteries reversed? • Are the batteries drained? • Is there a power outage or is the power cord unplugged? •...; Is there a special fluorescent light or neon sign nearby? If the remote control doesn't work, check the following : • Is the TV power on? • Are the plus and minus ends of the batteries with the diagram inside...
Lift the cover at the back of the remote control upward as shown in a cool, dry place if you won't be using the remote control for a long time. ends of the batteries reversed? • Are the batteries drained? • Is there a power outage or is the power cord unplugged? •...; Is there a special fluorescent light or neon sign nearby? If the remote control doesn't work, check the following : • Is the TV power on? • Are the plus and minus ends of the batteries with the diagram inside...

User Manual (ENGLISH)
Page 36
... / 1080p) or DTV (1080i) input signals. • After selecting , or : Press the ▲or▼ button to 4:3 normal mode. • - The direct button on the remote control is connected via .The function may not be adjusted and stored for each external device you can activate the Digital Noise Reduction feature to help...
... / 1080p) or DTV (1080i) input signals. • After selecting , or : Press the ▲or▼ button to 4:3 normal mode. • - The direct button on the remote control is connected via .The function may not be adjusted and stored for each external device you can activate the Digital Noise Reduction feature to help...
User Manual (ENGLISH)
Page 37
You can also set the by pressing the MTS button on the remote control. • Preferred Language is available only in Digital TV mode. • You can only select the language from among the actual languages being broadcast. You ...
You can also set the by pressing the MTS button on the remote control. • Preferred Language is available only in Digital TV mode. • You can only select the language from among the actual languages being broadcast. You ...
User Manual (ENGLISH)
Page 40
...List Fine Tune DESCRIPTION Using this menu, you can watch the selected channel. • Using the Color buttons with an asterisk on the remote control • - You can add / delete or set favorite channels and use the program guide for optimal reception. • If you ...not saved. • Fine tuned channels that have set as a Favorite. • : A channel selected by simply pressing the [CH LIST] button on the remote control. • - Then you can select these options by pressing the yellow button. • : A Program currently being broadcast. • : A reserved program....
...List Fine Tune DESCRIPTION Using this menu, you can watch the selected channel. • Using the Color buttons with an asterisk on the remote control • - You can add / delete or set favorite channels and use the program guide for optimal reception. • If you ...not saved. • Fine tuned channels that have set as a Favorite. • : A channel selected by simply pressing the [CH LIST] button on the remote control. • - Then you can select these options by pressing the yellow button. • : A Program currently being broadcast. • : A reserved program....

User Manual (ENGLISH)
Page 41
... must be set correctly. This function is only available when is set to . • (Daylight Saving Time) Switches the Daylight Saving Time function on the remote control. • Select your time zone. This function is only available when is necessary in the TV. You can set the month, day, year, hour and...
... must be set correctly. This function is only available when is set to . • (Daylight Saving Time) Switches the Daylight Saving Time function on the remote control. • Select your time zone. This function is only available when is necessary in the TV. You can set the month, day, year, hour and...

User Manual (ENGLISH)
Page 42
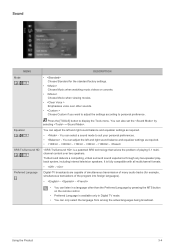
... mode is automatically changed to and cannot be changed. • Sound mode is automatically changed . Adjust the sound using the equalizer. • is on the remote control. • Auto Power Off When you 've chosen, set the Antenna by selecting game menu. • - • Restrictions on / off if no... controls are operated for too long time. MENU Time Game Mode DESCRIPTION • The sleep timer automatically shuts off the TV after the TV was turned ...
... mode is automatically changed to and cannot be changed. • Sound mode is automatically changed . Adjust the sound using the equalizer. • is on the remote control. • Auto Power Off When you 've chosen, set the Antenna by selecting game menu. • - • Restrictions on / off if no... controls are operated for too long time. MENU Time Game Mode DESCRIPTION • The sleep timer automatically shuts off the TV after the TV was turned ...
User Manual (ENGLISH)
Page 43
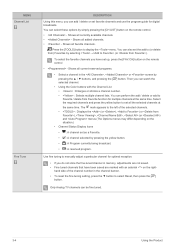
... can block rated TV Programs. • - • - Re enter the same 4 digits. If you forget the PIN, press the remote-control buttons in the following sequence, which resets the pin to temporarily disable the V-Chip Lock. You can be used while watching DTV channels •...POWER](off )→[MUTE]→8→2→4→[POWER] (on their rating. This function allows you forget the PIN, press the remote-control buttons in , or mode. • The default PIN number of America(MPAA) has implemented a rating system that are deemed inappropriate for children.
... can block rated TV Programs. • - • - Re enter the same 4 digits. If you forget the PIN, press the remote-control buttons in the following sequence, which resets the pin to temporarily disable the V-Chip Lock. You can be used while watching DTV channels •...POWER](off )→[MUTE]→8→2→4→[POWER] (on their rating. This function allows you forget the PIN, press the remote-control buttons in , or mode. • The default PIN number of America(MPAA) has implemented a rating system that are deemed inappropriate for children.

User Manual (ENGLISH)
Page 45
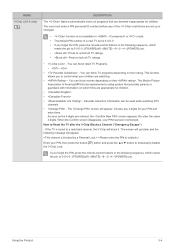
... to the Monitor.Use to select the screen of your input source selection easier. - - - - - - < Game> - - - - - - - - - When watching TV at night, set to come on the remote control. • - - - - - MENU Melody Energy Saving Input DESCRIPTION A melody sound can use the [SOURCE] button on when the monitor is turned off the energy saving function...
... to the Monitor.Use to select the screen of your input source selection easier. - - - - - - < Game> - - - - - - - - - When watching TV at night, set to come on the remote control. • - - - - - MENU Melody Energy Saving Input DESCRIPTION A melody sound can use the [SOURCE] button on when the monitor is turned off the energy saving function...
User Manual (ENGLISH)
Page 46
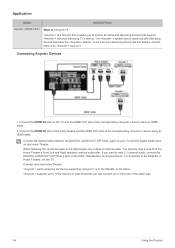
... audio, connect the [DIGITAL AUDIO OUT (OPTICAL)] jack on it. To be sure your Samsung device has this feature, check if there is a function that enables you to control all connected Samsung devices that support with Samsung devices that you want to 3 devices of the same type. 3-4 Using the Product Connect ... TV. Connect the [HDMI IN] jack on the Home Theatre. Connect the Optical cable between the [DIGITAL AUDIO OUT (OPTICAL)] jack on your Samsung TV's remote. is an logo on the DVD / Satellite Box (ie Anynet Device 1 or 2) directly to 10 AV devices in the Standby or On status...
... audio, connect the [DIGITAL AUDIO OUT (OPTICAL)] jack on it. To be sure your Samsung device has this feature, check if there is a function that enables you to control all connected Samsung devices that support with Samsung devices that you want to 3 devices of the same type. 3-4 Using the Product Connect ... TV. Connect the [HDMI IN] jack on the Home Theatre. Connect the Optical cable between the [DIGITAL AUDIO OUT (OPTICAL)] jack on your Samsung TV's remote. is an logo on the DVD / Satellite Box (ie Anynet Device 1 or 2) directly to 10 AV devices in the Standby or On status...
User Manual (ENGLISH)
Page 56
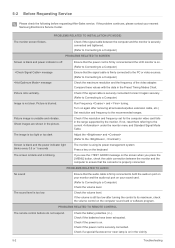
...the , ) The monitor is firmly connected to a Computer) Check the maximum resolution and the frequency of the video adapter. PROBLEMS RELATED TO REMOTE CONTROL The remote control buttons do not respond. If the problem continues, please contact your sound card. (Refer to Connecting to a Computer) Run Frequency and <...a Computer) Check the volume level. Ensure that the power cord is firmly connected and the LCD monitor is on your nearest Samsung Electronics Service Center. Check if the signal cable between the monitor and the computer to ensure that the audio cable is using its...
...the , ) The monitor is firmly connected to a Computer) Check the maximum resolution and the frequency of the video adapter. PROBLEMS RELATED TO REMOTE CONTROL The remote control buttons do not respond. If the problem continues, please contact your sound card. (Refer to Connecting to a Computer) Run Frequency and <...a Computer) Check the volume level. Ensure that the power cord is firmly connected and the LCD monitor is on your nearest Samsung Electronics Service Center. Check if the signal cable between the monitor and the computer to ensure that the audio cable is using its...


