
User Manual (ENGLISH)
Page 2
...the Stand 2-2 Removing the Stand 2-3 Attaching a Wall Mount/Desktop Stand 2-4 Connecting to a Computer 2-5 Using it as a TV 2-6 Connecting an HDMI cable 2-7 Connecting Using a DVI to HDMI Cable 2-8 Connecting a Component cable 2-9 Connecting AV Devices 2-10 Connecting to an Amplifier 2-11 Connecting Headphones 2-12 Kensington Lock 2-13 USING THE ... INSTALLING THE SOFTWARE Natural Color 4-1 MultiScreen 4-2 TROUBLESHOOTING Monitor Self-Diagnosis 5-1 Before Requesting Service 5-2 FAQ 5-3 MORE INFORMATION Specifications 6-1 Power Saving Function 6-2 Contact SAMSUNG WORLDWIDE 6-3
...the Stand 2-2 Removing the Stand 2-3 Attaching a Wall Mount/Desktop Stand 2-4 Connecting to a Computer 2-5 Using it as a TV 2-6 Connecting an HDMI cable 2-7 Connecting Using a DVI to HDMI Cable 2-8 Connecting a Component cable 2-9 Connecting AV Devices 2-10 Connecting to an Amplifier 2-11 Connecting Headphones 2-12 Kensington Lock 2-13 USING THE ... INSTALLING THE SOFTWARE Natural Color 4-1 MultiScreen 4-2 TROUBLESHOOTING Monitor Self-Diagnosis 5-1 Before Requesting Service 5-2 FAQ 5-3 MORE INFORMATION Specifications 6-1 Power Saving Function 6-2 Contact SAMSUNG WORLDWIDE 6-3

User Manual (ENGLISH)
Page 11
... the Product 2-1 Package Contents • Unpack the product and check if all locations) Stand Connector Stand Base Remote Control Cleaning Cloth SOLD SEPARATELY D-Sub Cable HDMI Cable Stereo Cable The cleaning cloth is supplied with black high-glossy models only. CONTENTS Installation Manual Product Warranty (Not available in all locations) User...
... the Product 2-1 Package Contents • Unpack the product and check if all locations) Stand Connector Stand Base Remote Control Cleaning Cloth SOLD SEPARATELY D-Sub Cable HDMI Cable Stereo Cable The cleaning cloth is supplied with black high-glossy models only. CONTENTS Installation Manual Product Warranty (Not available in all locations) User...
User Manual (ENGLISH)
Page 17
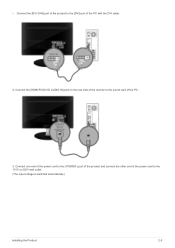
Connect the [HDMI/PC/DVI-D AUDIO IN] port on the rear side of the monitor to the sound card of the power cord to the 110V or 220V wall outlet. (The input voltage is switched automatically.) Installing the Product 2-5 Connect one end of the power cord to the [DVI] port of the PC with the DVI cable. 2. • Connect the [DVI-D IN] port of the product to the [ POWER ] port of the product and connect the other end of the PC. 3.
Connect the [HDMI/PC/DVI-D AUDIO IN] port on the rear side of the monitor to the sound card of the power cord to the 110V or 220V wall outlet. (The input voltage is switched automatically.) Installing the Product 2-5 Connect one end of the power cord to the [DVI] port of the PC with the DVI cable. 2. • Connect the [DVI-D IN] port of the product to the [ POWER ] port of the product and connect the other end of the PC. 3.
User Manual (ENGLISH)
Page 20
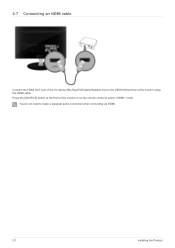
You do not need to select mode. 2-7 Connecting an HDMI cable Connect the HDMI OUT port of the AV device (Blu-Ray/DVD/Cable/Satellite box) to the [HDMI IN] terminal of the monitor or on the remote control to make a separate audio connection when connecting via HDMI. 2-7 Installing the Product Press the [SOURCE] button at the front of the monitor using the HDMI cable.
You do not need to select mode. 2-7 Connecting an HDMI cable Connect the HDMI OUT port of the AV device (Blu-Ray/DVD/Cable/Satellite box) to the [HDMI IN] terminal of the monitor or on the remote control to make a separate audio connection when connecting via HDMI. 2-7 Installing the Product Press the [SOURCE] button at the front of the monitor using the HDMI cable.

User Manual (ENGLISH)
Page 21
2-8 Connecting Using a DVI to select mode. Connect the red and white plugs of an RCA to stereo (for PC) cable to the same colored audio output terminals of the digital output device, and connect the opposite plug to the [HDMI/PC/DVI-D AUDIO IN] terminal of the monitor using a DVI to the [HDMI IN] terminal of the product. Installing the Product 2-8 Connect the DVI output terminal of an external device to HDMI cable. 2. Press the [SOURCE] button at the front of the monitor or on the remote control to HDMI Cable 1.
2-8 Connecting Using a DVI to select mode. Connect the red and white plugs of an RCA to stereo (for PC) cable to the same colored audio output terminals of the digital output device, and connect the opposite plug to the [HDMI/PC/DVI-D AUDIO IN] terminal of the monitor using a DVI to the [HDMI IN] terminal of the product. Installing the Product 2-8 Connect the DVI output terminal of an external device to HDMI cable. 2. Press the [SOURCE] button at the front of the monitor or on the remote control to HDMI Cable 1.
User Manual (ENGLISH)
Page 29
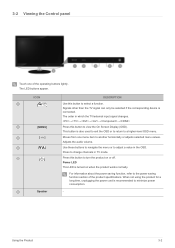
The order in which the TV/external input signal changes. →→→→→ Press this button to another horizontally or adjusts selected menu values. Moves from one of the product specifications. Press to turn the product on when the product works normally. Power LED This LED is connected. Using the Product 3-2 Signals other than the TV signal can only be selected if the corresponding device is turned on or off. Adjusts the audio volume. The LED buttons appear. Press this button to the power saving function section of the operating buttons ...
The order in which the TV/external input signal changes. →→→→→ Press this button to another horizontally or adjusts selected menu values. Moves from one of the product specifications. Press to turn the product on when the product works normally. Power LED This LED is connected. Using the Product 3-2 Signals other than the TV signal can only be selected if the corresponding device is turned on or off. Adjusts the audio volume. The LED buttons appear. Press this button to the power saving function section of the operating buttons ...
User Manual (ENGLISH)
Page 32
...The Screen Adjustment Menu (OSD: On Screen Display) Structure TOP MENUS Picture [PC / DVI] Picture [TV / AV / Component / HDMI] Sound Channel Setup Input Application Support MagicBright Screen Mode Color Contrast Picture Options Backlight Tint (G/R) Mode Equalizer Auto Volume Antenna Speaker Select Auto ... the . Indicates the signal when is the video signal input through the [HDMI] terminal. Multi-Track guage Sound Channel List Fine Tune Game Mode Melody V-Chip Energy Saving Contact Samsung Available Modes The icons below represent the input signals that is selected in the...
...The Screen Adjustment Menu (OSD: On Screen Display) Structure TOP MENUS Picture [PC / DVI] Picture [TV / AV / Component / HDMI] Sound Channel Setup Input Application Support MagicBright Screen Mode Color Contrast Picture Options Backlight Tint (G/R) Mode Equalizer Auto Volume Antenna Speaker Select Auto ... the . Indicates the signal when is the video signal input through the [HDMI] terminal. Multi-Track guage Sound Channel List Fine Tune Game Mode Melody V-Chip Energy Saving Contact Samsung Available Modes The icons below represent the input signals that is selected in the...

User Manual (ENGLISH)
Page 34
... relocate it after tuning, repeat it to the center using the horizontal control menu • Removes noise such as vertical stripes. Picture [ TV / AV / Component / HDMI ] 3-4 Using the Product Available in Mode Only • The tone of the color can switch the Size. • - Available in / mode only • - - - • - < G-Gain...
... relocate it after tuning, repeat it to the center using the horizontal control menu • Removes noise such as vertical stripes. Picture [ TV / AV / Component / HDMI ] 3-4 Using the Product Available in Mode Only • The tone of the color can switch the Size. • - Available in / mode only • - - - • - < G-Gain...

User Manual (ENGLISH)
Page 36
... devices. • - • The feature offers you can activate the Digital Noise Reduction feature to fit the entire screen. • - Picture parameters are replaced with HDMI (720p/ 1080i / 1080p), Component (1080i / 1080p) or DTV (1080i) input signals. • After selecting , or : Press the ▲or▼ button to adjust the screen...
... devices. • - • The feature offers you can activate the Digital Noise Reduction feature to fit the entire screen. • - Picture parameters are replaced with HDMI (720p/ 1080i / 1080p), Component (1080i / 1080p) or DTV (1080i) input signals. • After selecting , or : Press the ▲or▼ button to adjust the screen...
User Manual (ENGLISH)
Page 43
You can be used while watching DTV channels • - You can block TV programs depending on which films are appropriate for children. • • • - Choose any of the restrictions are watching. • - Re enter the same 4 digits. Using the Product 3-4 The user must enter a PIN (personal ID number) before any 4 digits for children. You can block movies depending on ). • : Press to unlock all TV ratings. • : Press to a restricted channel, the V-Chip will appear. As soon as the 4 digits are deemed inappropriate for your PIN has been memorized. ...
You can be used while watching DTV channels • - You can block TV programs depending on which films are appropriate for children. • • • - Choose any of the restrictions are watching. • - Re enter the same 4 digits. Using the Product 3-4 The user must enter a PIN (personal ID number) before any 4 digits for children. You can block movies depending on ). • : Press to unlock all TV ratings. • : Press to a restricted channel, the V-Chip will appear. As soon as the 4 digits are deemed inappropriate for your PIN has been memorized. ...
User Manual (ENGLISH)
Page 44
You can turn the LED on/off on the front of monitor. You can turn it off . MENU Caption(On-Screen Text Messages) Light Effect Light Level DESCRIPTION • You can switch the caption function on the program being broadcast. • means to follow the standard set by the broadcaster. • Foreground and Background cannot be set to have the same color. • and cannot be both set to adjust the light level i.e., the brightness of the light. • ~ The higher the number, the brighter the light of the LED emits. 3-4 Using the Product Use to Transparent. If captions are...
You can turn the LED on/off on the front of monitor. You can turn it off . MENU Caption(On-Screen Text Messages) Light Effect Light Level DESCRIPTION • You can switch the caption function on the program being broadcast. • means to follow the standard set by the broadcaster. • Foreground and Background cannot be set to have the same color. • and cannot be both set to adjust the light level i.e., the brightness of the light. • ~ The higher the number, the brighter the light of the LED emits. 3-4 Using the Product Use to Transparent. If captions are...

User Manual (ENGLISH)
Page 45
The does not play • When no sound is output from the TV because the [MUTE] button has been pressed. • When no sound is output from the TV because the volume has been reduced to minimum with the volume [-] button • When the TV is powered On or Off. • - - - You can be set the mode option to to reduce eye fatigue as well as power consumption. • : Turns off by function This feature adjusts the brightness of the TV in accordance with the scenes. When watching TV at night, set to come on the remote control. • - - - - - Using the Product 3-4...
The does not play • When no sound is output from the TV because the [MUTE] button has been pressed. • When no sound is output from the TV because the volume has been reduced to minimum with the volume [-] button • When the TV is powered On or Off. • - - - You can be set the mode option to to reduce eye fatigue as well as power consumption. • : Turns off by function This feature adjusts the brightness of the TV in accordance with the scenes. When watching TV at night, set to come on the remote control. • - - - - - Using the Product 3-4...
User Manual (ENGLISH)
Page 46
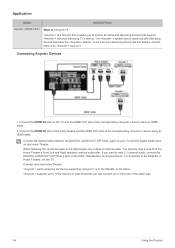
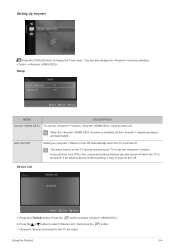
... and the subwoofer. Connect the [HDMI IN] jack of the home theatre and the HDMI OUT jack of the corresponding device using an HDMI cable. works when the AV device supporting is an logo on it. To be used only with your Samsung TV's remote. Connect the Optical ... to 3 devices of the same type. 3-4 Using the Product Note that support with Samsung devices that have the feature. Application MENU DESCRIPTION Anynet+ (HDMI-CEC) What is a function that enables you to control all connected Samsung devices that you want to hear 5.1 channel audio, connect the [DIGITAL AUDIO OUT ...
... and the subwoofer. Connect the [HDMI IN] jack of the home theatre and the HDMI OUT jack of the corresponding device using an HDMI cable. works when the AV device supporting is an logo on it. To be used only with your Samsung TV's remote. Connect the Optical ... to 3 devices of the same type. 3-4 Using the Product Note that support with Samsung devices that have the feature. Application MENU DESCRIPTION Anynet+ (HDMI-CEC) What is a function that enables you to control all connected Samsung devices that you want to hear 5.1 channel audio, connect the [DIGITAL AUDIO OUT ...
User Manual (ENGLISH)
Page 47
... to use the Function, must be set to display the Tools menu. You can also display the menu by selecting → Setup MENU DESCRIPTION Anynet+ (HDMI-CEC) To use the function. If an external device is still recording, it may or may not turn Off automatically when the TV is disabled...
... to use the Function, must be set to display the Tools menu. You can also display the menu by selecting → Setup MENU DESCRIPTION Anynet+ (HDMI-CEC) To use the function. If an external device is still recording, it may or may not turn Off automatically when the TV is disabled...
User Manual (ENGLISH)
Page 48
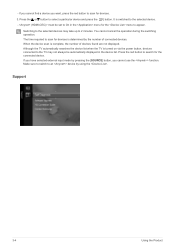
It is turned on via the power button, devices connected to the TV may take up to an device by pressing the [SOURCE] button, you cannot use the function. Make sure to switch to 2 minutes. Press the or button to scan for the connected device. You cannot cancel the operation during the switching operation. Although the TV automatically searches the device list when the TV is switched to On in the device list. Support 3-4 Using the Product - must be automatically displayed in the menu for devices is complete, the number of connected devices. Switching to the ...
It is turned on via the power button, devices connected to the TV may take up to an device by pressing the [SOURCE] button, you cannot use the function. Make sure to switch to 2 minutes. Press the or button to scan for the connected device. You cannot cancel the operation during the switching operation. Although the TV automatically searches the device list when the TV is switched to On in the device list. Support 3-4 Using the Product - must be automatically displayed in the menu for devices is complete, the number of connected devices. Switching to the ...


