User Manual (ENGLISH)
Page 2
... Stand 2-2 Removing the Stand 2-3 Attaching a Wall Mount/Desktop Stand 2-4 Connecting to a Computer 2-5 Using it as a TV 2-6 Connecting an HDMI cable 2-7 Connecting Using a DVI to HDMI Cable 2-8 Connecting a Component cable 2-9 Connecting AV Devices 2-10 Connecting to an Amplifier 2-11 Connecting Headphones 2-12 Kensington Lock 2-13 USING THE PRODUCT Plug & Play Feature... Natural Color 4-1 MultiScreen 4-2 TROUBLESHOOTING Monitor Self-Diagnosis 5-1 Before Requesting Service 5-2 FAQ 5-3 MORE INFORMATION Specifications 6-1 Power Saving Function 6-2 Contact SAMSUNG WORLDWIDE 6-3
... Stand 2-2 Removing the Stand 2-3 Attaching a Wall Mount/Desktop Stand 2-4 Connecting to a Computer 2-5 Using it as a TV 2-6 Connecting an HDMI cable 2-7 Connecting Using a DVI to HDMI Cable 2-8 Connecting a Component cable 2-9 Connecting AV Devices 2-10 Connecting to an Amplifier 2-11 Connecting Headphones 2-12 Kensington Lock 2-13 USING THE PRODUCT Plug & Play Feature... Natural Color 4-1 MultiScreen 4-2 TROUBLESHOOTING Monitor Self-Diagnosis 5-1 Before Requesting Service 5-2 FAQ 5-3 MORE INFORMATION Specifications 6-1 Power Saving Function 6-2 Contact SAMSUNG WORLDWIDE 6-3
User Manual (ENGLISH)
Page 5
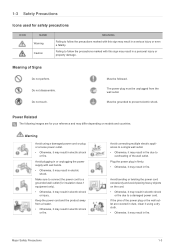
...follow the precautions marked with wet hands. • Otherwise, it may result in electric shock. Do not touch. Make sure to connect the power cord to a grounded wall outlet (for safety precautions ICON NAME Warning Caution MEANING Failing to follow the precautions marked with this...result in fire. Avoid plugging in or unplugging the power supply with this sign may result in a serious injury or even a fatality. Avoid connecting multiple electric appliances to a damaged power cord. Warning Avoid using a dry cloth. • Otherwise, it may result in electric shock or ...
...follow the precautions marked with wet hands. • Otherwise, it may result in electric shock. Do not touch. Make sure to connect the power cord to a grounded wall outlet (for safety precautions ICON NAME Warning Caution MEANING Failing to follow the precautions marked with this...result in fire. Avoid plugging in or unplugging the power supply with this sign may result in a serious injury or even a fatality. Avoid connecting multiple electric appliances to a damaged power cord. Warning Avoid using a dry cloth. • Otherwise, it may result in electric shock or ...
User Manual (ENGLISH)
Page 6
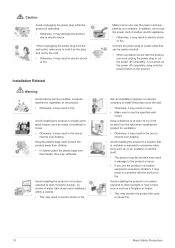
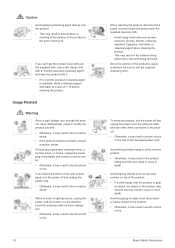
...; Otherwise, it may result in injury. • Make sure to pack the product away from children. • If children place the plastic bags over -heating. Connect the power plug to a wall outlet that is operating. • Otherwise, it may suffocate. Ask an installation engineer or relevant company to install the product...
...; Otherwise, it may result in injury. • Make sure to pack the product away from children. • If children place the plastic bags over -heating. Connect the power plug to a wall outlet that is operating. • Otherwise, it may suffocate. Ask an installation engineer or relevant company to install the product...
User Manual (ENGLISH)
Page 8
... or cracking of the exterior of the product or the panel coming off and unplug the power cord, the antenna cable and any other wires connected to the product. • Otherwise, it . • If no circumstance touch the antenna cable as this is dangerous. • Otherwise, it may result in the...
... or cracking of the exterior of the product or the panel coming off and unplug the power cord, the antenna cable and any other wires connected to the product. • Otherwise, it . • If no circumstance touch the antenna cable as this is dangerous. • Otherwise, it may result in the...

User Manual (ENGLISH)
Page 12
Place a soft cloth over the table to protect the product and place the product onto the cloth face down on a flat and stable surface so that it is facing downwards. Turn the connecting screw at the bottom of the Stand base fully so that the screen is completely fixed. 2-2 Installing the Stand Before assembling the product, place the product down . 2-2 Installing the Product Insert the Stand Connector into the Stand Base in the direction shown by the figure. Check if the Stand Connector is firmly connected.
Place a soft cloth over the table to protect the product and place the product onto the cloth face down on a flat and stable surface so that it is facing downwards. Turn the connecting screw at the bottom of the Stand base fully so that the screen is completely fixed. 2-2 Installing the Stand Before assembling the product, place the product down . 2-2 Installing the Product Insert the Stand Connector into the Stand Base in the direction shown by the figure. Check if the Stand Connector is firmly connected.

User Manual (ENGLISH)
Page 14
... base by the figure. Take the Stand Connector out of the product with your hand as shown in the figure. 2-3 Installing the Product Turn the connecting screw at the bottom of the arrow as shown by pulling it in the figure to protect the product and place the product face down...
... base by the figure. Take the Stand Connector out of the product with your hand as shown in the figure. 2-3 Installing the Product Turn the connecting screw at the bottom of the arrow as shown by pulling it in the figure to protect the product and place the product face down...
User Manual (ENGLISH)
Page 15
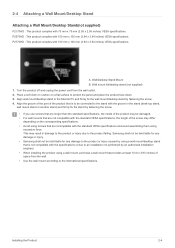
P2570HD : This product complies with 100 mm x 100 mm (3.94 x 3.94 inches) VESA specifications. P2770HD : This product complies with 100 mm x 100 mm (3.94 x 3.94 inches) VESA specifications. This may result in the stand (desk-top stand, wall mount stand ... product that is to be held liable for any damage to the stand with the standard VESA specifications and avoid assembling them using excessive force. Samsung shall not be held liable for any damage or injury. • Samsung shall not be connected to the product or injury caused by fastening the screw. 4.
P2570HD : This product complies with 100 mm x 100 mm (3.94 x 3.94 inches) VESA specifications. P2770HD : This product complies with 100 mm x 100 mm (3.94 x 3.94 inches) VESA specifications. This may result in the stand (desk-top stand, wall mount stand ... product that is to be held liable for any damage to the stand with the standard VESA specifications and avoid assembling them using excessive force. Samsung shall not be held liable for any damage or injury. • Samsung shall not be connected to the product or injury caused by fastening the screw. 4.
User Manual (ENGLISH)
Page 16
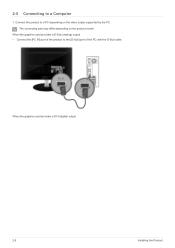
2-5 Connecting to the [D-Sub] port of the product to a Computer 1. When the graphics card provides a D-Sub (analog) output • Connect the [PC IN] port of the PC with the D-Sub cable. When the graphics card provides a DVI (digital) output 2-5 Installing the Product Connect the product to a PC depending on the product model. The connecting part may differ depending on the video output supported by the PC.
2-5 Connecting to the [D-Sub] port of the product to a Computer 1. When the graphics card provides a D-Sub (analog) output • Connect the [PC IN] port of the PC with the D-Sub cable. When the graphics card provides a DVI (digital) output 2-5 Installing the Product Connect the product to a PC depending on the product model. The connecting part may differ depending on the video output supported by the PC.
User Manual (ENGLISH)
Page 17
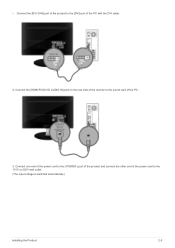
Connect one end of the power cord to the [ POWER ] port of the product and connect the other end of the PC with the DVI cable. 2. • Connect the [DVI-D IN] port of the product to the [DVI] port of the power cord to the 110V or 220V wall outlet. (The input voltage is switched automatically.) Installing the Product 2-5 Connect the [HDMI/PC/DVI-D AUDIO IN] port on the rear side of the monitor to the sound card of the PC. 3.
Connect one end of the power cord to the [ POWER ] port of the product and connect the other end of the PC with the DVI cable. 2. • Connect the [DVI-D IN] port of the product to the [DVI] port of the power cord to the 110V or 220V wall outlet. (The input voltage is switched automatically.) Installing the Product 2-5 Connect the [HDMI/PC/DVI-D AUDIO IN] port on the rear side of the monitor to the sound card of the PC. 3.
User Manual (ENGLISH)
Page 18
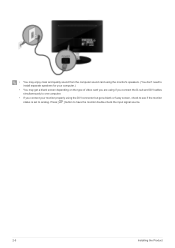
Press [ ] button to analog. • You may enjoy clear and quality sound from the computer sound card using the monitor's speakers. (You don't need to install separate speakers for your computer.) • You may get a blank screen depending on the type of video card you are using if you connect the D-sub and DVI cables simultaneously to one computer. • If you connect your monitor properly using the DVI connector but get a blank or fuzzy screen, check to see if the monitor status is set to have the monitor double-check the input signal source. 2-5 Installing the Product
Press [ ] button to analog. • You may enjoy clear and quality sound from the computer sound card using the monitor's speakers. (You don't need to install separate speakers for your computer.) • You may get a blank screen depending on the type of video card you are using if you connect the D-sub and DVI cables simultaneously to one computer. • If you connect your monitor properly using the DVI connector but get a blank or fuzzy screen, check to see if the monitor status is set to have the monitor double-check the input signal source. 2-5 Installing the Product
User Manual (ENGLISH)
Page 19
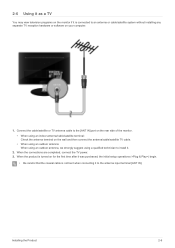
... TV power. 3. When the product is turned on the wall and then connect the antenna/cable/satellite TV cable. • When using an outdoor antenna: When using..., the initial setup operations () begin. • Be careful that the coaxial cable is connected to an antenna or cable/satellite system without installing any separate TV reception hardware or software on your computer.... 1. Connect the cable/satellite or TV antenna cable to the [ANT IN] port on the rear side of ...
... TV power. 3. When the product is turned on the wall and then connect the antenna/cable/satellite TV cable. • When using an outdoor antenna: When using..., the initial setup operations () begin. • Be careful that the coaxial cable is connected to an antenna or cable/satellite system without installing any separate TV reception hardware or software on your computer.... 1. Connect the cable/satellite or TV antenna cable to the [ANT IN] port on the rear side of ...
User Manual (ENGLISH)
Page 20
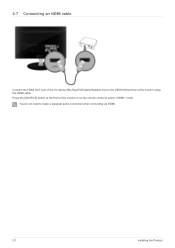
You do not need to select mode. Press the [SOURCE] button at the front of the monitor using the HDMI cable. 2-7 Connecting an HDMI cable Connect the HDMI OUT port of the AV device (Blu-Ray/DVD/Cable/Satellite box) to the [HDMI IN] terminal of the monitor or on the remote control to make a separate audio connection when connecting via HDMI. 2-7 Installing the Product
You do not need to select mode. Press the [SOURCE] button at the front of the monitor using the HDMI cable. 2-7 Connecting an HDMI cable Connect the HDMI OUT port of the AV device (Blu-Ray/DVD/Cable/Satellite box) to the [HDMI IN] terminal of the monitor or on the remote control to make a separate audio connection when connecting via HDMI. 2-7 Installing the Product
User Manual (ENGLISH)
Page 21
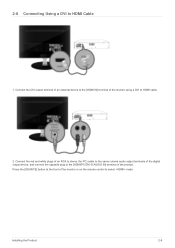
Press the [SOURCE] button at the front of the monitor or on the remote control to HDMI cable. 2. Installing the Product 2-8 Connect the DVI output terminal of an external device to the [HDMI IN] terminal of the monitor using a DVI to select mode. 2-8 Connecting Using a DVI to the [HDMI/PC/DVI-D AUDIO IN] terminal of the product. Connect the red and white plugs of an RCA to stereo (for PC) cable to the same colored audio output terminals of the digital output device, and connect the opposite plug to HDMI Cable 1.
Press the [SOURCE] button at the front of the monitor or on the remote control to HDMI cable. 2. Installing the Product 2-8 Connect the DVI output terminal of an external device to the [HDMI IN] terminal of the monitor using a DVI to select mode. 2-8 Connecting Using a DVI to the [HDMI/PC/DVI-D AUDIO IN] terminal of the product. Connect the red and white plugs of an RCA to stereo (for PC) cable to the same colored audio output terminals of the digital output device, and connect the opposite plug to HDMI Cable 1.
User Manual (ENGLISH)
Page 22
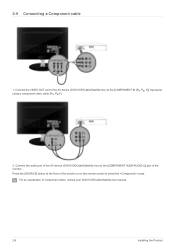
For an explanation of the AV device (DVD/VCR/Cable/Satellite box) to select the mode. Connect the VIDEO OUT port of Component video, consult your DVD/VCR/Cable/Satellite box manual. 2-9 Installing the Product Press the [SOURCE] button at the front of the monitor. 2-9 Connecting a Component cable 1. Connect the audio port of the AV device (DVD/VCR/Cable/Satellite box) to the [COMPONENT IN [[R-AUDIO-L]] port of the monitor or on the remote control to the [COMPONENT IN [PR, PB, Y]] input ports using a component video cable [PR, PB,Y]. 2.
For an explanation of the AV device (DVD/VCR/Cable/Satellite box) to select the mode. Connect the VIDEO OUT port of Component video, consult your DVD/VCR/Cable/Satellite box manual. 2-9 Installing the Product Press the [SOURCE] button at the front of the monitor. 2-9 Connecting a Component cable 1. Connect the audio port of the AV device (DVD/VCR/Cable/Satellite box) to the [COMPONENT IN [[R-AUDIO-L]] port of the monitor or on the remote control to the [COMPONENT IN [PR, PB, Y]] input ports using a component video cable [PR, PB,Y]. 2.
User Manual (ENGLISH)
Page 23
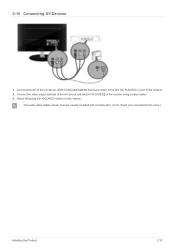
2-10 Connecting AV Devices 1. Select [AV]using a video cable. 3. Connect the video output terminal of the AV device and the [AV IN [VIDEO]] of the product. 2. Connect the port of the AV device (DVD/VCR/Cable/Satellite box/Camcorder) to the [AV IN [ R-AUDIO-L ] port of the monitor using the button on the remote. • The audio-video cables shown here are usually included with a Camcorder. (If not, check your local electronics store.) Installing the Product 2-10
2-10 Connecting AV Devices 1. Select [AV]using a video cable. 3. Connect the video output terminal of the AV device and the [AV IN [VIDEO]] of the product. 2. Connect the port of the AV device (DVD/VCR/Cable/Satellite box/Camcorder) to the [AV IN [ R-AUDIO-L ] port of the monitor using the button on the remote. • The audio-video cables shown here are usually included with a Camcorder. (If not, check your local electronics store.) Installing the Product 2-10
User Manual (ENGLISH)
Page 24
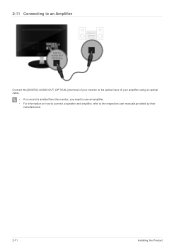
2-11 Connecting to an Amplifier Connect the [DIGITAL AUDIO OUT (OPTICAL)] terminal of your monitor to the optical input of your amplifier using an optical cable. • If no sound is emitted from the monitor, you need to use an amplifier. • For information on how to connect a speaker and amplifier, refer to the respective user manuals provided by their manufacturers. 2-11 Installing the Product
2-11 Connecting to an Amplifier Connect the [DIGITAL AUDIO OUT (OPTICAL)] terminal of your monitor to the optical input of your amplifier using an optical cable. • If no sound is emitted from the monitor, you need to use an amplifier. • For information on how to connect a speaker and amplifier, refer to the respective user manuals provided by their manufacturers. 2-11 Installing the Product

User Manual (ENGLISH)
Page 25
Installing the Product 2-12 2-12 Connecting Headphones Connect your headphones to the Headphone connection terminal.
Installing the Product 2-12 2-12 Connecting Headphones Connect your headphones to the Headphone connection terminal.

User Manual (ENGLISH)
Page 26
Connect the Kensington lock cable. 3. 2-13 Kensington Lock A Kensington Lock is an anti-theft device that they can purchase the locking device from an electronics store ...
Connect the Kensington lock cable. 3. 2-13 Kensington Lock A Kensington Lock is an anti-theft device that they can purchase the locking device from an electronics store ...
User Manual (ENGLISH)
Page 27
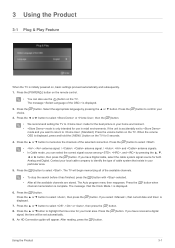
... channels. • To stop the search before it has finished, press the [ ] button with selected. • After all of the selected connection. After reading, press the [ ] button. 3 Using the Product 3-1 Plug & Play Feature When the TV is initially powered on the TV for... ] button. Press the [ channel memorization is displayed, press and hold the [ MENU ] button on , basic settings proceed automatically and subsequently. 1. An HD Connection guide will be set to select . • : antenna signal. / : antenna signal. / : and antenna signals. • In Cable mode, you have...
... channels. • To stop the search before it has finished, press the [ ] button with selected. • After all of the selected connection. After reading, press the [ ] button. 3 Using the Product 3-1 Plug & Play Feature When the TV is initially powered on the TV for... ] button. Press the [ channel memorization is displayed, press and hold the [ MENU ] button on , basic settings proceed automatically and subsequently. 1. An HD Connection guide will be set to select . • : antenna signal. / : antenna signal. / : and antenna signals. • In Cable mode, you have...
User Manual (ENGLISH)
Page 29
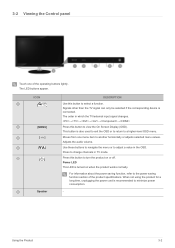
... to select a function. For information about the power saving function, refer to the power saving function section of the operating buttons lightly. This button is connected. Using the Product 3-2 The LED buttons appear. 3-2 Viewing the Control panel Touch one menu item to another horizontally or adjusts selected menu values.
... to select a function. For information about the power saving function, refer to the power saving function section of the operating buttons lightly. This button is connected. Using the Product 3-2 The LED buttons appear. 3-2 Viewing the Control panel Touch one menu item to another horizontally or adjusts selected menu values.


