User Manual (user Manual) (ver.1.0) (English)
Page 3
...PRECAUTIONS Before You Start 1-1 Custody and Maintenance 1-2 Safety Precautions 1-3 INSTALLING THE PRODUCT Package Contents 2-1 Installing the Stand 2-2 Removing the Stand 2-3 Installing the Stand for the Wall Mount 2-4 Connecting with a PC 2-5 Kensington Lock 2-6 USING THE PRODUCT Setting the Optimal ... 4-3 TROUBLESHOOTING Monitor Self-Diagnosis 5-1 Before Requesting Service 5-2 FAQ 5-3 MORE INFORMATION Specifications 6-1 Power Saving Function 6-2 Contact SAMSUNG WORLDWIDE 6-3 Correct Disposal of This Product (Waste Electrical & Electronic Equipment) - Europe only 6-4
...PRECAUTIONS Before You Start 1-1 Custody and Maintenance 1-2 Safety Precautions 1-3 INSTALLING THE PRODUCT Package Contents 2-1 Installing the Stand 2-2 Removing the Stand 2-3 Installing the Stand for the Wall Mount 2-4 Connecting with a PC 2-5 Kensington Lock 2-6 USING THE PRODUCT Setting the Optimal ... 4-3 TROUBLESHOOTING Monitor Self-Diagnosis 5-1 Before Requesting Service 5-2 FAQ 5-3 MORE INFORMATION Specifications 6-1 Power Saving Function 6-2 Contact SAMSUNG WORLDWIDE 6-3 Correct Disposal of This Product (Waste Electrical & Electronic Equipment) - Europe only 6-4
User Manual (user Manual) (ver.1.0) (English)
Page 16
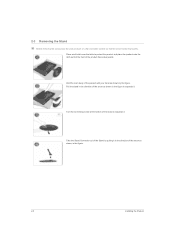
... a soft cloth over the table to protect the product and place the product onto the cloth so that the screen faces downwards. Pull the stand in the direction of the arrow as shown in the figure to separate it in the direction of the product with your hand as shown... figure. 2-3 Installing the Product Hold the main body of the arrow as shown by pulling it . 2-3 Removing the Stand Before removing the stand, place the product down on a flat and stable surface so that the front of the stand to separate it. Turn the connecting screw at the bottom of the product faces downwards.
... a soft cloth over the table to protect the product and place the product onto the cloth so that the screen faces downwards. Pull the stand in the direction of the arrow as shown in the figure to separate it in the direction of the product with your hand as shown... figure. 2-3 Installing the Product Hold the main body of the arrow as shown by pulling it . 2-3 Removing the Stand Before removing the stand, place the product down on a flat and stable surface so that the front of the stand to separate it. Turn the connecting screw at the bottom of the product faces downwards.


