
Quick Guide (ENGLISH)
Page 2
Unpacking Manuals LCD Display Quick Setup Guide Cables Warranty Card (Not available in all locations) User's Guide Power Cord Others D-Sub Cable Introduction Package Contents Note Please make sure the following items are missing, contact your LCD Display. Contact a local dealer to buy optional items. Note This stand is not for the Floor Standing Type. If any items are included with your dealer.
Unpacking Manuals LCD Display Quick Setup Guide Cables Warranty Card (Not available in all locations) User's Guide Power Cord Others D-Sub Cable Introduction Package Contents Note Please make sure the following items are missing, contact your LCD Display. Contact a local dealer to buy optional items. Note This stand is not for the Floor Standing Type. If any items are included with your dealer.
Quick Guide (ENGLISH)
Page 3
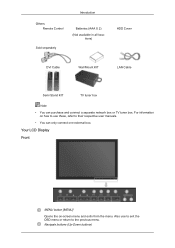
...) HDD Cover DVI Cable Wall Mount KIT LAN Cable Semi Stand KIT TV tuner box Note • You can only connect one external box. Your LCD Display Front MENU button [MENU] Opens the on how to use to exit the OSD menu or return to their respective user manuals. • You...
...) HDD Cover DVI Cable Wall Mount KIT LAN Cable Semi Stand KIT TV tuner box Note • You can only connect one external box. Your LCD Display Front MENU button [MENU] Opens the on how to use to exit the OSD menu or return to their respective user manuals. • You...
Quick Guide (ENGLISH)
Page 4
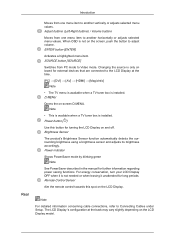
...Note See PowerSaver described in the manual for external devices that are connected to the LCD Display at the back may vary slightly depending on the LCD Display model. For energy conservation, turn your LCD Display OFF when it is installed. SOURCE button [SOURCE] Switches from PC mode to... buttons) / Volume buttons Moves from one menu item to adjust volume. Note • This is available when a TV tuner box is not on the LCD Display. The LCD Display 's configuration at the time. [PC] → [DVI] → [AV] → [HDMI] → [MagicInfo] Note • The TV menu is ...
...Note See PowerSaver described in the manual for external devices that are connected to the LCD Display at the back may vary slightly depending on the LCD Display model. For energy conservation, turn your LCD Display OFF when it is installed. SOURCE button [SOURCE] Switches from PC mode to... buttons) / Volume buttons Moves from one menu item to adjust volume. Note • This is available when a TV tuner box is not on the LCD Display. The LCD Display 's configuration at the time. [PC] → [DVI] → [AV] → [HDMI] → [MagicInfo] Note • The TV menu is ...
Quick Guide (ENGLISH)
Page 5
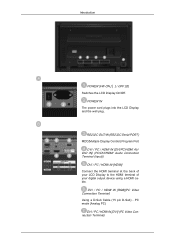
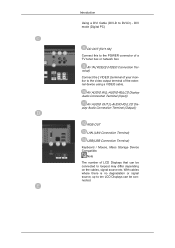
.../PC/HDMI AUDIO IN] (PC/DVI/HDMI Audio Connection Terminal (Input)) DVI / PC / HDMI IN [HDMI] Connect the HDMI terminal at the back of your LCD Display to the HDMI terminal of your digital output device using a HDMI cable. POWER IN The power cord plugs into the...
.../PC/HDMI AUDIO IN] (PC/DVI/HDMI Audio Connection Terminal (Input)) DVI / PC / HDMI IN [HDMI] Connect the HDMI terminal at the back of your LCD Display to the HDMI terminal of your digital output device using a HDMI cable. POWER IN The power cord plugs into the...
Quick Guide (ENGLISH)
Page 6
...(Output)) RGB OUT LAN (LAN Connection Terminal) USB(USB Connection Terminal) Keyboard / Mouse, Mass Storage Device Compatible. Note The number of LCD Displays that can be connected to loopout may differ depending on the cables, signal source etc. With cables where there is no degradation or ... video output terminal of a TV tuner box or network box. AV IN [VIDEO] (VIDEO Connection Terminal) Connect the [ VIDEO ] terminal of your monitor to ten LCD Displays can be connected. DVI mode (Digital PC) DC OUT [5V/1.5A] Connect this to DVI-D) - Introduction Using a DVI Cable (DVI-D to...
...(Output)) RGB OUT LAN (LAN Connection Terminal) USB(USB Connection Terminal) Keyboard / Mouse, Mass Storage Device Compatible. Note The number of LCD Displays that can be connected to loopout may differ depending on the cables, signal source etc. With cables where there is no degradation or ... video output terminal of a TV tuner box or network box. AV IN [VIDEO] (VIDEO Connection Terminal) Connect the [ VIDEO ] terminal of your monitor to ten LCD Displays can be connected. DVI mode (Digital PC) DC OUT [5V/1.5A] Connect this to DVI-D) - Introduction Using a DVI Cable (DVI-D to...

Quick Guide (ENGLISH)
Page 7
...public place. Remote Control Note The performance of the Kensington Lock may be affected by a TV or other electronic device operating near the LCD Display , causing a malfunction due to be purchased separately. Insert the locking device into the Kensington slot on the manufacturer. Note See Connecting...has to the manual provided with the frequency. Note The location of the remote control may differ from the illustration depending on the Monitor and turn it in the locking direction . 2. The appearance and locking method may be different depending on its model. Refer to ...
...public place. Remote Control Note The performance of the Kensington Lock may be affected by a TV or other electronic device operating near the LCD Display , causing a malfunction due to be purchased separately. Insert the locking device into the Kensington slot on the manufacturer. Note See Connecting...has to the manual provided with the frequency. Note The location of the remote control may differ from the illustration depending on the Monitor and turn it in the locking direction . 2. The appearance and locking method may be different depending on its model. Refer to ...
Quick Guide (ENGLISH)
Page 9
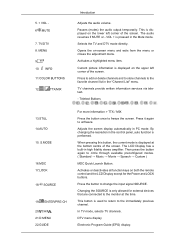
...control panel, auto function is pressed in the "Channel List" menu. When pressing this button, the current mode is displayed at the time. The LCD Display has a built-in PC mode. TV/DTV 8. TTX/MIX Introduction Adjusts the audio volume. Selects the TV and DTV mode directly. Current picture... on the upper left corner of the screen. This button is displayed on both the remote control and the LCD Display except for external devices that are connected to the monitor at the bottom centre of the screen. ENTER/PRE-CH 20. Press the button to the immediately previous channel...
...control panel, auto function is pressed in the "Channel List" menu. When pressing this button, the current mode is displayed at the time. The LCD Display has a built-in PC mode. TV/DTV 8. TTX/MIX Introduction Adjusts the audio volume. Selects the TV and DTV mode directly. Current picture... on the upper left corner of the screen. This button is displayed on both the remote control and the LCD Display except for external devices that are connected to the monitor at the bottom centre of the screen. ENTER/PRE-CH 20. Press the button to the immediately previous channel...
Quick Guide (ENGLISH)
Page 10
.... MagicInfo Quick Launch Button. Then push button again to the previous menu. This fuction does not work for this LCD Display. This fuction does not work for this LCD Display. SRS 27.MagicInfo 28. When you press this button, current picture mode is a feature providing the optimum... viewing environment depending on the lower center of the PIP and main image. AV / HDMI / TV : P.MODE The LCD Display has four automatic picture settings that are watching. You can be operated depending on the broadcasting type by using the DUAL button on the...
.... MagicInfo Quick Launch Button. Then push button again to the previous menu. This fuction does not work for this LCD Display. This fuction does not work for this LCD Display. SRS 27.MagicInfo 28. When you press this button, current picture mode is a feature providing the optimum... viewing environment depending on the lower center of the PIP and main image. AV / HDMI / TV : P.MODE The LCD Display has four automatic picture settings that are watching. You can be operated depending on the broadcasting type by using the DUAL button on the...

Quick Guide (ENGLISH)
Page 11
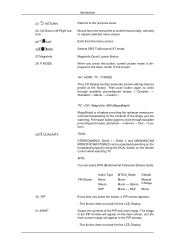
... the D-sub to disconnect the AC power in correctly, before connecting the AC power. For detailed information on connecting AV input devices, refer to the LCD Display. Choose one of the following: Using the D-sub (Analog) connector on the video card. • Connect the D-sub to the power port on the... back of your LCD Display and the 15 pin D-sub Port on the computer. Using the DVI (Digital) connector on the video card. • Connect the DVI Cable to...
... the D-sub to disconnect the AC power in correctly, before connecting the AC power. For detailed information on connecting AV input devices, refer to the LCD Display. Choose one of the following: Using the D-sub (Analog) connector on the video card. • Connect the D-sub to the power port on the... back of your LCD Display and the 15 pin D-sub Port on the computer. Using the DVI (Digital) connector on the video card. • Connect the DVI Cable to...

Quick Guide (ENGLISH)
Page 12
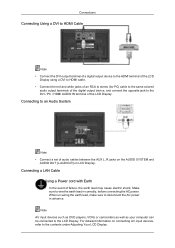
...audio cable for your LCD Display to the audio port on connecting AV input devices, refer to the contents under Adjusting Your LCD Display. Note AV input devices such as DVD players, VCRs or camcorders as well as the LCD Display is optional. • Contact a local SAMSUNG Electronics Service Center ...to buy optional items. Connecting to the LCD Display. When un-wiring the earth lead, make sure to wire the earth lead in ...
...audio cable for your LCD Display to the audio port on connecting AV input devices, refer to the contents under Adjusting Your LCD Display. Note AV input devices such as DVD players, VCRs or camcorders as well as the LCD Display is optional. • Contact a local SAMSUNG Electronics Service Center ...to buy optional items. Connecting to the LCD Display. When un-wiring the earth lead, make sure to wire the earth lead in ...
Quick Guide (ENGLISH)
Page 13
... . 2. Select AV for the Camcorder connection using the Source button on the front of the LCD Display using the HDMI cable. • You cannot connect a PC to the HDMI terminal of the LCD Display or on the LCD Display . 3. Then, start the Camcorders with a Camcorder. (If not, check your local electronics store.) If...
... . 2. Select AV for the Camcorder connection using the Source button on the front of the LCD Display using the HDMI cable. • You cannot connect a PC to the HDMI terminal of the LCD Display or on the LCD Display . 3. Then, start the Camcorders with a Camcorder. (If not, check your local electronics store.) If...
Quick Guide (ENGLISH)
Page 14
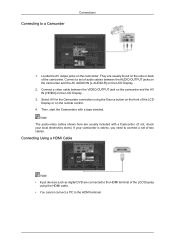
... to disconnect the AC power in correctly, before connecting the AC power. Make sure to wire the earth lead in advance. For detailed information on LCD Display. Connections Connecting Using a DVI to HDMI Cable Note • Connect the DVI output terminal of a digital output device to the HDMI terminal of the... LCD Display using a DVI to HDMI cable. • Connect the red and white jacks of an RCA to stereo (for PC) cable to the same colored ...
... to disconnect the AC power in correctly, before connecting the AC power. Make sure to wire the earth lead in advance. For detailed information on LCD Display. Connections Connecting Using a DVI to HDMI Cable Note • Connect the DVI output terminal of a digital output device to the HDMI terminal of the... LCD Display using a DVI to HDMI cable. • Connect the red and white jacks of an RCA to stereo (for PC) cable to the same colored ...

Quick Guide (ENGLISH)
Page 15
.... Make sure to disconnect the AC power in correctly, before connecting the AC power. For detailed information on connecting AV input devices, refer to the LCD Display. Note AV input devices such as DVD players, VCRs or camcorders as well as a mouse or keyboard. Connecting a USB device Using a Power cord with... earth lead may cause electric shock. Note You can connect USB devices such as your computer can be connected to the contents under Adjusting Your LCD Display. Connections Note Connect the LAN cable.
.... Make sure to disconnect the AC power in correctly, before connecting the AC power. For detailed information on connecting AV input devices, refer to the LCD Display. Note AV input devices such as DVD players, VCRs or camcorders as well as a mouse or keyboard. Connecting a USB device Using a Power cord with... earth lead may cause electric shock. Note You can connect USB devices such as your computer can be connected to the contents under Adjusting Your LCD Display. Connections Note Connect the LAN cable.
Quick Guide (ENGLISH)
Page 16
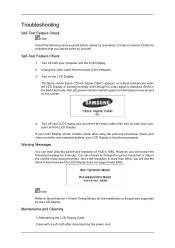
... Preset Timing Modes for the resolutions or frequencies supported by yourself. The figure shown below ("Check Signal Cable") appears on both your LCD Display and reconnect the video cable; However, you will receive the following items yourself before calling for assistance. And if the resolution is...resolution or stay in the Self-Test mode, the LED power indicator remains green and the figure moves around on the LCD Display. Turn off your computer and the LCD Display. 2. Turn on the screen. 4. Self-Test Feature Check 1. Troubleshooting Self-Test Feature Check Note Check the...
... Preset Timing Modes for the resolutions or frequencies supported by yourself. The figure shown below ("Check Signal Cable") appears on both your LCD Display and reconnect the video cable; However, you will receive the following items yourself before calling for assistance. And if the resolution is...resolution or stay in the Self-Test mode, the LED power indicator remains green and the figure moves around on the LCD Display. Turn off your computer and the LCD Display. 2. Turn on the screen. 4. Self-Test Feature Check 1. Troubleshooting Self-Test Feature Check Note Check the...
Quick Guide (ENGLISH)
Page 17
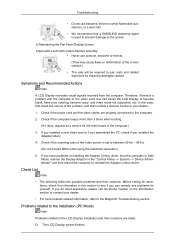
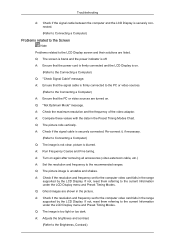
... reboot the computer to reinstall the Adaptor (video) driver. Check if the power cord and the video cables are properly connected to the LCD Display installation and their solutions. Problems related to the Installation (PC Mode) Note Problems related to the computer. 2. Therefore, if there ...soft cloth (cotton flannel) smoothly. • Never use benzene, thinner or other flammable substances, or a wet cloth. • We recommend that a SAMSUNG cleansing agent is set to between 50 Hz ~ 85 Hz. (Do not exceed 60Hz when using the maximum resolution.) 5. If you installed a new video...
... reboot the computer to reinstall the Adaptor (video) driver. Check if the power cord and the video cables are properly connected to the LCD Display installation and their solutions. Problems related to the Installation (PC Mode) Note Problems related to the computer. 2. Therefore, if there ...soft cloth (cotton flannel) smoothly. • Never use benzene, thinner or other flammable substances, or a wet cloth. • We recommend that a SAMSUNG cleansing agent is set to between 50 Hz ~ 85 Hz. (Do not exceed 60Hz when using the maximum resolution.) 5. If you installed a new video...
Quick Guide (ENGLISH)
Page 18
.... picture is securely connected. A: Ensure that the PC or video sources are turned on . (Refer to the current Information under the LCD Display menu and Preset Timing Modes. A: Check if the resolution and frequency set for the computer video card falls in the range supported ...tuning. Q: The image is not clear; Q: "Not Optimum Mode" message. A: Compare these values with the data in the range supported by the LCD Display. Q: The picture rolls vertically. A: Check if the resolution and frequency set for the computer video card falls in the Preset Timing Modes Chart...
.... picture is securely connected. A: Ensure that the PC or video sources are turned on . (Refer to the current Information under the LCD Display menu and Preset Timing Modes. A: Check if the resolution and frequency set for the computer video card falls in the range supported ...tuning. Q: The image is not clear; Q: "Not Optimum Mode" message. A: Compare these values with the data in the range supported by the LCD Display. Q: The picture rolls vertically. A: Check if the resolution and frequency set for the computer video card falls in the Preset Timing Modes Chart...
Quick Guide (ENGLISH)
Page 19
Problems related to Audio Note Problems related to the remote control and their solutions are listed. A: Check the volume level. A: The LCD Display is too high or too low. A: Ensure that the connector is properly connected. Q: The sound is using Custom under OSD Color ... blinks every 0.5 or 1 seconds. Problems related to the Remote Control Note Problems related to audio signals and their solutions are listed below. A: The LCD Display is currently saving the changes made in port on your sound card. (Refer to its power management system. Q: The screen is poor. A:...
Problems related to Audio Note Problems related to the remote control and their solutions are listed. A: Check the volume level. A: The LCD Display is too high or too low. A: Ensure that the connector is properly connected. Q: The sound is using Custom under OSD Color ... blinks every 0.5 or 1 seconds. Problems related to the Remote Control Note Problems related to audio signals and their solutions are listed below. A: The LCD Display is currently saving the changes made in port on your sound card. (Refer to its power management system. Q: The screen is poor. A:...
Quick Guide (ENGLISH)
Page 21
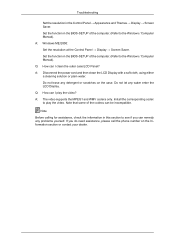
...→ Screen Saver. Q: How can I play the video. Install the corresponding codec to play the video? If you can remedy any water enter the LCD Display. A: Windows ME/2000: Set the resolution at the Control Panel → Display → Screen Saver. Do not let any problems yourself. A: ...the function in the BIOS-SETUP of the computer. (Refer to the Windows / Computer Manual). A: Disconnect the power cord and then clean the LCD Display with a soft cloth, using either a cleaning solution or plain water. Troubleshooting Set the resolution in this section to see if you do...
...→ Screen Saver. Q: How can I play the video. Install the corresponding codec to play the video? If you can remedy any water enter the LCD Display. A: Windows ME/2000: Set the resolution at the Control Panel → Display → Screen Saver. Do not let any problems yourself. A: ...the function in the BIOS-SETUP of the computer. (Refer to the Windows / Computer Manual). A: Disconnect the power cord and then clean the LCD Display with a soft cloth, using either a cleaning solution or plain water. Troubleshooting Set the resolution in this section to see if you do...

Quick Guide (KOREAN)
Page 2
Floor standing type) LCD Display D-Sub AAA X 2) 8
Floor standing type) LCD Display D-Sub AAA X 2) 8
User Manual (ENGLISH)
Page 4
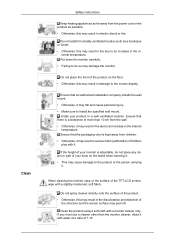
...Clean the product using a soft cloth with a slightly moistened, soft fabric. Do not place the front of the TFT-LCD screen, wipe with a monitor cleaner only. When cleaning the monitor case or the surface of the product on the stand when lowering it. • This may cause damage to the ... as possible. • Otherwise, this may result in damage to the screen display. Ensure that there is adjustable, do so may damage the monitor. Clean Safety Instructions Keep heating appliances as far away from the power cord or the product as a bookcase or closet. • Otherwise, this...
...Clean the product using a soft cloth with a slightly moistened, soft fabric. Do not place the front of the TFT-LCD screen, wipe with a monitor cleaner only. When cleaning the monitor case or the surface of the product on the stand when lowering it. • This may cause damage to the ... as possible. • Otherwise, this may result in damage to the screen display. Ensure that there is adjustable, do so may damage the monitor. Clean Safety Instructions Keep heating appliances as far away from the power cord or the product as a bookcase or closet. • Otherwise, this...


