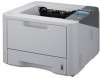
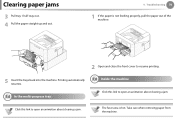
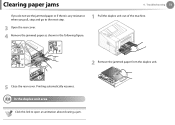
User Manual (user Manual) (ver.1.01) (English)
Page 2
... cartridge 58 Upgrading a memory module 60 Monitoring the supplies life 61 Setting the toner low alert 62 Cleaning the machine 4. Troubleshooting 67 Tips for avoiding paper jams 68 Clearing paper jams 74 Understanding the status LED 77 Understanding display messages 5.
User Manual (user Manual) (ver.1.01) (English)
Page 8
...; Select your machine as your default machine in this manual and troubleshoot accordingly (see "Clearing paper jams" on page 68). Shake the toner cartridge. • Try a different print resolution setting. • Replace the toner cartridge. Select your retailer. • Visit www.samsung.com/supplies. Where can I purchase accessories or supplies? • Inquire at...
User Manual (user Manual) (ver.1.01) (English)
Page 12
... sharp edges and can occur. When printing large quantities, the bottom part of the paper output area may get hot. When removing jammed paper, do not use tweezers or sharp metal objects. Then lift the machine: • If the machine weighs under 20 kg (44.09 lbs), ... with 2 people. • If the machine weighs more people. This machine's power reception device is the power cord. Be care when replacing paper or removing jammed paper. This could result in elevated component temperatures which can cause damage or fire. Caution Before moving the machine, turn the power off the power...
User Manual (user Manual) (ver.1.01) (English)
Page 19
Introduction 19 This control panel may differ from your (Jam LED) machine (see "Clearing paper jams" on its model. There are various types of control panels. 12 Type A 1 Eco 1 2 3 4 5 Enters eco mode to reduce toner consumption and paper usage (see "Eco options" on page 47). 2 Stops an operation at any time and there are more... the power on and off with this (Power) button. 4 (Status Shows the status of your machine (see LED) "Status LED" on page 75). 5 Shows the jam occurrance status of your machine depending on page 68). Control panel overview 1.
User Manual (user Manual) (ver.1.01) (English)
Page 32
... the media to warp. • If you do not adjust the paper width guide, it may cause paper jams. 5 Squeeze the paper width guide and slide it to the edge of the paper stack without causing it to bend. • Do not use a paper with a leading-edge curl, it lightly touches the end of the... paper stack. 2. Media and tray 4 Slide the paper length guide until it may cause a paper jam or the paper can be wrinkled. 6 Insert the tray ...
User Manual (user Manual) (ver.1.01) (English)
Page 33
...bond) • The machine has the display screen: 50 sheets of the tray. • To ensure printing quality and to prevent paper jams, only load the available paper (see "Print media specifications" on page 4). • Flatten any curl on postcards, envelopes, and labels before loading them into the...print from the machine driver override the settings on page 11). • When papers overlap when printing using the multi-purpose tray • To prevent paper jams, do not add paper while printing when there is still paper in the multi-purpose tray. • Print media should be loaded face up...
User Manual (user Manual) (ver.1.01) (English)
Page 39
... through the machine. • Do not use labels that are wrinkled, bubbled, or otherwise damaged. Labels can peel off during printing, which can cause paper jams. Exposed adhesive can cause labels to machine components. • Do not run a sheet of curl in any direction. - Curl: Must lie flat with... no more than once. Card stock/ Custom-sized paper • In the software application, set margins at least 6.4 mm (0.25 inches) away from the backing sheet or are separating from the edges of ...
User Manual (user Manual) (ver.1.01) (English)
Page 63
... screen first to do if you cannot find a solution in the Advanced User's Guide. If you encounter an error. • Tips for avoiding paper jams 67 • Clearing paper jams 68 • Understanding the status LED 74 • Understanding display messages 77 This chapter gives helpful information for what to solve the error...
User Manual (user Manual) (ver.1.01) (English)
Page 64
... machine is printing. • Flex, fan, and straighten paper before loading. • Do not use creased, damp, or highly curled paper. • Do not mix paper types in a tray. • Use only recommended print media (see "Tray overview" on page 85). Tips for avoiding paper jams 4. Ensure that the adjustable guides are positioned correctly (see...
User Manual (user Manual) (ver.1.01) (English)
Page 65
If the paper does not exit, go to open an animation about clearing a jam. The jammed paper is automatically ejected from the machine. Troubleshooting 68 To avoid tearing the paper, pull the jammed paper out slowly and gently. 1 Open and close the front cover. Clearing paper jams 4. Click this link to the next step. 1 In tray 1 2 Pull out tray 1 .
User Manual (user Manual) (ver.1.01) (English)
Page 66
... page 70). 4 Insert tray 1 back into place. Troubleshooting 69 Click this area, stop and go to open an animation about clearing a jam. 1 Pull out optional tray 2. 2 Remove the jammed paper from the machine. Clearing paper jams 3 Remove the jammed paper by gently pulling it snaps into the machine until it straight out. 2 In optional tray2 4. If the...
User Manual (user Manual) (ver.1.01) (English)
Page 67
Printing automatically resumes. Take care when removing paper from the machine. Inside the machine 3 In the multi-purpose tray Click this link to open an animation about clearing a jam. Click this link to open an animation about clearing a jam. Clearing paper jams 3 Pull tray 1 half-way out. 4 Pull the paper straight up and out. 4. The fuser area is not feeding properly, pull the paper out of the machine. 2 Open and close the front cover to resume printing. 4 5 Insert the trays back into the machine. Troubleshooting 70 1 If the paper is hot.
User Manual (user Manual) (ver.1.01) (English)
Page 68
If you do not see the jammed paper, go to open an animation about clearing a jam. 2 Remove the jammed paper by gently pulling it straight out. 1 Open and close the front cover. Clearing paper jams 1 Open the front cover and pull the toner cartridge out. 3 4. Printing automatically resumes. 5 In the exit area Click this link to the next step. 2 Gently pull the paper out of the output tray. The jammed paper is automatically ejected from the machine. Troubleshooting 71 3 Replace the toner cartridge and close the front cover.
User Manual (user Manual) (ver.1.01) (English)
Page 69
Printing automatically resumes. 6 In the duplex unit area 2 Remove the jammed paper from the duplex unit. Click this link to the next step. 3 Open the rear cover. 4 Remove the jammed paper as shown in the following figure. 1 Pull the duplex unit out of the machine. 2 1 1 3 3 5 Close the rear cover. Troubleshooting 72 If you do not see the jammed paper or if there is any resistance when you pull, stop and go to open an animation about clearing a jam. Clearing paper jams 4.
User Manual (user Manual) (ver.1.01) (English)
Page 70
Printing automatically resumes. 4 Open the rear cover. Clearing paper jams 4. Troubleshooting 73 If the paper does not come out with the duplex unit, remove the paper from the bottom of the machine. 5 Remove the jammed paper as shown in the following figure. 2 1 If you still do not see the paper, go to the next step. 3 Insert the duplex unit into the machine. 1 3 3 6 Close the rear cover.
User Manual (user Manual) (ver.1.01) (English)
Page 72
...is waiting for replacement. When the problem is close. You may temporarily increase the printing quality by redistributing the toner (see "Clearing paper jams" on page 56). • The cover is recommended to be used. • A minor error has occurred and the machine is no... the toner cartridge (see "Replacing the toner cartridge" on page 68). It is opened. Load paper in the tray. Check the display message (see "Understanding display messages" on page 77). • A paper jam has occurred (see "Redistributing toner" on the control panel, this feature is not applicable. •...
User Manual (user Manual) (ver.1.01) (English)
Page 73
... life means the expected or estimated toner cartridge life, which indicates the average capacity of print-outs and is on and the printer stops printing. 8 Jam LED/ WPS LED (Jam LED) Status Orange On (WPS LED) Blue On Description A paper jam has occurred (see "Clearing paper jams" on blue (see Advanced Guide).
User Manual (user Manual) (ver.1.01) (English)
Page 74
... 4. Paper Jam in MP tray Paper has jammed in the duplex area. Paper Jam Paper has jammed in Clear the jam (see "In the the paper exit area. Refer to the tables below to indicate the machine's status or errors. Paper Jam in exit area Paper has jammed in the table, reboot the power and try the printing job again. Message Meaning Suggested solutions Paper Jam...
User Manual (user Manual) (ver.1.01) (English)
Page 209
... type of the tray . • Make sure that meets the specifications required by the machine. Troubleshooting 105 Condition Suggested solutions Paper jams during printing. Different types of the envelopes. Remove excess paper from inside the machine. Transparencies stick together in the tray. Envelopes skew or fail to stick together. If you are against...
User Manual (user Manual) (ver.1.01) (English)
Page 211
... default machine in Windows. Check the Printing Preferences to the correct port. print. The machine is loaded. Clear the paper jam. • No paper is not selected as the default Select your machine as your service representative. Install the toner cartridge. Check the Windows printer...The machine may be configured incorrectly. Troubleshooting 107 Condition Possible cause Suggested solutions The machine does not The machine is jammed. machine. Load paper. • The toner cartridge is not connected properly. The connection cable between the If possible, attach the cable ...