
User Manual (user Manual) (ver.1.00) (English)
Page 4
...Using Toner Save Mode 5.6 Printing on Both Sides of the Paper (Manual Duplexing 5.7 Printing Multiple Pages on One Sheet of Paper (N-Up Printing) - 5.10 Scaling Your Document 5.11 Fitting Your Document To a Selected Paper Size ---------- 5.12 Printing Booklets 5.13 Printing Posters 5.16...the Printer 6.4 7 Problem Solving Troubleshooting Checklist 7.1 Solving General Printing Problems 7.2 Printing Special Pages 7.6 Clearing Paper Jams 7.7 Solving Print Quality Problems 7.16 Troubleshooting Error Messages 7.22 Common Windows Problems 7.25 Common Macintosh Problems 7.26 Troubleshooting PS Errors ...
...Using Toner Save Mode 5.6 Printing on Both Sides of the Paper (Manual Duplexing 5.7 Printing Multiple Pages on One Sheet of Paper (N-Up Printing) - 5.10 Scaling Your Document 5.11 Fitting Your Document To a Selected Paper Size ---------- 5.12 Printing Booklets 5.13 Printing Posters 5.16...the Printer 6.4 7 Problem Solving Troubleshooting Checklist 7.1 Solving General Printing Problems 7.2 Printing Special Pages 7.6 Clearing Paper Jams 7.7 Solving Print Quality Problems 7.16 Troubleshooting Error Messages 7.22 Common Windows Problems 7.25 Common Macintosh Problems 7.26 Troubleshooting PS Errors ...
User Manual (user Manual) (ver.1.00) (English)
Page 25
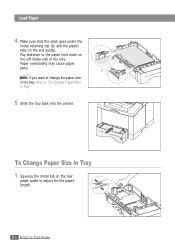
Load Paper 4 Make sure that the stack goes under the metal retaining clip A and the plastic tabs on the rear paper guide to adjust for the paper length. 2.6 SETTING UP YOUR PRINTER Paper overloading may cause paper jams. A Note: If you want to change the paper size in the tray, refer to the paper limit mark on the left inside wall of the tray. To Change Paper Size in Tray" 5 Slide the tray back into the printer. Pay attention to : "To Change Paper Size in Tray 1 Squeeze the metal tab on the end guides.
Load Paper 4 Make sure that the stack goes under the metal retaining clip A and the plastic tabs on the rear paper guide to adjust for the paper length. 2.6 SETTING UP YOUR PRINTER Paper overloading may cause paper jams. A Note: If you want to change the paper size in the tray, refer to the paper limit mark on the left inside wall of the tray. To Change Paper Size in Tray" 5 Slide the tray back into the printer. Pay attention to : "To Change Paper Size in Tray 1 Squeeze the metal tab on the end guides.
User Manual (user Manual) (ver.1.00) (English)
Page 26
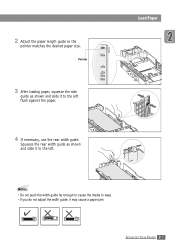
Load Paper 4 If necessary, use the rear width guide. SETTING UP YOUR PRINTER 2.7 Squeeze the rear width guide as shown and slide it may cause a paper jam. 2 Adjust the paper length guide so the pointer matches the desired paper size. Notes: • Do not push the width guide far enough to cause the media to warp. • If you do not adjust the width guide, it to the left flush against the paper. LGL Pointer FOLIO A4 LTR EXEC JIS B5 3 After loading paper, squeeze the side guide as shown and slide it to the left .
Load Paper 4 If necessary, use the rear width guide. SETTING UP YOUR PRINTER 2.7 Squeeze the rear width guide as shown and slide it may cause a paper jam. 2 Adjust the paper length guide so the pointer matches the desired paper size. Notes: • Do not push the width guide far enough to cause the media to warp. • If you do not adjust the width guide, it to the left flush against the paper. LGL Pointer FOLIO A4 LTR EXEC JIS B5 3 After loading paper, squeeze the side guide as shown and slide it to the left .
User Manual (user Manual) (ver.1.00) (English)
Page 56
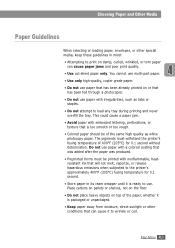
... its ream wrapper until it is too smooth or too rough. • Colored paper should be printed with nonflammable, heatresistant ink that can cause paper jams and poor print quality. • Use cut-sheet paper only. Do not use . The pigments must be of 400°F (205&#... the printer's approximately 400°F (205°C) fusing temperature for 0.1 second without deterioration. This could cause a paper jam. • Avoid paper with irregularities, such as white photocopy paper. PRINT MEDIA 4.3 Place cartons on pallets or shelves, not on the floor. • Do not place heavy ...
... its ream wrapper until it is too smooth or too rough. • Colored paper should be printed with nonflammable, heatresistant ink that can cause paper jams and poor print quality. • Use cut-sheet paper only. Do not use . The pigments must be of 400°F (205&#... the printer's approximately 400°F (205°C) fusing temperature for 0.1 second without deterioration. This could cause a paper jam. • Avoid paper with irregularities, such as white photocopy paper. PRINT MEDIA 4.3 Place cartons on pallets or shelves, not on the floor. • Do not place heavy ...
User Manual (user Manual) (ver.1.00) (English)
Page 57
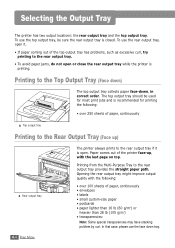
...sure the rear output tray is closed. Printing from the Multi-Purpose Tray to the Top Output Tray (Face down) The top output tray collects paper face-down tray. 4.4 PRINT MEDIA Opening the rear output tray might improve output quality with the last page on top. To use the face... , with the following: • over 100 sheets of the printer face-up ) œ Rear output tray ML-L1A65S0ER PRINTER PrintSeramsung The printer always prints to the rear output tray. • To avoid paper jams, do not open or close the rear output tray while the printer is open it is printing. Selecting...
...sure the rear output tray is closed. Printing from the Multi-Purpose Tray to the Top Output Tray (Face down) The top output tray collects paper face-down tray. 4.4 PRINT MEDIA Opening the rear output tray might improve output quality with the last page on top. To use the face... , with the following: • over 100 sheets of the printer face-up ) œ Rear output tray ML-L1A65S0ER PRINTER PrintSeramsung The printer always prints to the rear output tray. • To avoid paper jams, do not open or close the rear output tray while the printer is open it is printing. Selecting...
User Manual (user Manual) (ver.1.00) (English)
Page 59
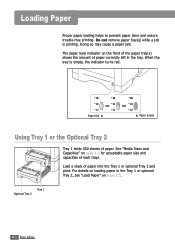
... 2.5. When the tray is printing. See "Media Sizes and Capacities" on the front of the paper tray(s) shows the amount of each trays. Loading Paper Proper paper loading helps to prevent paper jams and ensure trouble-free printing. Paper full œ œ¤¤Paper empty Using Tray 1 or the Optional Tray 2 Tray 1 holds 550 sheets of...
... 2.5. When the tray is printing. See "Media Sizes and Capacities" on the front of the paper tray(s) shows the amount of each trays. Loading Paper Proper paper loading helps to prevent paper jams and ensure trouble-free printing. Paper full œ œ¤¤Paper empty Using Tray 1 or the Optional Tray 2 Tray 1 holds 550 sheets of...
User Manual (user Manual) (ver.1.00) (English)
Page 60
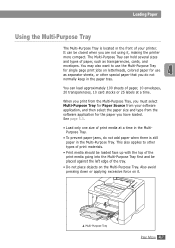
... jobs on the Multi-Purpose Tray. The Multi-Purpose Tray can load approximately 100 sheets of paper, 10 envelopes, 20 transparencies, 10 card stocks or 25 labels at a time in the MultiPurpose Tray. • To prevent paper jams, do not normally keep in the front of print media at a time. Loading... Paper Using the Multi-Purpose Tray The Multi-Purpose Tray is still paper in the Multi-Purpose Tray. See page 5.3. • Load only one size ...
... jobs on the Multi-Purpose Tray. The Multi-Purpose Tray can load approximately 100 sheets of paper, 10 envelopes, 20 transparencies, 10 card stocks or 25 labels at a time in the MultiPurpose Tray. • To prevent paper jams, do not normally keep in the front of print media at a time. Loading... Paper Using the Multi-Purpose Tray The Multi-Purpose Tray is still paper in the Multi-Purpose Tray. See page 5.3. • Load only one size ...
User Manual (user Manual) (ver.1.00) (English)
Page 67
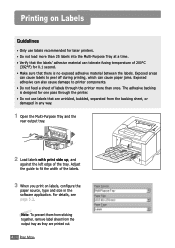
...from the output tray as they are printed out. 4.14 PRINT MEDIA Exposed areas can cause labels to peel off during printing, which can cause paper jams. Exposed adhesive can tolerate fusing temperature of 200°C (392°F) for laser printers. • Do not load more than once. The ...sticking together, remove label sheet from the backing sheet, or damaged in the software application. For details, see page 5.3. Printing on labels, configure the paper source, type and size in any way. 1 Open the Multi-Purpose Tray and the rear output tray. 2 Load labels with print side up, ...
...from the output tray as they are printed out. 4.14 PRINT MEDIA Exposed areas can cause labels to peel off during printing, which can cause paper jams. Exposed adhesive can tolerate fusing temperature of 200°C (392°F) for laser printers. • Do not load more than once. The ...sticking together, remove label sheet from the backing sheet, or damaged in the software application. For details, see page 5.3. Printing on labels, configure the paper source, type and size in any way. 1 Open the Multi-Purpose Tray and the rear output tray. 2 Load labels with print side up, ...
User Manual (user Manual) (ver.1.00) (English)
Page 70
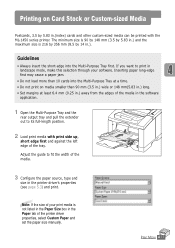
... Tray and the rear output tray and pull the extender out to its full-length position. 2 Load print media with the ML-1450 series printer. Inserting paper long-edge first may cause a paper jam. • Do not load more than 90 mm (3.5 in.) wide or 148 mm(5.83 in.) long. • Set margins at a ... and other custom-sized media can be printed with print side up, short edge first and against the left edge of the media. 3 Configure the paper source, type and size in the printer driver's properties (see page 5.3) and print. Printing on media smaller than 10 cards into the Multi-Purpose ...
... Tray and the rear output tray and pull the extender out to its full-length position. 2 Load print media with the ML-1450 series printer. Inserting paper long-edge first may cause a paper jam. • Do not load more than 90 mm (3.5 in.) wide or 148 mm(5.83 in.) long. • Set margins at a ... and other custom-sized media can be printed with print side up, short edge first and against the left edge of the media. 3 Configure the paper source, type and size in the printer driver's properties (see page 5.3) and print. Printing on media smaller than 10 cards into the Multi-Purpose ...
User Manual (user Manual) (ver.1.00) (English)
Page 91
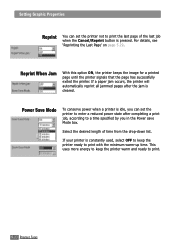
... Save Mode To conserve power when a printer is idle, you can set the printer to enter a reduced power state after the jam is pressed. Reprint When Jam With this option ON, the printer keeps the image for a printed page until the printer signals that the page has successfully exited the... Setting Graphic Properties Reprint You can set the printer not to print the last page of time from the drop-down list. If a paper jam occurs, the printer will automatically reprint all jammed pages after completing a print job, according to a time specified by you in the Power save Mode box.
... Save Mode To conserve power when a printer is idle, you can set the printer to enter a reduced power state after the jam is pressed. Reprint When Jam With this option ON, the printer keeps the image for a printed page until the printer signals that the page has successfully exited the... Setting Graphic Properties Reprint You can set the printer not to print the last page of time from the drop-down list. If a paper jam occurs, the printer will automatically reprint all jammed pages after completing a print job, according to a time specified by you in the Power save Mode box.
User Manual (user Manual) (ver.1.00) (English)
Page 100
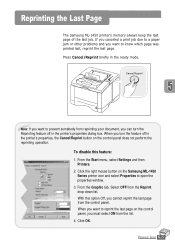
...the list. 4. When you want to a paper jam or other problems and you cannot reprint the last page from the Reprint drop-down list. PRINTING TASKS 5.29 To disable this option Off, you want to reprint the last page on the Samsung ML-1450 Series printer icon and select Properties to know which.... From the Graphic tab, Select OFF from the control panel. Press Cancel/Reprint briefly in the ready mode. Reprinting the Last Page The Samsung ML-1450 printer's memory always keep the last page of the last job. Click the right mouse button on the control panel, you must select ON...
...the list. 4. When you want to a paper jam or other problems and you cannot reprint the last page from the Reprint drop-down list. PRINTING TASKS 5.29 To disable this option Off, you want to reprint the last page on the Samsung ML-1450 Series printer icon and select Properties to know which.... From the Graphic tab, Select OFF from the control panel. Press Cancel/Reprint briefly in the ready mode. Reprinting the Last Page The Samsung ML-1450 printer's memory always keep the last page of the last job. Click the right mouse button on the control panel, you must select ON...
User Manual (user Manual) (ver.1.00) (English)
Page 102
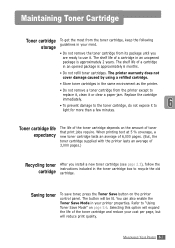
... To save toner, press the Toner Save button on the amount of 3,000 pages.) Recycling toner After you are ready to use it or clear a paper jam. Replace the cartridge immediately. • To prevent damage to the toner cartridge, do not expose it to "Using Toner Save Mode" on page 5.6. You can...
... To save toner, press the Toner Save button on the amount of 3,000 pages.) Recycling toner After you are ready to use it or clear a paper jam. Replace the cartridge immediately. • To prevent damage to the toner cartridge, do not expose it to "Using Toner Save Mode" on page 5.6. You can...
User Manual (user Manual) (ver.1.00) (English)
Page 107
7CHAPTER Problem Solving This chapter gives helpful information for what to do if you encounter a printer error. It provides information on the following topics: x Troubleshooting Checklist x Solving General Printing Problems x Printing Special Pages x Clearing Paper Jams x Solving Print Quality Problems x Troubleshooting Error Messages x Common Windows Problems x Common Macintosh Problems x Troubleshooting PS Errors
7CHAPTER Problem Solving This chapter gives helpful information for what to do if you encounter a printer error. It provides information on the following topics: x Troubleshooting Checklist x Solving General Printing Problems x Printing Special Pages x Clearing Paper Jams x Solving Print Quality Problems x Troubleshooting Error Messages x Common Windows Problems x Common Macintosh Problems x Troubleshooting PS Errors
User Manual (user Manual) (ver.1.00) (English)
Page 108
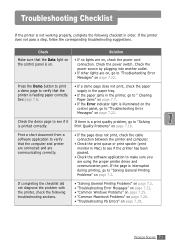
...printer driver and communication port. See page 7.6. • If a demo page does not print, check the paper supply in the paper tray. • If the paper jams in order. PROBLEM SOLVING 7.1 If completing the checklist did not diagnose the problem with the printer, check the... following checklist in the printer, go to " Clearing Paper Jams" on page 7.7. • If the Error indicator light is not working properly, complete the following troubleshooting sections. • "Solving General Printing...
...printer driver and communication port. See page 7.6. • If a demo page does not print, check the paper supply in the paper tray. • If the paper jams in order. PROBLEM SOLVING 7.1 If completing the checklist did not diagnose the problem with the printer, check the... following checklist in the printer, go to " Clearing Paper Jams" on page 7.7. • If the Error indicator light is not working properly, complete the following troubleshooting sections. • "Solving General Printing...
User Manual (user Manual) (ver.1.00) (English)
Page 114
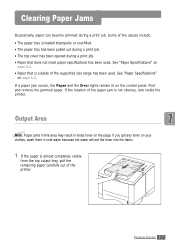
... toner on page A.2. • Paper that does not meet paper specifications has been used . See "Paper Specifications" on the control panel. See "Paper Specifications" on the page. PROBLEM SOLVING 7.7 Clearing Paper Jams Occasionally, paper can become jammed during a print job. • Paper that is almost completely visible from ... used . If the location of the causes include: • The paper tray is not obvious, look inside the printer. Some of the paper jam is loaded improperly or overfilled. • The paper tray has been pulled out during a print job. • The ...
... toner on page A.2. • Paper that does not meet paper specifications has been used . See "Paper Specifications" on the control panel. See "Paper Specifications" on the page. PROBLEM SOLVING 7.7 Clearing Paper Jams Occasionally, paper can become jammed during a print job. • Paper that is almost completely visible from ... used . If the location of the causes include: • The paper tray is not obvious, look inside the printer. Some of the paper jam is loaded improperly or overfilled. • The paper tray has been pulled out during a print job. • The ...
User Manual (user Manual) (ver.1.00) (English)
Page 115
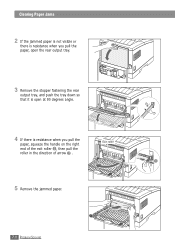
Exit roller 2 5 Remove the jammed paper. 2 1 1 7.8 PROBLEM SOLVING Clearing Paper Jams 2 If the jammed paper is not visible or there is resistance when you pull the paper, open the rear output tray. 3 Remove the stopper fastening the rear output tray, and push the tray down so that it is open at 90 degrees angle. 4 If there is resistance when you pull the paper, squeeze the handle on the right end of the exit roller 1 , then pull the roller in the direction of arrow 2 .
Exit roller 2 5 Remove the jammed paper. 2 1 1 7.8 PROBLEM SOLVING Clearing Paper Jams 2 If the jammed paper is not visible or there is resistance when you pull the paper, open the rear output tray. 3 Remove the stopper fastening the rear output tray, and push the tray down so that it is open at 90 degrees angle. 4 If there is resistance when you pull the paper, squeeze the handle on the right end of the exit roller 1 , then pull the roller in the direction of arrow 2 .
User Manual (user Manual) (ver.1.00) (English)
Page 116
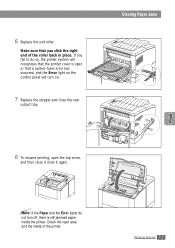
.... Make sure that you fail to do not turn off, there is open or that the printer cover is still jammed paper inside of the roller back in place. Clearing Paper Jams 1 2 Note: If the Paper and the Error lights do so, the printer system will recognizes that a system fuser error has occurred, and the...
.... Make sure that you fail to do not turn off, there is open or that the printer cover is still jammed paper inside of the roller back in place. Clearing Paper Jams 1 2 Note: If the Paper and the Error lights do so, the printer system will recognizes that a system fuser error has occurred, and the...

User Manual (user Manual) (ver.1.00) (English)
Page 117
... Tray 1 from the printer and carefully pull the jammed paper free from inside of the paper is properly aligned in the paper feed area and cannot be accessed from the printer. 7.10 PROBLEM SOLVING Clearing Paper Jams Input Area Note: If paper has entered the toner cartridge area, follow the instructions... on page 7.12. It is jammed in the tray. Note: If the paper is easier to expose the jammed paper. 2 Remove any misfed paper by pulling it out by the...
... Tray 1 from the printer and carefully pull the jammed paper free from inside of the paper is properly aligned in the paper feed area and cannot be accessed from the printer. 7.10 PROBLEM SOLVING Clearing Paper Jams Input Area Note: If paper has entered the toner cartridge area, follow the instructions... on page 7.12. It is jammed in the tray. Note: If the paper is easier to expose the jammed paper. 2 Remove any misfed paper by pulling it out by the...
User Manual (user Manual) (ver.1.00) (English)
Page 118
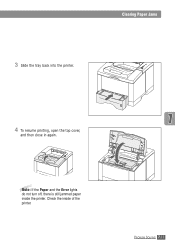
Clearing Paper Jams 4 To resume printing, open the top cover, and then close in again. Note: If the Paper and the Error lights do not turn off, there is still jammed paper inside of the printer. PROBLEM SOLVING 7.11 Check the inside the printer. 3 Slide the tray back into the printer.
Clearing Paper Jams 4 To resume printing, open the top cover, and then close in again. Note: If the Paper and the Error lights do not turn off, there is still jammed paper inside of the printer. PROBLEM SOLVING 7.11 Check the inside the printer. 3 Slide the tray back into the printer.
User Manual (user Manual) (ver.1.00) (English)
Page 119
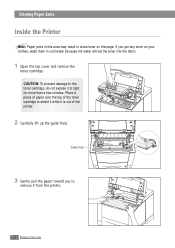
Clearing Paper Jams Inside the Printer Note: Paper jams in this area may result in loose toner on your clothes, wash them in cold water because hot water will set the toner into the fabric. 1 Open the top cover and remove the toner cartridge. Guide feed 3 Gently pull the paper toward you get any toner on... the page. Place a piece of paper over the top of the toner cartridge to shield it while it to light for more than a few minutes. If...
Clearing Paper Jams Inside the Printer Note: Paper jams in this area may result in loose toner on your clothes, wash them in cold water because hot water will set the toner into the fabric. 1 Open the top cover and remove the toner cartridge. Guide feed 3 Gently pull the paper toward you get any toner on... the page. Place a piece of paper over the top of the toner cartridge to shield it while it to light for more than a few minutes. If...


