User Manual (ENGLISH)
Page 3
Contents 1 Introduction Special Features 1.1 Printer Components 1.3 2 Setting Up Your Printer STEP 1: Unpack Your Printer 2.1 STEP 2: Install the Toner Cartridge 2.2 STEP 3: Loading Paper 2.4 STEP 4: Connect to the Computer with a Parallel Cable ----- 2.6 STEP 5: Turn on the Printer 2.7 STEP 6: Print a Demo Page 2.7 STEP 7: Install the Printer Software 2.8 Installing Software from Diskette 2.13 3 Using Control Panel Control Panel Buttons 3.1 Control Panel...
Contents 1 Introduction Special Features 1.1 Printer Components 1.3 2 Setting Up Your Printer STEP 1: Unpack Your Printer 2.1 STEP 2: Install the Toner Cartridge 2.2 STEP 3: Loading Paper 2.4 STEP 4: Connect to the Computer with a Parallel Cable ----- 2.6 STEP 5: Turn on the Printer 2.7 STEP 6: Print a Demo Page 2.7 STEP 7: Install the Printer Software 2.8 Installing Software from Diskette 2.13 3 Using Control Panel Control Panel Buttons 3.1 Control Panel...
User Manual (ENGLISH)
Page 4
... 5.9 Setting Graphic Properties 5.11 Printing Watermarks 5.13 Using Page Overlay 5.16 Reprinting the Last Page 5.20 Printing in a Network Environment 5.21 6 Maintaining Your Printer Maintaining the Toner Cartridge 6.1 Cleaning the Printer 6.4 7 Problem Solving Troubleshooting Checklist 7.1 Solving General Printing Problems 7.2 Clearing Paper Jams 7.6 Solving Print Quality Problems 7.11 Troubleshooting Error Messages 7.17 Common Windows...
... 5.9 Setting Graphic Properties 5.11 Printing Watermarks 5.13 Using Page Overlay 5.16 Reprinting the Last Page 5.20 Printing in a Network Environment 5.21 6 Maintaining Your Printer Maintaining the Toner Cartridge 6.1 Cleaning the Printer 6.4 7 Problem Solving Troubleshooting Checklist 7.1 Solving General Printing Problems 7.2 Clearing Paper Jams 7.6 Solving Print Quality Problems 7.11 Troubleshooting Error Messages 7.17 Common Windows...

User Manual (ENGLISH)
Page 13
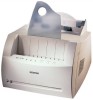
Inside View Toner cartridge Rear View Printer Components Front cover Power switch Power receptacle USB port Parallel port (ML-1210 Only) INTRODUCTION 1.4
Inside View Toner cartridge Rear View Printer Components Front cover Power switch Power receptacle USB port Parallel port (ML-1210 Only) INTRODUCTION 1.4
User Manual (ENGLISH)
Page 14
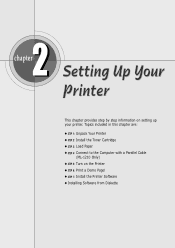
x STEP 7: Install the Printer Software x Installing Software from Diskette 2chapter This chapter provides step by step information on the Printer x STEP 6: Print a Demo Page! Topics included in this chapter are: x STEP 1: Unpack Your Printer x STEP 2: Install the Toner Cartridge x STEP 3: Load Paper x STEP 4: Connect to the Computer with a Parallel Cable (ML-1210 Only) x STEP 5: Turn on setting up your printer.
x STEP 7: Install the Printer Software x Installing Software from Diskette 2chapter This chapter provides step by step information on the Printer x STEP 6: Print a Demo Page! Topics included in this chapter are: x STEP 1: Unpack Your Printer x STEP 2: Install the Toner Cartridge x STEP 3: Load Paper x STEP 4: Connect to the Computer with a Parallel Cable (ML-1210 Only) x STEP 5: Turn on setting up your printer.
User Manual (ENGLISH)
Page 15
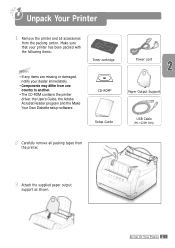
... the packing carton. SETTING UP YOUR PRINTER 2.1 Unpack Your Printer 1 Remove the printer and all packing tapes from the printer. 3 Attach the supplied paper output support as shown. Toner cartridge CD-ROM* Setup Guide Power cord Paper Output Support USB Cable (ML-1220M Only) 2 Carefully remove all ...accessories from one country to another. • The CD-ROM contains the printer driver, the User's Guide, the Adobe...
... the packing carton. SETTING UP YOUR PRINTER 2.1 Unpack Your Printer 1 Remove the printer and all packing tapes from the printer. 3 Attach the supplied paper output support as shown. Toner cartridge CD-ROM* Setup Guide Power cord Paper Output Support USB Cable (ML-1220M Only) 2 Carefully remove all ...accessories from one country to another. • The CD-ROM contains the printer driver, the User's Guide, the Adobe...

User Manual (ENGLISH)
Page 16
CAUTION: To prevent damage, do not expose the toner cartridge to distribute the toner evenly inside the cartridge. Cover it with a dry cloth and wash clothing in cold water. Hot water sets toner into fabric. 2.2 SETTING UP YOUR PRINTER If toner gets on your clothing, wipe it toward you to open. 2 ...Remove the toner cartridge from side to side to light for more than a few minutes. Install the Toner Cartridge 1 Grasp the front cover by both sides of the cover...
CAUTION: To prevent damage, do not expose the toner cartridge to distribute the toner evenly inside the cartridge. Cover it with a dry cloth and wash clothing in cold water. Hot water sets toner into fabric. 2.2 SETTING UP YOUR PRINTER If toner gets on your clothing, wipe it toward you to open. 2 ...Remove the toner cartridge from side to side to light for more than a few minutes. Install the Toner Cartridge 1 Grasp the front cover by both sides of the cover...

User Manual (ENGLISH)
Page 17
Make sure that is securely closed. Install the Toner Cartridge 5 Grasp the handle and insert the cartridge in the printer until it snaps into place. 6 Close the front cover. Note: When printing text at 5% coverage, you can expect a toner cartridge life of approximately 2,500 pages (1,000 pages for the toner cartridge that the cover is shipped with the printer). SETTING UP YOUR PRINTER 2.3 4 Locate the cartridge slots inside the printer, one on each side.
Make sure that is securely closed. Install the Toner Cartridge 5 Grasp the handle and insert the cartridge in the printer until it snaps into place. 6 Close the front cover. Note: When printing text at 5% coverage, you can expect a toner cartridge life of approximately 2,500 pages (1,000 pages for the toner cartridge that the cover is shipped with the printer). SETTING UP YOUR PRINTER 2.3 4 Locate the cartridge slots inside the printer, one on each side.

User Manual (ENGLISH)
Page 54
... If the button backlight is on, toner save mode activates and the printer uses less toner to print a page. • If the button backlight is determined by the setting you've made on the control panel of your toner cartridge and reduce your cost per page without a significant reduction in the... printer driver must be set to Printer Setting. To enable this option to allow the printer to use less toner on each page. 3 Click OK. See page 5.1 ...
... If the button backlight is on, toner save mode activates and the printer uses less toner to print a page. • If the button backlight is determined by the setting you've made on the control panel of your toner cartridge and reduce your cost per page without a significant reduction in the... printer driver must be set to Printer Setting. To enable this option to allow the printer to use less toner on each page. 3 Click OK. See page 5.1 ...

User Manual (ENGLISH)
Page 71
6chapter This chapter provides suggestions for maintaining the toner cartridge and printer. Topics included in this chapter are: x Maintaining the Toner Cartridge x Cleaning the Printer
6chapter This chapter provides suggestions for maintaining the toner cartridge and printer. Topics included in this chapter are: x Maintaining the Toner Cartridge x Cleaning the Printer

User Manual (ENGLISH)
Page 72
... panel. Selecting this option will extend the life of toner that print jobs require. MAINTAINING YOUR PRINTER 6.1 Toner cartridge life expectancy The life of the toner cartridge depends on the amount of the toner cartridge and reduce your cost per page, but will be lit. Saving toner To save toner, press the Toner Save...
... panel. Selecting this option will extend the life of toner that print jobs require. MAINTAINING YOUR PRINTER 6.1 Toner cartridge life expectancy The life of the toner cartridge depends on the amount of the toner cartridge and reduce your cost per page, but will be lit. Saving toner To save toner, press the Toner Save...

User Manual (ENGLISH)
Page 73
... on a printed page. You may be hot. • To prevent damage to the toner cartridge, do not expose it off with a dry cloth and wash clothing in cold water. Hot water sets toner into the printer. The fusing area may be able to temporarily improve print quality by redistributing the toner... side to side five or six times to redistribute the toner. CAUTION: • Avoid reaching too far into fabric. 6.2 MAINTAINING YOUR PRINTER Toner Cartridge Redistributing Toner When toner is low, faded or light areas may appear on your clothing, wipe it to light for more than a few minutes. 3 ...
... on a printed page. You may be hot. • To prevent damage to the toner cartridge, do not expose it off with a dry cloth and wash clothing in cold water. Hot water sets toner into the printer. The fusing area may be able to temporarily improve print quality by redistributing the toner... side to side five or six times to redistribute the toner. CAUTION: • Avoid reaching too far into fabric. 6.2 MAINTAINING YOUR PRINTER Toner Cartridge Redistributing Toner When toner is low, faded or light areas may appear on your clothing, wipe it to light for more than a few minutes. 3 ...

User Manual (ENGLISH)
Page 74
Insure the toner cartridge snaps into the printer. See "Install the Toner Cartridge" on page 2.2. Toner Cartridge MAINTAINING YOUR PRINTER 6.3 If the print remains light Remove the old cartridge and install a new toner cartridge. 4 Reinsert the toner cartridge into place. 5 Firmly close the cover.
Insure the toner cartridge snaps into the printer. See "Install the Toner Cartridge" on page 2.2. Toner Cartridge MAINTAINING YOUR PRINTER 6.3 If the print remains light Remove the old cartridge and install a new toner cartridge. 4 Reinsert the toner cartridge into place. 5 Firmly close the cover.

User Manual (ENGLISH)
Page 75
...Wipe the outside surface of the printer with a piece of the printer, be careful not to cool. Note: To prevent damage to light for the printer to touch the transfer roller (located underneath the toner cartridge ). This buildup can accumulate inside the printer. 2 Open the front cover and... remove the toner cartridge. 3 With a dry, lint-free cloth, wipe away any dust...
...Wipe the outside surface of the printer with a piece of the printer, be careful not to cool. Note: To prevent damage to light for the printer to touch the transfer roller (located underneath the toner cartridge ). This buildup can accumulate inside the printer. 2 Open the front cover and... remove the toner cartridge. 3 With a dry, lint-free cloth, wipe away any dust...
User Manual (ENGLISH)
Page 76
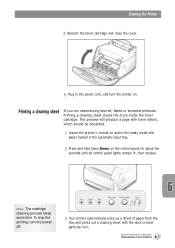
.... Printing a cleaning sheet cleans the drum inside the toner cartridge. This process will produce a page with toner debris, which should be discarded. 1 Insure the printer is turned on and in the automatic input tray. 2 Press and hold down Demo on the control panel for about ten ...seconds until all control panel lights remain lit, then release. Note: The cartridge cleaning process takes some time. Cleaning the Printer 4 Reinsert the toner cartridge and close the cover. 5 Plug in the power cord, and turn the power off. 3 Your...
.... Printing a cleaning sheet cleans the drum inside the toner cartridge. This process will produce a page with toner debris, which should be discarded. 1 Insure the printer is turned on and in the automatic input tray. 2 Press and hold down Demo on the control panel for about ten ...seconds until all control panel lights remain lit, then release. Note: The cartridge cleaning process takes some time. Cleaning the Printer 4 Reinsert the toner cartridge and close the cover. 5 Plug in the power cord, and turn the power off. 3 Your...
User Manual (ENGLISH)
Page 79
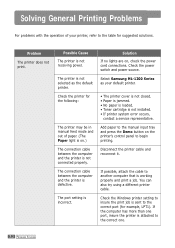
... loaded. • Toner cartridge is not installed. • If printer system error occurs, contact a service representative. Solving General Printing Problems For problems with the operation of paper. (The Paper light is on , check the power cord connections. Check the printer for suggested solutions. Select Samsung ML-1200 Series as the default printer. If the computer has...
... loaded. • Toner cartridge is not installed. • If printer system error occurs, contact a service representative. Solving General Printing Problems For problems with the operation of paper. (The Paper light is on , check the power cord connections. Check the printer for suggested solutions. Select Samsung ML-1200 Series as the default printer. If the computer has...

User Manual (ENGLISH)
Page 82
... it does not pages. Some parts, such as the controller or the board, may have any printing problem after your printer prints about 50,000 pages, you have blank Check the file to replace the transfer roller. ATTENTION: The lifetime of ...wrong, garbled, or incomplete. (continued) The software application is Replace the toner cartridge. PROBLEM SOLVING 7.5 Solving General Printing Problems Problem Possible Cause The printer prints, but are blank. The toner cartridge is malfunctioning. Solution Try printing a job from another application. Print the document ...
... it does not pages. Some parts, such as the controller or the board, may have any printing problem after your printer prints about 50,000 pages, you have blank Check the file to replace the transfer roller. ATTENTION: The lifetime of ...wrong, garbled, or incomplete. (continued) The software application is Replace the toner cartridge. PROBLEM SOLVING 7.5 Solving General Printing Problems Problem Possible Cause The printer prints, but are blank. The toner cartridge is malfunctioning. Solution Try printing a job from another application. Print the document ...

User Manual (ENGLISH)
Page 86
Printing can be resumed. CAUTION: To prevent damage to light for more than a few minutes. Make sure that no paper remains inside the printer. 4 Reinsert the toner cartridge and close the front cover. Clearing Paper Jams PROBLEM SOLVING 7.9 Place a piece of paper over the top of the toner cartridge to shield it while it is out of the printer. 3 Gently pull the paper toward you to remove it to the toner cartridge, do not expose it from the printer. 2 Remove the toner cartridge.
Printing can be resumed. CAUTION: To prevent damage to light for more than a few minutes. Make sure that no paper remains inside the printer. 4 Reinsert the toner cartridge and close the front cover. Clearing Paper Jams PROBLEM SOLVING 7.9 Place a piece of paper over the top of the toner cartridge to shield it while it is out of the printer. 3 Gently pull the paper toward you to remove it to the toner cartridge, do not expose it from the printer. 2 Remove the toner cartridge.

User Manual (ENGLISH)
Page 88
...• Clean the inside of faded or smeared defects may indicate that the toner cartridge needs cleaning. See "Cleaning the Printer" on . If this does not improve the print quality, install a new toner cartridge. • The paper may not meet paper specifications (for example, the paper is...11 respectively. • A combination of the printer (see page 6.4). • Adjust the print resolution from the printer properties (see page 5.11). • Insure Toner Save Mode is low. You may be able to temporarily extend the toner cartridge life. Clean the LSU. Solving Print Quality Problems...
...• Clean the inside of faded or smeared defects may indicate that the toner cartridge needs cleaning. See "Cleaning the Printer" on . If this does not improve the print quality, install a new toner cartridge. • The paper may not meet paper specifications (for example, the paper is...11 respectively. • A combination of the printer (see page 6.4). • Adjust the print resolution from the printer properties (see page 5.11). • Insure Toner Save Mode is low. You may be able to temporarily extend the toner cartridge life. Clean the LSU. Solving Print Quality Problems...
User Manual (ENGLISH)
Page 90
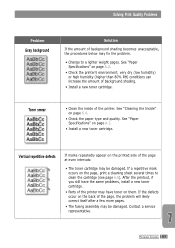
... SOLVING 7.13 After the printout, if you still have the same problems, install a new toner cartridge. • Parts of the printer. Vertical repetitive defects If marks repeatedly appear on the back of the page, the problem will likely correct itself after a few more ... high humidity (higher than 80% RH) conditions can increase the amount of the page at even intervals: • The toner cartridge may be damaged. See "Paper Specifications" on page A.2. • Check the printer's environment; If the defects occur on the printed side of background shading. • Install a new toner...
... SOLVING 7.13 After the printout, if you still have the same problems, install a new toner cartridge. • Parts of the printer. Vertical repetitive defects If marks repeatedly appear on the back of the page, the problem will likely correct itself after a few more ... high humidity (higher than 80% RH) conditions can increase the amount of the page at even intervals: • The toner cartridge may be damaged. See "Paper Specifications" on page A.2. • Check the printer's environment; If the defects occur on the printed side of background shading. • Install a new toner...

User Manual (ENGLISH)
Page 92
... require repair. PROBLEM SOLVING 7.15 Clean the inside of paper in the input tray. Install a new toner cartridge. • The printer may be defective and need replacing. Contact a service representative. Both high temperature and humidity can cause paper curl. Solving ...output slot. • Turn over the stack of printouts are dirty • The transfer roller may not be dirty. Black pages • The toner cartridge may be installed properly. See "Paper Specifications" on page 6.4. • Check for leaking toner. See "Cleaning the Inside" on page A.2. •...
... require repair. PROBLEM SOLVING 7.15 Clean the inside of paper in the input tray. Install a new toner cartridge. • The printer may be defective and need replacing. Contact a service representative. Both high temperature and humidity can cause paper curl. Solving ...output slot. • Turn over the stack of printouts are dirty • The transfer roller may not be dirty. Black pages • The toner cartridge may be installed properly. See "Paper Specifications" on page 6.4. • Check for leaking toner. See "Cleaning the Inside" on page A.2. •...


