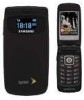

User Manual (ENGLISH)
Page 3
Table of Your Phone 23 Turning Your Phone On and Off 25 Using Your Phone's Battery and Charger 26 Using a microSD Memory Card with Your Phone 32 Navigating Through Phone Menus 34 Displaying Your Phone Number 35 Making and Answering Calls 36 Entering Text 50 Phone Basics 13 Front View of Your Phone 14 Viewing the Display Screen 18 Features...
Table of Your Phone 23 Turning Your Phone On and Off 25 Using Your Phone's Battery and Charger 26 Using a microSD Memory Card with Your Phone 32 Navigating Through Phone Menus 34 Displaying Your Phone Number 35 Making and Answering Calls 36 Entering Text 50 Phone Basics 13 Front View of Your Phone 14 Viewing the Display Screen 18 Features...
User Manual (ENGLISH)
Page 7
... Voice Command . . 221 Section 4: Safety and Warranty Information 223 4A. Important Safety Information 225 General Precautions 226 Maintaining Safe Use of and Access to Your Phone 227 Caring for the Battery 229 Using Your Phone With a Hearing Aid Device 230 Radio Frequency (RF) Energy 232 Owner's Record 234...
... Voice Command . . 221 Section 4: Safety and Warranty Information 223 4A. Important Safety Information 225 General Precautions 226 Maintaining Safe Use of and Access to Your Phone 227 Caring for the Battery 229 Using Your Phone With a Hearing Aid Device 230 Radio Frequency (RF) Energy 232 Owner's Record 234...

User Manual (ENGLISH)
Page 39
... the basic functions and calling features of Your Phone ࡗ Turning Your Phone On and Off ࡗ Using Your Phone's Battery and Charger ࡗ Using a microSD Memory Card with Your Phone ࡗ Navigating Through Phone Menus ࡗ Displaying Your Phone Number ࡗ Making and Answering Calls ࡗ Entering Text Your phone is packed with features that are important...
... the basic functions and calling features of Your Phone ࡗ Turning Your Phone On and Off ࡗ Using Your Phone's Battery and Charger ࡗ Using a microSD Memory Card with Your Phone ࡗ Navigating Through Phone Menus ࡗ Displaying Your Phone Number ࡗ Making and Answering Calls ࡗ Entering Text Your phone is packed with features that are important...
User Manual (ENGLISH)
Page 41
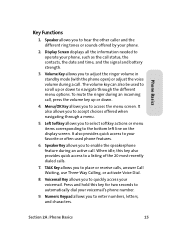
... to navigate through a menu. 5. To mute the ringer during a call , press the volume key up or down . 4. It also provides quick access to your phone. 2. Press and hold this key also provides quick access to scroll up or down to enable the speakerphone feature during an active call status, the... contacts, the date and time, and the signal and battery strength. 3. Menu/OK Key allows you to hear the other caller and the different ring tones or sounds offered by your favorite or often ...
... to navigate through a menu. 5. To mute the ringer during a call , press the volume key up or down . 4. It also provides quick access to your phone. 2. Press and hold this key also provides quick access to scroll up or down to enable the speakerphone feature during an active call status, the... contacts, the date and time, and the signal and battery strength. 3. Menu/OK Key allows you to hear the other caller and the different ring tones or sounds offered by your favorite or often ...

User Manual (ENGLISH)
Page 46
...8 or that your current signal strength. Indicates that 1-Beep is set on . Indicates your current battery charge strength. (Icon shown fully charged in idle mode.) Indicates your phone. Displays your phone has a ringer volume set and the vibrate option is not checked. The more lines you have... been muted. Indicates that the speakerphone is on your current battery charge strength. (Icon shown fully discharged ...
...8 or that your current signal strength. Indicates that 1-Beep is set on . Indicates your current battery charge strength. (Icon shown fully charged in idle mode.) Indicates your phone. Displays your phone has a ringer volume set and the vibrate option is not checked. The more lines you have... been muted. Indicates that the speakerphone is on your current battery charge strength. (Icon shown fully discharged ...

User Manual (ENGLISH)
Page 51
... finds a signal, it may display a "Looking for Service" screen, which indicates that your phone on ). Your screen remains blank while your phone off (unless the battery is charging). Turning Your Phone Off To turn your phone is searching for a signal. You can also initiate a search for Sprint PCS Service by pressing any key (when your...
... finds a signal, it may display a "Looking for Service" screen, which indicates that your phone on ). Your screen remains blank while your phone off (unless the battery is charging). Turning Your Phone Off To turn your phone is searching for a signal. You can also initiate a search for Sprint PCS Service by pressing any key (when your...

User Manual (ENGLISH)
Page 52
...two minutes of its capacity, the battery icon blinks. Use only Sprint-approved or manufacturer-approved batteries and chargers with a Lithium Ion (Li-Ion) battery. Battery Capacity Your phone is fully drained. When the battery reaches 5% of talk time left, the phone sounds an audible alert and then ...1114 to order. They're also available at Sprint Stores or through your phone's battery level indicator and charge the battery before it runs out of continuous digital talk time. or manufacturer-approved batteries and accessories can be found at www.sprint.com - Sprint- Note:...
...two minutes of its capacity, the battery icon blinks. Use only Sprint-approved or manufacturer-approved batteries and chargers with a Lithium Ion (Li-Ion) battery. Battery Capacity Your phone is fully drained. When the battery reaches 5% of talk time left, the phone sounds an audible alert and then ...1114 to order. They're also available at Sprint Stores or through your phone's battery level indicator and charge the battery before it runs out of continuous digital talk time. or manufacturer-approved batteries and accessories can be found at www.sprint.com - Sprint- Note:...

User Manual (ENGLISH)
Page 53
Carefully remove the battery cover from the phone. Pull down on the release button (located on either side of the phone). 2. Lift up under one of the removal slots located on the back of the phone. Phone Basics Installing the Battery To install the Li-Ion battery: 1. Removal Slots Release Button 3. Battery Cover Section 2A: Phone Basics 27
Carefully remove the battery cover from the phone. Pull down on the release button (located on either side of the phone). 2. Lift up under one of the removal slots located on the back of the phone. Phone Basics Installing the Battery To install the Li-Ion battery: 1. Removal Slots Release Button 3. Battery Cover Section 2A: Phone Basics 27

User Manual (ENGLISH)
Page 54
Insert the battery cover alignment tabs into place. 6. Alignment Tabs 7. Gold Contact Pins 5. Gently press down until it snaps into the phone as shown below. Carefully slide the cover in the back of the phone at a 45-degree angle, making sure to line up the gold contacts. Insert the battery into the opening in and then press down on the battery until the cover snaps into place. 28 Section 2A: Phone Basics 4.
Insert the battery cover alignment tabs into place. 6. Alignment Tabs 7. Gold Contact Pins 5. Gently press down until it snaps into the phone as shown below. Carefully slide the cover in the back of the phone at a 45-degree angle, making sure to line up the gold contacts. Insert the battery into the opening in and then press down on the battery until the cover snaps into place. 28 Section 2A: Phone Basics 4.

User Manual (ENGLISH)
Page 55
Follow steps 1-3 from "Installing the Battery" on page 27. 2. Grip the battery at the bottom and pull it up and out at a 45-degree angle. Be careful not to damage the contact pins during this process. 3. Replace the battery cover by following steps 6 and 7 from "Installing the Battery" on page 27. Removing the Battery To remove the Li-Ion battery: 1. Section 2A: Phone Basics 29 Phone Basics Caution!
Follow steps 1-3 from "Installing the Battery" on page 27. 2. Grip the battery at the bottom and pull it up and out at a 45-degree angle. Be careful not to damage the contact pins during this process. 3. Replace the battery cover by following steps 6 and 7 from "Installing the Battery" on page 27. Removing the Battery To remove the Li-Ion battery: 1. Section 2A: Phone Basics 29 Phone Basics Caution!

User Manual (ENGLISH)
Page 56
... upper-right corner of your phone: ᮣ Plug the terminal end of your phone's battery level, glance at least six hours before first using your phone with your phone's display screen. Charging the Battery Your phone's Li-Ion battery is getting too low, the battery icon ( ) blinks and the phone sounds a warning tone. If the battery charge is rechargeable and should...
... upper-right corner of your phone: ᮣ Plug the terminal end of your phone's battery level, glance at least six hours before first using your phone with your phone's display screen. Charging the Battery Your phone's Li-Ion battery is getting too low, the battery icon ( ) blinks and the phone sounds a warning tone. If the battery charge is rechargeable and should...

User Manual (ENGLISH)
Page 57
... screen. THIS POWER UNIT IS INTENDED TO BE CORRECTLY ORIENTATED IN A VERTICAL OR HORIZONTAL OR FLOOR MOUNT POSITION Section 2A: Phone Basics 31 FOR CONNECTION TO A SUPPLY NOT IN THE U.S.A., USE AN ATTACHMENT PLUG ADAPTOR OF THE PROPER CONFIGURATION FOR THE POWER OUTLET. ...Please adhere to the following safety instructions per UL guidelines. SAVE THESE INSTRUCTIONS. UL Certified Travel Adapter The Travel Adapter for this phone has met UL 1310 safety requirements. TO REDUCE THE RISK OF FIRE OR ELECTRIC SHOCK, CAREFULLY FOLLOW THESE INSTRUCTIONS. Front Panel LCD Camera ...
... screen. THIS POWER UNIT IS INTENDED TO BE CORRECTLY ORIENTATED IN A VERTICAL OR HORIZONTAL OR FLOOR MOUNT POSITION Section 2A: Phone Basics 31 FOR CONNECTION TO A SUPPLY NOT IN THE U.S.A., USE AN ATTACHMENT PLUG ADAPTOR OF THE PROPER CONFIGURATION FOR THE POWER OUTLET. ...Please adhere to the following safety instructions per UL guidelines. SAVE THESE INSTRUCTIONS. UL Certified Travel Adapter The Travel Adapter for this phone has met UL 1310 safety requirements. TO REDUCE THE RISK OF FIRE OR ELECTRIC SHOCK, CAREFULLY FOLLOW THESE INSTRUCTIONS. Front Panel LCD Camera ...

User Manual (ENGLISH)
Page 58
...Locate the memory slot (to the right of the gold contact pins as music, videos, and photographs in your phone. Using a microSD Memory Card with ultra-small mobile phones and other devices. The maximum storage size for this media card is capable of flash memory specifically designed for ...shown below). Installing the microSD Memory Card To install the card: 1. It is ideal for use with Your Phone microSD Memory Card Your phone is 1 GB. Remove the battery. (See "Removing the Battery" on page 29.) 2. This card is the newest standard of supporting an optional memory storage media known ...
...Locate the memory slot (to the right of the gold contact pins as music, videos, and photographs in your phone. Using a microSD Memory Card with ultra-small mobile phones and other devices. The maximum storage size for this media card is capable of flash memory specifically designed for ...shown below). Installing the microSD Memory Card To install the card: 1. It is ideal for use with Your Phone microSD Memory Card Your phone is 1 GB. Remove the battery. (See "Removing the Battery" on page 29.) 2. This card is the newest standard of supporting an optional memory storage media known ...

User Manual (ENGLISH)
Page 59
If this does not work, repeat this process again. 4. 3. Carefully insert the microSD card into the opening and firmly push it has been inserted, firmly push the end of the card into the phone and release-the card should pop out. With the card now securely installed, replace the battery. (See "Installing the Battery" on page 27.) Phone Basics Section 2A: Phone Basics 33 Note: To remove the card, once it in until you hear a click indicating the card is securely installed.
If this does not work, repeat this process again. 4. 3. Carefully insert the microSD card into the opening and firmly push it has been inserted, firmly push the end of the card into the phone and release-the card should pop out. With the card now securely installed, replace the battery. (See "Installing the Battery" on page 27.) Phone Basics Section 2A: Phone Basics 33 Note: To remove the card, once it in until you hear a click indicating the card is securely installed.

User Manual (ENGLISH)
Page 91
... > Display > Backlight > Pwr Save Mode. 2. Changing the Display Screen Your phone offers options for what you see on the main LCD screen. Select Sprint or Samsung and press . 3. Accept the new theme by pressing Continue ( ). Note: Long backlight settings affect the battery's talk and standby times. To activate the Power Save Mode: 1. Select...
... > Display > Backlight > Pwr Save Mode. 2. Changing the Display Screen Your phone offers options for what you see on the main LCD screen. Select Sprint or Samsung and press . 3. Accept the new theme by pressing Continue ( ). Note: Long backlight settings affect the battery's talk and standby times. To activate the Power Save Mode: 1. Select...

User Manual (ENGLISH)
Page 166
... current network coverage. Ⅲ My Phone #: plays back and displays your phone number. 140 Section 2H: Using Your Phone's Voice Services Press and hold . 2. Using Check You can have the phone play back and display information about its current state, including its phone number, current signal strength, network coverage, and battery level. (See "Getting Started With...
... current network coverage. Ⅲ My Phone #: plays back and displays your phone number. 140 Section 2H: Using Your Phone's Voice Services Press and hold . 2. Using Check You can have the phone play back and display information about its current state, including its phone number, current signal strength, network coverage, and battery level. (See "Getting Started With...

User Manual (ENGLISH)
Page 167
.... Good - Number of bars displayed is scanning. No Signal - When phone is 2. Number of bars displayed is 3-4. Low battery alert. Number of bars displayed is 1. Voice Services For example, say one of the valid status items. Battery Coverage Signal Strength High - The phone responds by itself. You can also say "Check" by playing back...
.... Good - Number of bars displayed is scanning. No Signal - When phone is 2. Number of bars displayed is 3-4. Low battery alert. Number of bars displayed is 1. Voice Services For example, say one of the valid status items. Battery Coverage Signal Strength High - The phone responds by itself. You can also say "Check" by playing back...

User Manual (ENGLISH)
Page 178
Viewing Your Camera's Status Area Display Image Saved/Remaining Menu Bar Battery Indicator Display Image Crosshairs Status Bar Capture Camera Options 152 Section 2I: Using the Built-in Camera
Viewing Your Camera's Status Area Display Image Saved/Remaining Menu Bar Battery Indicator Display Image Crosshairs Status Bar Capture Camera Options 152 Section 2I: Using the Built-in Camera

User Manual (ENGLISH)
Page 251
...Use of and Access to read and follow the information provided in this phone guide may result in serious bodily injury, death, or property damage. Failure to Your Phone ࡗ Caring for the Battery ࡗ Using Your Phone With a Hearing Aid Device ࡗ Radio Frequency (RF) Energy ...ࡗ Owner's Record ࡗ Phone Guide Proprietary Notice This phone guide contains important operational and safety information that will...
...Use of and Access to read and follow the information provided in this phone guide may result in serious bodily injury, death, or property damage. Failure to Your Phone ࡗ Caring for the Battery ࡗ Using Your Phone With a Hearing Aid Device ࡗ Radio Frequency (RF) Energy ...ࡗ Owner's Record ࡗ Phone Guide Proprietary Notice This phone guide contains important operational and safety information that will...

User Manual (ENGLISH)
Page 252
... the power off and remove the battery. ⅷ Although your phone is quite sturdy, it . ⅷ Any changes or modifications to your phone not expressly approved in this document could void your warranty for this equipment and void your phone and accessories to rain or liquid ... personnel should service your warranty. 226 Section 4A: Important Safety Information General Precautions There are several simple guidelines to operating your phone properly and maintaining safe, satisfactory service. ⅷ Speak directly into the mouthpiece. ⅷ Avoid exposing your authority to operate...
... the power off and remove the battery. ⅷ Although your phone is quite sturdy, it . ⅷ Any changes or modifications to your phone not expressly approved in this document could void your warranty for this equipment and void your phone and accessories to rain or liquid ... personnel should service your warranty. 226 Section 4A: Important Safety Information General Precautions There are several simple guidelines to operating your phone properly and maintaining safe, satisfactory service. ⅷ Speak directly into the mouthpiece. ⅷ Avoid exposing your authority to operate...


