User Manual (ENGLISH)
Page 2
... of Features 1 List of Parts 1 Familiarizing Yourself with Your New TV 2 Top Panel Buttons 2 Rear Panel Jacks 3 Remote Control 4 Installing Batteries in the Remote Control 6 The remote control doesn't work 6 Chapter 2: Installation Connecting VHF and UHF Antennas 7 Antennas with 300-ohm Flat Twin Leads 7 Antennas with 75-ohm Round Leads 8 Separate VHF and UHF Antennas 8 Connecting Cable...
... of Features 1 List of Parts 1 Familiarizing Yourself with Your New TV 2 Top Panel Buttons 2 Rear Panel Jacks 3 Remote Control 4 Installing Batteries in the Remote Control 6 The remote control doesn't work 6 Chapter 2: Installation Connecting VHF and UHF Antennas 7 Antennas with 300-ohm Flat Twin Leads 7 Antennas with 75-ohm Round Leads 8 Separate VHF and UHF Antennas 8 Connecting Cable...
User Manual (ENGLISH)
Page 3
... the V-Chip 45 Setting Up Your Personal ID Number (PIN 45 How to Enable/Disable the V-Chip 46 How to Set up Restrictions Using the 'TV guidelines' . . . . .46 How to Set up Restrictions using the MPAA Ratings: G, PG, PG-13, R, NC-17, X 48 How to Reset the... 59 Appendix How to connect the cables and stand base 61 Using the Anti-Theft Kensington Lock 62 Retractable Stand 63 Cleaning and Maintaining Your TV 64 Using Your TV in Another Country 64 Specifications 65 Display Modes 66 Setting Up Your Remote Control 67 Remote Control Codes 70 Contents 2
... the V-Chip 45 Setting Up Your Personal ID Number (PIN 45 How to Enable/Disable the V-Chip 46 How to Set up Restrictions Using the 'TV guidelines' . . . . .46 How to Set up Restrictions using the MPAA Ratings: G, PG, PG-13, R, NC-17, X 48 How to Reset the... 59 Appendix How to connect the cables and stand base 61 Using the Anti-Theft Kensington Lock 62 Retractable Stand 63 Cleaning and Maintaining Your TV 64 Using Your TV in Another Country 64 Specifications 65 Display Modes 66 Setting Up Your Remote Control 67 Remote Control Codes 70 Contents 2
User Manual (ENGLISH)
Page 4
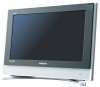
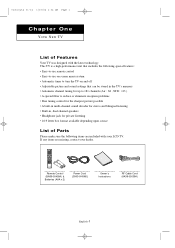
...1/10/04 1:02 AM Page 1 Chapter One YOUR NEW TV List of Parts Please make sure the following items are missing, contact your LCD TV. This TV is a high-performance unit that includes the following special features: • Easy-to-use remote control • Easy-to-use on-screen menu system &#...8226; Automatic timer to turn the TV on and off • Adjustable picture and sound...
...1/10/04 1:02 AM Page 1 Chapter One YOUR NEW TV List of Parts Please make sure the following items are missing, contact your LCD TV. This TV is a high-performance unit that includes the following special features: • Easy-to-use remote control • Easy-to-use on-screen menu system &#...8226; Automatic timer to turn the TV on and off • Adjustable picture and sound...
User Manual (ENGLISH)
Page 5
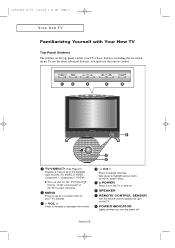
... off . MENU Press to make selections. SPEAKER REMOTE CONTROL SENSOR Aim the remote control towards this spot on -screen menu of your TV's basic features, including the on -screen menu. To use the more advanced features, you turn the TV on the control panel of the available input sources (TV, VIDEO, S-VIDEO, Component 1, Component 2, PC/DVI...
... off . MENU Press to make selections. SPEAKER REMOTE CONTROL SENSOR Aim the remote control towards this spot on -screen menu of your TV's basic features, including the on -screen menu. To use the more advanced features, you turn the TV on the control panel of the available input sources (TV, VIDEO, S-VIDEO, Component 1, Component 2, PC/DVI...

User Manual (ENGLISH)
Page 7
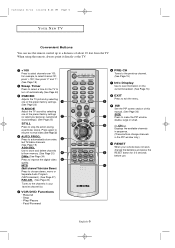
... to select on and off the sound. (See Page 15) MENU Displays the main on-screen menu. 5 MODE Selects a target device to controlled by the samsung remote control (TV, STB, VCR, CABLE, DVD) 6 CH and CH (Channel UP/Down) Press CH or CH to display all of about 23 feet from the... items and change the screen size. MUTE 4 Press to temporarily cut off . (See Page 15) 1 PC MODE 2 Press to switch to change menu values. (The remote control will only function with VCR or DVD units that are compatible with the LCD TV.) English-4 When using the remote, always point it directly at the...
... to select on and off the sound. (See Page 15) MENU Displays the main on-screen menu. 5 MODE Selects a target device to controlled by the samsung remote control (TV, STB, VCR, CABLE, DVD) 6 CH and CH (Channel UP/Down) Press CH or CH to display all of about 23 feet from the... items and change the screen size. MUTE 4 Press to temporarily cut off . (See Page 15) 1 PC MODE 2 Press to switch to change menu values. (The remote control will only function with VCR or DVD units that are compatible with the LCD TV.) English-4 When using the remote, always point it directly at the...
User Manual (ENGLISH)
Page 8
...feet from memory. (See Page 20) 4 DNIe (See Page 34) Press to stop the action during a particular scene. When using the remote, always point it directly at the TV. +100 Press to resume normal video.(See Page 32) AUTO PROG. MTS (Multi channel Television Stereo) Press to choose stereo, mono or... Tunes to the channels in the PIP window only.) RESET When your remote does not work, change the batteries and press the 9 RESET button for the TV to /from the TV. victoryia 01-14 1/11/04 8:26 PM Page 5 YOUR NEW TV Convenient Buttons You can use . 10 English-5 Play/Pause - Press ...
...feet from memory. (See Page 20) 4 DNIe (See Page 34) Press to stop the action during a particular scene. When using the remote, always point it directly at the TV. +100 Press to resume normal video.(See Page 32) AUTO PROG. MTS (Multi channel Television Stereo) Press to choose stereo, mono or... Tunes to the channels in the PIP window only.) RESET When your remote does not work, change the batteries and press the 9 RESET button for the TV to /from the TV. victoryia 01-14 1/11/04 8:26 PM Page 5 YOUR NEW TV Convenient Buttons You can use . 10 English-5 Play/Pause - Press ...
User Manual (ENGLISH)
Page 9
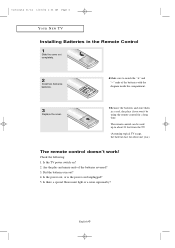
...if you won't be used up to match the "+" and "-" ends of the batteries reversed? 3. The remote control can be using the remote control for about 23 feet from the TV. (Assuming typical TV usage, the batteries last for a long time. Check the following: 1. Is there a special fluorescent light... or a neon sign nearby? English-6 Remove the batteries and store them in the Remote Control 1 Slide the ...
...if you won't be used up to match the "+" and "-" ends of the batteries reversed? 3. The remote control can be using the remote control for about 23 feet from the TV. (Assuming typical TV usage, the batteries last for a long time. Check the following: 1. Is there a special fluorescent light... or a neon sign nearby? English-6 Remove the batteries and store them in the Remote Control 1 Slide the ...
User Manual (ENGLISH)
Page 19
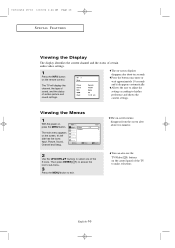
... UP/DOWN buttons to exit. The on the remote control. Then press ENTER( ) to access the icon's sub-menu. 3 Press the MENU button to select one of the TV to his/her preference and shows the current settings...and sound settings. Allows the user to adjust the settings according to make selections. English-16 The TV will display the channel, the type of sound, and the status of certain audio-video settings. ...screen after about two minutes. The on the control panel of the 5 icons. You can also use the TV/Video( ) buttons on -screen displays disappear after about ten seconds.
... UP/DOWN buttons to exit. The on the remote control. Then press ENTER( ) to access the icon's sub-menu. 3 Press the MENU button to select one of the TV to his/her preference and shows the current settings...and sound settings. Allows the user to adjust the settings according to make selections. English-16 The TV will display the channel, the type of sound, and the status of certain audio-video settings. ...screen after about two minutes. The on the control panel of the 5 icons. You can also use the TV/Video( ) buttons on -screen displays disappear after about ten seconds.

User Manual (ENGLISH)
Page 20
... to select "Air","STD", "HRC" or "IRC", then press the ENTER button. is displayed. 2 Press the UP/DOWN buttons to "Setting the Clock" on the remote control. Press the ENTER Button. The message "Plug & Play" is displayed. victoryia 17-31 1/10/04 1:06 AM Page 17 Chapter Four O P E R AT... I O N Plug & Play Feature When the TV is initially powered On, two basic customer settings proceed automatically and subsequently: Setting Auto program, Clock. 1 Press the POWER button on page 40). 5 The message...
... to select "Air","STD", "HRC" or "IRC", then press the ENTER button. is displayed. 2 Press the UP/DOWN buttons to "Setting the Clock" on the remote control. Press the ENTER Button. The message "Plug & Play" is displayed. victoryia 17-31 1/10/04 1:06 AM Page 17 Chapter Four O P E R AT... I O N Plug & Play Feature When the TV is initially powered On, two basic customer settings proceed automatically and subsequently: Setting Auto program, Clock. 1 Press the POWER button on page 40). 5 The message...

User Manual (ENGLISH)
Page 23
... "Add"and"Delete". You can assign a name to a channel. You can view any channel (including an erased channel) by using the number buttons on the remote control. Labeling Channel 1 Press the MENU button to select "Channel", then press the ENTER button. Press the UP/DOWN buttons to display the menu. Press...
... "Add"and"Delete". You can assign a name to a channel. You can view any channel (including an erased channel) by using the number buttons on the remote control. Labeling Channel 1 Press the MENU button to select "Channel", then press the ENTER button. Press the UP/DOWN buttons to display the menu. Press...

User Manual (ENGLISH)
Page 26
... UP/DOWN buttons to personal preference (see "Customizing the Picture, page 24). Alternate method: Simply press the P.MODE button on the remote control to select one of the standard picture settings. • Choose Dynamic to increase the clarity and sharpness of the picture. •...Custom" picture setting. Press ENTER . victoryia 17-31 1/10/04 1:06 AM Page 23 O P E R AT I O N Using Automatic Picture Settings Your TV has four automatic picture settings ("Dynamic", "Standard", "Movie", and "Custom") that are preset at the factory. You can select "Custom" which automatically recalls your ...
... UP/DOWN buttons to personal preference (see "Customizing the Picture, page 24). Alternate method: Simply press the P.MODE button on the remote control to select one of the standard picture settings. • Choose Dynamic to increase the clarity and sharpness of the picture. •...Custom" picture setting. Press ENTER . victoryia 17-31 1/10/04 1:06 AM Page 23 O P E R AT I O N Using Automatic Picture Settings Your TV has four automatic picture settings ("Dynamic", "Standard", "Movie", and "Custom") that are preset at the factory. You can select "Custom" which automatically recalls your ...

User Manual (ENGLISH)
Page 28
victoryia 17-31 1/10/04 1:06 AM Page 25 O P E R AT I O N Using Automatic Sound Settings Your TV has five automatic sound settings ("Standard", "Music", "Movie" "Speech" and "Custom") that is mostly dialogue (i.e., news). • Choose Custom to recall your personalized sound settings. 1 ...). English-25 Press the UP/DOWN buttons to select one of them by pressing the S.MODE button (or by making a selection from the on the remote control to select "Sound", then press the ENTER button. Or, you can activate any of the standard sound settings. • Choose Standard for the standard...
victoryia 17-31 1/10/04 1:06 AM Page 25 O P E R AT I O N Using Automatic Sound Settings Your TV has five automatic sound settings ("Standard", "Music", "Movie" "Speech" and "Custom") that is mostly dialogue (i.e., news). • Choose Custom to recall your personalized sound settings. 1 ...). English-25 Press the UP/DOWN buttons to select one of them by pressing the S.MODE button (or by making a selection from the on the remote control to select "Sound", then press the ENTER button. Or, you can activate any of the standard sound settings. • Choose Standard for the standard...
User Manual (ENGLISH)
Page 33
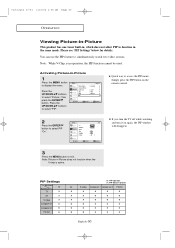
... PIP menu: Simply press the PIP button on again, the PIP window will disappear. 3 Press the MENU button to exit. PIP Settings Sub Picture TV Main Picture TV X AV X S-Video X Component 1 O Component 2 O PC/DVI O O : PIP operates X : PIP doesn't operate AV S-Video Component 1 Component 2 PC/DVI X X O O ... O X X X O O X X X English-30 Please see 'PIP Settings' below for details. If you turn the TV off while watching and turn it on the remote control. 2 Press the ENTER button to select PIP "On". Note: While V-Chip is in -Picture does not function when the...
... PIP menu: Simply press the PIP button on again, the PIP window will disappear. 3 Press the MENU button to exit. PIP Settings Sub Picture TV Main Picture TV X AV X S-Video X Component 1 O Component 2 O PC/DVI O O : PIP operates X : PIP doesn't operate AV S-Video Component 1 Component 2 PC/DVI X X O O ... O X X X O O X X X English-30 Please see 'PIP Settings' below for details. If you turn the TV off while watching and turn it on the remote control. 2 Press the ENTER button to select PIP "On". Note: While V-Chip is in -Picture does not function when the...

User Manual (ENGLISH)
Page 40
...-Channel Sound (MTS) Soundtrack Depending on the particular program being broadcast, you can also change the MTS setting by pressing the "MTS" button on the remote control. (When you change the MTS setting). You can listen to "Stereo" automatically. English-37 Note :The text at the bottom of the menu tells...
...-Channel Sound (MTS) Soundtrack Depending on the particular program being broadcast, you can also change the MTS setting by pressing the "MTS" button on the remote control. (When you change the MTS setting). You can listen to "Stereo" automatically. English-37 Note :The text at the bottom of the menu tells...

User Manual (ENGLISH)
Page 43
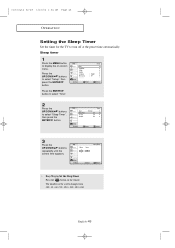
... the UP/DOWN buttons repeatedly until the correct minute appears. After the hour is necessary in order to use the various timer features of the TV. Press the MENU button to select am/pm and adjust with the UP/DOWN buttons. English-40 Press the LEFT/RIGHT buttons to Exit. Also... LEFT/RIGHT buttons to select "Minute". Press the UP/DOWN buttons until the correct hour appears. Note :You can check the time while watching the TV. (Just press the INFO button). 1 Press the MENU button to display the on the...
... the UP/DOWN buttons repeatedly until the correct minute appears. After the hour is necessary in order to use the various timer features of the TV. Press the MENU button to select am/pm and adjust with the UP/DOWN buttons. English-40 Press the LEFT/RIGHT buttons to Exit. Also... LEFT/RIGHT buttons to select "Minute". Press the UP/DOWN buttons until the correct hour appears. Note :You can check the time while watching the TV. (Just press the INFO button). 1 Press the MENU button to display the on the...
User Manual (ENGLISH)
Page 46
...; 90 • 120 • 150 • 180 • Off English-43 The number on the remote. victoryia 32-49 1/10/04 1:04 AM Page 43 O P E R AT I O N Setting the Sleep Timer Set the timer for the TV to select "Setup", then press the ENTER button. Press the UP/DOWN buttons to turn off...
...; 90 • 120 • 150 • 180 • Off English-43 The number on the remote. victoryia 32-49 1/10/04 1:04 AM Page 43 O P E R AT I O N Setting the Sleep Timer Set the timer for the TV to select "Setup", then press the ENTER button. Press the UP/DOWN buttons to turn off...

User Manual (ENGLISH)
Page 48
Enter your Pin has been memorized. English-45 ➜ Note: If you forget the Pin, press the remote-control buttons in the following sequence,which resets the pin to select "V-Chip", then press the ENTER button. 3 The "Enter Pin" screen will appear. ...V-Chip feature automatically locks out programming that is "0-0-0-0." 4 After entering a valid PIN number, the "V-Chip" screen will appear. Note: The default Pin number for a new TV set up or changed. The Change pin screen will appear. Press the MENU button to select "Change Pin." 5 Press the ENTER button. Setting Up Your...
Enter your Pin has been memorized. English-45 ➜ Note: If you forget the Pin, press the remote-control buttons in the following sequence,which resets the pin to select "V-Chip", then press the ENTER button. 3 The "Enter Pin" screen will appear. ...V-Chip feature automatically locks out programming that is "0-0-0-0." 4 After entering a valid PIN number, the "V-Chip" screen will appear. Note: The default Pin number for a new TV set up or changed. The Change pin screen will appear. Press the MENU button to select "Change Pin." 5 Press the ENTER button. Setting Up Your...

User Manual (ENGLISH)
Page 54
After the noise has been reduced, re-adjust the picture so that it is aligned on the remote control to select the PC mode. 1 Press the MENU button to remove or reduce picture noise. Press the PC button on the center of the ...
After the noise has been reduced, re-adjust the picture so that it is aligned on the remote control to select the PC mode. 1 Press the MENU button to remove or reduce picture noise. Press the PC button on the center of the ...

User Manual (ENGLISH)
Page 55
Press the LEFT/RIGHT buttons to exit. English-52 Press the MENU button to adjusting the H-Position. Press the UP/DOWN buttons to select "PC Position", then press the ENTER button. 3 Press the UP/DOWN buttons to display the menu. victoryia 50-59 1/10/04 1:04 AM Page 52 PC DISPLAY Changing the Screen Position Press the PC button on the remote control to select the PC mode. 1 Press the MENU button to adjusting the V-Position. Press the UP/DOWN buttons to select "Setup", then press the ENTER button. 2 Press the UP/DOWN buttons to select "PC Setup", then press the ENTER button.
Press the LEFT/RIGHT buttons to exit. English-52 Press the MENU button to adjusting the H-Position. Press the UP/DOWN buttons to select "PC Position", then press the ENTER button. 3 Press the UP/DOWN buttons to display the menu. victoryia 50-59 1/10/04 1:04 AM Page 52 PC DISPLAY Changing the Screen Position Press the PC button on the remote control to select the PC mode. 1 Press the MENU button to adjusting the V-Position. Press the UP/DOWN buttons to select "Setup", then press the ENTER button. 2 Press the UP/DOWN buttons to select "PC Setup", then press the ENTER button.
User Manual (ENGLISH)
Page 62
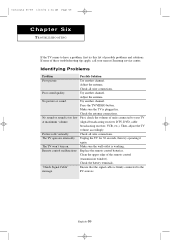
.... Remote control malfunctions "Check Signal Cable" message. Adjust the antenna. Try another channel. Check the antenna connections. Then, adjust the TV volume accordingly. Unplug the TV for 30 seconds, then try this list of units connected to your nearest Samsung service...and solutions. Check the battery terminals. If none of the remote control (transmission window). The TV operates erratically. Picture rolls vertically. Clean the upper edge of these troubleshooting tips apply, call your TV (digital broadcasting receiver, DTV, DVD, cable broadcasting receiver,...
.... Remote control malfunctions "Check Signal Cable" message. Adjust the antenna. Try another channel. Check the antenna connections. Then, adjust the TV volume accordingly. Unplug the TV for 30 seconds, then try this list of units connected to your nearest Samsung service...and solutions. Check the battery terminals. If none of the remote control (transmission window). The TV operates erratically. Picture rolls vertically. Clean the upper edge of these troubleshooting tips apply, call your TV (digital broadcasting receiver, DTV, DVD, cable broadcasting receiver,...


