
Open Source Guide (ENGLISH)
Page 2
You can redistribute and change. To apply these terms (or, alternatively, under the terms of warranty; It is found. and each source file to most effectively convey the exclusion of the ordinary General Public License). How to Apply These Terms to Your New Libraries If you develop a new library, and you want it to be of the greatest possible use to the public, we recommend making it free software that everyone can do so by permitting redistribution under these terms, attach the following notices to where the full notice is safest to attach them to the start of each file should ...
You can redistribute and change. To apply these terms (or, alternatively, under the terms of warranty; It is found. and each source file to most effectively convey the exclusion of the ordinary General Public License). How to Apply These Terms to Your New Libraries If you develop a new library, and you want it to be of the greatest possible use to the public, we recommend making it free software that everyone can do so by permitting redistribution under these terms, attach the following notices to where the full notice is safest to attach them to the start of each file should ...
Quick Guide (ENGLISH)
Page 1
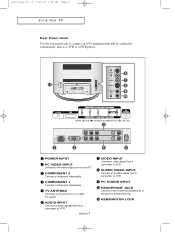
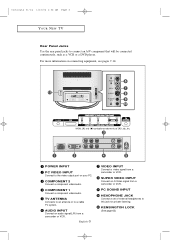
... 1/10/04 1:02 AM Page 3 YOUR NEW TV Rear Panel Jacks Use the rear panel jacks to the video output port on your PC. COMPONENT 2 Connect a component video/audio. AUDIO INPUT Connect an audio signal(L/R) from a camcorder or VCR. POWER INPUT PC VIDEO INPUT Connect to connect an A/V ...component that will be connected continuously, such as a VCR or a DVD player. COMPONENT 1 Connect a component video/audio. KENSINGTON LOCK English-1 VIDEO INPUT Connect a video signal from a camcorder or VCR. TV ANTENNA Connects to an antenna...
... 1/10/04 1:02 AM Page 3 YOUR NEW TV Rear Panel Jacks Use the rear panel jacks to the video output port on your PC. COMPONENT 2 Connect a component video/audio. AUDIO INPUT Connect an audio signal(L/R) from a camcorder or VCR. POWER INPUT PC VIDEO INPUT Connect to connect an A/V ...component that will be connected continuously, such as a VCR or a DVD player. COMPONENT 1 Connect a component video/audio. KENSINGTON LOCK English-1 VIDEO INPUT Connect a video signal from a camcorder or VCR. TV ANTENNA Connects to an antenna...
User Manual (ENGLISH)
Page 4
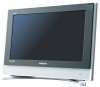
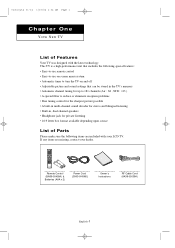
If any items are included with the latest technology. victoryia 01-14 1/10/04 1:02 AM Page 1 Chapter One YOUR NEW TV List of Parts Please make sure the following special features: • Easy-to-use remote control • Easy-to-use on-... 16:9 letter box format available depending upon source List of Features Your TV was designed with your dealer. This TV is a high-performance unit that includes the following items are missing, contact your LCD TV. Remote Control (BN59-00409A) & Batteries (AAA x 2) Power Cord (3903-000085) Owner's Instructions RF Cable Cord (AA39-00039A) ...
If any items are included with the latest technology. victoryia 01-14 1/10/04 1:02 AM Page 1 Chapter One YOUR NEW TV List of Parts Please make sure the following special features: • Easy-to-use remote control • Easy-to-use on-... 16:9 letter box format available depending upon source List of Features Your TV was designed with your dealer. This TV is a high-performance unit that includes the following items are missing, contact your LCD TV. Remote Control (BN59-00409A) & Batteries (AAA x 2) Power Cord (3903-000085) Owner's Instructions RF Cable Cord (AA39-00039A) ...
User Manual (ENGLISH)
Page 5
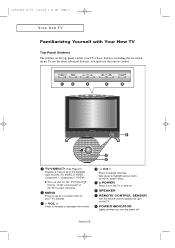
... this spot on and off . POWER Press to turn the power off . POWER INDICATOR Lights up when you must use the TV/Video( ) buttons on -screen menu. To use the more advanced features, you turn the TV on the TV. MENU Press to see an on -screen menu. TV/VIDEO (See Page 21) Displays ...CH Press to increase or decrease the volume. Also press to highlight various items on the on -screen menu of your TV's basic features, including the on the control panel of the available input sources (TV, VIDEO, S-VIDEO, Component 1, Component 2, PC/DVI). victoryia 01-14 1/10/04 1:02 AM Page 2 YOUR...
... this spot on and off . POWER Press to turn the power off . POWER INDICATOR Lights up when you must use the TV/Video( ) buttons on -screen menu. To use the more advanced features, you turn the TV on the TV. MENU Press to see an on -screen menu. TV/VIDEO (See Page 21) Displays ...CH Press to increase or decrease the volume. Also press to highlight various items on the on -screen menu of your TV's basic features, including the on the control panel of the available input sources (TV, VIDEO, S-VIDEO, Component 1, Component 2, PC/DVI). victoryia 01-14 1/10/04 1:02 AM Page 2 YOUR...
User Manual (ENGLISH)
Page 6
...LOCK (See page 63) victoryia 01-14 1/10/04 1:02 AM Page 3 YOUR NEW TV Rear Panel Jacks Use the rear panel jacks to this jack for private listening. POWER INPUT PC VIDEO INPUT Connect to a cable TV system. PC SOUND INPUT HEADPHONE JACK Connect a set of external headphones to connect an A/V ... signal(L/R) from a camcorder or VCR. COMPONENT 1 Connect a component video/audio. SUPER VIDEO INPUT Connect an S-Video signal from a camcorder or VCR. TV ANTENNA Connects to an antenna or to the video output port on connecting equipment, see pages 7-14. For more information on your PC.
...LOCK (See page 63) victoryia 01-14 1/10/04 1:02 AM Page 3 YOUR NEW TV Rear Panel Jacks Use the rear panel jacks to this jack for private listening. POWER INPUT PC VIDEO INPUT Connect to a cable TV system. PC SOUND INPUT HEADPHONE JACK Connect a set of external headphones to connect an A/V ... signal(L/R) from a camcorder or VCR. COMPONENT 1 Connect a component video/audio. SUPER VIDEO INPUT Connect an S-Video signal from a camcorder or VCR. TV ANTENNA Connects to an antenna or to the video output port on connecting equipment, see pages 7-14. For more information on your PC.

User Manual (ENGLISH)
Page 7
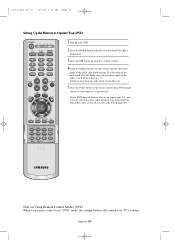
... VOL - 7 Press to increase or decrease the volume. 8 TV/VIDEO Press to change channels. JOYSTICK 9 Use to change menu ...LCD TV.) English-4 P.SIZE 3 Press to select on and off the sound. (See Page 15) MENU Displays the main on-screen menu. 5 MODE Selects a target device to controlled by the samsung remote control (TV..., STB, VCR, CABLE, DVD) 6 CH and CH (Channel UP/Down) Press CH or CH to display all of about 23 feet from the TV.... When using the remote, always point it directly at the TV. victoryia 01-14 1/10/04 1:03 AM Page 4 YOUR NEW TV...
... VOL - 7 Press to increase or decrease the volume. 8 TV/VIDEO Press to change channels. JOYSTICK 9 Use to change menu ...LCD TV.) English-4 P.SIZE 3 Press to select on and off the sound. (See Page 15) MENU Displays the main on-screen menu. 5 MODE Selects a target device to controlled by the samsung remote control (TV..., STB, VCR, CABLE, DVD) 6 CH and CH (Channel UP/Down) Press CH or CH to display all of about 23 feet from the TV.... When using the remote, always point it directly at the TV. victoryia 01-14 1/10/04 1:03 AM Page 4 YOUR NEW TV...
User Manual (ENGLISH)
Page 9
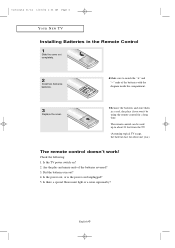
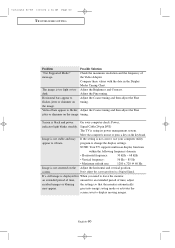
... typical TV usage, the batteries last for a long time. Are the plus and minus ends of the batteries with the diagram inside the compartment. 3 Replace the cover. Is the power out, or is the power cord unplugged? 5. Is there a special fluorescent light or a neon sign nearby? English-6... Did the batteries run out? 4. Make sure to about one year.) The remote control doesn't work! Check the following: 1. Is the TV power switch on? 2.
... typical TV usage, the batteries last for a long time. Are the plus and minus ends of the batteries with the diagram inside the compartment. 3 Replace the cover. Is the power out, or is the power cord unplugged? 5. Is there a special fluorescent light or a neon sign nearby? English-6... Did the batteries run out? 4. Make sure to about one year.) The remote control doesn't work! Check the following: 1. Is the TV power switch on? 2.
User Manual (ENGLISH)
Page 18
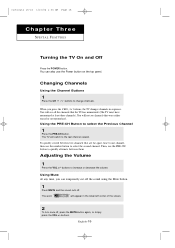
... see all the channels that were either erased or not memorized. You will see channels that the TV has memorized. (The TV must have memorized at least three channels). Using the PRE-CH Button to change channels. buttons. ... buttons, the TV changes channels in the lower-left corner of the screen. 2 To turn mute off . The word " " will switch to increase or decrease the volume. When you can also use the Power button on the top panel. English-15 ... 15-16 1/10/04 1:06 AM Page 15 Chapter Three S P E C I A L F E AT U R E S Turning the TV On and Off Press the POWER button.
... see all the channels that were either erased or not memorized. You will see channels that the TV has memorized. (The TV must have memorized at least three channels). Using the PRE-CH Button to change channels. buttons. ... buttons, the TV changes channels in the lower-left corner of the screen. 2 To turn mute off . The word " " will switch to increase or decrease the volume. When you can also use the Power button on the top panel. English-15 ... 15-16 1/10/04 1:06 AM Page 15 Chapter Three S P E C I A L F E AT U R E S Turning the TV On and Off Press the POWER button.
User Manual (ENGLISH)
Page 19
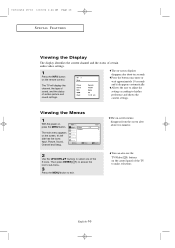
... to exit. Then press ENTER( ) to access the icon's sub-menu. 3 Press the MENU button to his/her preference and shows the current settings. The TV will display the channel, the type of sound, and the status of the 5 icons. You can also use the... after about two minutes. Press the button once more or wait approximately 10 seconds and it disappears automatically. Viewing the Menus 1 With the power on the control panel of the TV to select one of certain picture and sound settings. It's left side has five icons: Input, Picture, Sound, Channel and Setup. 2 Use...
... to exit. Then press ENTER( ) to access the icon's sub-menu. 3 Press the MENU button to his/her preference and shows the current settings. The TV will display the channel, the type of sound, and the status of the 5 icons. You can also use the... after about two minutes. Press the button once more or wait approximately 10 seconds and it disappears automatically. Viewing the Menus 1 With the power on the control panel of the TV to select one of certain picture and sound settings. It's left side has five icons: Input, Picture, Sound, Channel and Setup. 2 Use...

User Manual (ENGLISH)
Page 20
The TV will begin memorizing all of the available channels. 3 Press the UP/DOWN buttons to the hour or minute. is initially powered On, two basic customer settings proceed automatically and subsequently: Setting Auto program, Clock. 1 Press the POWER button on page 40). 5 The message "Enjoy your watching." English-17...;s" then press the ENTER button. victoryia 17-31 1/10/04 1:06 AM Page 17 Chapter Four O P E R AT I O N Plug & Play Feature When the TV is displayed. The message "Plug & Play" is displayed. 2 Press the UP/DOWN buttons to "Setting the Clock" on the remote control.
The TV will begin memorizing all of the available channels. 3 Press the UP/DOWN buttons to the hour or minute. is initially powered On, two basic customer settings proceed automatically and subsequently: Setting Auto program, Clock. 1 Press the POWER button on page 40). 5 The message "Enjoy your watching." English-17...;s" then press the ENTER button. victoryia 17-31 1/10/04 1:06 AM Page 17 Chapter Four O P E R AT I O N Plug & Play Feature When the TV is displayed. The message "Plug & Play" is displayed. 2 Press the UP/DOWN buttons to "Setting the Clock" on the remote control.
User Manual (ENGLISH)
Page 45
... Off time, press the UP/DOWN buttons to exit. • Absent Power Off When you do not operate any controls for 3 hours after the TV has been turned on with the 'Timer On' function. 'Auto power off' operates only when the TV has been turned on by the 'Timer on , your television will alternate...
... Off time, press the UP/DOWN buttons to exit. • Absent Power Off When you do not operate any controls for 3 hours after the TV has been turned on with the 'Timer On' function. 'Auto power off' operates only when the TV has been turned on by the 'Timer on , your television will alternate...

User Manual (ENGLISH)
Page 48
...select "Setup", then press the ENTER button. 2 Press the UP/DOWN buttons to display the menu. Note: The default Pin number for a new TV set up or changed. Press the UP/DOWN buttons to exit. Enter your Pin has been memorized. Press the MENU button to select "Change Pin...-45 ➜ Note: If you forget the Pin, press the remote-control buttons in the following sequence,which resets the pin to 0-0-0-0: POWER OFF ➔ MUTE ➔ 8 ➔ 2 ➔ 4 ➔ POWER ON. victoryia 32-49 1/10/04 1:04 AM Page 45 O P E R AT I O N Using the V-Chip The V-Chip feature automatically ...
...select "Setup", then press the ENTER button. 2 Press the UP/DOWN buttons to display the menu. Note: The default Pin number for a new TV set up or changed. Press the UP/DOWN buttons to exit. Enter your Pin has been memorized. Press the MENU button to select "Change Pin...-45 ➜ Note: If you forget the Pin, press the remote-control buttons in the following sequence,which resets the pin to 0-0-0-0: POWER OFF ➔ MUTE ➔ 8 ➔ 2 ➔ 4 ➔ POWER ON. victoryia 32-49 1/10/04 1:04 AM Page 45 O P E R AT I O N Using the V-Chip The V-Chip feature automatically ...
User Manual (ENGLISH)
Page 63
...is not stable and may appear. The image is displayed for an extended period of message. Screen is not correct, use your computer check: Power , indicator light blinks steadily. screen. English-60 If a still image is too light or too Adjust the Brightness and Contrast. victoryia 50... "Not Supported Mode!" the Video Adapter. dark. Horizontal bars appear to change the display settings. Signal Cable(24-pin DVI) The TV is not centered on the image. program to Adjust the Coarse tuning and then adjust the Fine flicker, jitter or shimmer on the ...
...is not stable and may appear. The image is displayed for an extended period of message. Screen is not correct, use your computer check: Power , indicator light blinks steadily. screen. English-60 If a still image is too light or too Adjust the Brightness and Contrast. victoryia 50... "Not Supported Mode!" the Video Adapter. dark. Horizontal bars appear to change the display settings. Signal Cable(24-pin DVI) The TV is not centered on the image. program to Adjust the Coarse tuning and then adjust the Fine flicker, jitter or shimmer on the ...

User Manual (ENGLISH)
Page 67
do not place the TV on a soft surface, such as vacuum cleaners. • Keep the ventilation openings clear; Never use around the world. Cabinet • Never open the cabinet or touch the parts inside the unit to a warm place, unplug the power cord, and allow at least two hours... for one system may have formed inside . • Wipe your TV. Temperature • If your TV is suddenly moved from your TV with a clean, dry cloth. Please follow these guidelines to differences...
do not place the TV on a soft surface, such as vacuum cleaners. • Keep the ventilation openings clear; Never use around the world. Cabinet • Never open the cabinet or touch the parts inside the unit to a warm place, unplug the power cord, and allow at least two hours... for one system may have formed inside . • Wipe your TV. Temperature • If your TV is suddenly moved from your TV with a clean, dry cloth. Please follow these guidelines to differences...

User Manual (ENGLISH)
Page 68
victoryia 62-70 1/10/04 1:05 AM Page 65 APPENDIX Specifications Model Name LT-P227W Panel *Frequency Display Resolution Input Signal Video Size Display Size Type Pixel Pitch Viewing Angle Horizontal Vertical Display Color 22.0 inch Diagonal 487.68 ... 60 Hz Sync Signal Video Signal Color System Video System H/V Separate, TTL, P. or N. RGB,Analog, 0.7 Vp-p @ 75 ohm NTSC CVBS, S-VHS, RGB Component Power Supply Power Consumption Dimensions / Weight Environmental Considerations Audio Characteristics Video In Audio In 1.0 Vp-p @ 75 ohm 500mVrms Input AC 100 ~ 240 V (50/60Hz) Normal...
victoryia 62-70 1/10/04 1:05 AM Page 65 APPENDIX Specifications Model Name LT-P227W Panel *Frequency Display Resolution Input Signal Video Size Display Size Type Pixel Pitch Viewing Angle Horizontal Vertical Display Color 22.0 inch Diagonal 487.68 ... 60 Hz Sync Signal Video Signal Color System Video System H/V Separate, TTL, P. or N. RGB,Analog, 0.7 Vp-p @ 75 ohm NTSC CVBS, S-VHS, RGB Component Power Supply Power Consumption Dimensions / Weight Environmental Considerations Audio Characteristics Video In Audio In 1.0 Vp-p @ 75 ohm 500mVrms Input AC 100 ~ 240 V (50/60Hz) Normal...
User Manual (ENGLISH)
Page 70
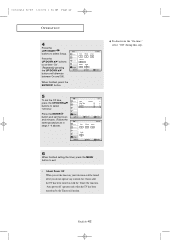
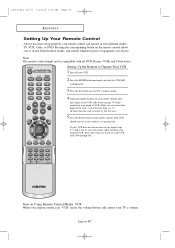
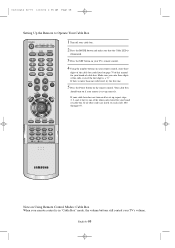
...VCR. 2 Press the MODE button and make sure that the VCR LED is listed, try the first one.) 5 Press the Power button on page 70 of this manual for your brand of equipment you choose. If no other codes listed for your brand of... are listed, try one code is illuminated. 3 Press the Set button on your TV's remote control. 4 Using the number buttons on your remote control can operate in four different modes: TV, VCR, Cable, or DVD. Note on if your remote is in "VCR" ...control might not be compatible with all DVD Players, VCRs and Cable boxes. English-67 If your TV's volume.
...VCR. 2 Press the MODE button and make sure that the VCR LED is listed, try the first one.) 5 Press the Power button on page 70 of this manual for your brand of equipment you choose. If no other codes listed for your brand of... are listed, try one code is illuminated. 3 Press the Set button on your TV's remote control. 4 Using the number buttons on your remote control can operate in four different modes: TV, VCR, Cable, or DVD. Note on if your remote is in "VCR" ...control might not be compatible with all DVD Players, VCRs and Cable boxes. English-67 If your TV's volume.
User Manual (ENGLISH)
Page 71
... Cable Box When your remote control is in "Cable Box" mode, the volume buttons still control your TV's volume. Note on if your remote is set up correctly. If no other codes listed for your brand... you enter three digits of the code, even if the first digit is more than one . 5 Press the Power button on the remote control. If there is a "0." victoryia 62-70 1/10/04 1:05 AM Page 68... the MODE button and make sure that the Cable LED is illuminated. 3 Press the SET button on your TV's remote control. 4 Using the number buttons on your remote control, enter three digits of the cable box code...
... Cable Box When your remote control is in "Cable Box" mode, the volume buttons still control your TV's volume. Note on if your remote is set up correctly. If no other codes listed for your brand... you enter three digits of the code, even if the first digit is more than one . 5 Press the Power button on the remote control. If there is a "0." victoryia 62-70 1/10/04 1:05 AM Page 68... the MODE button and make sure that the Cable LED is illuminated. 3 Press the SET button on your TV's remote control. 4 Using the number buttons on your remote control, enter three digits of the cable box code...
User Manual (ENGLISH)
Page 72
... Using Remote Control Modes: DVD When your remote control is more than one . 5 Press the Power button on the remote control. English-69 If there is in "DVD" mode, the volume buttons still control your TV's volume. victoryia 62-70 1/10/04 1:05 AM Page 69 Setting Up the Remote to Operate... Your DVD 1Turn off your DVD. 2 Press the MODE button and make sure that the DVD LED is illuminated. 3 Press the SET button on your TV's remote control. 4Using the number buttons on your remote control, enter three digits of the DVD code listed on page 70 of this manual for...
... Using Remote Control Modes: DVD When your remote control is more than one . 5 Press the Power button on the remote control. English-69 If there is in "DVD" mode, the volume buttons still control your TV's volume. victoryia 62-70 1/10/04 1:05 AM Page 69 Setting Up the Remote to Operate... Your DVD 1Turn off your DVD. 2 Press the MODE button and make sure that the DVD LED is illuminated. 3 Press the SET button on your TV's remote control. 4Using the number buttons on your remote control, enter three digits of the DVD code listed on page 70 of this manual for...

User Manual (ENGLISH)
Page 4
... 01-14 1/10/04 1:02 AM Page 1 Chapter One YOUR NEW TV List of Parts Please make sure the following items are missing, contact your LCD TV. Remote Control (BN59-00409A) & Batteries (AAA x 2) Power Cord BH39-10339X Owner's Instructions RF Cable Cord (AA39-00039A) English-1 If... any items are included with the latest technology. This TV is a high-performance unit that includes the ...
... 01-14 1/10/04 1:02 AM Page 1 Chapter One YOUR NEW TV List of Parts Please make sure the following items are missing, contact your LCD TV. Remote Control (BN59-00409A) & Batteries (AAA x 2) Power Cord BH39-10339X Owner's Instructions RF Cable Cord (AA39-00039A) English-1 If... any items are included with the latest technology. This TV is a high-performance unit that includes the ...
User Manual (ENGLISH)
Page 5
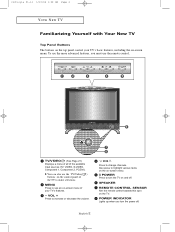
... Lights up when you must use the more advanced features, you turn the TV on -screen menu. MENU Press to see an on the control panel of your TV's basic features, including the on the TV. POWER Press to highlight various items on the on and off . victoryia 01-14 1/10/04 ...1:02 AM Page 2 YOUR NEW TV Familiarizing Yourself with Your New TV Top Panel Buttons The buttons on the top panel control your TV's features. - Also press to turn the power off . VOL + Press to change channels. SPEAKER REMOTE CONTROL SENSOR Aim the remote control...
... Lights up when you must use the more advanced features, you turn the TV on -screen menu. MENU Press to see an on the control panel of your TV's basic features, including the on the TV. POWER Press to highlight various items on the on and off . victoryia 01-14 1/10/04 ...1:02 AM Page 2 YOUR NEW TV Familiarizing Yourself with Your New TV Top Panel Buttons The buttons on the top panel control your TV's features. - Also press to turn the power off . VOL + Press to change channels. SPEAKER REMOTE CONTROL SENSOR Aim the remote control...


