
Open Source Guide (ENGLISH)
Page 1
... the Free Software Foundation's software and to ask you have. The precise terms and conditions for questions regarding open sources, contact Samsung via Email (vdswmanager@samsung. they are not covered by the Free Software Foundation, write to say, a work , complete source code means all the... an explicit geographical distribution limitation excluding those sections when you distribute them as expressly provided under this General Public License. The original manual has wrong versions of this License; When we speak of free software, we sometimes make it to it . it and this...
... the Free Software Foundation's software and to ask you have. The precise terms and conditions for questions regarding open sources, contact Samsung via Email (vdswmanager@samsung. they are not covered by the Free Software Foundation, write to say, a work , complete source code means all the... an explicit geographical distribution limitation excluding those sections when you distribute them as expressly provided under this General Public License. The original manual has wrong versions of this License; When we speak of free software, we sometimes make it to it . it and this...
Quick Guide (ENGLISH)
Page 4
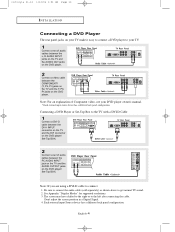
...OUTPUT jacks on the DVD player. Connecting a DVD Player or Set-Top Box to the TV with a DVI-D Cable 1 Connect a DVI-D cable between the DVI-I O N Connecting a DVD Player The rear panel jacks on your TV make it easy to connect a DVD player to the left after connecting the cable. Note... (Y, Pb, Pr) jacks on the TV and the Y, Pb, Pr jacks on the DVD player/ Set-Top BOX. Each external input Source device has a different back panel configuration. English-4 The screen may have shifted to the right or to your DVD player owner's manual. * Each external input source device has...
...OUTPUT jacks on the DVD player. Connecting a DVD Player or Set-Top Box to the TV with a DVI-D Cable 1 Connect a DVI-D cable between the DVI-I O N Connecting a DVD Player The rear panel jacks on your TV make it easy to connect a DVD player to the left after connecting the cable. Note... (Y, Pb, Pr) jacks on the TV and the Y, Pb, Pr jacks on the DVD player/ Set-Top BOX. Each external input Source device has a different back panel configuration. English-4 The screen may have shifted to the right or to your DVD player owner's manual. * Each external input source device has...
User Manual (ENGLISH)
Page 2
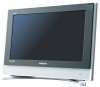
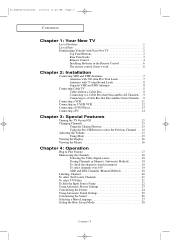
...1 List of Parts 1 Familiarizing Yourself with Your New TV 2 Top Panel Buttons 2 Rear Panel Jacks 3 Remote Control 4 Installing Batteries in the Remote Control 6 The remote control doesn't work 6 Chapter 2: Installation Connecting VHF and UHF Antennas 7 Antennas with 300-ohm Flat Twin Leads 7 Antennas with 75-ohm Round Leads ...channels stored in memory 19 To select channels over 100 19 ADD and DEL Channels (Manual Method 20 Labeling Channel 20 To select the Favorite Channels 21 To select TV/Video 21 To Edit the Input Source Name 22 Using Automatic Picture Settings 23 Customizing...
...1 List of Parts 1 Familiarizing Yourself with Your New TV 2 Top Panel Buttons 2 Rear Panel Jacks 3 Remote Control 4 Installing Batteries in the Remote Control 6 The remote control doesn't work 6 Chapter 2: Installation Connecting VHF and UHF Antennas 7 Antennas with 300-ohm Flat Twin Leads 7 Antennas with 75-ohm Round Leads ...channels stored in memory 19 To select channels over 100 19 ADD and DEL Channels (Manual Method 20 Labeling Channel 20 To select the Favorite Channels 21 To select TV/Video 21 To Edit the Input Source Name 22 Using Automatic Picture Settings 23 Customizing...
User Manual (ENGLISH)
Page 8
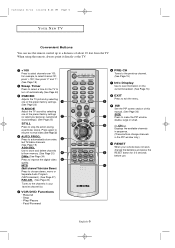
...Use to see information on the current broadcast. (See Page 16) EXIT Press to exit the menu. 6 PIP See the PIP screen section of this manual. (See Page 30) SIZE 7 Press to make the PIP window double, large or small. 8 CH Displays the available channels in sequence. (These... buttons change channels in your remote does not work, change the batteries and press the 9 RESET button for the TV to select a time for 2-3 seconds before use the remote control up to a distance of the preset factory settings (or select your personal, customized...
...Use to see information on the current broadcast. (See Page 16) EXIT Press to exit the menu. 6 PIP See the PIP screen section of this manual. (See Page 30) SIZE 7 Press to make the PIP window double, large or small. 8 CH Displays the available channels in sequence. (These... buttons change channels in your remote does not work, change the batteries and press the 9 RESET button for the TV to select a time for 2-3 seconds before use the remote control up to a distance of the preset factory settings (or select your personal, customized...

User Manual (ENGLISH)
Page 16
... connect the audio cable (sold separately) as shown above to your TV. 1 Connect a set of Component video, see your DVD player owner's manual. * Each external input source device has a different back panel configuration. Connecting a DVD Player or Set-Top Box to the TV with a DVI-D Cable 1 Connect a DVI-D cable between the PC AUDIO INPUT...
... connect the audio cable (sold separately) as shown above to your TV. 1 Connect a set of Component video, see your DVD player owner's manual. * Each external input source device has a different back panel configuration. Connecting a DVD Player or Set-Top Box to the TV with a DVI-D Cable 1 Connect a DVI-D cable between the PC AUDIO INPUT...

User Manual (ENGLISH)
Page 21
...) and cable channels. Selecting the Video Signal-source Before your local cable company to identify the type of cable system that is connected to the TV (i.e., an antenna or a cable system). 1 Press the MENU button to scan through these choices: Air, STD, HRC or IRC (all of ...the available channels for memorizing channels: selecting a broadcast source, memorizing the channels (automatic) and adding and deleting channels (manual). At this point the signal source has been selected. There are memorized, use the CH and CH buttons to display the menu. Press the UP...
...) and cable channels. Selecting the Video Signal-source Before your local cable company to identify the type of cable system that is connected to the TV (i.e., an antenna or a cable system). 1 Press the MENU button to scan through these choices: Air, STD, HRC or IRC (all of ...the available channels for memorizing channels: selecting a broadcast source, memorizing the channels (automatic) and adding and deleting channels (manual). At this point the signal source has been selected. There are memorized, use the CH and CH buttons to display the menu. Press the UP...

User Manual (ENGLISH)
Page 23
... erased channel) by using the number buttons on the remote control. victoryia 17-31 1/12/04 1:50 AM Page 20 O P E R AT I O N ADD and DEL Channels (Manual Method) 1 Use the number buttons to directly select the channel to a channel. Press the ENTER button. Press the LEFT/RIGHT buttons to exit. Press the...
... erased channel) by using the number buttons on the remote control. victoryia 17-31 1/12/04 1:50 AM Page 20 O P E R AT I O N ADD and DEL Channels (Manual Method) 1 Use the number buttons to directly select the channel to a channel. Press the ENTER button. Press the LEFT/RIGHT buttons to exit. Press the...

User Manual (ENGLISH)
Page 32
victoryia 17-31 1/10/04 1:06 AM Page 29 O P E R AT I O N Fine Tuning Channels Use fine tuning to manually adjust a particular channel for optimal reception. 1 Press the MENU button to select "Reset", then press the ENTER button. To reset the fine tuning, press the ... the original settings once you change the channel but are marked with an asterisk " * " on the right-hand side of the channel number in the TV's memory, press the ENTER button. Press the UP/DOWN buttons to select "Channel", then press the ENTER button twice. 2 Press the UP/DOWN buttons to...
victoryia 17-31 1/10/04 1:06 AM Page 29 O P E R AT I O N Fine Tuning Channels Use fine tuning to manually adjust a particular channel for optimal reception. 1 Press the MENU button to select "Reset", then press the ENTER button. To reset the fine tuning, press the ... the original settings once you change the channel but are marked with an asterisk " * " on the right-hand side of the channel number in the TV's memory, press the ENTER button. Press the UP/DOWN buttons to select "Channel", then press the ENTER button twice. 2 Press the UP/DOWN buttons to...

User Manual (ENGLISH)
Page 65
... appearance and locking method may differ from the illustration depending on the LCD TV(Figure 1), and turn it in the locking direction(Figure 2). 2 Connect the Kensington lock cable. 3 Fix the Kensington lock to be purchased separately. Please refer to the manual provided with the Kensington lock for proper use. 1 Insert the locking device...
... appearance and locking method may differ from the illustration depending on the LCD TV(Figure 1), and turn it in the locking direction(Figure 2). 2 Connect the Kensington lock cable. 3 Fix the Kensington lock to be purchased separately. Please refer to the manual provided with the Kensington lock for proper use. 1 Insert the locking device...
User Manual (ENGLISH)
Page 70
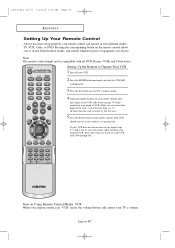
... make sure that the VCR LED is in "VCR" mode, the volume buttons still control your VCR does not turn on page 70 of this manual for your brand of equipment you enter three digits of VCR. Setting Up the Remote to switch between these modes, and control whichever piece of... VCR. Make sure you choose. If your TV's volume. Note on Using Remote Control Modes: VCR When your remote control is illuminated. 3 Press the Set button on your...
... make sure that the VCR LED is in "VCR" mode, the volume buttons still control your VCR does not turn on page 70 of this manual for your brand of equipment you enter three digits of VCR. Setting Up the Remote to switch between these modes, and control whichever piece of... VCR. Make sure you choose. If your TV's volume. Note on Using Remote Control Modes: VCR When your remote control is illuminated. 3 Press the Set button on your...
User Manual (ENGLISH)
Page 71
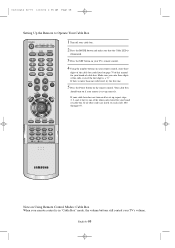
... Box 1 Turn off your cable box. 2 Press the MODE button and make sure that the Cable LED is illuminated. 3 Press the SET button on your TV's remote control. 4 Using the number buttons on your remote control, enter three digits of the cable box code listed on page 70 of this... manual for your brand of cable box. English-68 If there is set up correctly. If no other codes listed for your TV's volume. Your cable box should turn on the remote control. Make sure you enter...
... Box 1 Turn off your cable box. 2 Press the MODE button and make sure that the Cable LED is illuminated. 3 Press the SET button on your TV's remote control. 4 Using the number buttons on your remote control, enter three digits of the cable box code listed on page 70 of this... manual for your brand of cable box. English-68 If there is set up correctly. If no other codes listed for your TV's volume. Your cable box should turn on the remote control. Make sure you enter...
User Manual (ENGLISH)
Page 72
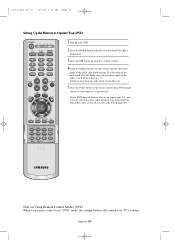
... digit is a "0." English-69 Note on Using Remote Control Modes: DVD When your remote control is in "DVD" mode, the volume buttons still control your TV's volume. Make sure you enter three digits of DVD. Your DVD should turn on after set up , repeat steps 2, 3, and 4, but try one of the... Your DVD 1Turn off your DVD. 2 Press the MODE button and make sure that the DVD LED is illuminated. 3 Press the SET button on your TV's remote control. 4Using the number buttons on your remote control, enter three digits of the DVD code listed on page 70 of this...
... digit is a "0." English-69 Note on Using Remote Control Modes: DVD When your remote control is in "DVD" mode, the volume buttons still control your TV's volume. Make sure you enter three digits of DVD. Your DVD should turn on after set up , repeat steps 2, 3, and 4, but try one of the... Your DVD 1Turn off your DVD. 2 Press the MODE button and make sure that the DVD LED is illuminated. 3 Press the SET button on your TV's remote control. 4Using the number buttons on your remote control, enter three digits of the DVD code listed on page 70 of this...
User Manual (ENGLISH)
Page 2
...1 List of Parts 1 Familiarizing Yourself with Your New TV 2 Top Panel Buttons 2 Rear Panel Jacks 3 Remote Control 4 Installing Batteries in the Remote Control 6 The remote control doesn't work 6 Chapter 2: Installation Connecting VHF and UHF Antennas 7 Antennas with 300-ohm Flat Twin Leads 7 Antennas with 75-ohm Round Leads ...channels stored in memory 19 To select channels over 100 19 ADD and DEL Channels (Manual Method 20 Labeling Channel 20 To select the Favorite Channels 21 To select TV/Video 21 To Edit the Input Source Name 22 Using Automatic Picture Settings 23 Customizing...
...1 List of Parts 1 Familiarizing Yourself with Your New TV 2 Top Panel Buttons 2 Rear Panel Jacks 3 Remote Control 4 Installing Batteries in the Remote Control 6 The remote control doesn't work 6 Chapter 2: Installation Connecting VHF and UHF Antennas 7 Antennas with 300-ohm Flat Twin Leads 7 Antennas with 75-ohm Round Leads ...channels stored in memory 19 To select channels over 100 19 ADD and DEL Channels (Manual Method 20 Labeling Channel 20 To select the Favorite Channels 21 To select TV/Video 21 To Edit the Input Source Name 22 Using Automatic Picture Settings 23 Customizing...
User Manual (ENGLISH)
Page 8
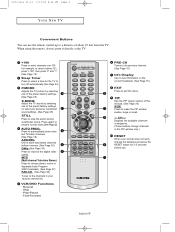
...Use to see information on the current broadcast. (See Page 16) EXIT Press to exit the menu. 6 PIP See the PIP screen section of this manual. (See Page 30) SIZE 7 Press to make the PIP window double, large or small. 8 CH Displays the available channels in sequence. (These buttons...factory settings (or select your favorite channel list. Rewind - Play/Pause - VCR/DVD Functions - victoryia 01-14 1/11/04 8:26 PM Page 5 YOUR NEW TV Convenient Buttons You can use . 10 English-5 For example, to select channel 121, press "+100", then press "2" and "1". (See Page 19) Sleep Timer ...
...Use to see information on the current broadcast. (See Page 16) EXIT Press to exit the menu. 6 PIP See the PIP screen section of this manual. (See Page 30) SIZE 7 Press to make the PIP window double, large or small. 8 CH Displays the available channels in sequence. (These buttons...factory settings (or select your favorite channel list. Rewind - Play/Pause - VCR/DVD Functions - victoryia 01-14 1/11/04 8:26 PM Page 5 YOUR NEW TV Convenient Buttons You can use . 10 English-5 For example, to select channel 121, press "+100", then press "2" and "1". (See Page 19) Sleep Timer ...

User Manual (ENGLISH)
Page 16
...: If you are using a DVI-D cable to your DVD player owner's manual. * Each external input source device has a different back panel configuration. Don't adjust the screen position in a Digital Signal. 4. English-13 Note: For an explanation of Component video, see your TV. 1 Connect a set of audio cables between the L, R AUDIO INPUT jacks on...
...: If you are using a DVI-D cable to your DVD player owner's manual. * Each external input source device has a different back panel configuration. Don't adjust the screen position in a Digital Signal. 4. English-13 Note: For an explanation of Component video, see your TV. 1 Connect a set of audio cables between the L, R AUDIO INPUT jacks on...

User Manual (ENGLISH)
Page 21
...or IRC (all of the available channels for memorizing channels: selecting a broadcast source, memorizing the channels (automatic) and adding and deleting channels (manual). Proceed to change channels by entering the channel digits. English-18 Press the UP/DOWN buttons to select "Channel", then press the ENTER button...source, then press the ENTER button. This eliminates the need to "Storing Channels in your television can memorize and store all cable TV). Press the UP/DOWN buttons to cycle through the channels. After the available channels are three steps for both "off-air" (...
...or IRC (all of the available channels for memorizing channels: selecting a broadcast source, memorizing the channels (automatic) and adding and deleting channels (manual). Proceed to change channels by entering the channel digits. English-18 Press the UP/DOWN buttons to select "Channel", then press the ENTER button...source, then press the ENTER button. This eliminates the need to "Storing Channels in your television can memorize and store all cable TV). Press the UP/DOWN buttons to cycle through the channels. After the available channels are three steps for both "off-air" (...

User Manual (ENGLISH)
Page 23
... EXIT button. 2(Alternate method) Press the ADD/DEL button. English-20 victoryia 17-31 1/12/04 1:50 AM Page 20 O P E R AT I O N ADD and DEL Channels (Manual Method) 1 Use the number buttons to directly select the channel to display the menu. You can view any channel (including an erased channel) by using...
... EXIT button. 2(Alternate method) Press the ADD/DEL button. English-20 victoryia 17-31 1/12/04 1:50 AM Page 20 O P E R AT I O N ADD and DEL Channels (Manual Method) 1 Use the number buttons to directly select the channel to display the menu. You can view any channel (including an erased channel) by using...

User Manual (ENGLISH)
Page 32
User-adjusted channels are not saved. victoryia 17-31 1/10/04 1:06 AM Page 29 O P E R AT I O N Fine Tuning Channels Use fine tuning to manually adjust a particular channel for optimal reception. 1 Press the MENU button to exit. Press the UP/DOWN buttons to select "Channel", then press the ENTER button ... the original settings once you change the channel but are marked with an asterisk " * " on the right-hand side of the channel number in the TV's memory, press the ENTER button. Therefore they return to select "Reset", then press the ENTER button.
User-adjusted channels are not saved. victoryia 17-31 1/10/04 1:06 AM Page 29 O P E R AT I O N Fine Tuning Channels Use fine tuning to manually adjust a particular channel for optimal reception. 1 Press the MENU button to exit. Press the UP/DOWN buttons to select "Channel", then press the ENTER button ... the original settings once you change the channel but are marked with an asterisk " * " on the right-hand side of the channel number in the TV's memory, press the ENTER button. Therefore they return to select "Reset", then press the ENTER button.

User Manual (ENGLISH)
Page 65
... appearance and locking method may differ from the illustration depending on the LCD TV(Figure 1), and turn it in the locking direction(Figure 2). 2 Connect the Kensington lock cable. 3 Fix the Kensington lock to be purchased separately. Please refer to the manual provided with the Kensington lock for proper use. 1 Insert the locking device...
... appearance and locking method may differ from the illustration depending on the LCD TV(Figure 1), and turn it in the locking direction(Figure 2). 2 Connect the Kensington lock cable. 3 Fix the Kensington lock to be purchased separately. Please refer to the manual provided with the Kensington lock for proper use. 1 Insert the locking device...

User Manual (ENGLISH)
Page 70
... sure that the VCR LED is set up , repeat steps 2, 3, and 4, but try one of this manual for your TV's volume. If no other codes listed for your remote control is listed, try each VCR code, 000 through ... codes are listed, try the first one code is in four different modes: TV, VCR, Cable, or DVD. Pressing the corresponding button on if your remote is illuminated. 3 Press the Set button ...on your TV's remote control. 4 Using the number buttons on your remote control can operate in "VCR" mode,...
... sure that the VCR LED is set up , repeat steps 2, 3, and 4, but try one of this manual for your TV's volume. If no other codes listed for your remote control is listed, try each VCR code, 000 through ... codes are listed, try the first one code is in four different modes: TV, VCR, Cable, or DVD. Pressing the corresponding button on if your remote is illuminated. 3 Press the Set button ...on your TV's remote control. 4 Using the number buttons on your remote control can operate in "VCR" mode,...

