

Quick Guide (easy Manual) (English)
Page 1
...continuously, such as a VCR or a DVD player. POWER INPUT ANYNET HEADPHONE JACK Connect a set top boxes, DVD players, AV receivers and digital TVs). HDMI IN Supports connections between HDMIconnection-enabled AV devices (set of external headphones for private listening. S-VIDEO Connect a Video signal from a camcorder ... PC. English-1 COMPONENT IN 1 Connect component video/audio from a DVD/VCR/Set-top Box. YOUR NEW TV Rear Panel Jacks Use the rear panel jacks to a cable TV system. DVI-D INPUT Connect to the digital video output jack on your DVD/Set-top Box. SUBWOOFER OUTPUT...
...continuously, such as a VCR or a DVD player. POWER INPUT ANYNET HEADPHONE JACK Connect a set top boxes, DVD players, AV receivers and digital TVs). HDMI IN Supports connections between HDMIconnection-enabled AV devices (set of external headphones for private listening. S-VIDEO Connect a Video signal from a camcorder ... PC. English-1 COMPONENT IN 1 Connect component video/audio from a DVD/VCR/Set-top Box. YOUR NEW TV Rear Panel Jacks Use the rear panel jacks to a cable TV system. DVI-D INPUT Connect to the digital video output jack on your DVD/Set-top Box. SUBWOOFER OUTPUT...

Quick Guide (easy Manual) (English)
Page 2
...).The difference between HDMI-connection-enabled AV devices (Set Top boxes, DVD players, AV receivers and digital TVs). 1 Connect HDMI cable from the TV to connect Core Core provided reduces EMI(E1ectromagnetic Interference) noises from electrical or electronic products and prevents magnetic ...HDMI device. I N S TA L L AT I O N Connecting HDMI Supports connections between HDMI and DVI is that enables the transmission of TV or Component cable, install Core as shown in size, has the HDCP(High Definition Content Protection) coding feature installed, and supports multi - channel digital...
...).The difference between HDMI-connection-enabled AV devices (Set Top boxes, DVD players, AV receivers and digital TVs). 1 Connect HDMI cable from the TV to connect Core Core provided reduces EMI(E1ectromagnetic Interference) noises from electrical or electronic products and prevents magnetic ...HDMI device. I N S TA L L AT I O N Connecting HDMI Supports connections between HDMI and DVI is that enables the transmission of TV or Component cable, install Core as shown in size, has the HDCP(High Definition Content Protection) coding feature installed, and supports multi - channel digital...

Quick Guide (easy Manual) (English)
Page 3
..., you must connect two cables. 5 Connect a video cable between the AV OUT VIDEO OUT jack on the VCR and the VIDEO jack on the TV. English-3 If your local electronics store). 4 Connect a set of AV OUT audio cables between the AV OUT ANT OUT terminal on the VCR and... 1 if you have a "mono" (non-stereo) VCR, use the Y-connector (not supplied) to hook up to the ANT IN terminal on the back of the TV. I N S TA L L AT I O N Connecting a VCR These instructions assume that you have already connected your VCR tape. * Each external input source device has a different back ...
..., you must connect two cables. 5 Connect a video cable between the AV OUT VIDEO OUT jack on the VCR and the VIDEO jack on the TV. English-3 If your local electronics store). 4 Connect a set of AV OUT audio cables between the AV OUT ANT OUT terminal on the VCR and... 1 if you have a "mono" (non-stereo) VCR, use the Y-connector (not supplied) to hook up to the ANT IN terminal on the back of the TV. I N S TA L L AT I O N Connecting a VCR These instructions assume that you have already connected your VCR tape. * Each external input source device has a different back ...

Quick Guide (easy Manual) (English)
Page 4
...your VCR and your local electronics store.) * Each external input source device has a different back panel configuration. I N S TA L L AT I INPUT connector on the TV and the DVI connector on the DVD player/ Set-Top BOX. 2 Connect a set of audio cables between the S-VIDEO OUT jack on the VCR and... the S-VIDEO INPUT jack on the TV. Connecting a DVI-D Cable 1 Connect a DVI-D cable between the DVI-I O N Connecting an S-VHS VCR Your Samsung TV can be adjusted on the DVD player/ Set-Top BOX. English-4 Note:If you are using a DVI...
...your VCR and your local electronics store.) * Each external input source device has a different back panel configuration. I N S TA L L AT I INPUT connector on the TV and the DVI connector on the DVD player/ Set-Top BOX. 2 Connect a set of audio cables between the S-VIDEO OUT jack on the VCR and... the S-VIDEO INPUT jack on the TV. Connecting a DVI-D Cable 1 Connect a DVI-D cable between the DVI-I O N Connecting an S-VHS VCR Your Samsung TV can be adjusted on the DVD player/ Set-Top BOX. English-4 Note:If you are using a DVI...

Quick Guide (easy Manual) (English)
Page 5
... the AUDIO OUT jacks on the DVD player. 2 Connect a video cable between the COMPONENT1 or COMPONENT2 (Y, PB, PR) jacks on the TV and the Y, PB, PR jacks on the DVD player. English-5 Note: For an explanation of Component video, see your Set-Top Box owner's manual. * Each ...panel configuration. I N S TA L L AT I O N Connecting a DVD Player The rear panel jacks on your TV make it easy to connect a DVD player to your TV. 1 Connect a set of audio cables between the L, R COMPONENT1 or COMPONENT2 AUDIO INPUT jacks on the TV and the AUDIO OUT jacks on the Set-Top Box. 2 Connect a video cable...
... the AUDIO OUT jacks on the DVD player. 2 Connect a video cable between the COMPONENT1 or COMPONENT2 (Y, PB, PR) jacks on the TV and the Y, PB, PR jacks on the DVD player. English-5 Note: For an explanation of Component video, see your Set-Top Box owner's manual. * Each ...panel configuration. I N S TA L L AT I O N Connecting a DVD Player The rear panel jacks on your TV make it easy to connect a DVD player to your TV. 1 Connect a set of audio cables between the L, R COMPONENT1 or COMPONENT2 AUDIO INPUT jacks on the TV and the AUDIO OUT jacks on the Set-Top Box. 2 Connect a video cable...

Quick Guide (easy Manual) (English)
Page 6
Sub cable to "PC (PC IN)" on the rear of your set and the other end to "AUDIO (PC IN)" on the rear of the sound card on your TV may be different. - Connect the stereo audio cable to "Audio Out" of your computer. I N S TA L L AT I O N Connecting a PC Note: This figure shows the Standard Connector-jack panel. The actual configuration on your set . - TV Rear panel PC VIDEO CABLE ( D-SUB ) PC AUDIO CABLE English-6 Connect the D-
Sub cable to "PC (PC IN)" on the rear of your set and the other end to "AUDIO (PC IN)" on the rear of the sound card on your TV may be different. - Connect the stereo audio cable to "Audio Out" of your computer. I N S TA L L AT I O N Connecting a PC Note: This figure shows the Standard Connector-jack panel. The actual configuration on your set . - TV Rear panel PC VIDEO CABLE ( D-SUB ) PC AUDIO CABLE English-6 Connect the D-

User Manual (user Manual) (ver.1.0) (English)
Page 2
... Connecting VHF and UHF Antennas 7 Antennas with 300-ohm Flat Twin Leads 7 Antennas with 75-ohm Round Leads 8 Separate VHF and UHF Antennas 8 Connecting Cable TV 8 Cable without a Cable Box 8 Connecting to a Cable Box that Descrambles All Channels . . . . 9 Connecting to a Cable Box that Descrambles Some Channels . . 9 Connecting HDMI 11 How... to connect Core 11 Connecting a VCR 12 Connecting an S-VHS VCR 13 Connecting a DVI-D Cable 13 Connecting a DVD Player 14 Connecting a Digital TV Set-Top Box 14 Connecting a PC 14 ANYNET 16 What is the Anynet 16 Anynet 17 Connecting...
... Connecting VHF and UHF Antennas 7 Antennas with 300-ohm Flat Twin Leads 7 Antennas with 75-ohm Round Leads 8 Separate VHF and UHF Antennas 8 Connecting Cable TV 8 Cable without a Cable Box 8 Connecting to a Cable Box that Descrambles All Channels . . . . 9 Connecting to a Cable Box that Descrambles Some Channels . . 9 Connecting HDMI 11 How... to connect Core 11 Connecting a VCR 12 Connecting an S-VHS VCR 13 Connecting a DVI-D Cable 13 Connecting a DVD Player 14 Connecting a Digital TV Set-Top Box 14 Connecting a PC 14 ANYNET 16 What is the Anynet 16 Anynet 17 Connecting...

User Manual (user Manual) (ver.1.0) (English)
Page 3
... Setting the Sleep Timer 59 Viewing Closed Captions 60 Using the V-Chip 62 Color Weakness 68 Selecting the Melody 69 Chapter 5: PC Display Using Your TV as a Computer (PC) Display 70 How to Set up Your PC Software (Windows only 70 How to Auto Adjust 71 Adjusting the Screen Quality 72... Screen Position or Color Settings 74 Chapter 6: Troubleshooting Identifying Problems 75 Appendix Installing the Stand 82 Wall Mount Installation Guide 83 Cleaning and Maintaining Your TV 85 Using Your TV in Another Country 85 Specifications 86 Display Modes 87 Contents 2
... Setting the Sleep Timer 59 Viewing Closed Captions 60 Using the V-Chip 62 Color Weakness 68 Selecting the Melody 69 Chapter 5: PC Display Using Your TV as a Computer (PC) Display 70 How to Set up Your PC Software (Windows only 70 How to Auto Adjust 71 Adjusting the Screen Quality 72... Screen Position or Color Settings 74 Chapter 6: Troubleshooting Identifying Problems 75 Appendix Installing the Stand 82 Wall Mount Installation Guide 83 Cleaning and Maintaining Your TV 85 Using Your TV in Another Country 85 Specifications 86 Display Modes 87 Contents 2
User Manual (user Manual) (ver.1.0) (English)
Page 4
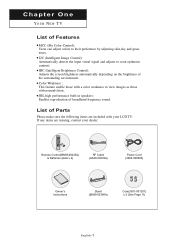
...to view images as those with your dealer. List of Parts Please make sure the following items are missing, contact your LCD TV. If any items are included with normalvision. IBC (Intelligent Brightness Control): Adjusts the screen brightness automatically depending on the brightness of... broadband frequency sound. Chapter One YOUR NEW TV List of Features MCC (My Color Control): Users can adjust colors to creat optimum contrast. I2C (Intelligent Image Control): Automatically ...
...to view images as those with your dealer. List of Parts Please make sure the following items are missing, contact your LCD TV. If any items are included with normalvision. IBC (Intelligent Brightness Control): Adjusts the screen brightness automatically depending on the brightness of... broadband frequency sound. Chapter One YOUR NEW TV List of Features MCC (My Color Control): Users can adjust colors to creat optimum contrast. I2C (Intelligent Image Control): Automatically ...

User Manual (user Manual) (ver.1.0) (English)
Page 5
... INDICATOR Lights when unit is on -screen menu. MENU Press to turn the TV on /off . YOUR NEW TV Familiarizing Yourself with Your New TV Right-Side Panel Buttons The buttons on -screen menu of your TV's basic features, including the onscreen menu. English-2 SOURCE Displays a menu of all of ...setting on and off timer. SPEAKER LIGHT DETECTING SENSOR Adjusts brightness of screen automatically by detecting brightness of the available input sources (TV, AV, S-VIDEO, Component 1, Component 2, HDMI, DVI, PC). POWER Press to see an on the Right-side panel control your...
... INDICATOR Lights when unit is on -screen menu. MENU Press to turn the TV on /off . YOUR NEW TV Familiarizing Yourself with Your New TV Right-Side Panel Buttons The buttons on -screen menu of your TV's basic features, including the onscreen menu. English-2 SOURCE Displays a menu of all of ...setting on and off timer. SPEAKER LIGHT DETECTING SENSOR Adjusts brightness of screen automatically by detecting brightness of the available input sources (TV, AV, S-VIDEO, Component 1, Component 2, HDMI, DVI, PC). POWER Press to see an on the Right-side panel control your...

User Manual (user Manual) (ver.1.0) (English)
Page 6
English-3 COMPONENT IN 1 Connect component video/audio from a DVD/VCR/Set-top Box. YOUR NEW TV Rear Panel Jacks Use the rear panel jacks to the audio output jack on your PC. For more information on your PC. HDMI IN Supports ... Connect to the digital video output jack on your DVD/Set-top Box. (DVI-D terminal does not support PC.) DVI-D AUDIO INPUT Connect to a cable TV system. S-VIDEO Connect a Video signal from a camcorder or VCR AV INPUT/OUTPUT Connect a Video signal from a camcorder or VCR. SUBWOOFER OUTPUT Connect to the video...
English-3 COMPONENT IN 1 Connect component video/audio from a DVD/VCR/Set-top Box. YOUR NEW TV Rear Panel Jacks Use the rear panel jacks to the audio output jack on your PC. For more information on your PC. HDMI IN Supports ... Connect to the digital video output jack on your DVD/Set-top Box. (DVI-D terminal does not support PC.) DVI-D AUDIO INPUT Connect to a cable TV system. S-VIDEO Connect a Video signal from a camcorder or VCR AV INPUT/OUTPUT Connect a Video signal from a camcorder or VCR. SUBWOOFER OUTPUT Connect to the video...
User Manual (user Manual) (ver.1.0) (English)
Page 7
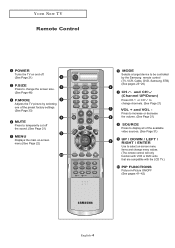
...LEFT / RIGHT / ENTER Use to display all of about 23 feet from the TV. When using the remote, always point it directly at the TV. POWER Turns the TV on and off. (See Page 21) P.SIZE Press to change the screen size.... (See Page 48) P.MODE Adjusts the TV picture by selecting one of the preset factory settings. (See Page 33) MUTE Press to ... main on-screen menu.(See Page 22) MODE Selects a target device to be controlled by the Samsung remote control (TV, VCR, Cable, DVD, Samsung STB) (See pages 23~26) CH and CH (Channel UP/Down) Press CH or CH ...
...LEFT / RIGHT / ENTER Use to display all of about 23 feet from the TV. When using the remote, always point it directly at the TV. POWER Turns the TV on and off. (See Page 21) P.SIZE Press to change the screen size.... (See Page 48) P.MODE Adjusts the TV picture by selecting one of the preset factory settings. (See Page 33) MUTE Press to ... main on-screen menu.(See Page 22) MODE Selects a target device to be controlled by the Samsung remote control (TV, VCR, Cable, DVD, Samsung STB) (See pages 23~26) CH and CH (Channel UP/Down) Press CH or CH ...

User Manual (user Manual) (ver.1.0) (English)
Page 8
... change channels in your remote does not work, change the batteries and press the RESET button for 2-3 seconds before use. Press to automatically store selected TV/cable channels. (See Page 29) ADD/DEL Use to store and delete channels to/from memory. (See Page 30) DNIe Press to improve the ...) AUTO PROG. Rewind - Press again to resume normal video. (See Page 48) MTS (Multi channel Television Stereo) Press to select channels over 100. TV, VCR, Cable, DVD, or Samsung Set-top box. (See pages 23~26) Stop - Fast/Forward English-5 PRE-CH Tunes to the previous channel. (See page 21) INFO Use...
... change channels in your remote does not work, change the batteries and press the RESET button for 2-3 seconds before use. Press to automatically store selected TV/cable channels. (See Page 29) ADD/DEL Use to store and delete channels to/from memory. (See Page 30) DNIe Press to improve the ...) AUTO PROG. Rewind - Press again to resume normal video. (See Page 48) MTS (Multi channel Television Stereo) Press to select channels over 100. TV, VCR, Cable, DVD, or Samsung Set-top box. (See pages 23~26) Stop - Fast/Forward English-5 PRE-CH Tunes to the previous channel. (See page 21) INFO Use...

User Manual (user Manual) (ver.1.0) (English)
Page 9
Are the batteries drained? 4. Make sure to about 23 feet from the TV. (Assuming typical TV usage, the batteries last for a long time. Is the TV power switch on? 2. Is there a power outage, or is the power cord unplugged? 5. Are the plus and minus ends of the batteries with the diagram ... sign nearby? The remote control can be using the remote control for about one year.) If remote control doesn't work Check the following: 1. YOUR NEW TV Installing Batteries in a cool, dry place if you won't be used up to match the "+" and "-" ends of the batteries reversed? 3.
Are the batteries drained? 4. Make sure to about 23 feet from the TV. (Assuming typical TV usage, the batteries last for a long time. Is the TV power switch on? 2. Is there a power outage, or is the power cord unplugged? 5. Are the plus and minus ends of the batteries with the diagram ... sign nearby? The remote control can be using the remote control for about one year.) If remote control doesn't work Check the following: 1. YOUR NEW TV Installing Batteries in a cool, dry place if you won't be used up to match the "+" and "-" ends of the batteries reversed? 3.

User Manual (user Manual) (ver.1.0) (English)
Page 11
... (available at most electronics shops). 1 Connect both antenna leads to view unscrambled cable channels. Connecting Cable TV To connect to the TV. Separate VHF and UHF Antennas If you have two separate antennas for your TV (one VHF and one UHF), you do not need a cable box to the combiner. 2 Plug ...the combiner into the ANT IN terminal on back of the TV. English-8 Cable without a Cable Box 1 Plug the incoming cable into the ANT IN terminal on the bottom of the back panel. I N S TA L L AT I O N ...
... (available at most electronics shops). 1 Connect both antenna leads to view unscrambled cable channels. Connecting Cable TV To connect to the TV. Separate VHF and UHF Antennas If you have two separate antennas for your TV (one VHF and one UHF), you do not need a cable box to the combiner. 2 Plug ...the combiner into the ANT IN terminal on back of the TV. English-8 Cable without a Cable Box 1 Plug the incoming cable into the ANT IN terminal on the bottom of the back panel. I N S TA L L AT I O N ...

User Manual (user Manual) (ver.1.0) (English)
Page 12
... ANT OUT terminal on your cable box. This terminal might be labeled "ANT OUT", "VHF OUT", or simply, "OUT". 2 Connect the other end of the TV. I N S TA L L AT I O N Connecting to a Cable Box that Descrambles All Channels 1 Find the cable that is connected to the ANTENNA IN terminal on your cable box...
... ANT OUT terminal on your cable box. This terminal might be labeled "ANT OUT", "VHF OUT", or simply, "OUT". 2 Connect the other end of the TV. I N S TA L L AT I O N Connecting to a Cable Box that Descrambles All Channels 1 Find the cable that is connected to the ANTENNA IN terminal on your cable box...

User Manual (user Manual) (ver.1.0) (English)
Page 13
Set the A/B switch to the "B" position to view scrambled channels. (When you will need to tune your TV to the "A" position for normal viewing. I N S TA L L AT I O N 4 Connect a coaxial cable between the ANT OUT terminal on the cable box and the B-IN terminal on ... RF (A/B) switch. 6 Connect the last coaxial cable between the OUT terminal on the RF (A/B) switch and the VHF/UHF terminal on the rear of the TV. After you've made this connection, set the A/B switch to "B," you set the A/B switch to the cable box's output channel, which is usually channel 3 or...
Set the A/B switch to the "B" position to view scrambled channels. (When you will need to tune your TV to the "A" position for normal viewing. I N S TA L L AT I O N 4 Connect a coaxial cable between the ANT OUT terminal on the cable box and the B-IN terminal on ... RF (A/B) switch. 6 Connect the last coaxial cable between the OUT terminal on the RF (A/B) switch and the VHF/UHF terminal on the rear of the TV. After you've made this connection, set the A/B switch to "B," you set the A/B switch to the cable box's output channel, which is usually channel 3 or...

User Manual (user Manual) (ver.1.0) (English)
Page 14
.... How to connect Core Core provided reduces EMI(E1ectromagnetic Interference) noises from electrical or electronic products and prevents magnetic impact from the TV to the input terminal of digital audio and video signals using a single cable without compression. - After connecting AV cable of digital... between HDMI-connection-enabled AV devices (Set Top boxes, DVD players, AV receivers and digital TVs). 1 Connect HDMI cable from ambient environment. HDMI allows multiple channels of TV or Component cable, install Core as shown in size, has the HDCP(High Definition Content Protection...
.... How to connect Core Core provided reduces EMI(E1ectromagnetic Interference) noises from electrical or electronic products and prevents magnetic impact from the TV to the input terminal of digital audio and video signals using a single cable without compression. - After connecting AV cable of digital... between HDMI-connection-enabled AV devices (Set Top boxes, DVD players, AV receivers and digital TVs). 1 Connect HDMI cable from ambient environment. HDMI allows multiple channels of TV or Component cable, install Core as shown in size, has the HDCP(High Definition Content Protection...

User Manual (user Manual) (ver.1.0) (English)
Page 15
...two cables. 5 Connect a video cable between the AV OUT VIDEO OUT jack on the VCR and the VIDEO jack on the TV. I N S TA L L AT I O N Connecting a VCR These instructions assume that you have not yet connected to... an antenna or a cable system. 1 Unplug the cable or antenna from the back of the TV. 2 Connect the cable or antenna to the ANT IN terminal on the back of the VCR. 3... Connect a coaxial cable between the AV OUT ANT OUT terminal on the VCR and the antenna terminal on the TV. A coaxial cable is stereo, you have a "mono" (non-stereo) VCR, use the Y-connector (not ...
...two cables. 5 Connect a video cable between the AV OUT VIDEO OUT jack on the VCR and the VIDEO jack on the TV. I N S TA L L AT I O N Connecting a VCR These instructions assume that you have not yet connected to... an antenna or a cable system. 1 Unplug the cable or antenna from the back of the TV. 2 Connect the cable or antenna to the ANT IN terminal on the back of the VCR. 3... Connect a coaxial cable between the AV OUT ANT OUT terminal on the VCR and the antenna terminal on the TV. A coaxial cable is stereo, you have a "mono" (non-stereo) VCR, use the Y-connector (not ...

User Manual (user Manual) (ver.1.0) (English)
Page 16
...DVI-I O N Connecting an S-VHS VCR Your Samsung TV can be adjusted on the source(Set-top box). 4.Each external input source device has a different back panel configuration. English-13 An S-video cable is usually included with an S-VHS VCR. (If not, check your TV. 2 Connect a set of audio AV OUT... screen must be connected to an S-Video signal from an S-VHS VCR. (This connection delivers a better picture as shown above to get normal TV sound. 2.See Appendix "Display Modes "for supported resolutions. 3.The screen may have shifted to the right or to your VCR and your local ...
...DVI-I O N Connecting an S-VHS VCR Your Samsung TV can be adjusted on the source(Set-top box). 4.Each external input source device has a different back panel configuration. English-13 An S-video cable is usually included with an S-VHS VCR. (If not, check your TV. 2 Connect a set of audio AV OUT... screen must be connected to an S-Video signal from an S-VHS VCR. (This connection delivers a better picture as shown above to get normal TV sound. 2.See Appendix "Display Modes "for supported resolutions. 3.The screen may have shifted to the right or to your VCR and your local ...


