

Open Source Guide (ENGLISH)
Page 2
... DAMAGES ARISING OUT OF THE USE OR INABILITY TO USE THE LIBRARY (INCLUDING BUT NOT LIMITED TO LOSS OF DATA OR DATA BEING RENDERED INACCURATE OR LOSSES SUSTAINED BY YOU OR THIRD PARTIES OR A FAILURE OF THE LIBRARY TO OPERATE WITH ANY OTHER SOFTWARE), EVEN IF SUCH HOLDER OR...You can redistribute and change. 16. It is found. To apply these terms, attach the following notices to the public, we recommend making it free software that everyone can do so by permitting redistribution under these terms (or, alternatively, under the terms of warranty; and each source file to where the...
... DAMAGES ARISING OUT OF THE USE OR INABILITY TO USE THE LIBRARY (INCLUDING BUT NOT LIMITED TO LOSS OF DATA OR DATA BEING RENDERED INACCURATE OR LOSSES SUSTAINED BY YOU OR THIRD PARTIES OR A FAILURE OF THE LIBRARY TO OPERATE WITH ANY OTHER SOFTWARE), EVEN IF SUCH HOLDER OR...You can redistribute and change. 16. It is found. To apply these terms, attach the following notices to the public, we recommend making it free software that everyone can do so by permitting redistribution under these terms (or, alternatively, under the terms of warranty; and each source file to where the...

Quick Guide (easy Manual) (English)
Page 3
... cable is stereo, you have already connected your TV to view your local electronics store). 4 Connect a set of AV OUT audio cables between the AV OUT VIDEO OUT jack on the VCR and the VIDEO jack on the TV. English-3 If your VCR is usually included with a VCR. (If not, check your VCR tape. * Each external input source device has a different back panel...
... cable is stereo, you have already connected your TV to view your local electronics store). 4 Connect a set of AV OUT audio cables between the AV OUT VIDEO OUT jack on the VCR and the VIDEO jack on the TV. English-3 If your VCR is usually included with a VCR. (If not, check your VCR tape. * Each external input source device has a different back panel...

User Manual (user Manual) (ver.1.0) (English)
Page 2
... Connecting AV Signal Cables 18 Connecting TV + DVD Receiver: Connecting AV Signal Cables . 19 Connecting TV + DVD Combo + DVD Receiver: Connecting AV Signal Cables 20 Chapter 3: Operation Turning the TV On and Off 21 Changing Channels 21 Using the Channel Buttons 21 Using the Pre-CH Button to select the Previous Channel . . . . . 21 Adjusting the Volume 21 Using Mute 21 Viewing the Display 22 Viewing the Menus 22 Setting Up Your Remote Control 23 Remote Control Codes 26 Chapter 4: Special Features Plug & Play Feature 27 Memorizing the Channels 28 Selecting the Video Signal-source...
... Connecting AV Signal Cables 18 Connecting TV + DVD Receiver: Connecting AV Signal Cables . 19 Connecting TV + DVD Combo + DVD Receiver: Connecting AV Signal Cables 20 Chapter 3: Operation Turning the TV On and Off 21 Changing Channels 21 Using the Channel Buttons 21 Using the Pre-CH Button to select the Previous Channel . . . . . 21 Adjusting the Volume 21 Using Mute 21 Viewing the Display 22 Viewing the Menus 22 Setting Up Your Remote Control 23 Remote Control Codes 26 Chapter 4: Special Features Plug & Play Feature 27 Memorizing the Channels 28 Selecting the Video Signal-source...

User Manual (user Manual) (ver.1.0) (English)
Page 15
... VCR tape. * Each external input source device has a different back panel configuration. Follow the instructions in "Viewing a VCR or Camcorder Tape" to the instructions on the TV. English-12 Skip step 1 if you have already connected your TV to an antenna or a cable TV system (according to view your local electronics store). 4 Connect a set of the VCR. 3 Connect a coaxial cable between the AUDIO OUT jacks on...
... VCR tape. * Each external input source device has a different back panel configuration. Follow the instructions in "Viewing a VCR or Camcorder Tape" to the instructions on the TV. English-12 Skip step 1 if you have already connected your TV to an antenna or a cable TV system (according to view your local electronics store). 4 Connect a set of the VCR. 3 Connect a coaxial cable between the AUDIO OUT jacks on...

User Manual (user Manual) (ver.1.0) (English)
Page 20
... begins to operate when the Anynet-supported AV devices are plugged in which digital optical/coaxial cables are connected to two devices besides the TV. 6. "Standard Connection" means a connection configuration in and enter Standby mode. All video cables are connected. 9. I N S TA L L AT I O N 2.Anynet 1. One Anynet System menu can support only one of the same type of devices. 5. Anynet System can support up to the TV set -top box models T165 and...
... begins to operate when the Anynet-supported AV devices are plugged in which digital optical/coaxial cables are connected to two devices besides the TV. 6. "Standard Connection" means a connection configuration in and enter Standby mode. All video cables are connected. 9. I N S TA L L AT I O N 2.Anynet 1. One Anynet System menu can support only one of the same type of devices. 5. Anynet System can support up to the TV set -top box models T165 and...

User Manual (user Manual) (ver.1.0) (English)
Page 26
...'s remote control. 4 Using the number buttons on your remote control, enter three digits of the VCR code listed on page 26 of this manual for your brand of VCR. If no other codes listed for your brand of VCR. Note on the remote control allows you to Operate Your VCR 1 Turn off your VCR. 2 Press the MODE button and make sure that the VCR LED is only compatible with all DVD Players, VCRs...
...'s remote control. 4 Using the number buttons on your remote control, enter three digits of the VCR code listed on page 26 of this manual for your brand of VCR. If no other codes listed for your brand of VCR. Note on the remote control allows you to Operate Your VCR 1 Turn off your VCR. 2 Press the MODE button and make sure that the VCR LED is only compatible with all DVD Players, VCRs...

User Manual (user Manual) (ver.1.0) (English)
Page 28
... the Power button on Using Remote Control Modes: DVD When your remote control is in "DVD" mode, the volume buttons still control your TV's volume. Note on the remote control. English-25 Your DVD should turn on after set up , repeat steps 2, 3, and 4, but try each code, 000 through 009. If no other codes listed for your brand of DVD. Setting Up the Remote to Operate Your DVD 1Turn off your DVD. 2 Press the MODE button and make sure that the DVD LED...
... the Power button on Using Remote Control Modes: DVD When your remote control is in "DVD" mode, the volume buttons still control your TV's volume. Note on the remote control. English-25 Your DVD should turn on after set up , repeat steps 2, 3, and 4, but try each code, 000 through 009. If no other codes listed for your brand of DVD. Setting Up the Remote to Operate Your DVD 1Turn off your DVD. 2 Press the MODE button and make sure that the DVD LED...

User Manual (user Manual) (ver.1.0) (English)
Page 34
... other external input source connected to select the Input source, then press the ENTER button. Press the UP/DOWN buttons to the TV. Press the EXIT button when done to watch among the labeled channels. Use to select the input source of your favorite channels to exit. 3 To select the Favorite channels, you have set the channel as a favorite channel. Press the ENTER button to add a check mark to display...
... other external input source connected to select the Input source, then press the ENTER button. Press the UP/DOWN buttons to the TV. Press the EXIT button when done to watch among the labeled channels. Use to select the input source of your favorite channels to exit. 3 To select the Favorite channels, you have set the channel as a favorite channel. Press the ENTER button to add a check mark to display...

User Manual (user Manual) (ver.1.0) (English)
Page 82
... display works properly. Then go to see if two or more than one of the same type of device is damaged. Check to [Settings] in properly. Check to see if the device is connected to the Input port of the other Anynet device.) Connect the video cable of the Anynet device is plugged in the Anynet menu and select [Basic Connection Setting] or [Advanced Connection Setting...
... display works properly. Then go to see if two or more than one of the same type of device is damaged. Check to [Settings] in properly. Check to see if the device is connected to the Input port of the other Anynet device.) Connect the video cable of the Anynet device is plugged in the Anynet menu and select [Basic Connection Setting] or [Advanced Connection Setting...

User Manual (user Manual) (ver.1.0) (English)
Page 84
... executes the steps involved in watching TV broadcasts on TV. Basic Connection Setting A menu item to switch the mode of the device during the Anynet system configuration. RS232C cable Used to transmit signals to TV mode. COAXIAL Subwoofer Coaxial digital output port. OPTICAL Optical digital output port. Complements the low-sound reproduction capability of electricity. The simple connection helps protect the device from the TV. Allows high capacity data transmission...
... executes the steps involved in watching TV broadcasts on TV. Basic Connection Setting A menu item to switch the mode of the device during the Anynet system configuration. RS232C cable Used to transmit signals to TV mode. COAXIAL Subwoofer Coaxial digital output port. OPTICAL Optical digital output port. Complements the low-sound reproduction capability of electricity. The simple connection helps protect the device from the TV. Allows high capacity data transmission...
User Manual (user Manual) (ver.1.0) (English)
Page 87
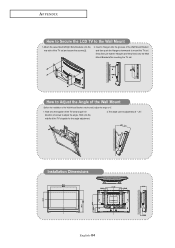
... firmly fixed onto the Wall Mount Bracket after mounting the TV set and pull it in direction of the Wall Mount Bracket and then push the Hangers downwards to adjust the angle. Insert 4 Hangers into the grooves of arrows to mount the TV set and secure the screws(3). 2. Installation Dimensions English-84 How to Adjust the Angle of the Wall Mount Before the installation of the Wall Mount Bracket onto the wall, adjust the...
... firmly fixed onto the Wall Mount Bracket after mounting the TV set and pull it in direction of the Wall Mount Bracket and then push the Hangers downwards to adjust the angle. Insert 4 Hangers into the grooves of arrows to mount the TV set and secure the screws(3). 2. Installation Dimensions English-84 How to Adjust the Angle of the Wall Mount Before the installation of the Wall Mount Bracket onto the wall, adjust the...
User Manual (user Manual) (ver.1.0) (English)
Page 4
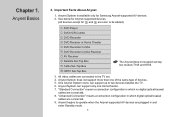
... type of devices. 5. "Standard Connection" means a connection configuration in which no digital optical/coaxial cables are plugged in and enter Standby mode. 3 Anynet System can support up to be added) DVD Player DVD/VCR Combo DVD Recorder DVD Receiver or Home Theater DVD Recorder Combo DVD Recorder Combo Receiver AV Receiver Satellite Set-Top Box Cable Set-Top Box HDTV Set-Top Box The Anynet does not support set . 4. Chapter 1. Anynet System does not support more than one Home theater. 7. All video cables...
... type of devices. 5. "Standard Connection" means a connection configuration in which no digital optical/coaxial cables are plugged in and enter Standby mode. 3 Anynet System can support up to be added) DVD Player DVD/VCR Combo DVD Recorder DVD Receiver or Home Theater DVD Recorder Combo DVD Recorder Combo Receiver AV Receiver Satellite Set-Top Box Cable Set-Top Box HDTV Set-Top Box The Anynet does not support set . 4. Chapter 1. Anynet System does not support more than one Home theater. 7. All video cables...

User Manual (user Manual) (ver.1.0) (English)
Page 17
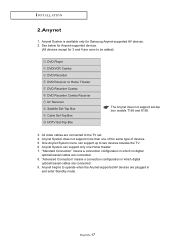
... to Video Input 1 of each product are shown in 1). 3. To enjoy 5.1-channel sound on Page 25. 2. How to the connection diagram for instructions for connecting optical cables. In that case, you buy separate component cables or DVI cables for video signal transmission, connect the audio cable from the device connected with , optical cables. Chapter 4. Connecting/ Installing an Anynet Device 2. Refer to Connect the AV Signal Cables and Configure the Anynet Connection Settings 1. You can enjoy better sound quality and 5.1 channel sound...
... to Video Input 1 of each product are shown in 1). 3. To enjoy 5.1-channel sound on Page 25. 2. How to the connection diagram for instructions for connecting optical cables. In that case, you buy separate component cables or DVI cables for video signal transmission, connect the audio cable from the device connected with , optical cables. Chapter 4. Connecting/ Installing an Anynet Device 2. Refer to Connect the AV Signal Cables and Configure the Anynet Connection Settings 1. You can enjoy better sound quality and 5.1 channel sound...

User Manual (user Manual) (ver.1.0) (English)
Page 50
...: Check to see if the display works properly. Solution2: Check to see if the video cable is connected properly, turn the TV off and go to the Anynet device (Combo) using the Input button on the remote control and see if the Anynet devices connected are connected properly, set the input source to [Set up] in the Anynet menu and select [Typical Setup] or [Customized Setup]. 49 Solution3: If the...
...: Check to see if the display works properly. Solution2: Check to see if the video cable is connected properly, turn the TV off and go to the Anynet device (Combo) using the Input button on the remote control and see if the Anynet devices connected are connected properly, set the input source to [Set up] in the Anynet menu and select [Typical Setup] or [Customized Setup]. 49 Solution3: If the...
User Manual (user Manual) (ver.1.0) (English)
Page 55
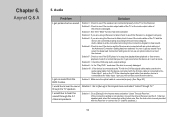
... the video/audio signal cable from the device connected with the Receiver to [Set up ] in such a mode. Chapter 6. Audio Problem Solution I would like to see if the disc is not selected, connect the Anynet Receiver and the 5.1 channel speakers and select the connection setting before use an optical cable to the Video Input 1 port,you don 't get picture but do not use . Solution9 : In the "Play DVD " mode,see if the DVD player is in the Anynet menu and...
... the video/audio signal cable from the device connected with the Receiver to [Set up ] in such a mode. Chapter 6. Audio Problem Solution I would like to see if the disc is not selected, connect the Anynet Receiver and the 5.1 channel speakers and select the connection setting before use an optical cable to the Video Input 1 port,you don 't get picture but do not use . Solution9 : In the "Play DVD " mode,see if the DVD player is in the Anynet menu and...

User Manual (user Manual) (ver.1.0) (English)
Page 56
... input on TV. Glossary Glossary Problem The Anynet System Watch TV Play DVD Play VCR Watch Satellite Switch to TV Remote Control Mode Switch to Anynet Remote Control Mode Typical Setup Customized Setup Select Audio Port Solution A system that enables you connected the audio output of the products or buy separate video cables to connect the devices.) A menu item to configure the system setting before using the Anynet System. (Choose this menu item when you use optical connectors to connect...
... input on TV. Glossary Glossary Problem The Anynet System Watch TV Play DVD Play VCR Watch Satellite Switch to TV Remote Control Mode Switch to Anynet Remote Control Mode Typical Setup Customized Setup Select Audio Port Solution A system that enables you connected the audio output of the products or buy separate video cables to connect the devices.) A menu item to configure the system setting before using the Anynet System. (Choose this menu item when you use optical connectors to connect...

User Manual (user Manual) (ver.1.0) (English)
Page 4
...: Connecting AV Signal Cables 18 Connecting TV + DVD Receiver: Connecting AV Signal Cables . 19 Connecting TV + DVD Combo + DVD Receiver: Connecting AV Signal Cables 20 Chapter 3: Operation Turning the TV On and Off 21 Changing Channels 21 Using the Channel Buttons 21 Using the Pre-CH Button to select the Previous Channel . . . . . 21 Adjusting the Volume 21 Using Mute 21 Viewing the Display 22 Viewing the Menus 22 Setting Up Your Remote Control 23 Remote Control Codes 26 Plug & Play Feature 27 Memorizing the Channels 28 Selecting the Video Signal-source 28 Storing Channels in...
...: Connecting AV Signal Cables 18 Connecting TV + DVD Receiver: Connecting AV Signal Cables . 19 Connecting TV + DVD Combo + DVD Receiver: Connecting AV Signal Cables 20 Chapter 3: Operation Turning the TV On and Off 21 Changing Channels 21 Using the Channel Buttons 21 Using the Pre-CH Button to select the Previous Channel . . . . . 21 Adjusting the Volume 21 Using Mute 21 Viewing the Display 22 Viewing the Menus 22 Setting Up Your Remote Control 23 Remote Control Codes 26 Plug & Play Feature 27 Memorizing the Channels 28 Selecting the Video Signal-source 28 Storing Channels in...
User Manual (user Manual) (ver.1.0) (English)
Page 22
... box models T165 and K165. 3. Anynet System can support up to operate when the Anynet-supported AV devices are connected. 9. Anynet begins to two devices besides the TV. 6. I N S TA L L AT I O N 2.Anynet 1. "Advanced Connection" means a connection configuration in and enter Standby mode. One Anynet System menu can support only one of the same type of devices. 5. All video cables are connected to be added) DVD Player DVD/VCR Combo DVD Recorder DVD Receiver...
... box models T165 and K165. 3. Anynet System can support up to operate when the Anynet-supported AV devices are connected. 9. Anynet begins to two devices besides the TV. 6. I N S TA L L AT I O N 2.Anynet 1. "Advanced Connection" means a connection configuration in and enter Standby mode. One Anynet System menu can support only one of the same type of devices. 5. All video cables are connected to be added) DVD Player DVD/VCR Combo DVD Recorder DVD Receiver...

User Manual (user Manual) (ver.1.0) (English)
Page 84
... Setup]. If the video cables are connected properly according to the Anynet device (Combo) using the Input button on the remote control and see if the display works properly. Check to see if the cables are connected properly, set the input source to the instructions. Then go to the connection diagram. Check to see if the Anynet devices connected are connected properly according to the Anynet connection diagram. (Make sure that the Output port of...
... Setup]. If the video cables are connected properly according to the Anynet device (Combo) using the Input button on the remote control and see if the display works properly. Check to see if the cables are connected properly, set the input source to the instructions. Then go to the connection diagram. Check to see if the Anynet devices connected are connected properly according to the Anynet connection diagram. (Make sure that the Output port of...

User Manual (user Manual) (ver.1.0) (English)
Page 86
... allows accurate sound reproduction. TROUBLESHOOTING Glossary The Anynet System Watch TV Broadcast Play DVD Watch Satellite Switch to TV Remote Control Mode Typical Setup Customized Setup Select Audio Input Port RS232C cable OPTICAL COAXIAL Subwoofer Content A system that allows controlling Samsung AV devices from electric interference, reducing the loss of electricity. Optical digital output port. The simple connection helps protect the device from the TV. Used to transmit signals to which you connected the audio input port of the...
... allows accurate sound reproduction. TROUBLESHOOTING Glossary The Anynet System Watch TV Broadcast Play DVD Watch Satellite Switch to TV Remote Control Mode Typical Setup Customized Setup Select Audio Input Port RS232C cable OPTICAL COAXIAL Subwoofer Content A system that allows controlling Samsung AV devices from electric interference, reducing the loss of electricity. Optical digital output port. The simple connection helps protect the device from the TV. Used to transmit signals to which you connected the audio input port of the...


