Owners Manual
Page 3
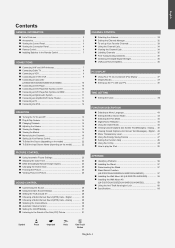
... 44 Using the Game Mode 44 Viewing Closed Captions (On-Screen Text Messages) - Analog ... 45 Viewing Closed Captions (On-Screen Text Messages) - Digital 29 Choosing a Multi-Channel Sound (MTS) track - Digital .. 46 Menu Transparency Level 47 Using the Energy Saving Feature 47 Setting the Function Help 48 Using the V-Chip 48 How to the Sound of Features 2 Accessories 2 Viewing the Control Panel 3 Viewing the Connection Panel 4 Remote Control 6 Installing Batteries in the Remote Control 7 CONNECTIONS Connecting VHF and UHF Antennas 7 Connecting Cable TV 8 Connecting a VCR...
... 44 Using the Game Mode 44 Viewing Closed Captions (On-Screen Text Messages) - Analog ... 45 Viewing Closed Captions (On-Screen Text Messages) - Digital 29 Choosing a Multi-Channel Sound (MTS) track - Digital .. 46 Menu Transparency Level 47 Using the Energy Saving Feature 47 Setting the Function Help 48 Using the V-Chip 48 How to the Sound of Features 2 Accessories 2 Viewing the Control Panel 3 Viewing the Connection Panel 4 Remote Control 6 Installing Batteries in the Remote Control 7 CONNECTIONS Connecting VHF and UHF Antennas 7 Connecting Cable TV 8 Connecting a VCR...

Owners Manual
Page 4
... no Set-Top Box needed. Excellent Digital Interface & Networking : With a built-in HD digital tuner, non-subscription HD broadcasts can be viewed with your dealer. DNIe technology provides life-like clear images. Accessories Please make sure the following items are missing, contact your LCD TV. Excellent Picture Quality - SRS TruSurround XT - A special sleep timer. Remote Control The supplied remote can be used to turn the TV on the model. Remote Control...
... no Set-Top Box needed. Excellent Digital Interface & Networking : With a built-in HD digital tuner, non-subscription HD broadcasts can be viewed with your dealer. DNIe technology provides life-like clear images. Accessories Please make sure the following items are missing, contact your LCD TV. Excellent Picture Quality - SRS TruSurround XT - A special sleep timer. Remote Control The supplied remote can be used to turn the TV on the model. Remote Control...

Owners Manual
Page 5
... to change channels. POWER INDICATOR Blinks and turns off . REMOTE CONTROL SENSOR Aim the remote control towards this button as you would use the ENTER button on and lights up in stand-by mode. Viewing the Control Panel Buttons on the Lower-Right Part of your TV's basic features, including the on-screen menu. SPEAKERS (POWER) Press to decrease or increase the volume. Press to turn the TV on and off when the power is on the remote control. 26 inch model supports...
... to change channels. POWER INDICATOR Blinks and turns off . REMOTE CONTROL SENSOR Aim the remote control towards this button as you would use the ENTER button on and lights up in stand-by mode. Viewing the Control Panel Buttons on the Lower-Right Part of your TV's basic features, including the on-screen menu. SPEAKERS (POWER) Press to decrease or increase the volume. Press to turn the TV on and off when the power is on the remote control. 26 inch model supports...
Owners Manual
Page 6
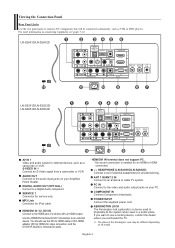
...-S4052D AV IN 1 Video and audio inputs for private listening. S-VIDEO IN 1 Connect an S-Video signal from a camcorder or VCR. HDMI/DVI IN 1/2, DVI IN Connect to use the DVI to HDMI cable or DVI-HDMI adapter (DVI to HDMI connection. HEADPHONE (LN-S2651D/LN-S2652D) Connect a set of a device with an HDMI output. If you purchased the TV. Viewing the Connection Panel Rear Panel Jacks Use the rear panel jacks to a Digital Audio component. DIGITAL AUDIO OUT (OPTICAL) Connect to connect A/V components that will be different...
...-S4052D AV IN 1 Video and audio inputs for private listening. S-VIDEO IN 1 Connect an S-Video signal from a camcorder or VCR. HDMI/DVI IN 1/2, DVI IN Connect to use the DVI to HDMI cable or DVI-HDMI adapter (DVI to HDMI connection. HEADPHONE (LN-S2651D/LN-S2652D) Connect a set of a device with an HDMI output. If you purchased the TV. Viewing the Connection Panel Rear Panel Jacks Use the rear panel jacks to a Digital Audio component. DIGITAL AUDIO OUT (OPTICAL) Connect to connect A/V components that will be different...

Owners Manual
Page 8
... video sources. NUMERIC BUTTONS Press to change channels in Picture ON/OFF. PIP Picture-in the PIP window only.) CAPTION Controls the caption decoder. SRS Selects SRS TruSurround XT mode. CH / CH Press to change menu values. SLEEP Press to select a preset time interval for automatic shut off . SET Sets the remote to control your TV, DVD, STB, CABLE (box), or VCR SOURCE Press to display all of about 23 feet from memory. POWER Turns the TV on -screen menu...
... video sources. NUMERIC BUTTONS Press to change channels in Picture ON/OFF. PIP Picture-in the PIP window only.) CAPTION Controls the caption decoder. SRS Selects SRS TruSurround XT mode. CH / CH Press to change menu values. SLEEP Press to select a preset time interval for automatic shut off . SET Sets the remote to control your TV, DVD, STB, CABLE (box), or VCR SOURCE Press to display all of about 23 feet from memory. POWER Turns the TV on -screen menu...

Owners Manual
Page 9
...) 1. English-7 Connect both antenna leads to the TV. Is there a power outage, or is the power cord unplugged? 5. Lift the cover at most electronics shops). 1. Remove the batteries and store them in the Remote Control 1. Use a screwdriver to tighten the screws. Plug the adaptor into the ANT 1 IN (AIR) terminal on a 300-75 Ω adapter (not supplied). Antennas with the diagram inside the compartment. 3. Connections Connecting VHF...
...) 1. English-7 Connect both antenna leads to the TV. Is there a power outage, or is the power cord unplugged? 5. Lift the cover at most electronics shops). 1. Remove the batteries and store them in the Remote Control 1. Use a screwdriver to tighten the screws. Plug the adaptor into the ANT 1 IN (AIR) terminal on a 300-75 Ω adapter (not supplied). Antennas with the diagram inside the compartment. 3. Connections Connecting VHF...

Owners Manual
Page 10
... need a cable box to view unscrambled cable channels. Set the A/B switch to the "B" position to view scrambled channels. (When you set the A/B switch to the "A" position for normal viewing. Connecting Cable TV To connect to a cable TV system, follow the instructions below . Plug the incoming cable into the ANT 2 IN (CABLE) terminal on the cable box. This terminal might be labeled "ANT OUT", "VHF OUT" or simply, "OUT". ANT 2 IN (CABLE) 2. Cable without a Cable Box ANT 2 IN (CABLE) 1. Connect...
... need a cable box to view unscrambled cable channels. Set the A/B switch to the "B" position to view scrambled channels. (When you set the A/B switch to the "A" position for normal viewing. Connecting Cable TV To connect to a cable TV system, follow the instructions below . Plug the incoming cable into the ANT 2 IN (CABLE) terminal on the cable box. This terminal might be labeled "ANT OUT", "VHF OUT" or simply, "OUT". ANT 2 IN (CABLE) 2. Cable without a Cable Box ANT 2 IN (CABLE) 1. Connect...

Owners Manual
Page 11
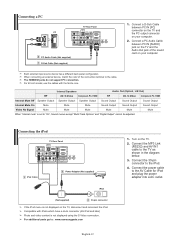
... inch model, use a Y-connector (not supplied) to hook up to the cable. If your VCR is usually included with the ferrite core. 1. English-9 When connecting an external device, match the color of the VCR. 3. Each external input source device has a different back panel configuration. Connect the cable or antenna to the ANT IN terminal on the back of the connection terminal to a standard VHS VCR.) VCR Rear Panel TV Rear Panel 3 Audio Cable...
... inch model, use a Y-connector (not supplied) to hook up to the cable. If your VCR is usually included with the ferrite core. 1. English-9 When connecting an external device, match the color of the VCR. 3. Each external input source device has a different back panel configuration. Connect the cable or antenna to the ANT IN terminal on the back of the connection terminal to a standard VHS VCR.) VCR Rear Panel TV Rear Panel 3 Audio Cable...

Owners Manual
Page 12
... Panel Each external input source device has a different back panel configuration. When connecting an external device, match the color of the connection terminal to HDMI Cable (Not supplied) Each external input source device has a different back panel configuration. Each external input source device has a different back panel configuration. For 40 inch model, use the cables with the ferrite core. Connect a Component Cable between the DVI IN [R-AUDIO-L] jack on the TV and the AUDIO OUT jacks on the DVD player/ Set-Top Box. Connect Audio Cables...
... Panel Each external input source device has a different back panel configuration. When connecting an external device, match the color of the connection terminal to HDMI Cable (Not supplied) Each external input source device has a different back panel configuration. Each external input source device has a different back panel configuration. For 40 inch model, use the cables with the ferrite core. Connect a Component Cable between the DVI IN [R-AUDIO-L] jack on the TV and the AUDIO OUT jacks on the DVD player/ Set-Top Box. Connect Audio Cables...

Owners Manual
Page 13
... the external device. Digital Audio System TV Rear Panel Optical Cable (Not supplied) 5.1CH audio is possible when the TV is smaller in size, has the HDCP (High Bandwidth Digital Copy Protection) coding feature installed, and supports multi-channel digital audio. For 40 inch model, use the cables with the ferrite core. 1. When a Digital Audio System is connected to the "DIGITAL AUDIO OUT (OPTICAL)" terminal: Decrease the gain (volume) of the connection terminal to the cable. English-11 1. Each external input source device...
... the external device. Digital Audio System TV Rear Panel Optical Cable (Not supplied) 5.1CH audio is possible when the TV is smaller in size, has the HDCP (High Bandwidth Digital Copy Protection) coding feature installed, and supports multi-channel digital audio. For 40 inch model, use the cables with the ferrite core. 1. When a Digital Audio System is connected to the "DIGITAL AUDIO OUT (OPTICAL)" terminal: Decrease the gain (volume) of the connection terminal to the cable. English-11 1. Each external input source device...
Owners Manual
Page 14
...-Track Options" and "Digital Output" cannot be adjusted. The HDMI/DVI jacks do not support PC connection. Internal Speakers Audio Out (Optical, L/R Out) RF AV, S-Video Component, PC, HDMI RF AV, S-Video Component, PC, HDMI Internal Mute Off Speaker Output Speaker Output Speaker Output Sound Output Sound Output Sound Output Internal Mute On Mute Mute Mute Sound Output Sound Output Sound Output Video No Signal Mute Mute Mute Mute Mute Mute When "Internal mute" is set to the AV Cable for iPod and plug the power adapter into a AC outlet...
...-Track Options" and "Digital Output" cannot be adjusted. The HDMI/DVI jacks do not support PC connection. Internal Speakers Audio Out (Optical, L/R Out) RF AV, S-Video Component, PC, HDMI RF AV, S-Video Component, PC, HDMI Internal Mute Off Speaker Output Speaker Output Speaker Output Sound Output Sound Output Sound Output Internal Mute On Mute Mute Mute Sound Output Sound Output Sound Output Video No Signal Mute Mute Mute Mute Mute Mute When "Internal mute" is set to the AV Cable for iPod and plug the power adapter into a AC outlet...
Owners Manual
Page 15
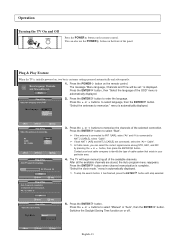
... remote control. After all of the available channels. Press the or buttons to identify the type of the selected connection. is automatically displayed. 3. "Select the antennas to select "Start". Contact your particular area. 4. To stop selected. 5. Plug & Play Feature When the TV is complete. In Cable mode, you can also use the POWER button on the front of the OSD" menu is automatically displayed. 2. "Select the clock mode...
... remote control. After all of the available channels. Press the or buttons to identify the type of the selected connection. is automatically displayed. 3. "Select the antennas to select "Start". Contact your particular area. 4. To stop selected. 5. Plug & Play Feature When the TV is complete. In Cable mode, you can also use the POWER button on the front of the OSD" menu is automatically displayed. 2. "Select the clock mode...
Owners Manual
Page 17
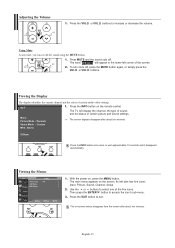
... . The word " " will display the channel, the type of sound, and the status of certain audio-video settings. 1. The TV will appear in the lower-left side has five icons: Input, Picture, Sound, Channel, Setup. 2. Press the INFO button once more or wait approximately 10 seconds and it disappears automatically. Press the INFO button on the screen. The main menu appears on the remote control. Then press the...
... . The word " " will display the channel, the type of sound, and the status of certain audio-video settings. 1. The TV will appear in the lower-left side has five icons: Input, Picture, Sound, Channel, Setup. 2. Press the INFO button once more or wait approximately 10 seconds and it disappears automatically. Press the INFO button on the screen. The main menu appears on the remote control. Then press the...
Owners Manual
Page 19
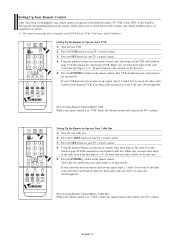
... three digits of cable box. The remote control might not be compatible with all DVD Players, VCRs, Cable boxes, and Set-Top Boxes. Setting Up the Remote to Operate Your VCR 1. If no other codes listed for your brand of the VCR code listed on Using Remote Control Modes: Cable Box When your remote control is listed, try each code, 000 through 080. Using the number buttons on your remote control, enter three digits of cable box. Setting Up Your Remote Control After it has been set up correctly. Press the POWER button...
... three digits of cable box. The remote control might not be compatible with all DVD Players, VCRs, Cable boxes, and Set-Top Boxes. Setting Up the Remote to Operate Your VCR 1. If no other codes listed for your brand of the VCR code listed on Using Remote Control Modes: Cable Box When your remote control is listed, try each code, 000 through 080. Using the number buttons on your remote control, enter three digits of cable box. Setting Up Your Remote Control After it has been set up correctly. Press the POWER button...

Owners Manual
Page 20
... remote control is in "STB" mode, the volume buttons still control your TV's remote control. 3. If no other codes are listed, try the first one .) 5. Press the POWER button on your STB. 2. Using the number buttons on your remote control, enter three digits of the STB code listed on after set up correctly. English-18 Turn off your brand of DVD. Press the SET button on the remote control. Your STB should turn on page 21 of this manual...
... remote control is in "STB" mode, the volume buttons still control your TV's remote control. 3. If no other codes are listed, try the first one .) 5. Press the POWER button on your STB. 2. Using the number buttons on your remote control, enter three digits of the STB code listed on after set up correctly. English-18 Turn off your brand of DVD. Press the SET button on the remote control. Your STB should turn on page 21 of this manual...

Owners Manual
Page 24
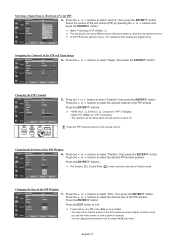
... the remote control to exit. Press the ENTER button to select "VCR", "DVD", "D-VHS", "Cable STB", "HD STB", "Satellite STB", "PVR STB", "AV Receiver", "DVD Receiver", "GAME", "Camcorder", "DVD Combo", "PC", "VOD STB", or "TV" input source, then press the ENTER button. Press the or buttons to select "Input". Press the MENU button to select "Source List". Press the SOURCE button on the side of the TV. 26 inch model only supports AV, S-Video, Component, PC...
... the remote control to exit. Press the ENTER button to select "VCR", "DVD", "D-VHS", "Cable STB", "HD STB", "Satellite STB", "PVR STB", "AV Receiver", "DVD Receiver", "GAME", "Camcorder", "DVD Combo", "PC", "VOD STB", or "TV" input source, then press the ENTER button. Press the or buttons to select "Input". Press the MENU button to select "Source List". Press the SOURCE button on the side of the TV. 26 inch model only supports AV, S-Video, Component, PC...
Owners Manual
Page 29
... ENTER buttons. • MAIN: AV(1, 2), S-Video(1, 2), Component / PIP: TV(Digital) • MAIN: PC, HDMI(1,2) / PIP: TV(Analog) • The channel can adjust picture position only by pressing the or buttons and press the ENTER button. In the PIP Source selection menu, 'TV' represents both analog and digital tuning. Selecting a Signal Source (External A/V) for PIP. 3. Press the or buttons to select "Size", then press the ENTER button. Press the or buttons to exit. Changing the Size of the PIP Window...
... ENTER buttons. • MAIN: AV(1, 2), S-Video(1, 2), Component / PIP: TV(Digital) • MAIN: PC, HDMI(1,2) / PIP: TV(Analog) • The channel can adjust picture position only by pressing the or buttons and press the ENTER button. In the PIP Source selection menu, 'TV' represents both analog and digital tuning. Selecting a Signal Source (External A/V) for PIP. 3. Press the or buttons to select "Size", then press the ENTER button. Press the or buttons to exit. Changing the Size of the PIP Window...

Owners Manual
Page 50
... the remote-control buttons in the following sequence, which resets the pin to display the menu. Setting the Function Help Displays help is activated, the PIP features do not function. Press the MENU button to 0-0-0-0 : Power Off. → Mute → 8 → 2 → 4 → Power On. Press the or buttons to display the menu. The predetermined value of a new TV set up or changed. Using the V-Chip The V-Chip feature automatically locks out programs...
... the remote-control buttons in the following sequence, which resets the pin to display the menu. Setting the Function Help Displays help is activated, the PIP features do not function. Press the MENU button to 0-0-0-0 : Power Off. → Mute → 8 → 2 → 4 → Power On. Press the or buttons to display the menu. The predetermined value of a new TV set up or changed. Using the V-Chip The V-Chip feature automatically locks out programs...
Owners Manual
Page 58
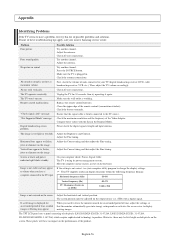
... time, adjust the settings so that the signal cable is displayed for 30 seconds, then try this list of possible problems and solutions. The TV won't turn on the screen. Digital broadcasting screen problem. First, check the volume of the remote control (transmission window). Replace the remote control batteries. The image is working. Vertical bars appear to change the display settings. The TV is not correct, use your nearest Samsung service center. If the setting is using its power...
... time, adjust the settings so that the signal cable is displayed for 30 seconds, then try this list of possible problems and solutions. The TV won't turn on the screen. Digital broadcasting screen problem. First, check the volume of the remote control (transmission window). Replace the remote control batteries. The image is working. Vertical bars appear to change the display settings. The TV is not correct, use your nearest Samsung service center. If the setting is using its power...

Owners Manual
Page 60
... TV set -bracket into the wall-bracket . Make over 35 mm-depth-hole on the wall. English-58 Installation Guide 2 Turn the power off . This LCD TV accepts a 200 mm x 100 mm VESA-compliant mounting interface pad. Connect wall-bracket to assemble the Wall Mount Bracket M4 X L15 Screw: 8 EA M4 X L20 Wood Screw: 4 EA Anchor: 4 EA 1 Mark the location on the wall where the hole will be used when attaching the wall mount to a wall. Fix anchors...
... TV set -bracket into the wall-bracket . Make over 35 mm-depth-hole on the wall. English-58 Installation Guide 2 Turn the power off . This LCD TV accepts a 200 mm x 100 mm VESA-compliant mounting interface pad. Connect wall-bracket to assemble the Wall Mount Bracket M4 X L15 Screw: 8 EA M4 X L20 Wood Screw: 4 EA Anchor: 4 EA 1 Mark the location on the wall where the hole will be used when attaching the wall mount to a wall. Fix anchors...


