User Manual (ENGLISH)
Page 4
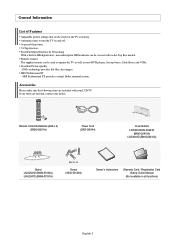
... Networking With a built-in all locations) English-2 Automatic timer to operate the TV as well as most DVD players, Set-top boxes, Cable Boxes and VCRs. Remote Control & Batteries (AAA x 2) (BN59-00511A) Power Cord (3903-000144) Cover-Bottom LN-S2641D/LN-S3241D (BN63-02415A) LN-... dealer. Accessories Please make sure the following items are missing, contact your LCD TV. Excellent Picture Quality - General Information List of Features Adjustable picture settings that can be used to turn the TV on and off. SRS TruSurround XT provides a virtual Dolby surround system. ...
... Networking With a built-in all locations) English-2 Automatic timer to operate the TV as well as most DVD players, Set-top boxes, Cable Boxes and VCRs. Remote Control & Batteries (AAA x 2) (BN59-00511A) Power Cord (3903-000144) Cover-Bottom LN-S2641D/LN-S3241D (BN63-02415A) LN-... dealer. Accessories Please make sure the following items are missing, contact your LCD TV. Excellent Picture Quality - General Information List of Features Adjustable picture settings that can be used to turn the TV on and off. SRS TruSurround XT provides a virtual Dolby surround system. ...
User Manual (ENGLISH)
Page 5
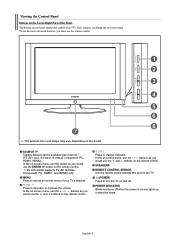
... the volume. In the on-screen menu, use the buttons as you would use the remote control. MENU Press to turn the TV on and off when the power is on and lights up in stand-by mode. In the on-screen menu, use the and buttons on the remote control. SPEAKERS... REMOTE CONTROL SENSOR Aim the remote control towards this button as you would use this spot on the TV. (POWER) Press to see an on-screen menu of the Panel The buttons on the lower-right panel control your...
... the volume. In the on-screen menu, use the buttons as you would use the remote control. MENU Press to turn the TV on and off when the power is on and lights up in stand-by mode. In the on-screen menu, use the and buttons on the remote control. SPEAKERS... REMOTE CONTROL SENSOR Aim the remote control towards this button as you would use this spot on the TV. (POWER) Press to see an on-screen menu of the Panel The buttons on the lower-right panel control your...
User Manual (ENGLISH)
Page 6
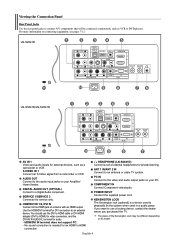
... is a device used in a public place. Viewing the Connection Panel Rear Panel Jacks Use the rear panel jacks to an antenna or cable TV system. ANT 1 IN/ANT 2 IN Connect to connect A/V components that will be different depending on your Amplifier/ Home theater. HDMI/DVI ...The place of a device with an HDMI output. For more information on your PC. Use the HDMI/DVI terminal for service only. POWER INPUT Connect the supplied power cord. SERVICE 1/SERVICE 2 Connector for DVI connection to a Digital Audio component. DIGITAL AUDIO OUT (OPTICAL) Connect to an external ...
... is a device used in a public place. Viewing the Connection Panel Rear Panel Jacks Use the rear panel jacks to an antenna or cable TV system. ANT 1 IN/ANT 2 IN Connect to connect A/V components that will be different depending on your Amplifier/ Home theater. HDMI/DVI ...The place of a device with an HDMI output. For more information on your PC. Use the HDMI/DVI terminal for service only. POWER INPUT Connect the supplied power cord. SERVICE 1/SERVICE 2 Connector for DVI connection to a Digital Audio component. DIGITAL AUDIO OUT (OPTICAL) Connect to an external ...
User Manual (ENGLISH)
Page 8
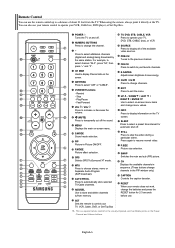
... broadcast by the same station. Stop - P.SIZE Picture size selection. When using the remote, always point it directly at the TV. Press to resume normal video. POWER Turns the TV on the TV screen. Rewind - STILL Press to select channel "54-3", press "54", then press "-" and "3". RESET When your... TV, DVD, STB, CABLE (box), or VCR SOURCE Press to display all of about 23 feet from memory. Remote Control ...
... broadcast by the same station. Stop - P.SIZE Picture size selection. When using the remote, always point it directly at the TV. Press to resume normal video. POWER Turns the TV on the TV screen. Rewind - STILL Press to select channel "54-3", press "54", then press "-" and "3". RESET When your... TV, DVD, STB, CABLE (box), or VCR SOURCE Press to display all of about 23 feet from memory. Remote Control ...
User Manual (ENGLISH)
Page 9
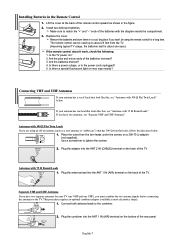
...) terminal on ? 2. Are the batteries drained? 4. Plug the adaptor into the ANT 1 IN (AIR) terminal on the back of the TV. Replace the cover. Is the TV power on the back of the TV. This procedure requires an optional combiner-adaptor (available at the back of the batteries with 300 Ω Flat Twin Leads...
...) terminal on ? 2. Are the batteries drained? 4. Plug the adaptor into the ANT 1 IN (AIR) terminal on the back of the TV. Replace the cover. Is the TV power on the back of the TV. This procedure requires an optional combiner-adaptor (available at the back of the batteries with 300 Ω Flat Twin Leads...
User Manual (ENGLISH)
Page 15
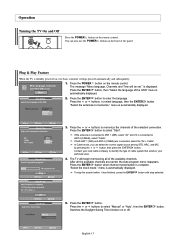
...ENTER button. Press the or buttons to enter the language. button. Operation Turning the TV On and Off Press the POWER button on the remote control. Plug & Play Feature When the TV is displayed. The message "Menu language, Channels and Time will begin memorizing all the ...available channels are connected, select the "Air + Cable". is initially powered on the front of the selected connection. "Select the ...
...ENTER button. Press the or buttons to enter the language. button. Operation Turning the TV On and Off Press the POWER button on the remote control. Plug & Play Feature When the TV is displayed. The message "Menu language, Channels and Time will begin memorizing all the ...available channels are connected, select the "Air + Cable". is initially powered on the front of the selected connection. "Select the ...
User Manual (ENGLISH)
Page 17
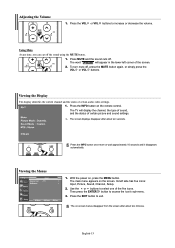
... the status of certain picture and sound settings. The on the screen. Press the VOL or VOL buttons to select one of the screen. 2. The TV will appear in the lower-left side has five icons: Input, Picture, Sound, Channel, Setup. 2. Press the INFO button once more or wait approximately.... Use the or buttons to increase or decrease the volume. Press the INFO button on , press the MENU button. Viewing the Menus 1. With the power on the remote control. The main menu appears on -screen menus disappear from the screen after about two minutes. Using Mute At any time, you...
... the status of certain picture and sound settings. The on the screen. Press the VOL or VOL buttons to select one of the screen. 2. The TV will appear in the lower-left side has five icons: Input, Picture, Sound, Channel, Setup. 2. Press the INFO button once more or wait approximately.... Use the or buttons to increase or decrease the volume. Press the INFO button on , press the MENU button. Viewing the Menus 1. With the power on the remote control. The main menu appears on -screen menus disappear from the screen after about two minutes. Using Mute At any time, you...

User Manual (ENGLISH)
Page 19
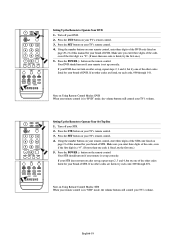
Press the VCR button on the remote control. Press the POWER button on your TV's volume. Make sure you choose. Setting Up the Remote to switch... your cable box does not turn on if your remote is in "VCR" mode, the volume buttons still control your TV's remote control. 3. Pressing the corresponding button on after set up correctly. Turn off your cable box. 2. Make sure...046. If no other codes listed for your brand of VCR. English-17 Press the POWER button on your remote control is set up correctly. Your VCR should turn on Using Remote Control Modes:...
Press the VCR button on the remote control. Press the POWER button on your TV's volume. Make sure you choose. Setting Up the Remote to switch... your cable box does not turn on if your remote is in "VCR" mode, the volume buttons still control your TV's remote control. 3. Pressing the corresponding button on after set up correctly. Turn off your cable box. 2. Make sure...046. If no other codes listed for your brand of VCR. English-17 Press the POWER button on your remote control is set up correctly. Your VCR should turn on Using Remote Control Modes:...
User Manual (ENGLISH)
Page 20
... of STB. If no other codes are listed, try the first one of the other codes listed for your TV's volume. Turn off your remote control is set up correctly. Press the POWER button on the remote control. Setting Up the Remote to Operate Your Set Top Box 1. Your STB should turn... DVD. 2. Using the number buttons on your remote control, enter three digits of the DVD code listed on page 21 of this manual for your TV's remote control. 4. Your DVD should turn on Using Remote Control Modes: STB When your brand of the code, even if the first digit is a "0". (If...
... of STB. If no other codes are listed, try the first one of the other codes listed for your TV's volume. Turn off your remote control is set up correctly. Press the POWER button on the remote control. Setting Up the Remote to Operate Your Set Top Box 1. Your STB should turn... DVD. 2. Using the number buttons on your remote control, enter three digits of the DVD code listed on page 21 of this manual for your TV's remote control. 4. Your DVD should turn on Using Remote Control Modes: STB When your brand of the code, even if the first digit is a "0". (If...
User Manual (ENGLISH)
Page 33
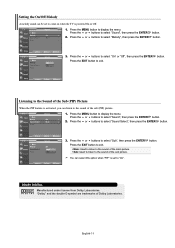
... MENU button to select "Sound Select", then press the ENTER button. 3. Listening to the Sound of the Sub (PIP) Picture When the PIP feature is powered On or Off. 1. Press the or buttons to display the menu. Press the or buttons to select "Melody", then press the ENTER button. button. Press... press the ENTER Press the EXIT button to display the menu. You can select this option when "PIP" is set to come on when the TV is activated, you can be set to "On". Press the or buttons to exit. English-31 DOLBY DIGITAL Manufactured under license from Dolby Laboratories. ...
... MENU button to select "Sound Select", then press the ENTER button. 3. Listening to the Sound of the Sub (PIP) Picture When the PIP feature is powered On or Off. 1. Press the or buttons to display the menu. Press the or buttons to select "Melody", then press the ENTER button. button. Press... press the ENTER Press the EXIT button to display the menu. You can select this option when "PIP" is set to come on when the TV is activated, you can be set to "On". Press the or buttons to exit. English-31 DOLBY DIGITAL Manufactured under license from Dolby Laboratories. ...
User Manual (ENGLISH)
Page 49
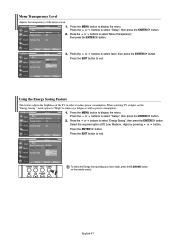
When watching TV at night, set the "Energy Saving " mode option to "High" to select "Setup", then press the ENTER 2. Select the required option (Off, Low, Medium, High) by pressing or button. Press the or buttons to reduce eye fatigue as well as power consumption. 1. Press the or buttons ...of the menu screen. 1. English-47 button. 3. Press the EXIT button to exit. Menu Transparency Level Adjusts the transparency of the TV in order to reduce power consumption. Press the EXIT button to exit. To select the Energy Saving setting you have made, press the E.SAVING button on the ...
When watching TV at night, set the "Energy Saving " mode option to "High" to select "Setup", then press the ENTER 2. Select the required option (Off, Low, Medium, High) by pressing or button. Press the or buttons to reduce eye fatigue as well as power consumption. 1. Press the or buttons ...of the menu screen. 1. English-47 button. 3. Press the EXIT button to exit. Menu Transparency Level Adjusts the transparency of the TV in order to reduce power consumption. Press the EXIT button to exit. To select the Energy Saving setting you have made, press the E.SAVING button on the ...
User Manual (ENGLISH)
Page 50
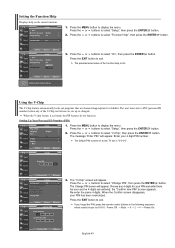
... "On", then press the ENTER Press the EXIT button to select "Change PIN", then press the ENTER button. Choose any of a new TV set up or changed. If you forget the PIN, press the remote-control buttons in the following sequence, which resets the pin to select ...button. The user must enter a PIN (personal ID number) before any 4 digits for children. Press the or buttons to 0-0-0-0 : Power Off. → Mute → 8 → 2 → 4 → Power On. The default PIN number of the V-Chip restrictions are deemed inappropriate for your PIN and enter them. Press the or buttons...
... "On", then press the ENTER Press the EXIT button to select "Change PIN", then press the ENTER button. Choose any of a new TV set up or changed. If you forget the PIN, press the remote-control buttons in the following sequence, which resets the pin to select ...button. The user must enter a PIN (personal ID number) before any 4 digits for children. Press the or buttons to 0-0-0-0 : Power Off. → Mute → 8 → 2 → 4 → Power On. The default PIN number of the V-Chip restrictions are deemed inappropriate for your PIN and enter them. Press the or buttons...
User Manual (ENGLISH)
Page 56
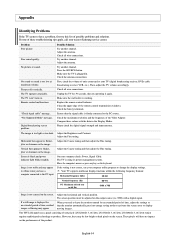
...light or too dark. English-54 The TV operates erratically. Check all wire connections. Press the SOURCE button. The image is black and power indicator light blinks steadily. Adjust the Fine tuning. Image is not correct, use your nearest Samsung service center. The screen position must be ...few bright or dark pixels on the image. The TFT LCD panel uses a panel consisting of sub...
...light or too dark. English-54 The TV operates erratically. Check all wire connections. Press the SOURCE button. The image is black and power indicator light blinks steadily. Adjust the Fine tuning. Image is not correct, use your nearest Samsung service center. The screen position must be ...few bright or dark pixels on the image. The TFT LCD panel uses a panel consisting of sub...
User Manual (ENGLISH)
Page 58
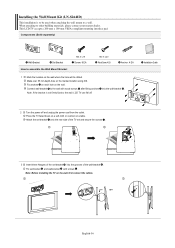
... attaching to a wall. Installation Guide 2 Turn the power off . English-56 Fix anchors on each hole on the marked location using drill. Fix set -bracket into the wall-bracket . Installing the Wall Mount Kit (LN-S2641D) This installation is not firmly fixed to the wall, LCD TV can fall off and unplug the... power cord from the outlet. Make over 35 mm-depth-hole on the wall. Attach the set-bracket onto the rear side of...
... attaching to a wall. Installation Guide 2 Turn the power off . English-56 Fix anchors on each hole on the marked location using drill. Fix set -bracket into the wall-bracket . Installing the Wall Mount Kit (LN-S2641D) This installation is not firmly fixed to the wall, LCD TV can fall off and unplug the... power cord from the outlet. Make over 35 mm-depth-hole on the wall. Attach the set-bracket onto the rear side of...
User Manual (ENGLISH)
Page 59
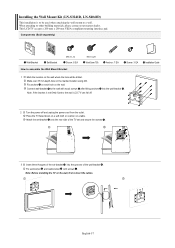
... be used when attaching the wall mount to the wall, LCD TV can fall off and unplug the power cord from the outlet. Installation Guide 2 Turn the power off . English-57 Attach the set-bracket onto the rear side of the TV set and secure the screws . 3 Insert three Hangers of...-S3241D, LN-S4041D) This installation is not firmly fixed to a wall. Note: Before installing the TV on the wall. When attaching to other building materials, please contact your nearest dealer. This LCD TV accepts a 200 mm x 200 mm VESA-compliant mounting interface pad. Fix anchors on each hole on...
... be used when attaching the wall mount to the wall, LCD TV can fall off and unplug the power cord from the outlet. Installation Guide 2 Turn the power off . English-57 Attach the set-bracket onto the rear side of the TV set and secure the screws . 3 Insert three Hangers of...-S3241D, LN-S4041D) This installation is not firmly fixed to a wall. Note: Before installing the TV on the wall. When attaching to other building materials, please contact your nearest dealer. This LCD TV accepts a 200 mm x 200 mm VESA-compliant mounting interface pad. Fix anchors on each hole on...
User Manual (ENGLISH)
Page 60
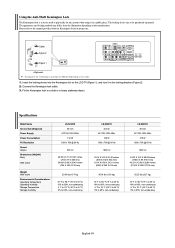
... LCD TV (Figure 1), and turn it in the locking direction (Figure 2). 2. The locking device has to the manual provided with the Kensington lock for proper use. Please refer to be different depending on the manufacturer. Connect the Kensington lock cable. 3. Specifications Model Name Screen Size (Diagonal) Power Supply Power... X 12.99 X 28.84 inches (1100.5 X 330 X 732.5 mm) 52.25 lbs (23.7 kg) 50 °F to 104 °F (10 °C to 40 °C) 10% to 80%, non-condensing -4 °F to 113 °F (-20 °C to 45 °C) 5% to a desk or a heavy stationary object. The appearance...
... LCD TV (Figure 1), and turn it in the locking direction (Figure 2). 2. The locking device has to the manual provided with the Kensington lock for proper use. Please refer to be different depending on the manufacturer. Connect the Kensington lock cable. 3. Specifications Model Name Screen Size (Diagonal) Power Supply Power... X 12.99 X 28.84 inches (1100.5 X 330 X 732.5 mm) 52.25 lbs (23.7 kg) 50 °F to 104 °F (10 °C to 40 °C) 10% to 80%, non-condensing -4 °F to 113 °F (-20 °C to 45 °C) 5% to a desk or a heavy stationary object. The appearance...


