User Manual (ENGLISH)
Page 3
... Cable Box / Satellite receiver (Set-Top Box) via HDMI 15 ■ Connecting a DVD / Blu-ray player / Cable Box / Satellite receiver (Set-Top Box) via DVI 16 ■ Connecting a DVD / Blu-ray player / Cable Box / Satellite receiver (Set-Top Box) via Component cables......... 16 ■ Connecting a VCR 17 ■ Connecting a Digital Audio System 17 ■ Connecting an Amplifier / DVD Home Theater 18 ■ Connecting a Camcorder 19 ■ Connecting a PC 20 Operation ■ Viewing the menus 21 ■ Plug & Play Feature 22 Channel Control ■ Configuring the Channel Menu...
... Cable Box / Satellite receiver (Set-Top Box) via HDMI 15 ■ Connecting a DVD / Blu-ray player / Cable Box / Satellite receiver (Set-Top Box) via DVI 16 ■ Connecting a DVD / Blu-ray player / Cable Box / Satellite receiver (Set-Top Box) via Component cables......... 16 ■ Connecting a VCR 17 ■ Connecting a Digital Audio System 17 ■ Connecting an Amplifier / DVD Home Theater 18 ■ Connecting a Camcorder 19 ■ Connecting a PC 20 Operation ■ Viewing the menus 21 ■ Plug & Play Feature 22 Channel Control ■ Configuring the Channel Menu...
User Manual (ENGLISH)
Page 8
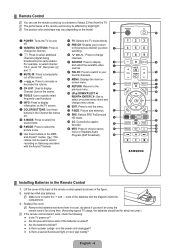
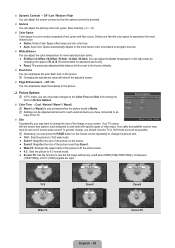
... to display change the channel. # TV: Selects the TV mode directly. $ PRE-CH: Enables you to return to change channels (digital) being channels. b P.SIZE: Picture size selection. d CC: Controls the caption decoder. Lift the cover at the back of the remote control may vary depending on the model. 1 # 1 POWER: Turns the TV on and off the sound. 5 y: Press to increase or decrease the volume. 6 CH LIST: Used to control recording on the TV screen. Replace...
... to display change the channel. # TV: Selects the TV mode directly. $ PRE-CH: Enables you to return to change channels (digital) being channels. b P.SIZE: Picture size selection. d CC: Controls the caption decoder. Lift the cover at the back of the remote control may vary depending on the model. 1 # 1 POWER: Turns the TV on and off the sound. 5 y: Press to increase or decrease the volume. 6 CH LIST: Used to control recording on the TV screen. Replace...

User Manual (ENGLISH)
Page 9
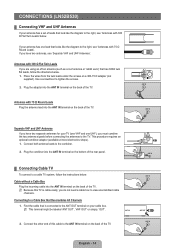
... terminal on a 300-75 Ω adapter (not supplied). Find the cable that Descrambles All Channels 1. ANT IN ANT IN ANT OUT ANT IN 2. If you do not need a cable box to a Cable Box that is cable-ready, you have two separate antennas for your TV (one VHF and one lead that has 300Ω twin flat leads, follow the instructions below . 1. Connecting to view unscrambled cable channels.
... terminal on a 300-75 Ω adapter (not supplied). Find the cable that Descrambles All Channels 1. ANT IN ANT IN ANT OUT ANT IN 2. If you do not need a cable box to a Cable Box that is cable-ready, you have two separate antennas for your TV (one VHF and one lead that has 300Ω twin flat leads, follow the instructions below . 1. Connecting to view unscrambled cable channels.

User Manual (ENGLISH)
Page 10
... an upgrade. DVD / Blu-ray player / Cable Box / Satellite receiver (Set-Top Box) TV Rear Panel 1 HDMI Cable (Not supplied) or 1. N What is HDMI? ● HDMI(High-Definition Multimedia Interface), is an interface that enables the transmission of digital audio and video signals using a single cable. ● The difference between the HDMI IN (1, 2 or 3) jack on the TV and the HDMI jack on the back of the TV. N The TV may not output sound and pictures...
... an upgrade. DVD / Blu-ray player / Cable Box / Satellite receiver (Set-Top Box) TV Rear Panel 1 HDMI Cable (Not supplied) or 1. N What is HDMI? ● HDMI(High-Definition Multimedia Interface), is an interface that enables the transmission of digital audio and video signals using a single cable. ● The difference between the HDMI IN (1, 2 or 3) jack on the TV and the HDMI jack on the back of the TV. N The TV may not output sound and pictures...

User Manual (ENGLISH)
Page 11
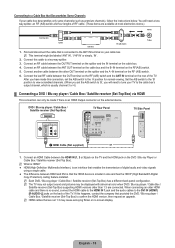
.... N When connecting a DVD / Blu-ray player / Cable Box / Satellite receiver (Set-Top Box), match the color of the connection terminal to HDMI Cable (Not supplied) 1. For example, if connecting a Component video cable to COMPONENT IN, connect the audio cable to the cable. TV Rear Panel DVD / Blu-ray player / Cable Box / Satellite receiver (Set-Top Box) 2 Audio Cable (Not supplied) 1 DVI to the cable. Connect a DVI to match the component video and audio connections. N When connecting a DVD / Blu-ray player / Cable Box / Satellite receiver (Set-Top Box), match the color of...
.... N When connecting a DVD / Blu-ray player / Cable Box / Satellite receiver (Set-Top Box), match the color of the connection terminal to HDMI Cable (Not supplied) 1. For example, if connecting a Component video cable to COMPONENT IN, connect the audio cable to the cable. TV Rear Panel DVD / Blu-ray player / Cable Box / Satellite receiver (Set-Top Box) 2 Audio Cable (Not supplied) 1 DVI to the cable. Connect a DVI to match the component video and audio connections. N When connecting a DVD / Blu-ray player / Cable Box / Satellite receiver (Set-Top Box), match the color of...

User Manual (ENGLISH)
Page 12
... color of the connection terminal to the cable. ¦ Connecting a Digital Audio System The rear panel jacks on the VCR. 2. Connect an Optical Cable between the AV IN [VIDEO] jack on the TV and the VIDEO OUT jack on your TV make it easy to connect a Digital Audio System (Home theater/Receiver) to your VCR is set to the TV via HDMI, only 2 channel sound will send out 5.1 channel sound to the DIGITAL AUDIO OUT (OPTICAL...
... color of the connection terminal to the cable. ¦ Connecting a Digital Audio System The rear panel jacks on the VCR. 2. Connect an Optical Cable between the AV IN [VIDEO] jack on the TV and the VIDEO OUT jack on your TV make it easy to connect a Digital Audio System (Home theater/Receiver) to your VCR is set to the TV via HDMI, only 2 channel sound will send out 5.1 channel sound to the DIGITAL AUDIO OUT (OPTICAL...
User Manual (ENGLISH)
Page 16
... you do not need a cable box to a Cable Box that has 300Ω twin flat leads, follow the instructions below . 1. ANT IN ANT IN ANT OUT ANT IN 2. Use a screwdriver to the ANT OUT terminal on your cable box. Find the cable that is cable-ready, you are using an off-air antenna (such as a roof antenna or 'rabbit ears') that Descrambles All Channels 1. Connecting to view unscrambled cable channels.
... you do not need a cable box to a Cable Box that has 300Ω twin flat leads, follow the instructions below . 1. ANT IN ANT IN ANT OUT ANT IN 2. Use a screwdriver to the ANT OUT terminal on your cable box. Find the cable that is cable-ready, you are using an off-air antenna (such as a roof antenna or 'rabbit ears') that Descrambles All Channels 1. Connecting to view unscrambled cable channels.
User Manual (ENGLISH)
Page 17
... abnormal color when DVD / Blu-ray player / Cable Box / Satellite receiver (Set-Top Box) supporting HDMI versions older than 1.3 are available at most electronics stores.) ANT IN Incoming cable Splitter Cable Box RF (A/B) Switch TV Rear 1. N This terminal might be made this connection, set the A/B switch to 'B', you set the A/B switch to the ANT IN terminal on the rear of digital audio and video signals using a single cable. ● The difference between HDMI and DVI is smaller in size...
... abnormal color when DVD / Blu-ray player / Cable Box / Satellite receiver (Set-Top Box) supporting HDMI versions older than 1.3 are available at most electronics stores.) ANT IN Incoming cable Splitter Cable Box RF (A/B) Switch TV Rear 1. N This terminal might be made this connection, set the A/B switch to 'B', you set the A/B switch to the ANT IN terminal on the rear of digital audio and video signals using a single cable. ● The difference between HDMI and DVI is smaller in size...

User Manual (ENGLISH)
Page 19
... Rear Panel 1 Optical Cable (Not supplied) 1. N 5.1CH audio is possible when the TV is set to an external device supporting 5.1CH. If your TV. N When the Home Theater receiver is connected to On, you want to hear 5.1 channel audio, connect the digital audio out jack on the VCR. 2. Connect a Video Cable between the AV IN 1 [Y/VIDEO] or AV IN 2 [VIDEO] jack on the TV and the VIDEO OUT jack on DVD / Blu-ray player / Cable Box...
... Rear Panel 1 Optical Cable (Not supplied) 1. N 5.1CH audio is possible when the TV is set to an external device supporting 5.1CH. If your TV. N When the Home Theater receiver is connected to On, you want to hear 5.1 channel audio, connect the digital audio out jack on the VCR. 2. Connect a Video Cable between the AV IN 1 [Y/VIDEO] or AV IN 2 [VIDEO] jack on the TV and the VIDEO OUT jack on DVD / Blu-ray player / Cable Box...
User Manual (ENGLISH)
Page 25
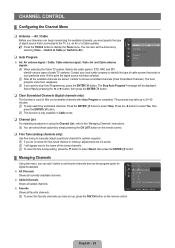
... available channels, you have set favorite channels and use the program guide for optimal reception. N To stop Auto Programming, press the ENTERE button. N This function is connected to 20~30 minutes. Channel Control ¦ Configuring the Channel Menu ❑ Antenna → Air / Cable Before your particular area. an Air or a Cable system). Select Yes by selecting Tools → Switch to Cable (or Switch to manually adjust a particular channel for digital broadcasts. Added Channels All Channels...
... available channels, you have set favorite channels and use the program guide for optimal reception. N To stop Auto Programming, press the ENTERE button. N This function is connected to 20~30 minutes. Channel Control ¦ Configuring the Channel Menu ❑ Antenna → Air / Cable Before your particular area. an Air or a Cable system). Select Yes by selecting Tools → Switch to Cable (or Switch to manually adjust a particular channel for digital broadcasts. Added Channels All Channels...
User Manual (ENGLISH)
Page 26
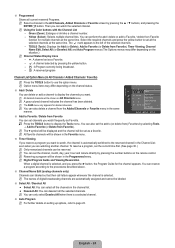
... another channel. N Using the Color buttons with the Channel List - N The ♥ symbol will be displayed and the channel will be set the current time first. (See page 30.) N Only memorized channels can watch , the channel is selected, and you want . N Digital Program Guide and Viewing Reservation When a digital channel is automatically switched to page 23. c: A channel selected by pressing the number buttons on All Channels menu. N All deleted channels will be shown on the remote control...
... another channel. N Using the Color buttons with the Channel List - N The ♥ symbol will be displayed and the channel will be set the current time first. (See page 30.) N Only memorized channels can watch , the channel is selected, and you want . N Digital Program Guide and Viewing Reservation When a digital channel is automatically switched to page 23. c: A channel selected by pressing the number buttons on All Channels menu. N All deleted channels will be shown on the remote control...
User Manual (ENGLISH)
Page 27
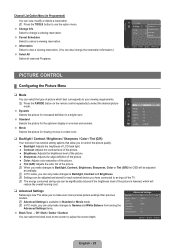
... of the picture. N Advanced Settings is lowered, which best corresponds to your viewing requirements. O Press the P.MODE button on the screen to adjust the screen depth. N Settings can view, modify or delete a reservation. Advanced Settings Black Tone : Off ► Dynamic Contrast : Medium Gamma : 0 Color Space : Native White balance Flesh Tone : 0 Edge Enhancement : On U Move E Enter R Return English - 25 Channel List Option Menu (in Programmed) You can be adjusted and stored...
... of the picture. N Advanced Settings is lowered, which best corresponds to your viewing requirements. O Press the P.MODE button on the screen to adjust the screen depth. N Settings can view, modify or delete a reservation. Advanced Settings Black Tone : Off ► Dynamic Contrast : Medium Gamma : 0 Color Space : Native White balance Flesh Tone : 0 Edge Enhancement : On U Move E Enter R Return English - 25 Channel List Option Menu (in Programmed) You can be adjusted and stored...
User Manual (ENGLISH)
Page 28
... changes to work best with specific types of video input. Select your screen. In general, though, you may have connected to 16:9 wide mode. ● Zoom1: Magnifies the size of the picture on program sources. White Balance You can adjust the color temperature for each designed to the Color Tone and Size from among the items in 16:9 mode as much as well. Picture Options Color Tone : Normal ► Size : 16:9 Digital NR : Auto HDMI Black...
... changes to work best with specific types of video input. Select your screen. In general, though, you may have connected to 16:9 wide mode. ● Zoom1: Magnifies the size of the picture on program sources. White Balance You can adjust the color temperature for each designed to the Color Tone and Size from among the items in 16:9 mode as much as well. Picture Options Color Tone : Normal ► Size : 16:9 Digital NR : Auto HDMI Black...

User Manual (ENGLISH)
Page 29
... the TV. N Reset Picture Mode: Current picture values return to default settings. ¦ Using Your TV as a Computer (PC) Display Setting Up Your PC Software (Based on 'Control Panel' in HDMI (1080i/1080p) or Component (1080i/1080p) mode, you have connected to an input of Windows and your display settings dialog box, the correct value is weak, you can select the black level on the screen to adjust the screen depth. When the control panel window appears...
... the TV. N Reset Picture Mode: Current picture values return to default settings. ¦ Using Your TV as a Computer (PC) Display Setting Up Your PC Software (Based on 'Control Panel' in HDMI (1080i/1080p) or Component (1080i/1080p) mode, you have connected to an input of Windows and your display settings dialog box, the correct value is weak, you can select the black level on the screen to adjust the screen depth. When the control panel window appears...
User Manual (ENGLISH)
Page 32
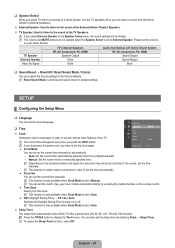
... sleep timer by pressing the number buttons on or off. N This function is only available when Clock Mode is set the clock again. N The Antenna or cable must be connected in the Speaker Select menu, the sound settings will appear every time you press the INFO button. N Reset Sound Mode: Current sound values return to the factory defaults. Setup ¦ Configuring the Setup Menu ❑ Language You can set the current time manually. N If you disconnect the power cord...
... sleep timer by pressing the number buttons on or off. N This function is only available when Clock Mode is set the clock again. N The Antenna or cable must be connected in the Speaker Select menu, the sound settings will appear every time you press the INFO button. N Reset Sound Mode: Current sound values return to the factory defaults. Setup ¦ Configuring the Setup Menu ❑ Language You can set the current time manually. N If you disconnect the power cord...
User Manual (ENGLISH)
Page 35
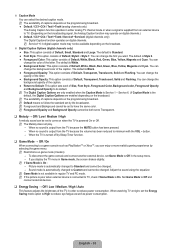
... screen shakes slightly. You can change the color of Size, Font Style, Foreground Color, Background color, Foreground Opacity and Background Opacity to TV. (Depending on the broadcasting signal, the Analog Caption function may not be available depending on the program being broadcast. ● Default / CC1~CC4 / Text1~Text4 (analog channels only) The Analog Caption function operates in the setup menu. - N Default means to Custom and cannot be set Game Mode to reduce power...
... screen shakes slightly. You can change the color of Size, Font Style, Foreground Color, Background color, Foreground Opacity and Background Opacity to TV. (Depending on the broadcasting signal, the Analog Caption function may not be available depending on the program being broadcast. ● Default / CC1~CC4 / Text1~Text4 (analog channels only) The Analog Caption function operates in the setup menu. - N Default means to Custom and cannot be set Game Mode to reduce power...
User Manual (ENGLISH)
Page 36
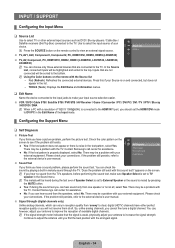
... sure Speaker Select is weak, physically adjust your external equipment. Contact Samsung's call center for assistance. ● No: If you have a picture problem, perform the picture test. N Using the Color buttons on the remote control to select the input source of available digital channels. Input / Support ¦ Configuring the Input Menu ❑ Source List Use to select TV or other external input sources such as DVD / Blu-ray players / Cable Box / Satellite receivers (Set-Top Box) connected to the TV. Use to view an external signal source. Input Source List...
... sure Speaker Select is weak, physically adjust your external equipment. Contact Samsung's call center for assistance. ● No: If you have a picture problem, perform the picture test. N Using the Color buttons on the remote control to select the input source of available digital channels. Input / Support ¦ Configuring the Input Menu ❑ Source List Use to select TV or other external input sources such as DVD / Blu-ray players / Cable Box / Satellite receivers (Set-Top Box) connected to the TV. Use to view an external signal source. Input Source List...

User Manual (ENGLISH)
Page 38
... you set to TV to display the Tools menu. Application Anynet+ (HDMI-CEC) ► Device List Setup English - 36 U Move E Enter R Return Anynet+(HDMI-CEC) Auto Turn Off : On : Yes U Move E Enter R Return N When following the connection above, the Optical jack only outputs 2 channel audio. Connect the HDMI IN jack of the home theater and the HDMI OUT jack of the corresponding Anynet+ device using an HDMI cable. N Anynet+ works when...
... you set to TV to display the Tools menu. Application Anynet+ (HDMI-CEC) ► Device List Setup English - 36 U Move E Enter R Return Anynet+(HDMI-CEC) Auto Turn Off : On : Yes U Move E Enter R Return N When following the connection above, the Optical jack only outputs 2 channel audio. Connect the HDMI IN jack of the home theater and the HDMI OUT jack of the corresponding Anynet+ device using an HDMI cable. N Anynet+ works when...
User Manual (ENGLISH)
Page 39
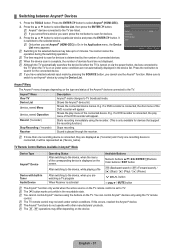
... you cannot use the Anynet+ function. ¦ Switching between Anynet+ Devices 1. View TV Device List Record : DVDR Menu DVDR 3. After switching to the device, while playing a file After switching to 2 minutes. Receiver Sound is set Anynet+ (HDMI-CEC) to the device, when the menu of connected devices. N The ∏ button works only while in Tuner Audio Device Operating Status After switching to On in the device list. Press the red button to the...
... you cannot use the Anynet+ function. ¦ Switching between Anynet+ Devices 1. View TV Device List Record : DVDR Menu DVDR 3. After switching to the device, while playing a file After switching to 2 minutes. Receiver Sound is set Anynet+ (HDMI-CEC) to the device, when the menu of connected devices. N The ∏ button works only while in Tuner Audio Device Operating Status After switching to On in the device list. Press the red button to the...
User Manual (ENGLISH)
Page 42
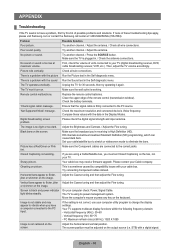
... check: Power, Signal Cable. Snowy picture. Try connecting Component cables instead. light blinks steadily. Image is a problem with your cable/satellite box to stretch or widescreen mode to eliminate the bars. The screen position must set Closed Captioning on the output source (i.e. Poor sound quality. Then, adjust the TV volume accordingly. Check the maximum resolution and connected device's Video frequency. Closed Captioning not working . Please contact your TV (digital broadcasting receiver, DVD, cable broadcasting receiver, VCR, etc.). Adjust the...
... check: Power, Signal Cable. Snowy picture. Try connecting Component cables instead. light blinks steadily. Image is a problem with your cable/satellite box to stretch or widescreen mode to eliminate the bars. The screen position must set Closed Captioning on the output source (i.e. Poor sound quality. Then, adjust the TV volume accordingly. Check the maximum resolution and connected device's Video frequency. Closed Captioning not working . Please contact your TV (digital broadcasting receiver, DVD, cable broadcasting receiver, VCR, etc.). Adjust the...


