Quick Guide (easy Manual) (ver.1.0) (English)
Page 1
...available channels. After the TV has memorized the channels, the Clock Mode screen appears. 6. Press Right arrow button on your new Samsung TV. Basic Functions Changing the Screen Size Your TV has several screen size options, each designed to work best with factory adjusted... to Channel 3 or 4, according to ensure your remote control, follow these steps: 1. Thereafter, each screen in your TV, call: 1-800-SAMSUNG (1-800-726-7864) For web support please visit: www.samsung.com/support 1-800-SAMSUNG (1-800-726-7864) Samsung Electronics America, Inc. 85 Challenger Road Ridgefield Park,...
...available channels. After the TV has memorized the channels, the Clock Mode screen appears. 6. Press Right arrow button on your new Samsung TV. Basic Functions Changing the Screen Size Your TV has several screen size options, each designed to work best with factory adjusted... to Channel 3 or 4, according to ensure your remote control, follow these steps: 1. Thereafter, each screen in your TV, call: 1-800-SAMSUNG (1-800-726-7864) For web support please visit: www.samsung.com/support 1-800-SAMSUNG (1-800-726-7864) Samsung Electronics America, Inc. 85 Challenger Road Ridgefield Park,...
Quick Guide (easy Manual) (ver.1.0) (English)
Page 2
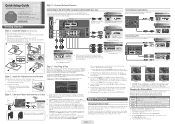
... on the back of the TV. 3. Changing Channels and Adjusting the Volume You can enjoy photo, music, and movie files stored on Samsung recorders with the following menu options: Picture, Sound, Channel, Setup, Input, Application, and Support. Connect a USB device containing photo, ...or router) to your TV to configure network connections automatically. When the Application selection screen appears, press the EnterE button on your remote, and IP Address : the select Setup → Network. To configure your network connection for the visually impaired persons and has ...
... on the back of the TV. 3. Changing Channels and Adjusting the Volume You can enjoy photo, music, and movie files stored on Samsung recorders with the following menu options: Picture, Sound, Channel, Setup, Input, Application, and Support. Connect a USB device containing photo, ...or router) to your TV to configure network connections automatically. When the Application selection screen appears, press the EnterE button on your remote, and IP Address : the select Setup → Network. To configure your network connection for the visually impaired persons and has ...

User Manual (user Manual) (ver.1.0) (English)
Page 3
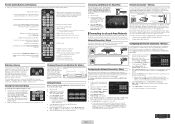
...Preset Sound Mode 17 Adjusting sound settings 17 SouSnLdEEPSystems, Etc. Note : Important information Step by pressing the TOOLS button on the remote control. English 3 English Additional Functions 35 yy Anynet 37 Setting Up Anynet+ 38 Switching between Anynet+ Devices 38 Recording 38 ...Features 4 yy Accessories 4 yy Installing the LCD TV Stand (40 ~ 55 inch TVs).......... 4 yy Viewing the Control Panel 5 yy Viewing the Remote Control 6 yy Connecting to an Antenna 7 yy Plug & Play (Initial Setup 7 Connections yy Connecting to an AV Device 8 yy Connecting to ...
...Preset Sound Mode 17 Adjusting sound settings 17 SouSnLdEEPSystems, Etc. Note : Important information Step by pressing the TOOLS button on the remote control. English 3 English Additional Functions 35 yy Anynet 37 Setting Up Anynet+ 38 Switching between Anynet+ Devices 38 Recording 38 ...Features 4 yy Accessories 4 yy Installing the LCD TV Stand (40 ~ 55 inch TVs).......... 4 yy Viewing the Control Panel 5 yy Viewing the Remote Control 6 yy Connecting to an Antenna 7 yy Plug & Play (Initial Setup 7 Connections yy Connecting to an AV Device 8 yy Connecting to ...
User Manual (user Manual) (ver.1.0) (English)
Page 4
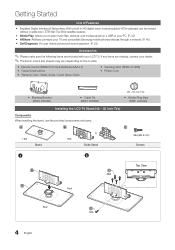
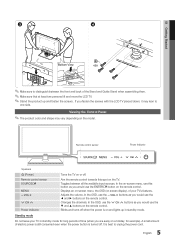
...✎✎The items' colors and shapes may vary depending on a USB or your PC. (P. 30) yy AllShare: AllShare connects your TV and compatible Samsung mobile phones/devices through a network. (P. 40) yy Self Diagnosis: You can be viewed without a cable box / STB (Set-Top-Box) satellite receiver... Top View A Front Rear C 1EA 4 English yy Media Play: Allows you to play music files, pictures, and movies saved on the models. yy Remote Control (BN59-01041A) & Batteries (AAA x 2) yy Owner's Instructions yy Warranty Card / Safety Guide / Quick Setup Guide yy Cleaning Cloth (BN63-01798B...
...✎✎The items' colors and shapes may vary depending on a USB or your PC. (P. 30) yy AllShare: AllShare connects your TV and compatible Samsung mobile phones/devices through a network. (P. 40) yy Self Diagnosis: You can be viewed without a cable box / STB (Set-Top-Box) satellite receiver... Top View A Front Rear C 1EA 4 English yy Media Play: Allows you to play music files, pictures, and movies saved on the models. yy Remote Control (BN59-01041A) & Batteries (AAA x 2) yy Owner's Instructions yy Warranty Card / Safety Guide / Quick Setup Guide yy Cleaning Cloth (BN63-01798B...
User Manual (user Manual) (ver.1.0) (English)
Page 5
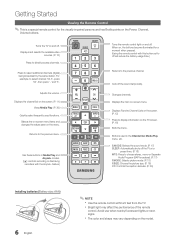
... power button is turned off when the power is best to one side. If you would use the ENTERE button on the remote control. Remote control sensor Power Indicator Speakers P (Power) Remote control sensor SOURCEE MENU y z Power Indicator Turns the TV on the TV. In the on-screen menu, use the y buttons ... off . In the OSD, use this spot on or off. Changes the channels. In the OSD, use the ◄ and ► buttons on the remote control. A small amount of your TV in standby mode. Displays an on-screen menu, the OSD (on and lights up and fasten the screws. Viewing...
... power button is turned off when the power is best to one side. If you would use the ENTERE button on the remote control. Remote control sensor Power Indicator Speakers P (Power) Remote control sensor SOURCEE MENU y z Power Indicator Turns the TV on the TV. In the on-screen menu, use the y buttons ... off . In the OSD, use this spot on or off. Changes the channels. In the OSD, use the ◄ and ► buttons on the remote control. A small amount of your TV in standby mode. Displays an on-screen menu, the OSD (on and lights up and fasten the screws. Viewing...
User Manual (user Manual) (ver.1.0) (English)
Page 6
...screen. (P. 11) Views Media Play. (P. 30) Quickly select frequently used in Media Play and Anynet+ modes. (�: controls recording on Samsung recorders with this button set to off . Returns to select additional channels (digital) being broadcast by the same station. Use these buttons in the... the sound mode. (P. 17) SLEEP: Automatically shuts off the sound temporarily. xx The color and shape may affect the performance of the remote control. Selects the on-screen menu items and changes the values seen on , the buttons become illuminated for the visually impaired persons and has...
...screen. (P. 11) Views Media Play. (P. 30) Quickly select frequently used in Media Play and Anynet+ modes. (�: controls recording on Samsung recorders with this button set to off . Returns to select additional channels (digital) being broadcast by the same station. Use these buttons in the... the sound mode. (P. 17) SLEEP: Automatically shuts off the sound temporarily. xx The color and shape may affect the performance of the remote control. Selects the on-screen menu items and changes the values seen on , the buttons become illuminated for the visually impaired persons and has...

User Manual (user Manual) (ver.1.0) (English)
Page 13
... channel has been deleted. PPicture Menu INFO ¦¦ Changing the Preset Picture Mode OO MENUm → Picture → Mode → ENTERE Mode t Select your remote for entering the date and time. ✎✎ If you selected Once, Every Week or Every Day in Repeat, you can be displayed automatically at...
... channel has been deleted. PPicture Menu INFO ¦¦ Changing the Preset Picture Mode OO MENUm → Picture → Mode → ENTERE Mode t Select your remote for entering the date and time. ✎✎ If you selected Once, Every Week or Every Day in Repeat, you can be displayed automatically at...

User Manual (user Manual) (ver.1.0) (English)
Page 18
... Saving Time) function on or off timer settings can set the month, day, year, hour and minute directly by pressing the number buttons on the remote control. ¦¦ Setting the On/Off Timer OO MENUm → Setup → Time → Timer 1 → ENTERE FAV.CH ■■ Timer 1 / Timer 2 / Timer...
... Saving Time) function on or off timer settings can set the month, day, year, hour and minute directly by pressing the number buttons on the remote control. ¦¦ Setting the On/Off Timer OO MENUm → Setup → Time → Timer 1 → ENTERE FAV.CH ■■ Timer 1 / Timer 2 / Timer...

User Manual (user Manual) (ver.1.0) (English)
Page 20
.... -- xx Parental restriction levels differ depending on the downloaded information. The default menu name and Downloadable U.S. xx Even if you forget the PIN, press the remote-control buttons in digital caption mode depending on the broadcasting station. ■■ Change PIN: The Change PIN screen will automatically be displayed on the...
.... -- xx Parental restriction levels differ depending on the downloaded information. The default menu name and Downloadable U.S. xx Even if you forget the PIN, press the remote-control buttons in digital caption mode depending on the broadcasting station. ■■ Change PIN: The Change PIN screen will automatically be displayed on the...
User Manual (user Manual) (ver.1.0) (English)
Page 25
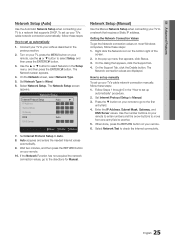
... press the ENTERE button. In the pop-up automatically" procedure. 2. 04 Advanced Features Network Setup (Auto) Use the Automatic Network Setup when connecting your remote. 10. Connect your TV to your TV to select Setup, and then press the ENTERE button. 3. Use the ▲ or ▼ button to...Support Tab, click the Details button. Use the number buttons on your TV's cable network connection manually, follow these steps: 1. To set up your remote, use the ▲ or ▼ button to a network that supports DHCP. Turn on your TV, press the Menu button on your TV's...
... press the ENTERE button. In the pop-up automatically" procedure. 2. 04 Advanced Features Network Setup (Auto) Use the Automatic Network Setup when connecting your remote. 10. Connect your TV to your TV to select Setup, and then press the ENTERE button. 3. Use the ▲ or ▼ button to...Support Tab, click the Details button. Use the number buttons on your TV's cable network connection manually, follow these steps: 1. To set up your remote, use the ▲ or ▼ button to a network that supports DHCP. Turn on your TV, press the Menu button on your TV's...
User Manual (user Manual) (ver.1.0) (English)
Page 27
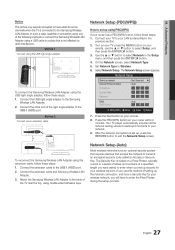
...during the setup process. 27 English Select Network Setup. The Security Key is based on your network. 9. Connect the extension cable and Samsung Wireless LAN Adapter. 3. Your TV player automatically acquires all the network setting values it needs and connects to the USB 1 (HDD...: A PBC(WPS) U Move E Enter R Return 7. Connect your TV to your remote, use this method of the right angle adapter to your remote. 8. On the Network screen, select Network Type. 5. Set Network Type to the Samsung Wireless LAN Adapter. 2. Press the PBC(WPS) button on your LAN as described in...
...during the setup process. 27 English Select Network Setup. The Security Key is based on your network. 9. Connect the extension cable and Samsung Wireless LAN Adapter. 3. Your TV player automatically acquires all the network setting values it needs and connects to the USB 1 (HDD...: A PBC(WPS) U Move E Enter R Return 7. Connect your TV to your remote, use this method of the right angle adapter to your remote. 8. On the Network screen, select Network Type. 5. Set Network Type to the Samsung Wireless LAN Adapter. 2. Press the PBC(WPS) button on your LAN as described in...
User Manual (user Manual) (ver.1.0) (English)
Page 28
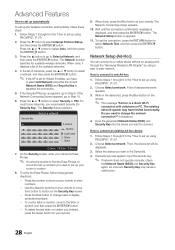
... these steps: 1. In the list of the set up using a peer to peer network. For most home networks, you want to button on the remote. ✎✎ The message "Ad-hoc is displayed, and then press the ENTERE button. To a enter letter or symbol, move from button to ...you entered, press the Green button on your router or modem. 8. Use the direction buttons on your remote. 9. To delete the last letter or number you used to enter numbers. -- Follow Steps 1 through the "Samsung Wireless LAN Adapter" by using PBC(WPS)". (P. 27) 2. Select the device you want in the...
... these steps: 1. In the list of the set up using a peer to peer network. For most home networks, you want to button on the remote. ✎✎ The message "Ad-hoc is displayed, and then press the ENTERE button. To a enter letter or symbol, move from button to ...you entered, press the Green button on your router or modem. 8. Use the direction buttons on your remote. 9. To delete the last letter or number you used to enter numbers. -- Follow Steps 1 through the "Samsung Wireless LAN Adapter" by using PBC(WPS)". (P. 27) 2. Select the device you want in the...

User Manual (user Manual) (ver.1.0) (English)
Page 34
...; or ► button to select Photos, then press the ENTERE button in the Media Play menu. 2. During the slide show, files are saved on the remote control to start the slide show . -- Other file extensions are not displayed, even if they are displayed in order. ✎✎Music files can search...
...; or ► button to select Photos, then press the ENTERE button in the Media Play menu. 2. During the slide show, files are saved on the remote control to start the slide show . -- Other file extensions are not displayed, even if they are displayed in order. ✎✎Music files can search...

User Manual (user Manual) (ver.1.0) (English)
Page 37
...xx Only one Home Theater can connect an Anynet+ device using the HDMI cable. xx You can be connected. To be used only with your Samsung TV's remote. Connect the HDMI IN jack of the home theater and the HDMI OUT jack of the corresponding Anynet+ device using an HDMI cable. 2. ... corresponding Anynet+ device using an HDMI cable. ✎✎NOTE xx Connect the Optical cable between the DIGITAL AUDIO OUT (OPTICAL) jack on your Samsung device has this feature, check if there is a function that have the Anynet+ feature. Some HDMI cables may not support Anynet+ functions. xx Anynet...
...xx Only one Home Theater can connect an Anynet+ device using the HDMI cable. xx You can be connected. To be used only with your Samsung TV's remote. Connect the HDMI IN jack of the home theater and the HDMI OUT jack of the corresponding Anynet+ device using an HDMI cable. 2. ... corresponding Anynet+ device using an HDMI cable. ✎✎NOTE xx Connect the Optical cable between the DIGITAL AUDIO OUT (OPTICAL) jack on your Samsung device has this feature, check if there is a function that have the Anynet+ feature. Some HDMI cables may not support Anynet+ functions. xx Anynet...
User Manual (user Manual) (ver.1.0) (English)
Page 39
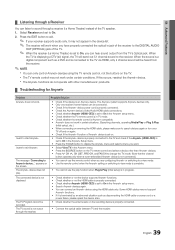
... of the receiver to On, you want. • Select View TV in the Anynet+ menu. • Press the SOURCE button on the TV remote control and select a device other manufacturers' products. ¦¦ Troubleshooting for Anynet+ Problem Anynet+ does not work under certain conditions. The message ...'Connecting to On. 2. The TV Program cannot be heard from the TV's Optical jack. xx The TV remote control may not appear in the device list. ✎✎ The receiver will work in certain situations. (Searching channels, operating Media Play or ...
... of the receiver to On, you want. • Select View TV in the Anynet+ menu. • Press the SOURCE button on the TV remote control and select a device other manufacturers' products. ¦¦ Troubleshooting for Anynet+ Problem Anynet+ does not work under certain conditions. The message ...'Connecting to On. 2. The TV Program cannot be heard from the TV's Optical jack. xx The TV remote control may not appear in the device list. ✎✎ The receiver will work in certain situations. (Searching channels, operating Media Play or ...

User Manual (user Manual) (ver.1.0) (English)
Page 40
... mobile phone as blank or broken characters. E Select R Return e Exit A Setup R Return 40 English Mobile devices may be displayed as a remote control. ■■ TV name: Sets the TV name so you view call arrivals SMS messages and schedules set on the list again. Using ... Screen Keyboard). If the deleted mobile device is available in your mobile phones. ✎✎For more information, visit "www.samsung.com" or contact the Samsung call arrivals, SMS messages and schedules set on or trieds to connect to TV viewing mode. Additionally, you can use your ...
... mobile phone as blank or broken characters. E Select R Return e Exit A Setup R Return 40 English Mobile devices may be displayed as a remote control. ■■ TV name: Sets the TV name so you view call arrivals SMS messages and schedules set on the list again. Using ... Screen Keyboard). If the deleted mobile device is available in your mobile phones. ✎✎For more information, visit "www.samsung.com" or contact the Samsung call arrivals, SMS messages and schedules set on or trieds to connect to TV viewing mode. Additionally, you can use your ...
User Manual (user Manual) (ver.1.0) (English)
Page 46
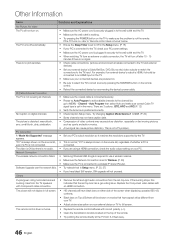
...device's power cable. The picture is distorted: macroblock, error, small block, dots, pixelization. • Compression of the remote. • Try pointing the remote directly at the TV from 5~6 feet away. 46 English "PC" is always shown on the TV to make sure... does not work . • Replace the remote control batteries with correct polarity (+/-). • Clean the transmission window located on your PC. Network Connection The wireless network connection failed. • Samsung Wireless USB dongle is required to use a wireless network. • Make sure the Network Connection...
...device's power cable. The picture is distorted: macroblock, error, small block, dots, pixelization. • Compression of the remote. • Try pointing the remote directly at the TV from 5~6 feet away. 46 English "PC" is always shown on the TV to make sure... does not work . • Replace the remote control batteries with correct polarity (+/-). • Clean the transmission window located on your PC. Network Connection The wireless network connection failed. • Samsung Wireless USB dongle is required to use a wireless network. • Make sure the Network Connection...
User Manual (user Manual) (ver.1.0) (English)
Page 47
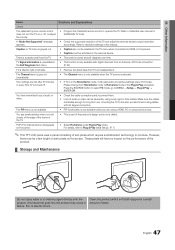
... small particles when you are lost after 30 minutes or every time TV is turned off , or adjust the volume. • Program the Cable/Sat remote control to produce. These pixels will have intermittent loss of audio or video. • Check the cable connections and reconnect them. • Loss of... the Store Demo mode, it . For details, refer to Cable/Sat user manual for long term use. Make sure the cables are flexible enough for SAMSUNG TV code. Refer to Plug & Play (Initial Setup). (P. 7) ✎✎This TFT LCD panel uses a panel consisting of the TV and adjust the external ...
... small particles when you are lost after 30 minutes or every time TV is turned off , or adjust the volume. • Program the Cable/Sat remote control to produce. These pixels will have intermittent loss of audio or video. • Check the cable connections and reconnect them. • Loss of... the Store Demo mode, it . For details, refer to Cable/Sat user manual for long term use. Make sure the cables are flexible enough for SAMSUNG TV code. Refer to Plug & Play (Initial Setup). (P. 7) ✎✎This TFT LCD panel uses a panel consisting of the TV and adjust the external ...
User Manual (user Manual) (ver.1.0) (English)
Page 51
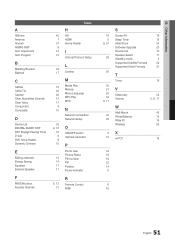
... Language MP3 Play MTS N Network Connection Network Setup O ON/OFF button Optimal resolution P Photo view Picture Reset PIN number PIP Position Power Indicator 6, 12 12 R Remote Control RGB 16 8 9, 37 28 50 30 21 20 34 6, 17 24 25 S Screen Fit 16 Sleep Timer 18 Slide Show 34 Software Upgrade 23...
... Language MP3 Play MTS N Network Connection Network Setup O ON/OFF button Optimal resolution P Photo view Picture Reset PIN number PIP Position Power Indicator 6, 12 12 R Remote Control RGB 16 8 9, 37 28 50 30 21 20 34 6, 17 24 25 S Screen Fit 16 Sleep Timer 18 Slide Show 34 Software Upgrade 23...
User Manual (user Manual) (ver.1.0) (English, French)
Page 3
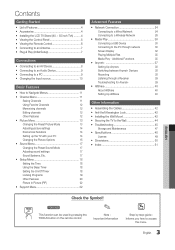
... Features yy List of Features 4 yy Accessories 4 yy Installing the LCD TV Stand (40 ~ 55 inch TVs).......... 4 yy Viewing the Control Panel 5 yy Viewing the Remote Control 6 yy Connecting to an Antenna 7 yy Plug & Play (Initial Setup 7 Connections yy Connecting to an AV Device 8 yy Connecting to an Audio Device 9 yy... Changing the Preset Sound Mode 17 Adjusting sound settings 17 SouSnLdEEPSystems, Etc. English 3 English Note : Important information Step by pressing the TOOLS button on the remote control.
... Features yy List of Features 4 yy Accessories 4 yy Installing the LCD TV Stand (40 ~ 55 inch TVs).......... 4 yy Viewing the Control Panel 5 yy Viewing the Remote Control 6 yy Connecting to an Antenna 7 yy Plug & Play (Initial Setup 7 Connections yy Connecting to an AV Device 8 yy Connecting to an Audio Device 9 yy... Changing the Preset Sound Mode 17 Adjusting sound settings 17 SouSnLdEEPSystems, Etc. English 3 English Note : Important information Step by pressing the TOOLS button on the remote control.

