User Manual
Page 3
...through a Receiver (Home theater 97 ■ Troubleshooting for Anynet 97 Appendix ■ Troubleshooting 98 ■ Installing the Stand 100 ■ Disconnecting the Stand 100 ■ Auto Wall-Mount Adjustment (Sold separately 101 ■ Wall Mount Kit Specifications (VESA 102 ■ ... ■ Remote Control 5 ■ Installing Batteries in the Remote Control 6 Connections ■ Connecting VHF and UHF Antennas 6 ■ Connecting Cable TV 7 ■ Connecting a DVD Player or Cable Box/ Satellite receiver (Set-Top Box) via HDMI 8 ■ Connecting a DVD Player or Cable...
...through a Receiver (Home theater 97 ■ Troubleshooting for Anynet 97 Appendix ■ Troubleshooting 98 ■ Installing the Stand 100 ■ Disconnecting the Stand 100 ■ Auto Wall-Mount Adjustment (Sold separately 101 ■ Wall Mount Kit Specifications (VESA 102 ■ ... ■ Remote Control 5 ■ Installing Batteries in the Remote Control 6 Connections ■ Connecting VHF and UHF Antennas 6 ■ Connecting Cable TV 7 ■ Connecting a DVD Player or Cable Box/ Satellite receiver (Set-Top Box) via HDMI 8 ■ Connecting a DVD Player or Cable...
User Manual
Page 5
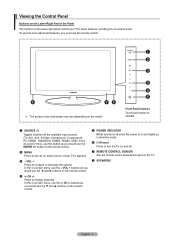
.... VOL + Press to see an on-screen menu of the Panel The buttons on and lights up in stand-by mode. 6 (Power) Press to operate. 1 SOURCE Toggles between all the available input sources (TV, AV1, AV2, S-Video, Component1, Component2, PC, HDMI1, HDMI2/DVI, HDMI3, HDMI4, USB). In the on-screen ... control. 1 2 3 8 78 ➣ The product color and shape may vary depending on the model. 4 5 6 Front Panel buttons Touch each button to turn the TV on and off. 7 REMOTE CONTROL SENSOR Aim the remote control towards this button as you would use the ▼ and ▲ buttons on the remote...
.... VOL + Press to see an on-screen menu of the Panel The buttons on and lights up in stand-by mode. 6 (Power) Press to operate. 1 SOURCE Toggles between all the available input sources (TV, AV1, AV2, S-Video, Component1, Component2, PC, HDMI1, HDMI2/DVI, HDMI3, HDMI4, USB). In the on-screen ... control. 1 2 3 8 78 ➣ The product color and shape may vary depending on the model. 4 5 6 Front Panel buttons Touch each button to turn the TV on and off. 7 REMOTE CONTROL SENSOR Aim the remote control towards this button as you would use the ▼ and ▲ buttons on the remote...
User Manual
Page 102
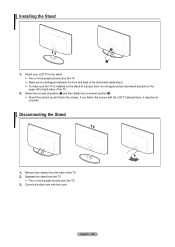
... a proper level, do not apply excess downward pressure to one side. Attach your LCD TV to the stand. ➣ Two or more people should carry the TV. ➣ Make sure to distinguish between the front and back of the stand when attaching it may lean to the upper left of right sides of the... TV. 2. Cover the bottom hole with the LCD TV placed down, it . ➣ To make sure the TV is installed on the stand at position 2. ➣ Stand the product up and fasten the screws. If you fasten the screws with the cover...
... a proper level, do not apply excess downward pressure to one side. Attach your LCD TV to the stand. ➣ Two or more people should carry the TV. ➣ Make sure to distinguish between the front and back of the stand when attaching it may lean to the upper left of right sides of the... TV. 2. Cover the bottom hole with the LCD TV placed down, it . ➣ To make sure the TV is installed on the stand at position 2. ➣ Stand the product up and fasten the screws. If you fasten the screws with the cover...


