
User Manual
Page 3
...Remote Control ...6 OPERATION Ŷ Viewing the menus ...21 Ŷ Plug & Play Feature...22 CHANNEL CONTROL Ŷ Con¿guring the Channel Menu ...23 Ŷ Managing Channels...23 CONNECTIONS (LN22B460) Ŷ Connecting VHF and UHF Antennas ...7 Ŷ Connecting Cable TV ...7 Ŷ Connecting a DVD / Blu-ray...the Input Menu ...34 Ŷ Con¿guring the Support Menu...34 APPENDIX Ŷ Troubleshooting ...36 Ŷ Installing the Stand ...37 Ŷ Disconnecting the Stand...37 Ŷ Wall Mount Kit Speci¿cations (VESA) ...38 Ŷ Using the Anti-Theft Kensington Lock ...38 ...
...Remote Control ...6 OPERATION Ŷ Viewing the menus ...21 Ŷ Plug & Play Feature...22 CHANNEL CONTROL Ŷ Con¿guring the Channel Menu ...23 Ŷ Managing Channels...23 CONNECTIONS (LN22B460) Ŷ Connecting VHF and UHF Antennas ...7 Ŷ Connecting Cable TV ...7 Ŷ Connecting a DVD / Blu-ray...the Input Menu ...34 Ŷ Con¿guring the Support Menu...34 APPENDIX Ŷ Troubleshooting ...36 Ŷ Installing the Stand ...37 Ŷ Disconnecting the Stand...37 Ŷ Wall Mount Kit Speci¿cations (VESA) ...38 Ŷ Using the Anti-Theft Kensington Lock ...38 ...
User Manual
Page 5
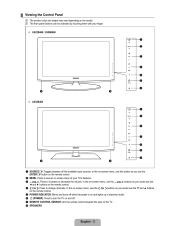
N The front panel buttons can be activated by mode. 6 P (POWER): Press to turn the TV on and off when the power is on and lights up in stand-by touching them with your TV's features. 3 y: Press to change channels. In the on-screen menu, use the Z buttons as you would use the &#...379; and Ź buttons on -screen menu of your ¿nger. „ LN22B460 / LN26B460 „ LN32B460 1 SOURCEE: Toggles ...
N The front panel buttons can be activated by mode. 6 P (POWER): Press to turn the TV on and off when the power is on and lights up in stand-by touching them with your TV's features. 3 y: Press to change channels. In the on-screen menu, use the Z buttons as you would use the &#...379; and Ź buttons on -screen menu of your ¿nger. „ LN22B460 / LN26B460 „ LN32B460 1 SOURCEE: Toggles ...
User Manual
Page 39
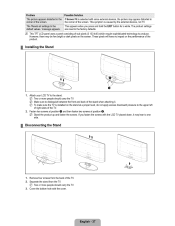
... screen. Cover the bottom hole with the LCD TV placed down, it . However, there may lean to distinguish between the front and back of the TV. 2. N Make sure to one side. ¦ Disconnecting the Stand 1. N To make sure the TV is installed on the stand at position 2. If you press and hold...with the cover. These pixels will have no impact on the screen. Attach your LCD TV to the factory defaults. English - 37 Separate the stand from the back of the TV. 2. N Two or more people should carry the TV. 3. The 'Resets all settings to the upper left of right sides of the...
... screen. Cover the bottom hole with the LCD TV placed down, it . However, there may lean to distinguish between the front and back of the TV. 2. N Make sure to one side. ¦ Disconnecting the Stand 1. N To make sure the TV is installed on the stand at position 2. If you press and hold...with the cover. These pixels will have no impact on the screen. Attach your LCD TV to the factory defaults. English - 37 Separate the stand from the back of the TV. 2. N Two or more people should carry the TV. 3. The 'Resets all settings to the upper left of right sides of the...

User Manual
Page 42
... (Diagonal) PC Resolution (Optimum) Sound (Output) Dimensions (WxDxH) Without Stand With stand Weight Without Stand With Stand Environmental Considerations Operating Temperature Operating Humidity Storage Temperature Storage Humidity Stand Swivel Left / Right 0Û LN22B460 22 inches (21.9 inches measured diagonally) 1360 x 768 @ 60Hz 5W x 2 21.7 X 2.8 X 14.7 inches (551.0 X 71.9 X 374.6 mm) 21.7 X 8.5 X 16.7 inches (551.0 X 215.9 X 424.5 mm) 10.8 Ibs...
... (Diagonal) PC Resolution (Optimum) Sound (Output) Dimensions (WxDxH) Without Stand With stand Weight Without Stand With Stand Environmental Considerations Operating Temperature Operating Humidity Storage Temperature Storage Humidity Stand Swivel Left / Right 0Û LN22B460 22 inches (21.9 inches measured diagonally) 1360 x 768 @ 60Hz 5W x 2 21.7 X 2.8 X 14.7 inches (551.0 X 71.9 X 374.6 mm) 21.7 X 8.5 X 16.7 inches (551.0 X 215.9 X 424.5 mm) 10.8 Ibs...
User Manual
Page 67
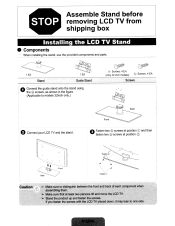
... fasten two @ screws at position 0. Stand Guide Stand Scr~ws .' ' o Connect the guide stand onto the stand using the ® screws, as shown in the figure. (Applicable to models 32inch only.) 'e Connect your LCD TV and the stand. Assemble Stand before removing LCD TV from shipping box Installing the LCD TV Stand • , Components When installing the stand, use the provided components and parts...
... fasten two @ screws at position 0. Stand Guide Stand Scr~ws .' ' o Connect the guide stand onto the stand using the ® screws, as shown in the figure. (Applicable to models 32inch only.) 'e Connect your LCD TV and the stand. Assemble Stand before removing LCD TV from shipping box Installing the LCD TV Stand • , Components When installing the stand, use the provided components and parts...

User Manual
Page 74
VCCI Class A Notice z: 0)1!.iii"/(;J:, 'I ) 2) 3) 4) 5) 6) 7) 8) 0 ICES-003 Class B Notice - Cet appareil numer;que de la c1asse Best conforme a la norme NMB-003 du Canada. Cet appareil numerique de la classe A est conforme a la norme NMB-003 du Canada. I ',!i*,J,ii!fljj'lQii"/'1P1liIJiI:11Ii!iA tJfWlthht~(VCCI)O)l,FjlHc::Jl-j Avis NMB-003, Classe A This Class A digital apparatus complies with Canadian ICES-003. Avis NMB-003, Classe B This Class B digital apparatus complies with Canadian ICES-003. Important Safety Instructions (UL Only) ICES-003 Class A Notice -
VCCI Class A Notice z: 0)1!.iii"/(;J:, 'I ) 2) 3) 4) 5) 6) 7) 8) 0 ICES-003 Class B Notice - Cet appareil numer;que de la c1asse Best conforme a la norme NMB-003 du Canada. Cet appareil numerique de la classe A est conforme a la norme NMB-003 du Canada. I ',!i*,J,ii!fljj'lQii"/'1P1liIJiI:11Ii!iA tJfWlthht~(VCCI)O)l,FjlHc::Jl-j Avis NMB-003, Classe A This Class A digital apparatus complies with Canadian ICES-003. Avis NMB-003, Classe B This Class B digital apparatus complies with Canadian ICES-003. Important Safety Instructions (UL Only) ICES-003 Class A Notice -


