User Manual (ENGLISH)
Page 3
...Messages) - Digital 33 Choosing a Multi-Channel Sound (MTS) track - English Contents General Information List of the Sub (PIP) Picture.....36 Resetting the Sound Settings to the Factory Defaults 36 Connecting Headphones 36 Channel Control Selecting the Antenna 37 Clearing Scrambled Channels -...the V-Chip 54 Upgrading the Software 61 Appendix Troubleshooting 62 Installing the Stand 64 Disconnecting the Stand 64 Wall-Mount Adjustment (LN-T4042H ,LN-T4642H 65 Wall Mount Kit Specifications ( VESA 66 Using the Anti-Theft Kensington Lock 67 Specifications 68 Symbol English - ...
...Messages) - Digital 33 Choosing a Multi-Channel Sound (MTS) track - English Contents General Information List of the Sub (PIP) Picture.....36 Resetting the Sound Settings to the Factory Defaults 36 Connecting Headphones 36 Channel Control Selecting the Antenna 37 Clearing Scrambled Channels -...the V-Chip 54 Upgrading the Software 61 Appendix Troubleshooting 62 Installing the Stand 64 Disconnecting the Stand 64 Wall-Mount Adjustment (LN-T4042H ,LN-T4642H 65 Wall Mount Kit Specifications ( VESA 66 Using the Anti-Theft Kensington Lock 67 Specifications 68 Symbol English - ...
User Manual (ENGLISH)
Page 4
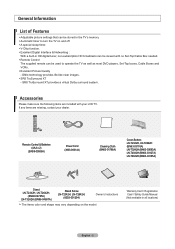
... Power Cord (3903-000144) Cleaning Cloth (BN63-01798A) Cover-Bottom LN-T2342H, LN-T2642H (BN63-03176A) LN-T3242H (BN63-03093A) LN-T4042H (BN63-03127A) LN-T4642H (BN63-03185A) Stand LN-T2342H, LN-T2642H, (BN96-04745A) LN-T3242H (BN96-04697A) Stand Screw LN-T2342H, LN-T2642H, (6002-001294) Owner's Instructions The items color and shape ...'s memory. Automatic timer to turn the TV on the model. General Information List of Features Adjustable picture settings that can be used to operate the TV as well as most DVD players, Set-Top boxes, Cable Boxes and VCRs...
... Power Cord (3903-000144) Cleaning Cloth (BN63-01798A) Cover-Bottom LN-T2342H, LN-T2642H (BN63-03176A) LN-T3242H (BN63-03093A) LN-T4042H (BN63-03127A) LN-T4642H (BN63-03185A) Stand LN-T2342H, LN-T2642H, (BN96-04745A) LN-T3242H (BN96-04697A) Stand Screw LN-T2342H, LN-T2642H, (6002-001294) Owner's Instructions The items color and shape ...'s memory. Automatic timer to turn the TV on the model. General Information List of Features Adjustable picture settings that can be used to operate the TV as well as most DVD players, Set-Top boxes, Cable Boxes and VCRs...
User Manual (ENGLISH)
Page 7
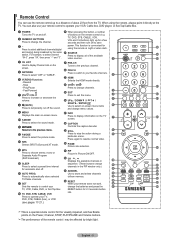
... ( When pressing this button, a number of the available video sources. RETURN Returns to the previous menu. @ P.MODE Press to select the picture mode. # SRS Selects SRS TruSurround XT mode. $ MTS Press to choose stereo, mono or Separate Audio Program (SAP broadcast). % SLEEP Press... to select "AIR" or "CABLE". 6 VCR/DVD Functions - e EXIT Press to stop the action during a particular scene. j P.SIZE Picture size selection. k PIP Picture-in sequence. (These buttons change the channel. 3 - n RESET When your favorite channels. The performance of about 23 feet from memory. For...
... ( When pressing this button, a number of the available video sources. RETURN Returns to the previous menu. @ P.MODE Press to select the picture mode. # SRS Selects SRS TruSurround XT mode. $ MTS Press to choose stereo, mono or Separate Audio Program (SAP broadcast). % SLEEP Press... to select "AIR" or "CABLE". 6 VCR/DVD Functions - e EXIT Press to stop the action during a particular scene. j P.SIZE Picture size selection. k PIP Picture-in sequence. (These buttons change the channel. 3 - n RESET When your favorite channels. The performance of about 23 feet from memory. For...
User Manual (ENGLISH)
Page 10
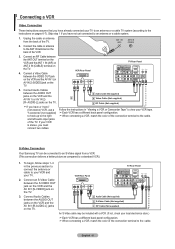
...an antenna or a cable TV system (according to your VCR and your TV. 2. Unplug the cable or antenna from a VCR. (This connection delivers a better picture as compared to the cable. and left audio input jacks of the connection terminal to a standard VCR.) 1. To begin, follow steps 1-3 in "Viewing a ... back panel configuration. Connect the cable or antenna to an antenna or a cable system. 1. VCR Rear Panel TV Rear Panel 5. S-Video Connection Your Samsung TV can be included with a VCR. (If not, check your VCR is stereo, you have not yet connected to the ANT IN terminal on the...
...an antenna or a cable TV system (according to your VCR and your TV. 2. Unplug the cable or antenna from a VCR. (This connection delivers a better picture as compared to the cable. and left audio input jacks of the connection terminal to a standard VCR.) 1. To begin, follow steps 1-3 in "Viewing a ... back panel configuration. Connect the cable or antenna to an antenna or a cable system. 1. VCR Rear Panel TV Rear Panel 5. S-Video Connection Your Samsung TV can be included with a VCR. (If not, check your VCR is stereo, you have not yet connected to the ANT IN terminal on the...
User Manual (ENGLISH)
Page 14
... Enter Skip We recommend setting the TV to Dynamic (Home) mode, press any Volume button and then hold down the MENU button for the best picture in your home environment. Shop Home 4. The message "Select the clock mode." Press the POWER button on the remote control. The TV will be set...
... Enter Skip We recommend setting the TV to Dynamic (Home) mode, press any Volume button and then hold down the MENU button for the best picture in your home environment. Shop Home 4. The message "Select the clock mode." Press the POWER button on the remote control. The TV will be set...
User Manual (ENGLISH)
Page 16
... the screen. 2. Press the INFO button on the remote control. The word will display the channel, the type of sound, and the status of certain picture and sound settings. Press MUTE button and the sound cuts off , press the MUTE button again, or simply press the VOL or VOL buttons. The... TV will appear in the lower-left corner of certain audio-video settings. 1. Air 7 Mono Picture Mode Sound Mode MTS Caption V-Chip 05 : 54 pm : Dynamic : Custom : Stereo : Off : Off Press the INFO button once more or wait approximately 10 seconds...
... the screen. 2. Press the INFO button on the remote control. The word will display the channel, the type of sound, and the status of certain picture and sound settings. Press MUTE button and the sound cuts off , press the MUTE button again, or simply press the VOL or VOL buttons. The... TV will appear in the lower-left corner of certain audio-video settings. 1. Air 7 Mono Picture Mode Sound Mode MTS Caption V-Chip 05 : 54 pm : Dynamic : Custom : Stereo : Off : Off Press the INFO button once more or wait approximately 10 seconds...
User Manual (ENGLISH)
Page 17
The menu' s left side has five icons: Picture, Sound, Channel, Setup, Input. 2. This eliminates the need to display the menu. Press the MENU button to change channels by entering the channels digits. Press ...
The menu' s left side has five icons: Picture, Sound, Channel, Setup, Input. 2. This eliminates the need to display the menu. Press the MENU button to change channels by entering the channels digits. Press ...
User Manual (ENGLISH)
Page 25
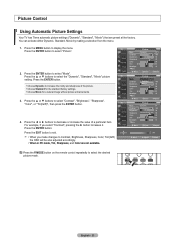
...tandard 100 Brightness Mo vie 50 Sharpness 85 Color 55 Tint G 50 R 50 Backlight 10 ▼More Move Enter Return TV Picture Mode : Dynamic ► Contrast 100 Brightness 50 Sharpness 85 Color 55 Tint G 50 R 50 Backlight 10 ▼More Move ...Tint(G/R)", then press the ENTER button. 4. Press the ▲ or ▼ buttons to select the desired picture mode. Picture Control Using Automatic Picture Settings Your TV has Three automatic picture settings ("Dynamic", "Standard", "Movie") that are not available. Press the MENU button to increase the clarity ...
...tandard 100 Brightness Mo vie 50 Sharpness 85 Color 55 Tint G 50 R 50 Backlight 10 ▼More Move Enter Return TV Picture Mode : Dynamic ► Contrast 100 Brightness 50 Sharpness 85 Color 55 Tint G 50 R 50 Backlight 10 ▼More Move ...Tint(G/R)", then press the ENTER button. 4. Press the ▲ or ▼ buttons to select the desired picture mode. Picture Control Using Automatic Picture Settings Your TV has Three automatic picture settings ("Dynamic", "Standard", "Movie") that are not available. Press the MENU button to increase the clarity ...
User Manual (ENGLISH)
Page 26
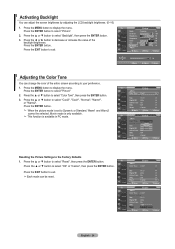
... ENTER button to select "Color Tone", then press the ENTER button. 3. Press the ▲ or ▼ button to select "Picture" 2. Movie mode is available in PC mode. Press the MENU button to select "Backlight", then press the ENTER button. 3. Each...: 9 ► Digital NR : Auto ► Active Color : On ► DNIe : Off ► Reset : Cancel ► Move Enter Return TV Picture ▲More Color Tone : Cool1Cool2 Detailed settings Cool1 Size : 16 : 9Normal Digital NR Active Color : : AOuntoWWaarrmm12 DNIe : Off Reset : Cancel Move Enter Return...
... ENTER button to select "Color Tone", then press the ENTER button. 3. Press the ▲ or ▼ button to select "Picture" 2. Movie mode is available in PC mode. Press the MENU button to select "Backlight", then press the ENTER button. 3. Each...: 9 ► Digital NR : Auto ► Active Color : On ► DNIe : Off ► Reset : Cancel ► Move Enter Return TV Picture ▲More Color Tone : Cool1Cool2 Detailed settings Cool1 Size : 16 : 9Normal Digital NR Active Color : : AOuntoWWaarrmm12 DNIe : Off Reset : Cancel Move Enter Return...
User Manual (ENGLISH)
Page 27
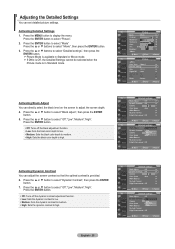
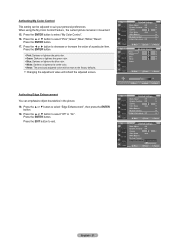
... Color Space : AuHtiogh White Balance My Color Control Edge Enhancement : Off Move Enter Return Activating Dynamic Contrast You can set detailed picture settings. Activating Detailed Settings 1. Press the ENTER button. Off: Turns off the black adjustment function. Low:...My Color Control Edge Enhancement : Off Move Enter Return English - 25 Press the ▲ or ▼ button to select "Picture". 2. Picture Mode is in Standard or Movie mode. Press the ENTER button to select "Black adjust", then press the ENTER button. 5. ...
... Color Space : AuHtiogh White Balance My Color Control Edge Enhancement : Off Move Enter Return Activating Dynamic Contrast You can set detailed picture settings. Activating Detailed Settings 1. Press the ENTER button. Off: Turns off the black adjustment function. Low:...My Color Control Edge Enhancement : Off Move Enter Return English - 25 Press the ▲ or ▼ button to select "Picture". 2. Picture Mode is in Standard or Movie mode. Press the ENTER button to select "Black adjust", then press the ENTER button. 5. ...
User Manual (ENGLISH)
Page 28
... ► button to the factory defaults. Changing the adjustment value will be reset to decrease or increase the value of pictures. (-3 ~ 3) 8. Activating Gamma You can adjust the color temperature for more natural picture colors. 12. Press the ▲ or ▼ button to the most natural color. 10. TV Detailed Settings Black Adjust...
... ► button to the factory defaults. Changing the adjustment value will be reset to decrease or increase the value of pictures. (-3 ~ 3) 8. Activating Gamma You can adjust the color temperature for more natural picture colors. 12. Press the ▲ or ▼ button to the most natural color. 10. TV Detailed Settings Black Adjust...
User Manual (ENGLISH)
Page 29
... ▲ or ▼ button to select "Edge Enhancement", then press the ENTER button. 19. When using the My Color Control Feature, the current picture remains in the picture. 18. Changing the adjustment value will be adjusted to suit your personal preferences. Press the ENTER button. Pink: Darkens or lightens the pink...
... ▲ or ▼ button to select "Edge Enhancement", then press the ENTER button. 19. When using the My Color Control Feature, the current picture remains in the picture. 18. Changing the adjustment value will be adjusted to suit your personal preferences. Press the ENTER button. Pink: Darkens or lightens the pink...
User Manual (ENGLISH)
Page 30
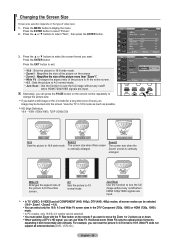
...Changing the Screen Size Screen size selection depends on the remote if you want . HD (High Definition) 16:9 - 1080i (1920x1080), 720P (1280x720) Picture ▲More Color Tone : Cool1 Detailed settings Size : 16 : 9 Digital NR : Auto Active Color : On DNIe : Off Reset : Cancel ...Enter Return Size 16 : 9 Zoom1 Zoom2 ▲ Wide Fit Position 4 : 3 ▼ Just Scan Reset Move Enter Return 16:9 Sets the picture to select "Size", then press the ENTER button. 3. English - 28 For example, you can press the P.SIZE button on the screen. •...
...Changing the Screen Size Screen size selection depends on the remote if you want . HD (High Definition) 16:9 - 1080i (1920x1080), 720P (1280x720) Picture ▲More Color Tone : Cool1 Detailed settings Size : 16 : 9 Digital NR : Auto Active Color : On DNIe : Off Reset : Cancel ...Enter Return Size 16 : 9 Zoom1 Zoom2 ▲ Wide Fit Position 4 : 3 ▼ Just Scan Reset Move Enter Return 16:9 Sets the picture to select "Size", then press the ENTER button. 3. English - 28 For example, you can press the P.SIZE button on the screen. •...
User Manual (ENGLISH)
Page 31
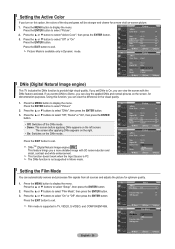
...2. The DNle function is available only in Movie mode. DNIeTM (Digital Natural Image engine) This feature brings you a more vivid on-screen picture. 1. TV Picture ▲More Color Tone : Cool1 ► Detailed settings ► Size : 16 : 9 ► Digital NR : Auto ► ...Active Color : On ► DNIe : Off ► Reset : Cancel ► Move Enter Return TV Picture ▲More Color Tone : Cool1 Detailed settings Size : 16 : 9 Digital NR : Auto Active Color : OOn ff DNIe : ODffemo Reset On ...
...2. The DNle function is available only in Movie mode. DNIeTM (Digital Natural Image engine) This feature brings you a more vivid on-screen picture. 1. TV Picture ▲More Color Tone : Cool1 ► Detailed settings ► Size : 16 : 9 ► Digital NR : Auto ► ...Active Color : On ► DNIe : Off ► Reset : Cancel ► Move Enter Return TV Picture ▲More Color Tone : Cool1 Detailed settings Size : 16 : 9 Digital NR : Auto Active Color : OOn ff DNIe : ODffemo Reset On ...
User Manual (ENGLISH)
Page 32
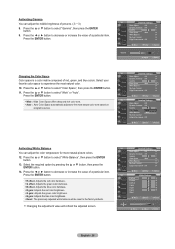
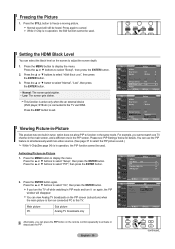
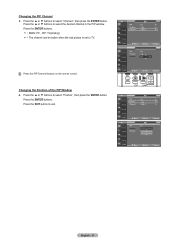
...Midium PC Home Theater PC : Off Energy Saving : Off HDMl Black Leve ▼More Move : Normal Low Enter Return Viewing Picture-in-Picture This product has one in -Picture 1. Press the ▲ or ▼ buttons to select "HDMI Black Level", then press the ENTER button. 3. Press ... button. Press the ENTER button again. Press the ▲ or ▼ buttons to activate or deactivate the PIP. Main picture PC Sub picture Analog TV broadcasts only Move Enter Return TV PIP PIP Position Channel : Off : On : Cable 3 Move Enter Return Alternately...
...Midium PC Home Theater PC : Off Energy Saving : Off HDMl Black Leve ▼More Move : Normal Low Enter Return Viewing Picture-in-Picture This product has one in -Picture 1. Press the ▲ or ▼ buttons to select "HDMI Black Level", then press the ENTER button. 3. Press ... button. Press the ENTER button again. Press the ▲ or ▼ buttons to activate or deactivate the PIP. Main picture PC Sub picture Analog TV broadcasts only Move Enter Return TV PIP PIP Position Channel : Off : On : Cable 3 Move Enter Return Alternately...
User Manual (ENGLISH)
Page 33
... "Channel", then press the ENTER button. Press the ENTER buttons. • MAIN: PC, PIP: TV(Analog) • The channel can be active when the sub picture is set to select "Position", then press the ENTER button. Press the ▲ or ▼ buttons to TV. Changing the PIP Channel 3. Press the ENTER...
... "Channel", then press the ENTER button. Press the ENTER buttons. • MAIN: PC, PIP: TV(Analog) • The channel can be active when the sub picture is set to select "Position", then press the ENTER button. Press the ▲ or ▼ buttons to TV. Changing the PIP Channel 3. Press the ENTER...
User Manual (ENGLISH)
Page 38
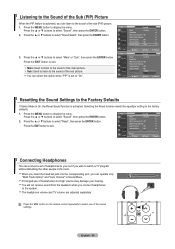
... a TV program without disturbing the other people in Sound Menu. 10 Prolonged use of headphones at a high volume may damage your set of the main picture.. • Sub: Used to listen to display the menu. TV Sound Mode : Custom ► Equalizer ► SRS TruSurround XT : Off ► Multi...speakers when you can operate only "Multi Track Option" and "Auto Volume" in the room. Press the MENU button to the sound of the sub picture. SRS TruSurround XT : Off Multi-Track Options • Main: Used to listen to the sound of headphones to your hearing. Press the ▲...
... a TV program without disturbing the other people in Sound Menu. 10 Prolonged use of headphones at a high volume may damage your set of the main picture.. • Sub: Used to listen to display the menu. TV Sound Mode : Custom ► Equalizer ► SRS TruSurround XT : Off ► Multi...speakers when you can operate only "Multi Track Option" and "Auto Volume" in the room. Press the MENU button to the sound of the sub picture. SRS TruSurround XT : Off Multi-Track Options • Main: Used to listen to the sound of headphones to your hearing. Press the ▲...
User Manual (ENGLISH)
Page 46
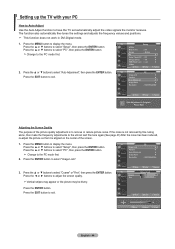
... to select "PC", then press the ENTER button. Press the ▲ or ▼ buttons to exit. Vertical stripes may appear or the picture may be blurry. Press the ENTER button. TV PC Image Lock ► Position ► Auto Adjustment ► Image Reset ► Resolution ...50 Fine 0 ▲ Coarse ▼ Move Enter Return Move Adjust 50 Return English - 44 Press the ENTER button to remove or reduce picture noise. Press the ▲ or ▼ buttons to exit. Press the EXIT button to select "PC", then press the ENTER button....
... to select "PC", then press the ENTER button. Press the ▲ or ▼ buttons to exit. Vertical stripes may appear or the picture may be blurry. Press the ENTER button. TV PC Image Lock ► Position ► Auto Adjustment ► Image Reset ► Resolution ...50 Fine 0 ▲ Coarse ▼ Move Enter Return Move Adjust 50 Return English - 44 Press the ENTER button to remove or reduce picture noise. Press the ▲ or ▼ buttons to exit. Press the EXIT button to select "PC", then press the ENTER button....

User Manual (ENGLISH)
Page 47
... Return Image Reset is available only in PC input mode to provide more dynamic scenes. Press the ▲ or ▼ buttons to view higher quality pictures while in the regular TV mode. Melody : Midium ► PC ► Press the ▲ or ▼ buttons to select "Setup", then press the ENTER button...
... Return Image Reset is available only in PC input mode to provide more dynamic scenes. Press the ▲ or ▼ buttons to view higher quality pictures while in the regular TV mode. Melody : Midium ► PC ► Press the ▲ or ▼ buttons to select "Setup", then press the ENTER button...

User Manual (ENGLISH)
Page 51
...then press the ENTER button. 4. Press the MENU button to display the menu. Game Mode is very weak, a blue screen automatically replaces the noisy picture background. Press the ▲ or ▼ buttons to exit. Function Description Selecting a Menu Language 1. Press the EXIT button to select "On"... Energy Saving : Off HDMl Black Level : Low ▼More Move Enter Return Using the Game Mode When connecting to continue viewing the poor picture, you display the TV menu in the Setup menu. Press the ▲ or ▼ buttons to select "English", "Español",...
...then press the ENTER button. 4. Press the MENU button to display the menu. Game Mode is very weak, a blue screen automatically replaces the noisy picture background. Press the ▲ or ▼ buttons to exit. Function Description Selecting a Menu Language 1. Press the EXIT button to select "On"... Energy Saving : Off HDMl Black Level : Low ▼More Move Enter Return Using the Game Mode When connecting to continue viewing the poor picture, you display the TV menu in the Setup menu. Press the ▲ or ▼ buttons to select "English", "Español",...


