User Manual (ENGLISH)
Page 3
... Setting the Clock 28 Setting the On/Off Timer 30 Setting the Sleep Timer 31 Viewing an External Signal Source 32 Assigning Names to External Input Mode 33 CHANNEL CONTROL Selecting Your Favorite Channels 34 Viewing the Channel Lists 35 Adding and Erasing Channels 36 Labeling the Channels 37 Fine Tuning...
... Setting the Clock 28 Setting the On/Off Timer 30 Setting the Sleep Timer 31 Viewing an External Signal Source 32 Assigning Names to External Input Mode 33 CHANNEL CONTROL Selecting Your Favorite Channels 34 Viewing the Channel Lists 35 Adding and Erasing Channels 36 Labeling the Channels 37 Fine Tuning...
User Manual (ENGLISH)
Page 5
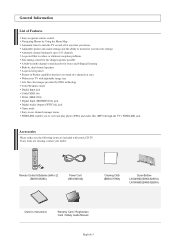
Remote Control & Batteries (AAA x 2) (BN59-00529A) Power Cord (3903-000144) Cleaning Cloth (BN63-01798A) Cover-Bottom LN-S4096D (BN63-02491A) LN-S4696D (BN63-02624A) Owner's Instructions Warranty Card / Registration Card / Safety Guide Manual English-3 If any time you choose Adjustable picture... any items are included with adjustable image size Life-like clear images provided by DNle technology Color Weakness mode Digital Input jack CableCARD slot D-Net (IEEE1394) Digital Input (HDMI/DVI IN) jack Digital Audio Output (OPTICAL) jack Game mode Easy-to view and play photo (JPEG...
Remote Control & Batteries (AAA x 2) (BN59-00529A) Power Cord (3903-000144) Cleaning Cloth (BN63-01798A) Cover-Bottom LN-S4096D (BN63-02491A) LN-S4696D (BN63-02624A) Owner's Instructions Warranty Card / Registration Card / Safety Guide Manual English-3 If any time you choose Adjustable picture... any items are included with adjustable image size Life-like clear images provided by DNle technology Color Weakness mode Digital Input jack CableCARD slot D-Net (IEEE1394) Digital Input (HDMI/DVI IN) jack Digital Audio Output (OPTICAL) jack Game mode Easy-to view and play photo (JPEG...

User Manual (ENGLISH)
Page 6
SOURCE Toggles between all the available input sources (TV, AV1, AV2, S-Video, Component1, Component2, PC, HDMI1, HDMI2). In the on-screen menu, use the buttons as you would use the and buttons ...
SOURCE Toggles between all the available input sources (TV, AV1, AV2, S-Video, Component1, Component2, PC, HDMI1, HDMI2). In the on-screen menu, use the buttons as you would use the and buttons ...

User Manual (ENGLISH)
Page 7
... to external IEEE1394 digital products such as VCR or DVD players. Sound connection is only needed for DVI connection to the audio input jacks on your PC. POWER INPUT Connect the supplied power cord. HDMI/DVI IN terminal does not support PC. - Two jacks are provided for this purpose, ...IN Connect to the video and audio output jacks on your D-Net controlled system. (Refer to page 91~105) AV IN 1 Video and audio inputs for HDMI to the HDMI jack of flexibility for connecting your Amplifier/ Home theater. For more information on connecting equipment, see pages 8-14. HDMI...
... to external IEEE1394 digital products such as VCR or DVD players. Sound connection is only needed for DVI connection to the audio input jacks on your PC. POWER INPUT Connect the supplied power cord. HDMI/DVI IN terminal does not support PC. - Two jacks are provided for this purpose, ...IN Connect to the video and audio output jacks on your D-Net controlled system. (Refer to page 91~105) AV IN 1 Video and audio inputs for HDMI to the HDMI jack of flexibility for connecting your Amplifier/ Home theater. For more information on connecting equipment, see pages 8-14. HDMI...

User Manual (ENGLISH)
Page 8
VIDEO, (R-AUDIO-L) Video and audio inputs for private listening. Side Panel Jacks Use the left side panel jacks to connect a component that is used only occasionally, such as a camcorder or VCR. Headphone Connect a set of external headphones for external devices, such as a camcorder or video game. (See page 11) WISELINK Connect an USB mass storage device to view photo files(JPEG) and play audio files (MP3). English-6
VIDEO, (R-AUDIO-L) Video and audio inputs for private listening. Side Panel Jacks Use the left side panel jacks to connect a component that is used only occasionally, such as a camcorder or VCR. Headphone Connect a set of external headphones for external devices, such as a camcorder or video game. (See page 11) WISELINK Connect an USB mass storage device to view photo files(JPEG) and play audio files (MP3). English-6

User Manual (ENGLISH)
Page 12
Skip step 1 if you have not yet connected to the right and left audio input jacks of the TV. Unplug the cable or antenna from an S-VHS VCR. (This connection delivers a better picture as compared to a standard VHS VCR.) VCR ...-L] jacks on the TV. 3. When connecting a VCR, match the color of the TV. We recommend the use of the VCR. 3. Connecting an S-VHS VCR Your Samsung TV can be connected to your VCR and your TV. 2. To begin, follow steps 1-3 in "Viewing a VCR or Camcorder Tape" to view your VCR is...
Skip step 1 if you have not yet connected to the right and left audio input jacks of the TV. Unplug the cable or antenna from an S-VHS VCR. (This connection delivers a better picture as compared to a standard VHS VCR.) VCR ...-L] jacks on the TV. 3. When connecting a VCR, match the color of the TV. We recommend the use of the VCR. 3. Connecting an S-VHS VCR Your Samsung TV can be connected to your VCR and your TV. 2. To begin, follow steps 1-3 in "Viewing a VCR or Camcorder Tape" to view your VCR is...
User Manual (ENGLISH)
Page 15
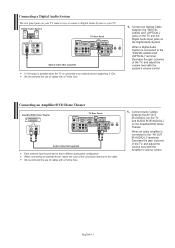
... Amplifier/DVD Home Theater. Connecting an Amplifier/DVD Home Theater Amplifier/DVD Home Theater TV Rear Panel Audio Cable (Not supplied) Each external input source device has a different back panel configuration. When an audio amplifier is connected to the "AV OUT [R-AUDIO-L]" terminals: Decrease the gain...with the system's volume control. Connect Audio Cables between the "DIGITAL AUDIO OUT (OPTICAL)" jacks on the TV and the Digital Audio Input jacks on the Digital Audio System. Digital Audio System TV Rear Panel Optical Cable (Not supplied) 5.1CH audio is possible when the TV...
... Amplifier/DVD Home Theater. Connecting an Amplifier/DVD Home Theater Amplifier/DVD Home Theater TV Rear Panel Audio Cable (Not supplied) Each external input source device has a different back panel configuration. When an audio amplifier is connected to the "AV OUT [R-AUDIO-L]" terminals: Decrease the gain...with the system's volume control. Connect Audio Cables between the "DIGITAL AUDIO OUT (OPTICAL)" jacks on the TV and the Digital Audio Input jacks on the Digital Audio System. Digital Audio System TV Rear Panel Optical Cable (Not supplied) 5.1CH audio is possible when the TV...
User Manual (ENGLISH)
Page 19
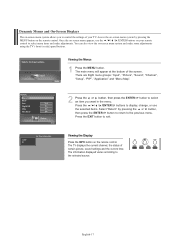
... remote control. The TV displays the current channel, the status of the screen. The information displayed varies according to exit. There are Eight menu groups: "Input", "Picture", "Sound", "Channel", "Setup", "PIP", "Application" and "Menu Map". 2 Press the or button, then press the ENTER an item you to control the settings of...
... remote control. The TV displays the current channel, the status of the screen. The information displayed varies according to exit. There are Eight menu groups: "Input", "Picture", "Sound", "Channel", "Setup", "PIP", "Application" and "Menu Map". 2 Press the or button, then press the ENTER an item you to control the settings of...
User Manual (ENGLISH)
Page 23
... or button to select "STD", "HRC" or "IRC". • STD, HRC and IRC identify various types of cable TV systems. Contact your TV, select the Input jack the STB is set to the previous menu. Select "Return" by using the number buttons on the remote control. • When connecting Digital Cable...
... or button to select "STD", "HRC" or "IRC". • STD, HRC and IRC identify various types of cable TV systems. Contact your TV, select the Input jack the STB is set to the previous menu. Select "Return" by using the number buttons on the remote control. • When connecting Digital Cable...

User Manual (ENGLISH)
Page 34
Press the ENTER button to select "Input". 2 Press the or button to select an external signal source. Only connected devices can be selected only when the external device is connected first. Press ... the ENTER button. • When you connect equipment to the TV, you can be selected. Before selecting an input source, make sure the corresponding external device is turned on the TV's side panel. HDMI input can choose between viewing signals from connected equipment, such as a VCR, DVD, Set-Top Box or the...
Press the ENTER button to select "Input". 2 Press the or button to select an external signal source. Only connected devices can be selected only when the external device is connected first. Press ... the ENTER button. • When you connect equipment to the TV, you can be selected. Before selecting an input source, make sure the corresponding external device is turned on the TV's side panel. HDMI input can choose between viewing signals from connected equipment, such as a VCR, DVD, Set-Top Box or the...

User Manual (ENGLISH)
Page 35
Select "Return" by pressing the or button, then press the ENTER button to return to name the input source you to the previous menu. English-33 Assigning Names to External Input Mode This feature enables you have connected. 1 Press the MENU button. Set other signal sources (AV1, AV2, S-Video, Component1,...DVD Combo, DVD HDD Recorder, PC, Internet TV Recv., Interactive TV Recv., VOD (Video On Demand) STB, TV. Press the ENTER button to select "Input". 2 Press the or button to select "Edit Name", then press the ENTER button. 3 Press the or button to select a signal source to edit, then...
Select "Return" by pressing the or button, then press the ENTER button to return to name the input source you to the previous menu. English-33 Assigning Names to External Input Mode This feature enables you have connected. 1 Press the MENU button. Set other signal sources (AV1, AV2, S-Video, Component1,...DVD Combo, DVD HDD Recorder, PC, Internet TV Recv., Interactive TV Recv., VOD (Video On Demand) STB, TV. Press the ENTER button to select "Input". 2 Press the or button to select "Edit Name", then press the ENTER button. 3 Press the or button to select a signal source to edit, then...

User Manual (ENGLISH)
Page 36
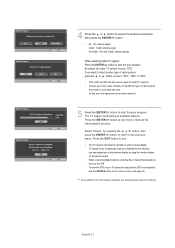
...-34 Channel Control Selecting Your Favorite Channels You can be set as Favorite channels. Only memorized channels can store your favorite channels for each available input source (such as TV and CATV). To Store Your Favorite Channels: 1 Press the MENU button. Press the EXIT button to deselect the selected channel and...
...-34 Channel Control Selecting Your Favorite Channels You can be set as Favorite channels. Only memorized channels can store your favorite channels for each available input source (such as TV and CATV). To Store Your Favorite Channels: 1 Press the MENU button. Press the EXIT button to deselect the selected channel and...

User Manual (ENGLISH)
Page 48
... the previous menu. Select "Return" by pressing the or button,then press the ENTER button to return to exit. This function doesn't work when the Input Source is not supported in the visual quality. 1 Press the MENU button. Press the then press the ENTER button.
... the previous menu. Select "Return" by pressing the or button,then press the ENTER button to return to exit. This function doesn't work when the Input Source is not supported in the visual quality. 1 Press the MENU button. Press the then press the ENTER button.

User Manual (ENGLISH)
Page 109
"Authentication is selected. Although DV Camcorder is in the device list, you select the camcorder as an input source, because the TV supports the MPEG format only. This message appears when you try to record a device, which is not compatible." English-107 message ...
"Authentication is selected. Although DV Camcorder is in the device list, you select the camcorder as an input source, because the TV supports the MPEG format only. This message appears when you try to record a device, which is not compatible." English-107 message ...

User Manual (ENGLISH)
Page 110
...Retry after connecting a recordable device (D-VHS, AV-HDD). This message appears when the selected function is unavailable to perform this function for the input source, except TV." This message may appear when you try to make a recording from connected external equipment. Before make a recording using ...when the recordable device is in analog mode. The message appears informing you that you cannot change the channels or change the input source using another device, first check if there is being initialized. This message also appears when the command is not connected"...
...Retry after connecting a recordable device (D-VHS, AV-HDD). This message appears when the selected function is unavailable to perform this function for the input source, except TV." This message may appear when you try to make a recording from connected external equipment. Before make a recording using ...when the recordable device is in analog mode. The message appears informing you that you cannot change the channels or change the input source using another device, first check if there is being initialized. This message also appears when the command is not connected"...

User Manual (ENGLISH)
Page 112
... PC IN [PC] on the TV. 1 15Pin (D-Sub) Cable 2 Audio Cable 2 Connect a Audio Cable between the Audio jack on the PC and the Audio input jack PC IN [AUDIO] on the model. You cannot connect this TV to the TV This figure shows the Standard Connector-jack panel. PC English-...
... PC IN [PC] on the TV. 1 15Pin (D-Sub) Cable 2 Audio Cable 2 Connect a Audio Cable between the Audio jack on the PC and the Audio input jack PC IN [AUDIO] on the model. You cannot connect this TV to the TV This figure shows the Standard Connector-jack panel. PC English-...

User Manual (ENGLISH)
Page 117
..." by pressing the or button, then press the ENTER button to return to select one of input source. Press the EXIT button to 92% of the TV screen, regardless of the aspect ratio of the input source. • 4 : 3 : Displays the picture as it is without changing the aspect ratio of the picture...
..." by pressing the or button, then press the ENTER button to return to select one of input source. Press the EXIT button to 92% of the TV screen, regardless of the aspect ratio of the input source. • 4 : 3 : Displays the picture as it is without changing the aspect ratio of the picture...
User Manual (ENGLISH)
Page 120
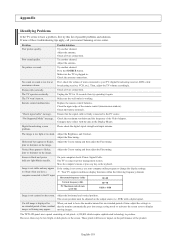
.... "Not Supported Mode" message. Press the SOURCE button. Make sure the TV is displayed for When you have a computer connected to the PC input. Make sure the wall outlet is too light or too dark. Ensure that the monitor automatically goes into energy saving mode or activates the screen... light blinks steadily. No sound or sound is too low at 60 Hz) 60~75 1920 x 1080 Image is not correct, use your nearest Samsung service center. moving images. Appendix Identifying Problems If the TV seems to have a problem, first try operating it again. No picture or sound. ...
.... "Not Supported Mode" message. Press the SOURCE button. Make sure the TV is displayed for When you have a computer connected to the PC input. Make sure the wall outlet is too light or too dark. Ensure that the monitor automatically goes into energy saving mode or activates the screen... light blinks steadily. No sound or sound is too low at 60 Hz) 60~75 1920 x 1080 Image is not correct, use your nearest Samsung service center. moving images. Appendix Identifying Problems If the TV seems to have a problem, first try operating it again. No picture or sound. ...

